이번에는 자바의 Wrapper 클래스에 대해 알아보자
1. Wrapper 클래스
0) 들어가기 전에
자바의 자료형은 기본 타입(primitive type)와 참조 타입(reference type)으로 나누어진다.
- 기본 타입 : 정수, 실수, 문자, 논리 리터럴을 저장하는 타입
- Ex) byte, short, char, int, long, float, double, boolean
- 참조 타입 : 배열, 열거, ㅋ르래스, 인터페이스 등 객체의 위치를 참조하는 타입
- Ex) class, interface, ...
Wrapper Class란?
- 래퍼 클래스(Wrapper Class)란 8개의 기본 타입에 해당하는 데이터를 객체로 표현하기 위해 포장해주는 클래스이다.
- 각각의 타입에 해당하는 데이터를 인수로 전달받아 해당 값을 가지는 객체로 만듦
- 래퍼 클래스는 모두
java.lang패키지에 포함되어 제공됨
1) Wrapper Class의 필요성
- 메서드에 전달된 인자들을 수정하기 위해서는 기본형 변수들을 참조형 변수로 변환해야 한다.
- 기본형 변수는 값으로 전달되기 때문에 전달된 인자를 수정할 수 없다!!!
java.lang패키지의 클래스들은 참조형 변수만을 다루기 때문- ArrayList와 Vector는 참조형 변수만 다루기 때문
- 멀티쓰레딩에서 동기화를 지원하려면 참조형 변수가 필요
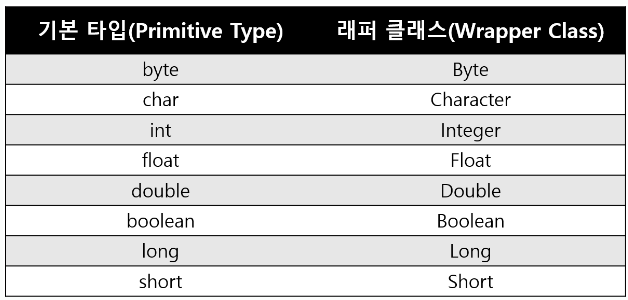
2) Wrapper Class의 종류
- 래퍼 클래스는
java.lang패키지에 포함되어 있는데, 각각 기본 타입에 대응되는 래퍼 클래스가 존재
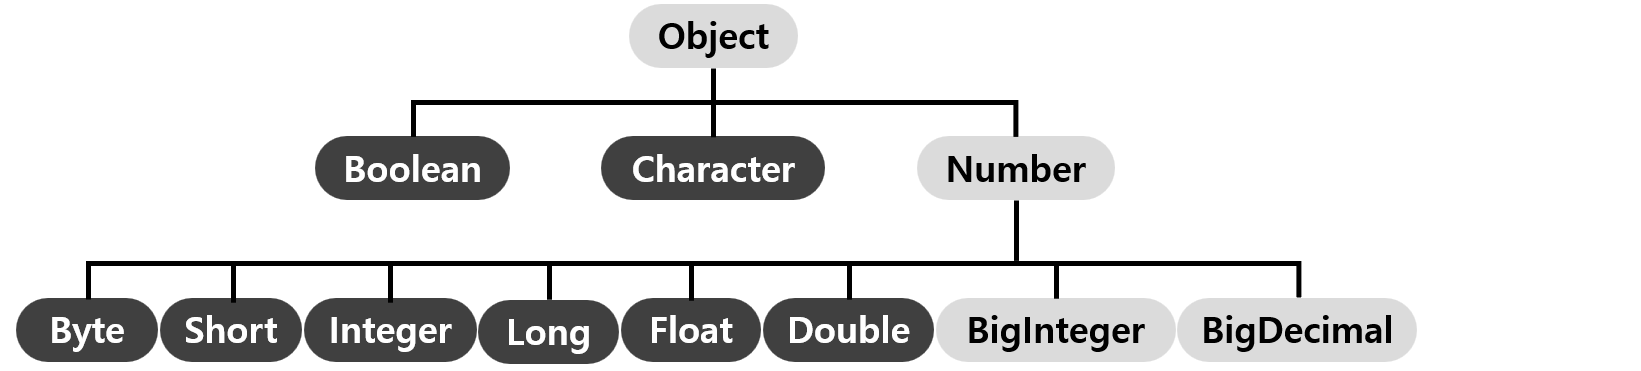
3) Wrapper Class의 구조도
- 래퍼 클래스는 다음과 같은 상속 계층을 가진다.
4) 박싱과 언박싱
박싱(Boxing)이란?
- 기본 타입의 데이터를 래퍼 클래스의 인스턴스로 변환하는 과정
언박싱(Unboxing)이란?
- 래퍼 클래스의 인스턴스에 저장된 값을 다시 기본 타입의 데이터로 꺼내는 과정
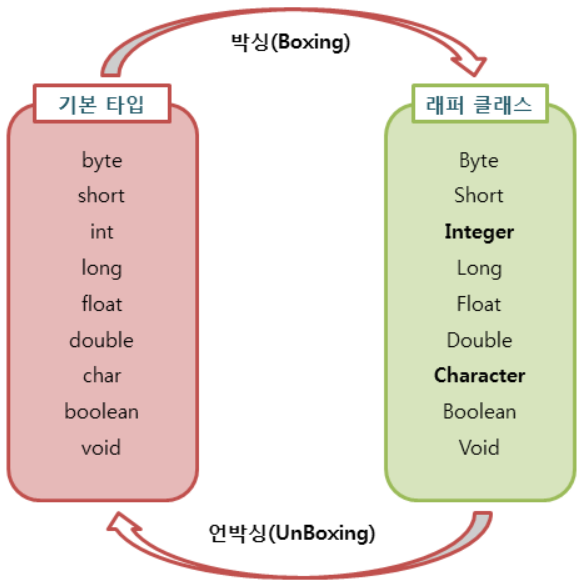
※ JDK 1.5부터 자바 컴파일러가 자동으로 처리해주어 이를 오토박싱과 오토 언 박싱이라 함※
// 박싱
Integer num = new Integer(24);

// 언박싱
int n = num.intValue();

// 오토 박싱
Integer num = 21;

// 오토 언박싱
int n = num;
5) Wrapper Class 구현 예제
(1) Wrapper Class 사용 예제
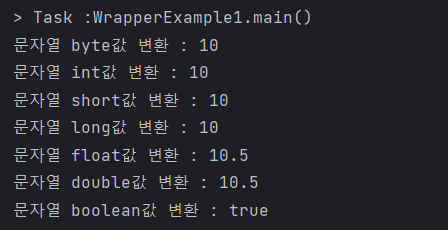
문자열을 기본 타입으로 변환 예제
public class WrapperExample1 {
	public static void main(String[] args) {
    	String str1 = "10";
        String str2 = "10.5";
        String str3 = "true";

        byte b = Byte.parseByte(str1);
        int i = Integer.parseInt(str1);
        short s = Short.parseShort(str1);
        long l = Long.parseLong(str1);
        float f = Float.parseFloat(str2);
        double d = Double.parseDouble(str2);
        boolean bool = Boolean.parseBoolean(str3);

        System.out.println("문자열 byte값 변환 : "+b);
        System.out.println("문자열 int값 변환 : "+i);
        System.out.println("문자열 short값 변환 : "+s);
        System.out.println("문자열 long값 변환 : "+l);
        System.out.println("문자열 float값 변환 : "+f);
        System.out.println("문자열 double값 변환 : "+d);
        System.out.println("문자열 boolean값 변환 : "+bool);
    }
}
위의 코드의 결과는 다음과 같다.
값 비교 예제
public class WrapperExample2 {
public class WrapperExample2 {
    public static void main(String[] args) {
        Integer a = 127;
        Integer b = 127;
        Integer c = 128;
        Integer d = 128;
        System.out.println(a == b);
        System.out.println(a.intValue() == b.intValue());
        System.out.println(c == d);
        System.out.println(c.intValue() == d.intValue());
        System.out.println(a.equals(b));
        System.out.println(c.equals(d));
    }
}
위의 코드의 결과는 간단하게 할당된 숫자가 같기 때문에 모든 결과값이 true일 것이라고 생각했지만 다음과 같았다.
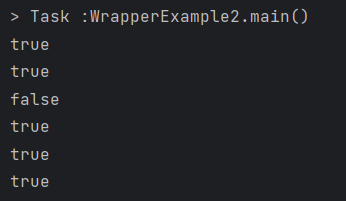
이는 Integer Cache와 관련이 있다. 이는 다음 정리 때 따로 정리해서 이해해보자~~

초보 개발자의 코딩 일기