Truffle 소개
Truffle 은 이더리움 디앱 개발을 위해 사용되는 프레임워크입니다
스마트 컨트랙트 컴파일부터 배포와 테스트까지 가능한 올인원 툴로써 디앱 개발에 많은 편의성을 제공합니다
(특히 calll과 send를 날리는 과정이 크게 단축됩니다)
간편한 툴인 만큼 솔리디티와 블록체인 네트워크의 기본원리를 알고 쓰는 것이 중요합니다
설치 & 실행
npx truffle init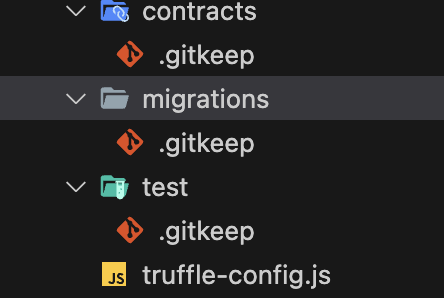
터미널에 명령어를 입력하면 컨피그 파일 생성과 함께 위와 같은 디렉토리 구조가 형성됩니다
- contracts : 스마트 컨트랙트 코드를 담을 디렉토리
- tests : 테스트 코드를 담을 디렉토리
- migrations : 배포 관련 코드를 담을 디렉토리
컨트랙트 생성
오늘도 카운터 기능을 구현한 스마트 컨트랙트 코드를 작성합니다
[Counter.sol]
// SPDX-License-Identifier: MIT
pragma solidity ^0.8.0;

contract Counter {
    uint256 value;

    constructor() {

    }
    function getValue() public view returns(uint256) {
        return value;
    }
    function increment() public {
        value += 1;
    }
        function decrement() public {
        value -= 1;
    }
}
컴파일 실행
npx truffle compile작성한 컨트랙트의 컴파일을 위 명령어로 실행합니다
(사용 가능한 명령어는 컨피그 파일(truffle-confg)을 참고합시다)
그 결과 build 디렉토리와 json파일이 생성됩니다 (Counter.json)
이 파일은 단일 객체로 구성되어 있는데, 그 안에는 컨트랙트의 ABI 정보, 바이트 코드 등
배포에 필요환 정보와 함께web3 메서드도 내장되어 있습니다
즉 통신(RPC 통신)을 위한 기능도 포함되어 있다는 뜻입니다
// ↓ web3 인스턴스 생성에 필요한 네트워크 주소는 컨피그 파일에서 자동으로 가져옵니다
const web3 = new Web3("127.0.0.1:8545")
[build/Counter.json]
{
  "contractName": "Counter",
  "abi": [
    {
      "inputs": [],
      "stateMutability": "nonpayable",
      "type": "constructor"
    },
    {
      "inputs": [],
      "name": "getValue",
      "outputs": [
        {
          "internalType": "uint256",
          "name": "",
          "type": "uint256"
        }
      ],
      "stateMutability": "view",
      "type": "function"
    },
    {
      "inputs": [],
      "name": "increment",
      "outputs": [],
      "stateMutability": "nonpayable",
      "type": "function"
    },
    {
      "inputs": [],
      "name": "decrement",
      "outputs": [],
      "stateMutability": "nonpayable",
      "type": "function"
    }
  ],
  "metadata": "{\"compiler\":{\"version\":\"0.8.20+commit.a1b79de6\"},\"language\":\"Solidity\",\"output\":{\"abi\":[{\"inputs\":[],\"stateMutability\":\"nonpayable\",\"type\":\"constructor\"},{\"inputs\":[],\"name\":\"decrement\",\"outputs\":[],\"stateMutability\":\"nonpayable\",\"type\":\"function\"},{\"inputs\":[],\"name\":\"getValue\",\"outputs\":[{\"internalType\":\"uint256\",\"name\":\"\",\"type\":\"uint256\"}],\"stateMutability\":\"view\",\"type\":\"function\"},{\"inputs\":[],\"name\":\"increment\",\"outputs\":[],\"stateMutability\":\"nonpayable\",\"type\":\"function\"}],\"devdoc\":{\"kind\":\"dev\",\"methods\":{},\"version\":1},\"userdoc\":{\"kind\":\"user\",\"methods\":{},\"version\":1}},\"settings\":{\"compilationTarget\":{\"project:/contracts/Counter.sol\":\"Counter\"},\"evmVersion\":\"shanghai\",\"libraries\":{},\"metadata\":{\"bytecodeHash\":\"ipfs\"},\"optimizer\":{\"enabled\":false,\"runs\":200},\"remappings\":[]},\"sources\":{\"project:/contracts/Counter.sol\":{\"keccak256\":\"0x7a1882e21087d57b479fb97d9e11290fe04f6eb499e06ffbdcdd41b20211c0d4\",\"license\":\"MIT\",\"urls\":[\"bzz-raw://11449b1a51092d1b3191d0a87b1937d3bcb6ebdc3dbb0920b7f174c0292b077a\",\"dweb:/ipfs/Qmc3sxpeLSsc11Ats3fw5XckZHQzXd1fTwmGm9iA9TGjKv\"]}},\"version\":1}",
  "bytecode": "0x608060405234801561000f575f...",
  "deployedBytecode": "0x608060405234801561000...",
...
배포 ~ 마이그레이션
먼저 어떤 블록체인 네트워크에 배포할 것인지를 설정해야 합니다
컨피그 파일에 기본적으로 배포를 위한 여러 세팅값이 전부 주석처리가 되어 있습니다
↓ deployment 섹션의 주석을 해제하기
가나쉬 네트워크(로컬호스트 8545포트를 사용중)가 열려있는 상태라면 자동으로 배포가 진행됩니다
  networks: {
    // Useful for testing. The `development` name is special - truffle uses it by default
    // if it's defined here and no other network is specified at the command line.
    // You should run a client (like ganache, geth, or parity) in a separate terminal
    // tab if you use this network and you must also set the `host`, `port` and `network_id`
    // options below to some value.
    //
    development: {
     host: "127.0.0.1",     // Localhost (default: none)
     port: 8545,            // Standard Ethereum port (default: none)
     network_id: "*",       // Any network (default: none)
    },
    //
    // An additional network, but with some advanced options…
    // advanced: {
    //   port: 8777,             // Custom port
    //   network_id: 1342,       // Custom network
    //   gas: 8500000,           // Gas sent with each transaction (default: ~6700000)
    //   gasPrice: 20000000000,  // 20 gwei (in wei) (default: 100 gwei)
    //   from: <address>,        // Account to send transactions from (default: accounts[0])
    //   websocket: true         // Enable EventEmitter interface for web3 (default: false)
    // },
    //
    // Useful for deploying to a public network.
    // Note: It's important to wrap the provider as a function to ensure truffle uses a new provider every time.
    // goerli: {
    //   provider: () => new HDWalletProvider(MNEMONIC, `https://goerli.infura.io/v3/${PROJECT_ID}`),
    //   network_id: 5,       // Goerli's id
    //   confirmations: 2,    // # of confirmations to wait between deployments. (default: 0)
    //   timeoutBlocks: 200,  // # of blocks before a deployment times out  (minimum/default: 50)
    //   skipDryRun: true     // Skip dry run before migrations? (default: false for public nets )
    // },
    //
    // Useful for private networks
    // private: {
    //   provider: () => new HDWalletProvider(MNEMONIC, `https://network.io`),
    //   network_id: 2111,   // This network is yours, in the cloud.
    //   production: true    // Treats this network as if it was a public net. (default: false)
    // }
  },
로컬이 아닌 진짜 블록체인 네트워크에 배포하게 될 때는 메인넷의 도메인을 기입해야 되겠죠
마이그레이션 파일 생성
컨트랙트 배포를 위해서는 migrations 디렉토리에 마이그레이션 파일을 만들어야 합니다
마이그레이션 파일은 (숫자_)파일명.js 형태로 만드는 것이 규칙이라고 하네요
그리고 Counter.json 파일 안에 담긴 바이트코드가 필요합니다
// artifacts는 json 파일을 가리킵니다 Counter는 json 파일 안에 있는 바이트코드
const Counter = artifacts.require('Counter')


module.exports = (deployer) => {
    deployer.deploy(Counter)
}
npx truffle migration그리고 명령어 입력시 컨트랙트 배포가 자동으로 진행됩니다
   Deploying 'Counter'
   -------------------
   > transaction hash:    0x96d4a63833340a14ff081153dadb4ef2b863cbee91558be180b9e2a8685ea4b0
   > Blocks: 0            Seconds: 0
   > contract address:    0x0734239Ba8884096Cf1230B9dc4F7D7EDb3934d5
   > block number:        1
   > block timestamp:     1684889555
   > account:             0xEAEa8C196275Bd319533754706cD304401703e6a
   > balance:             99.99689678
   > gas used:            155161 (0x25e19)
   > gas price:           20 gwei
   > value sent:          0 ETH
   > total cost:          0.00310322 ETH
지정하지도 않은 어카운트가 자동으로 잡히는 이유?
트러플은 가나쉬 네트워크에서 임의 생성한 10개의 어카운트 중에서
첫번째 어카운트을 디폴트로 설정하고 배포를 진행합니다
이는 가나쉬 서버를 리셋하더라도 자동으로 첫번째 계정을 잡아주기 때문에 아주 편리합니다
물론 로컬이 아닌 실제 네트워크(테스트넷이나 메인넷)에서 배포를 진행할 때는
배포를 실행할 어카운트의 비밀키를 컨피그 파일에 기입해 두어야합니다
*솔리디티 버전 호환성 이슈...
Error:  *** Deployment Failed ***

"Counter" hit an invalid opcode while deploying. Try:
   * Verifying that your constructor params satisfy all assert conditions.
   * Verifying your constructor code doesn't access an array out of bounds.
   * Adding reason strings to your assert statements.
유효하지 않은 오퍼코드(invalid opcode)가 발생했다고 나와 있는데
아마도 버전 호환성 문제로 추측됩니다
컨피그 파일의 버전(컴파일러 버전)을 낮추는 것으로 해결 완료
(0.8.20 → 0.8.0 ~ 0.8.18)
truffle console
npx truffle console명령어를 사용하면 자바스크립트 콘솔 환경에서 솔리디티 코드를 실행할 수 있습니다
truffle(development)> Counter.address

// '0x0734239Ba8884096Cf1230B9dc4F7D7EDb3934d5'

truffle(development)> Counter.abi
/**
[
  { inputs: [], stateMutability: 'nonpayable', type: 'constructor' },
  {
    inputs: [],
    name: 'getValue',
    outputs: [ [Object] ],
    stateMutability: 'view',
    type: 'function',
    constant: true
  },
  {
    inputs: [],
    name: 'increment',
    outputs: [],
    stateMutability: 'nonpayable',
    type: 'function'
  },
  {
    inputs: [],
    name: 'decrement',
    outputs: [],
    stateMutability: 'nonpayable',
    type: 'function'
  }
]
**/
그리고 콘솔창을 통해서 배포된 컨트랙트에 관한 여러 정보를 확인 할 수 있습니다
↓ 응용 예시 : Counter 컨트랙트의 인스턴스 생성 & 메서드 호출
let counter;
Counter.deployed().then(instance => counter = instance)
트러플 콘솔 환경에 counter 인스턴스가 생성됩니다
이제 인스턴스를 통해 컨트랙트 메서드의 작동을 확인 할 수 있습니다
// Counter.deployed().then(data => data.getValue())
counter.getValue()
// BN { negative: 0, words: [ 0, <1 empty item> ], length: 1, red: null }


counter.increment() // 트랜잭션이 발동됩니다
counter.increment()
counter.increment()


counter.getValue()
// BN { negative: 0, words: [ 3, <1 empty item> ], length: 1, red: null }
// increment를 호출한 만큼 값이 증가


counter.decrement()
counter.getValue()
// BN { negative: 0, words: [ 2, <1 empty item> ], length: 1, red: null }
+) 인스턴스를 얻는 다른 방법
const counter = await Counter.deployed()테스트 코드 작성하기
트러플에는 jest 대신 Mocha가 내장되어 있습니다
함수명이 약간씩 다르긴 하지만 기본적인 사용법은 거의 비슷합니다
[Counter.test.js]
const Counter = artifacts.require("Counter");

// constract <- describe의 상위 개념?
contract("Counter", (account) => {
    console.log(account)
})

/**
[
  '0xEAEa8C196275Bd319533754706cD304401703e6a',
  '0x8805905ECdbD6CaB78737952319E27B0e60D7B93',
	...
]
  0 passing (0ms)
**/
테스트 코드 실행 명령어
npx truffle test트러플의 테스트 기능은 항상 컨트랙트 재배포를 실시한 다음에 테스트할 코드가 실행됩니다
(솔리디티 코드를 작성할 때 글자 하나만 고쳐도 바이트 코드와 ABI가 변하기 때문에
기능 테스트 작업은 꼭 재배포를 거쳐야만 합니다)
단위 테스트 코드 예제
const Counter = artifacts.require("Counter");

contract("Counter", (accounts) => {
  let counterInstance;

  beforeEach(async () => {
    counterInstance = await Counter.deployed();
  });

  it("getCount?", async () => {
    const counterValue = await counterInstance.getValue();
    assert.equal(counterValue, 0);
  });

  it("increment?", async () => {
    await counterInstance.increment();
    const counterValue = await counterInstance.getValue();
    assert.equal(counterValue, 1);
  });

  it("decrement?", async () => {
    await counterInstance.increment();
    await counterInstance.increment();
    await counterInstance.decrement();
    const counterValue = await counterInstance.getValue();
    assert.equal(counterValue, 2);
  });
});
그리고 테스트 코드가 실행될 때마다 하나씩 블럭이 쌓이는 것도 확인할 수 있습니다
이것으로 트러플 튜토리얼 마침.
Truffle + React
리액트 프로젝트 생성
npx create-react-app
npm install web3
contracts 디렉토리를 만든 뒤 컨트랙트 빌드 파일(Counter.json) 파일을 집어넣습니다
이 json 객체는 컨트랙트에 관한 올인원 패키지 역할을 합니다
- 사용자 어카운트와 web3 인스턴스를 반환할 훅 생성
import Web3 from "web3";
import { useEffect, useState } from "react";

const useWeb3 = () => {
    const [account, setAccount] = useState(null);
    const [web3, setWeb3] = useState(null);

    const init = async () => {
        const [account] = await window.ethereum.request({ method: "eth_requestAccounts" });
        const web3Instance = new Web3(window.ethereum);

        setAccount(account);
        setWeb3(web3Instance);
    };

    useEffect(() => {
        if (!window.ethereum) return;
        init();
    }, []);
    return [account, web3];
};

export default useWeb3;requestAcount도 web3 메서드로 사용하는 것이 좋을지도...?
- 프론트엔드에서의 이벤트 처리
send, call 메서드를 발동시키려면 먼저 컨트랙트 인스턴스를 생성해야 합니다
new web3.eth.Contract(ABI, CA) // = deployed())인스턴스를 생성하려면 빌드파일에서부터 ABI와 컨트렉트 어드레스로 인자로 받아야 합니다
(CA를 어떤 방식으로 가져오는게 좋을지... 일단은 하드코딩)
import CounterContract from "../contracts/Counter.json"
...

    useEffect(() => {
        if (!web3 || !account) return

        // Contract(ABI, CA)
        const Deployed = new web3.eth.Contract(CounterContract.abi, CounterContract.networks[1684888803590].address) // = deployed())

        Deployed.methods.increment().send({ from: account })
    }, [])
어제까지와 비교하면 메서드 발동 코드가 훨씬 짧아진 것이 눈에 띕니다
	// 트러플 사용전
    const increment = async () => {
      const incrementData = abi.find((data) => data.name === "increment")
      const data = web3.eth.abi.encodeFunctionCall(incrementData, [])

      const from = user.account
      const to = "0xC56b7474E0A1Bf6ab53fdD9DeC1dE098b8b3C03C"

      const tx = {
        from,
        to,
        data,
      }
      await web3.eth.sendTransaction(tx).then((data) => {
        getCount()
      }).catch(console.error)


	// 트러플 사용
    const increment = async () => {
        await deployed.methods.increment().send({ from: account })
    }
↑ 확실히 send, call 메서드 발동 코드가 훨씬 간결하고 직관적으로 변했네요
- abi 파일에서 increment 메서드를 인코딩
- 인코딩한 데이터로 tx 객체를 생성
- send()
이것도 트러플이 제공하는 편의성중 하나입니다
어딘가 JSX 문법과 비슷해보이기도 합니다
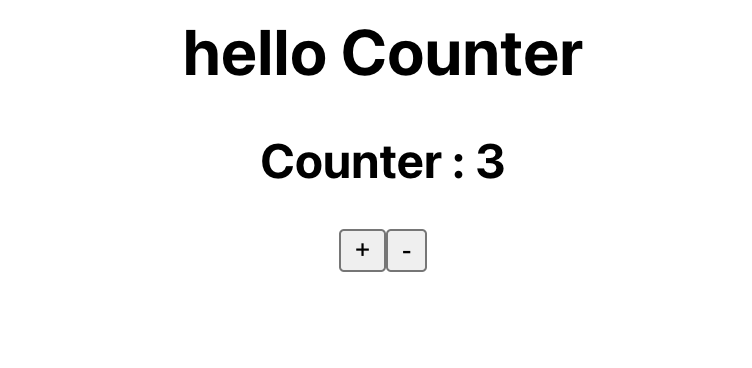
↓ 아직 한참 리팩토링이 필요한 카운터 컴포넌트
import { useState, useEffect } from "react"
import CounterContract from "../contracts/Counter.json"

const Counter = ({ account, web3 }) => {
    const [count, setCount] = useState(0);
    const [deployed, setDeployed] = useState(null)

    const increment = async () => {
        if (deployed === null) return console.log("no deployed")
        await deployed.methods.increment().send({ from: account })

        deployed.methods.getValue().call().then(value => {
            setCount(value)
        })
    }
    const decrement = async () => {
        if (deployed === null) return console.log("no deployed")
        await deployed.methods.decrement().send({ from: account })

        deployed.methods.getValue().call().then(value => {
            setCount(value)
        })
    }
    useEffect(() => {
        if (!web3 || !account) return

        // Contract(abi, CA) ~ Deployed 객체는 일종의 API 서버 역할
        const Deployed = new web3.eth.Contract(CounterContract.abi, CounterContract.networks[1684895478933].address) // == deployed()
        setDeployed(Deployed)

        Deployed.methods.getValue().call().then(value => {
            setCount(value)
        })}
    , [])


    return <>
        <div>
            <h2>Counter : {count}</h2>
            <button onClick={increment}>+</button>
            <button onClick={decrement}>-</button>
        </div>
    </>;
};

export default Counter;