
API KEY의 보안 관리
사이드 프로젝트로 특정 API를 사용하는데, Key값을 함께 REST API에 전달해야한다고 치자.
대충 이런 상황일 것이다.
- 서비스로부터 Key를 전달 받는다. 그리고 그 키를 나의 소스코드에 저장한다.
const String _apiKey = '48717be5d45b2d5f46dcd0'- 필요한 시점에 Header에 포함한다. 그리고 원하는 동작을 수행한다.
void setUpHeaders(...) {
	...
	options = BaseOptions(headers: {
		'Authorication': '$_apiKey'
	});
	... (HTTPRequest 구성)
}
위 코드는 간단하게 HTTP Request의 Header에 Key를 넣는 과정이다. 그리고 이 코드가 만약에 GitHub에 Public으로 올라간다면 어찌될까. 대부분은 관심이 없어서 큰 일이 안생긴다.
누가 마음먹고 악용하려고하면, 해당 키로 많은 Request를 발송할 것이고, 그래서 비용청구라는 결과가 발생할 수 있다. 그 비용 청구는 key의 주인이 감당할 것이다.
실제 사례중에서 암호화폐 플랫폼인 "3Commans"라는 회사가 API Key가 유출되면서 해커들에게 털렸다. 관련 기사
단순히 비용을 넘어서 많은 보안상 문제가 될텐데, 아예 .gitignore 를 통해서 업로드하지 않기도 한다. 그리고 key 값이 있는 파일을 다른 Repository로 관리하는 방법도 있다.
(혹은 .loadString(...) 메서드를 통해 특정 파일에 접근하는 방법)
그 방법 말고, 이번에는 컴파일 시점에 Key를 전달하는 방법을 설명하고자 한다.
정리
- API Key는 보안 유지함에 있어서 상당히 중요한 값이다. 그러므로 잘 보관하자.
- 보관하는 방법으로 Repository분리 + gitignore 사용하기, 파일에 접근해서 key 가져오기(당연히 gitignore 사용) 마지막으로 컴파일타임 환경변수 주입이 있다.
- 앞으로 쓸 글은 "컴파일 타임에 환경변수 주입" 을 할 예정이다.
실습
Terminal 명령어로 환경 변수 할당하기
간단하게 환경 변수를 받아서, UI에 그리는 코드를 작성한다.
import 'package:flutter/material.dart';
const String _dummyKey = 'API_KEY';
void main() async {
  const String apiKey = String.fromEnvironment(
    _dummyKey,
  );
runApp(MainApp(
configKey: apiKey,
));
}
class MainApp extends StatelessWidget {
const MainApp({
super.key,
required this.configKey,
});
final String configKey;
Widget build(BuildContext context) {
return MaterialApp(
home: Scaffold(
body: Center(
child: Text('KEY $_dummyKey: $configKey'),
),
),
);
}
}나머지 코드는 일반적인 UI 코드인데, 아래 부분을 집중해서 보자
const String apiKey = String.fromEnvironment(
_dummyKey,
);String.fromEnvironment() 부분이 핵심이다.
소스코드를 보자.
string.dart
/// The string value of the environment declaration [name].
///
/// Environment declarations are provided by the surrounding system compiling
/// or running the Dart program. Declarations map a string key to a string
/// value.
///
/// If [name] is not declared in the environment, the result is instead
/// [defaultValue].
///
/// Example of getting a value:
/// ```dart
/// const String.fromEnvironment("defaultFloo", defaultValue: "no floo")
/// ```
/// In order to check whether a declaration is there at all, use
/// [bool.hasEnvironment]. Example:
/// ```dart
/// const maybeDeclared = bool.hasEnvironment("maybeDeclared")
/// ? String.fromEnvironment("maybeDeclared")
/// : null;
/// ```
///
/// The string value, or lack of a value, associated with a [name]
/// must be consistent across all calls to `String.fromEnvironment`,
/// [int.fromEnvironment], [bool.fromEnvironment] and [bool.hasEnvironment]
/// in a single program.
///
/// This constructor is only guaranteed to work when invoked as `const`.
/// It may work as a non-constant invocation on some platforms which
/// have access to compiler options at run-time, but most ahead-of-time
/// compiled platforms will not have this information.
// The .fromEnvironment() constructors are special in that we do not want
// users to call them using "new". We prohibit that by giving them bodies
// that throw, even though const constructors are not allowed to have bodies.
// Disable those static errors.
//ignore: const_constructor_with_body
//ignore: const_factory
external const factory String.fromEnvironment(String name,
{String defaultValue = ""});
이해하기 쉽게 정리해보면, 아래와 같다.
요약
String.fromEnvironment메서드는 환경 변수를 읽어오는 생성자이다.name변수로 키를 지정한다. 없으면 defaultValue로 접근한다.- 환경 변수에 접근하기 전에 선언여부를 확인하는
bool.hasEnvironemnt함수가 있다. - 이 생성자는 컴파일타임에 결졍되므로
const와 사용되는 것을 권장한다.
이제 직접 환경변수를 전달해보자.
터미널에 아래 명령어를 실행시킨다.
(프로젝트가 있는 위치로 가서 아래에 있는 터미널 명령어를 실행해야함!)
flutter run --debug --dart-define=API_KEY="testing for environment values" --dart-define=API_KEY="testing for environment values" 이 부분에서 --dart-define 부분이 새롭게 정의한 환경변수에 값을 할당하는 부분이다. 정의한 환경 변수에서 "API_KEY" 라는 이름으로 저장한다는 명령어이다.
만약 여러개를 추가하고 싶다면, 아래처럼 쓰면 되겠다.
flutter run --debug --dart-define=API_KEY="key" --dart-define=API_URL="www.google.com"실행해보면, 정상적으로 입력받은 "API_KEY"가 출력될 것이다.
결과
KEY API_KEY: testing for environment valuesIDE의 힘을 빌리기
위 명령어를 다시 보자.
flutter run --debug --dart-define=API_KEY="testing for environment values" 실행할 때마다, 이렇게 입력하는건 귀찮다. 어디다가 복사해뒀다가 다시 붙여넣을 수도 있겠지만, IDE 자체에서 기능을 제공해준다.
VSCode로 하는 방법
AndroidStudio의 경우, GUI로 진행할 수 있는 걸로 알고 있는데, 다음기회에 작성해보는걸로...
VSCode가 프로젝트를 실행하는 과정을 간략하게 설명하면 아래와 같다.
- 프로젝트 초기화: VSCode가 Flutter 프로젝트를 열고, 프로젝트의 구조를 파악할 것이다. 이와 동시에
pubspec.yaml을 통해 의존성을 확인하고 필요하면 의존성을 가져온다. launch.json구성: 해당 json에서 구성된 파일대로 실행 환경설정을 구성한다.- 이후 로직은. Build 프로세스...
launch.json 은 .vscode 폴더에 있다. vscode 에서 실행할 때, 이 자료를 기준으로 실행환경을 구성한다. 그러므로 환경변수를 할당하고 싶다면, 이곳에서 추가하면 된다.
launch.json을 통해 실행환경 구성하기
- "launch.json" 생성하기
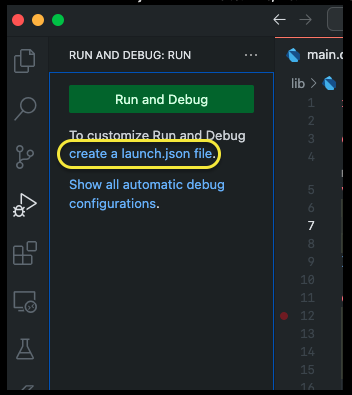
VSCode에 보면, 탭에서 4 번째에RUN AND DEBUG: RUN보면 파랑색 하이퍼링크가 있다.
"create a launch.json file." 이 있는데, 이것을 클릭한다.
- "launch.json" 에 환경변수 정의하기
내가 정의한 환경변수의 전체 파일이다.
{
    "version": "0.2.0",
    "configurations": [
        {
            "name": "Tutorial",
            "request": "launch",
            "type": "dart",
            "program": "lib/main.dart",
            "args": [
                "--dart-define",
                "API_KEY=1234567890",
            ]
        },

        ...(기존에 있던 것)...
    ]
}
args 부분을 보면, 어떤 값을 어떻게 전달할지 명시되어 있다. 이 부분이 아까 열심히 명령어로 적었던 환경변수 부분이다.
정상적으로 저장이 되었다면, 다음과 같은 실행버튼 옆에 "Tutorial" 이라고 실행할 목록이 있을 것이다.

실행하면, launch.json 에 저장한 key 값이 화면에 랜더링 되어 있을 것이다.
정리
- API Key 잘 보관해야한다.
- 잘 보관하는 방법들이 여러 가지 방법이 있지만, IDE의 실행 시점에서 Key를 할당하는 방법이 있다.
- VSCode의 경우
launch.json을 이용해서 값을 할당하고, 가져오는 것은String.fromEnvironment()메서드이다.
참고자료