[Storybook] Storybook 시작하기 Emotion 과 Storybook + TypeScript 로 디자인 시스템 구축하기
Storybook 디자인시스템 구축하기

회사에서 부족한 일정으로 미처 도입하지 못했던 디자인 시스템 구축을 개인적으로라도 꼭 해보고 싶어서 저녁 시간마다 열심히 디자인하고 개발했다.
emotion + storybook + typescript 로 진행했으며 rollup.js 로 번들 작업 후 npm 라이브러리로 배포해보았다.
내껄 하나 만들어두면 앞으로 사이드 프로젝트를 진행할 때 마다 마크업 시간이 줄어들고 그만큼 아주 편리하게 쓸 수 있을 것 같아서 꼭 만들어보고 싶었다😊
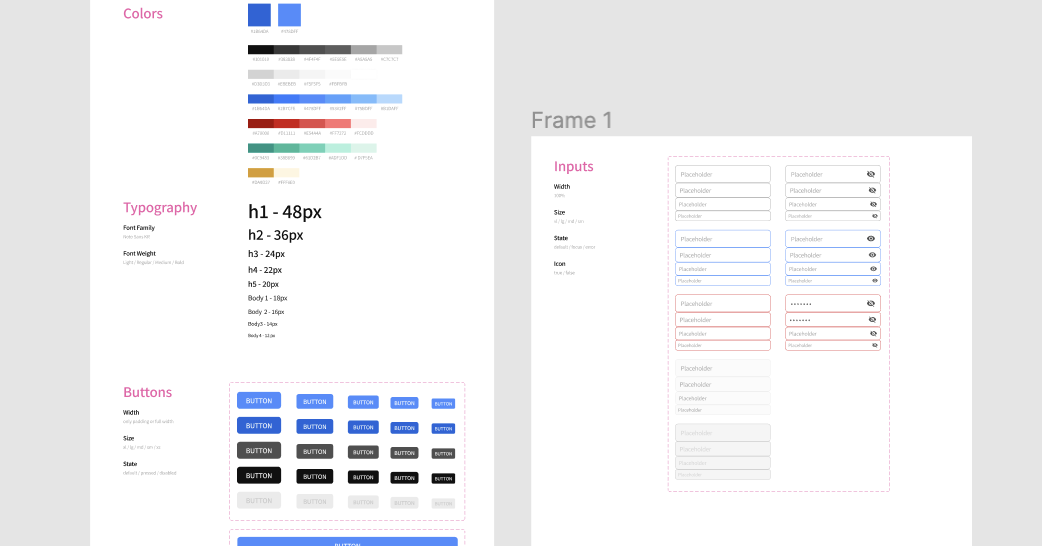
피그마로 열심히 디자인 한 것..!
시작하기
mkdir hyosun-design-system
cd hyosun-design-system
yarn init -y
npx -p @storybook/cli sb init --type react
이름이 효선이라서 그냥 hyosun-design-system 으로 지었다🤭
디렉토리
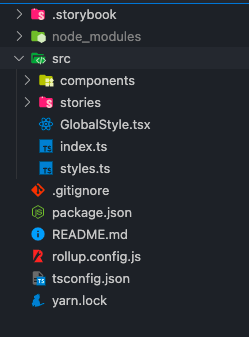
src 폴더를 만들고 하위에 stories 폴더를 옮기고 components 폴더를 생성하였다.
디렉토리 구조는 정답이 없어서 편하다고 생각되는대로 작업하면 될 것 같다.
.storybook/main.js 수정 (1)
stories 폴더가 src 하위로 옮겨졌기 때문에 .storybook/main.js 의 stories 배열 경로를 수정해주어야한다.
module.exports = {
  stories: ['../src/**/*.stories.mdx', '../src/**/*.stories.@(js|jsx|ts|tsx)'],
  addons: ['@storybook/addon-links', '@storybook/addon-essentials'],
  framework: '@storybook/react',
};
추가 install
react react-dom 설치
yarn add -D react react-domdevDependencies 에 react 와 react-dom을 설치한다.
설치안하고 yarn storybook 으로 실행해버리면 아래와 같이 react 가 존재하지 않는다고 에러가 난다!
ERR! Error: Cannot find module 'react/package.json'
ERR! Require stack:
...
typescript 와 babel-preset-react-app 설치
타입스크립트를 사용하기 위해서 꼭 설치해주어야하는 typescript
creact-react-app 에서 사용하는 바벨 사전 설정이 포함되어있는 패키지 babel-preset-react-app 도 필요합니다.
yarn add -D typescript babel-preset-react-appemotion 설치
그리고 emotion도 설치해준다.
yarn add @emotion/babel-preset-css-prop @emotion/react @emotion/styled@emotion/styled 는 styled-components 처럼 사용하기 위함이고
@emotion/babel-preset-css-prop 는 css props 으로 스타일을 줄 때 상단에
/** @jsx jsx */
import { jsx } from '@emotion/react'
매번 저것을 달아야하는 번거로움이 있다.
jsx 를 달아주는 이유는
React.createElement 가 아닌 jsx 함수를 호출하여 컴포넌트를 렌더링하기 위함인데, (추가문서)
@emotion/babel-preset-css-prop 를 설치하고 바벨 설정을 해주면 컴파일시 자동으로 jsx를 호출해주어 편리해진다.
.storybook/main.js 수정 (2)
설치한 emotion 의 버전은 11버전인데
storybook addon 에서 @storybook/addon-docs 가 emotion 10버전을 사용함으로써 버전 충돌 이슈가 있다.
main.js 에서 에러 해결을 위해 webpackFinal 설정을 해주어야한다.
@emotion/babel-preset-css-prop 설정도 이때 함께 해주면 된다.
const path = require('path');
const toPath = (_path) => path.join(process.cwd(), _path);

module.exports = {
  stories: ['../src/**/*.stories.mdx', '../src/**/*.stories.@(js|jsx|ts|tsx)'],
  addons: ['@storybook/addon-links', '@storybook/addon-essentials'],
  webpackFinal: async (config) => {
    config.module.rules.push({
      test: /\.(ts|tsx)$/,
      loader: require.resolve('babel-loader'),
      options: {
        presets: [
          ['react-app', { flow: false, typescript: true }],
          require.resolve('@emotion/babel-preset-css-prop'),
        ],
      },
    });
    config.resolve.extensions.push('.ts', '.tsx');
    config.resolve.alias = {
      ...config.resolve.alias,
      '@emotion/core': toPath('node_modules/@emotion/react'),
      '@emotion/styled': toPath('node_modules/@emotion/styled'),
      'emotion-theming': toPath('node_modules/@emotion/react'),
    };
    return config;
  },
};
기본 셋팅은 끝났으니 이제 컴포넌트를 만든 다음
yarn storybook으로 실행하면 된다!
컴포넌트 만들기는 바로 다음에 글을 작성할 예정이다.

스토리북에 emotion 셋업하면서 참고 많이 했습니다. 감사합니다~