스프링 시큐리티
스프링 기반 애플리케이션의 인증과 권한을 담당하는 하위 프레임 워크
인증과 인가
인증 : 사용자가 어떤 행위를 할 때 본인이 맞는지를 확인하는 절차
인가 : 인증이 완료된 사용자가 요청된 자원에 접근을 할 수 있는지 결정하는 절차
인증 방식에 대해
- credential 기반 인증 : 사용자명과 비밀번호를 이용한 방식
- 이중 인증(twofactor 인증) : 사용자가 입력한 개인 정보를 인증 후, 다른 인증 체계(예: 물리적인 카드)를 이용하여 두가지의 조합으로 인증하는 방식
- 하드웨어 인증 : 자동차 키와 같은 방식
spring security 는 credential 방식의 인증을 취한다.
- principal : 아이디, (spring security 로 부터 보호받는 자원(resurce) 으로 접근하는 대상)
- credential : 비밀번호, (resource 에 접근하는 대상의 비밀번호)
주요 모듈로는 이렇게 몇가지가 있는데 주요한 모듈을 중심으로 살펴보자
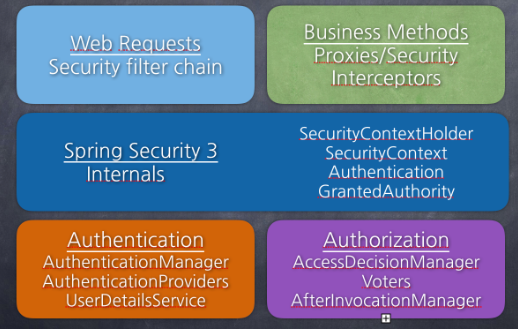
SecurityContextHolder
보안 컨텍스트 보관함? 뜻을 보면 보안 컨텍스트를 가지고 있는 객체인 것으로 유추가 된다.
조금 자세한 설명은 이렇다.
보안 주체의 세부 정보를 포함하여 응용 프로그램의 현재 보안 컨텍스트에 대한 세부 정보가 저장된다. SecurityContextHolder는 기본적으로 SecurityContextHolder.MODE_INHERITABLETHREADLOCAL 방법과SecurityContextHolder.MODE_THREADLOCAL 방법을 제공한다.
SecurityContext
Authentication을 보관하는 역할을 하며, SecurityContext를 통해 Authentication 객체를 꺼내올 수 있다.
Authentication을 보관한다.. SecurityContext를 통해 Authentication 객체를 얻는다..!
Authentication
Authentication는 현재 접근하는 주체의 정보와 권한을 담는 인터페이스이다.
Authentication 객체는 Security Context에 저장되며, SecurityContextHolder를 통해 SecurityContext에 접근하고, SecurityContext를 통해 Authentication에 접근할 수 있다.

**UsernamePasswordAuthenticationToken**
UsernamePasswordAuthenticationToken은 Authentication을 implements한 AbstractAuthenticationToken의 하위 클래스로, User의 ID가 Principal 역할을 하고, Password가 Credential의 역할을 한다.
UsernamePasswordAuthenticationToken의 첫 번째 생성자는 인증 전의 객체를 생성하고, 두번째 생성자는 인증이 완려된 객체를 생성한다.
이건 코드가 같이 있으면 이해가 빠를 것 같아서 첨부해보았다.
public class UsernamePasswordAuthenticationToken extends AbstractAuthenticationToken {
    // 주로 사용자의 ID에 해당함
    private final Object principal;
    // 주로 사용자의 PW에 해당함
    private Object credentials;

    // 인증 완료 전의 객체 생성
    public UsernamePasswordAuthenticationToken(Object principal, Object credentials) {
		super(null);
		this.principal = principal;
		this.credentials = credentials;
		setAuthenticated(false);
	}

    // 인증 완료 후의 객체 생성
    public UsernamePasswordAuthenticationToken(Object principal, Object credentials,
			Collection<? extends GrantedAuthority> authorities) {
		super(authorities);
		this.principal = principal;
		this.credentials = credentials;
		super.setAuthenticated(true); // must use super, as we override
	}
}

public abstract class AbstractAuthenticationToken implements Authentication, CredentialsContainer {
}
간단하게 스프링 시큐리티 이용하기
implementation 'org.springframework.boot:spring-boot-starter-security'
implementation 'org.thymeleaf.extras:thymeleaf-extras-springsecurity6:3.1.1.RELEASE'
이렇게 라이브러리를 설치만 하게 되면

다음과 같은 화면이 나타난다.
기본적으로 인증되지 않은 사용자는 서비스를 사용할 수 없게끔 되어 있다.
따라서 인증을 위한 로그인 화면이 나타나는 것
라이브러리를 추가한 뒤 rebuild를 진행하고
요청들이 스프링 시큐리티의 제어를 받을 수 있도록 시큐리티 설정을 다음과 같이 해준다
@Configuration // 스프링의 환경설정 파일임을 의미하는 애너테이션 -> 스프링 시큐리티 설정을 위해 사용되었음
@EnableWebSecurity //모든 요청 URL이 스프링 시큐리티의 제어를 받도록 만드는 애너테이션
public class SecurityConfig {

    @Bean
    SecurityFilterChain filterChain(HttpSecurity http) throws Exception{
        http.authorizeHttpRequests().requestMatchers(
                new AntPathRequestMatcher("/**")).permitAll();
        return http.build();
    }
}
추가 설명
@EnableWebSecurity애너테이션을 사용하면 내부적으로 SpringSecurityFilterChain이 동작하여 URL 필터가 적용된다.
스프링 시큐리티 설정은 SecurityFilterChain을 통해서 할 수 있는데 밑의 코드의 의미는 모든 인증되지 않은 요청을 허락한다는 의미이다. → 로그인을 하지 않아도 모든 페이지에 접근 가능
http.authorizeHttpRequests().requestMatchers(
    new AntPathRequestMatcher("/**")).permitAll();
더 정리하지는 못했지만 지금 당장 너무 많은 것을 집어 넣기 보다는 내게 필요한 지식을 정리하려고 하자 😚
Reference