리소스 요구사항
https://dev.mysql.com/doc/mysql-monitor/8.0/en/system-prereqs-reference.html
최소 하드웨어 요구사항
- 2 CPU Cores
- 2 GB RAM
- Disk I/O subsystem applicable to a write-intensive database
권장 하드웨어 요구사항
- 4 CPU Cores or more
- 8 GB RAM or more
- RAID10 or RAID 0+1 disk setup
디스크 공간 요구사항
| Platform | Service Manager Minimum Disk Space | Agent Minimum Disk Space |
|---|---|---|
| Linux x86 64-bit | 1.3 GB | 800 MB |
| macOS | 1.2 GB | 700 MB |
| Windows x86 64-bit | 800 MB | 500 MB |
설치 방법
본 글은 인터넷이 되지 않는 환경에서 MariaDB를 설치하는 방법을 설명합니다.
- 서버 A: 인터넷이 되지 않는 환경. 실제 수동 설치가 이루어져야 하는 서버
- 서버 B : 인터넷이 가능한 환경. 이곳에서 rpm 파일을 다운로드 받아서 서버 A로 넘겨야 합니다
- 서버 B에서 rpm 파일 다운로드
- rpm 파일 : 서버 B -> 서버 A
- 서버 A에서 rpm 파일을 이용해 설치
1. 서버 B에서 rpm 파일 다운로드
MariaDB Download 사이트로 이동
=> https://mariadb.org/download/?t=repo-config&d=CentOS+7&v=10.6&r_m=blendbyte
아래와 같이 OS와 MariaDB 버전을 선택하면 CentOS에 MariaDB Repository를 등록하는 방법을 소개합니다.
/etc/yum.repos.d/MariaDB.repo 파일에 해당 스크립트를 작성하면 된다고 하네요.
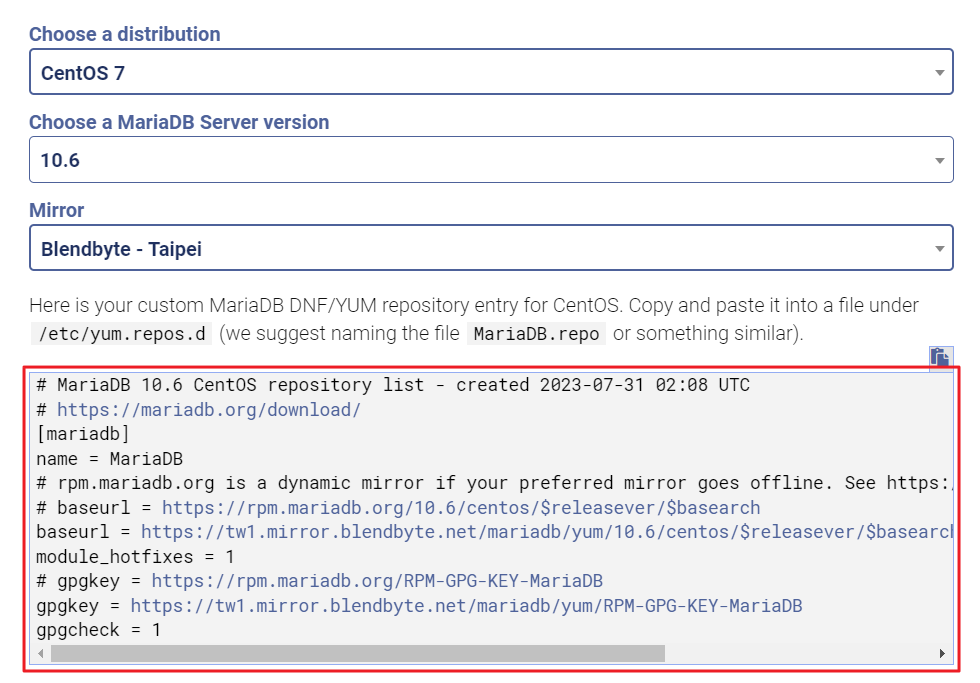
서버 B에서 MariaDB Repository를 등록합니다.
# vi /etc/yum.repos.d/MariaDB.repo
...
# MariaDB 10.6 CentOS repository list - created 2023-07-31 02:08 UTC
# https://mariadb.org/download/
[mariadb]
name = MariaDB
# rpm.mariadb.org is a dynamic mirror if your preferred mirror goes offline. See https://mariadb.org/mirrorbits/ for details.
# baseurl = https://rpm.mariadb.org/10.6/centos/$releasever/$basearch
baseurl = https://tw1.mirror.blendbyte.net/mariadb/yum/10.6/centos/$releasever/$basearch
module_hotfixes = 1
# gpgkey = https://rpm.mariadb.org/RPM-GPG-KEY-MariaDB
gpgkey = https://tw1.mirror.blendbyte.net/mariadb/yum/RPM-GPG-KEY-MariaDB
gpgcheck = 1
rpm 파일을 다운로드 받을 디렉토리를 생성하고 해당 디렉토리 내에 rpm 파일을 다운로드 받습니다.
# mkdir /IMAGES
# cd /IMAGES

# yum install --downloadonly --downloaddir=/IMAGES MariaDB-client MariaDB-server

# ls -al
-rw-r--r--.  1 root root 10422252 Jan 28  2023 galera-4-26.4.14-1.el7.centos.x86_64.rpm
-rw-r--r--.  1 root root    60180 Aug 23  2019 libpmem-1.5.1-2.1.el7.x86_64.rpm
-rw-r--r--.  1 root root 15157016 Jun  6 13:24 MariaDB-client-10.6.14-1.el7.centos.x86_64.rpm
-rw-r--r--.  1 root root    84084 Jun  6 13:24 MariaDB-common-10.6.14-1.el7.centos.x86_64.rpm
-rw-r--r--.  1 root root  2258500 Jun  6 13:24 MariaDB-compat-10.6.14-1.el7.centos.x86_64.rpm
-rw-r--r--.  1 root root  8675724 Jun  6 13:24 MariaDB-devel-10.6.14-1.el7.centos.x86_64.rpm
-rw-r--r--.  1 root root 26632028 Jun  6 13:24 MariaDB-server-10.6.14-1.el7.centos.x86_64.rpm
-rw-r--r--.  1 root root   128264 Jun  6 13:24 MariaDB-shared-10.6.14-1.el7.centos.x86_64.rpm
-rw-r--r--.  1 root root   296632 Aug 11  2017 socat-1.7.3.2-2.el7.x86_64.rpm
2. rpm 파일 : 서버 B -> 서버 A
ftp를 이용해 rpm 파일들을 모두 서버 A로 옮겨줍니다.
3. 서버 A에서 rpm 파일을 이용해 설치
의존성에 맞춰 아래의 순서대로 설치합니다.
마지막엔 MariaDB*를 통해 알아서 MariaDB가 접두어로 붙은 6개의 rpm 파일들이 의존성을 해결하며 설치되도록 합니다.
# rpm -Uvh socat-1.7.3.2-2.el7.x86_64.rpm
# rpm -Uvh galera-4-26.4.14-1.el7.centos.x86_64.rpm
# rpm -Uvh libpmem-1.5.1-2.1.el7.x86_64.rpm
# rpm -Uvh MariaDB*
3-1 my.cnf 설정
서버 측 설정은 server.cnf, 클라이언트 측 설정은 mysql-clients.cnf 파일을 수정하면 됩니다.
# cd /etc/my.cnf.d
# ls -al
-rw-r--r--. 1 root root  763 Nov 10 22:15 enable_encryption.preset
-rw-r--r--. 1 root root  298 Dec  3 14:35 mysql-clients.cnf
-rw-r--r--. 1 root root 1261 Dec  3 14:31 server.cnf
-rw-r--r--. 1 root root  120 Nov 10 22:15 spider.cnf
3-2 시작
MariaDB를 시작합니다.
# service mariadb start

# service mariadb status

# ps -ef | grep maria
mysql      5301      1  0 11:17 ?        00:00:00 /usr/sbin/mariadbd
root       5342   4468  0 11:18 pts/0    00:00:00 grep --color=auto mariadb
3-3 root 비밀번호 설정 및 mysql
OS root 유저로 MariaDB에 접속 후 MariaDB의 root 비밀번호를 설정합니다.
# mysql -u root

MariaDB [(none)]> use mysql;

MariaDB [(none)]> set password=password('<password>');
Query OK, 0 rows affected (0.001 sec)

MariaDB [(none)]> flush privileges;
Query OK, 0 rows affected (0.001 sec)

MariaDB [mysql]> select host, user, password from user;
+-----------+-------------+-------------------------------------------+
| Host      | User        | Password                                  |
+-----------+-------------+-------------------------------------------+
| localhost | mariadb.sys |                                           |
| localhost | root        | *   A23EA8B9A965E0644FF531612E9           |
| localhost | mysql       | invalid                                   |
| localhost |             |                                           |
| khyup     |             |                                           |
+-----------+-------------+-------------------------------------------+
OS의 mysql 유저로 접속 후 MariaDB에 접근 테스트를 해봅니다.
# passwd mysql

# su - mysql
This account is currently not available.
This account is currently not available.는 OS 유저의 로그인 쉘이 nologin으로 설정되어 있을 때 나타납니다. 로그일 쉘을 /bin/bash로 바꿔줍니다.
# cat /etc/passwd | grep mysql
mysql:x:986:980:MySQL server:/var/lib/mysql:/sbin/nologin

# chsh -s /bin/bash mysql
Changing shell for mysql.
Shell changed.

# cat /etc/passwd | grep mysql
mysql:x:986:980:MySQL server:/var/lib/mysql:/bin/bash
다시 mysql 유저로 접근을 시도합니다.
# su - mysql
Last login: Mon Jul 31 11:28:03 KST 2023 on pts/0
Attempting to create directory /var/lib/mysql/perl5
-bash-4.2$
MariaDB로 접근해봅니다.
-bash-4.2$ mysql -u root -p
Enter password:
Welcome to the MariaDB monitor.  Commands end with ; or \g.
Your MariaDB connection id is 8
Server version: 10.6.14-MariaDB MariaDB Server

Copyright (c) 2000, 2018, Oracle, MariaDB Corporation Ab and others.

Type 'help;' or '\h' for help. Type '\c' to clear the current input statement.

MariaDB [(none)]>

정리가 잘 된 글이네요. 도움이 됐습니다.