쇼핑몰 프로젝트 - 1. 프로젝트 세팅 (Express, Typescript, Next.js, typeorm, mySQL )
주변 컴공과 친구 2명과 새로운 프레임워크로 쇼핑몰 프로젝트를 해보기로 했습니다.
next.js를 사용 하긴 했지만 사실상 React와 크게 다름 없이 사용했지만 내가 구현한 Express서버 <-> next.js 통신하는 회원가입을 구현해보겠습니다.
1. 백엔드 (Node.js + Express + Typescript) 세팅
1-1 package.json 파일 생성
먼저 프로젝트 이름이 Persevi 이기 때문에 mkdir persevi && cd persevi, mkdir backend && cd backend 명령어로 폴더를 만들고 이동합니다. 앞으로 모든 백엔드 코드들은 이 backend 폴더안에서 작성됩니다.
이후 yarn init 으로 package.json 파일을 생성했습니다.
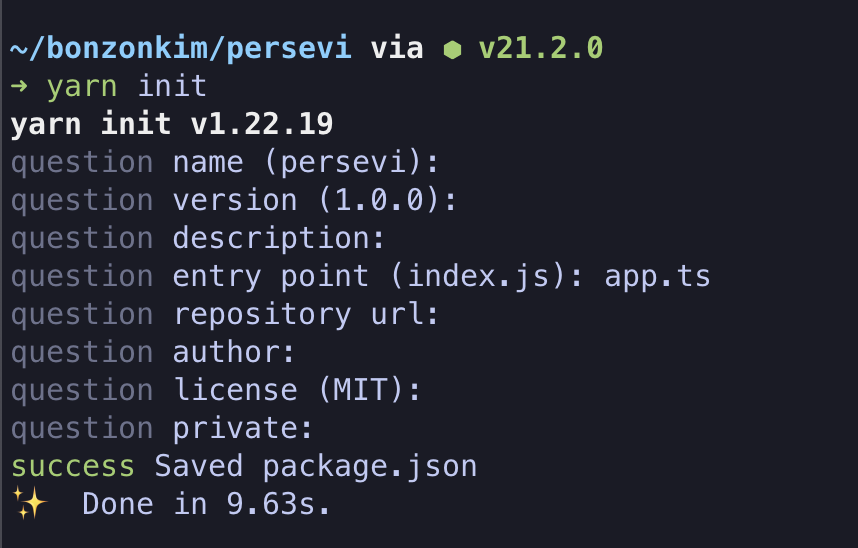
entry point는 앱이 실행될때 맨 처음 시작 포인트인데 저는 app.ts로 할 것이기 때문에 이렇게 설정했습니다. 따로 값을 주지않으면 기본값으로 설정됩니다.
1-2 필요한 package들 설치
yarn add -D express typescript ts-node nodemon @types/node @types/express cors @types/cors- nodemon : 서버 코드가 변경될 때마다 서버를 재시작 할 필요 없이 hot-reloading을 해줍니다.
- ts-node : Node.js 상에서 Typescript Compilier 를 통하지 않고 직접 Typescript를 실행시키는 역할을 합니다.
- cors, @types/cors : (Cross-origin resource sharing) localhost:3000의 next.js앱과 함께 이용 하니 설치했습니다 CORS에 대한 자세한 내용
1-3 tsconfig.json 생성
yarn tsc --init명령어로 tsconfig.json파일을 생성합니다.
이 명령어로 파일 생성시 모든 옵션들이 적혀있고 주석처리가 되어있는데 그중 필요한 부분만 해제하면서 작성했습니다.
{
  "compilerOptions": {
    "target": "es6", // 어떤 버전으로 컴파일할지 작성
    "module": "commonjs", //어떤 모듈 방식으로 컴파일할지 설정
    "outDir": "./dist",	//컴파일 후 js 파일들이 생성되는 곳
    "rootDir": ".",	//루트 폴더
    "strict": true,	//strict 옵션 활성화
    "baseUrl": "./src/**/*", // 소스파일 위치
    "moduleResolution": "node",	//모듈 해석 방법 설정: 'node' (Node.js)
    "esModuleInterop": true,
    "forceConsistentCasingInFileNames": true,
     "jsx": "react"
  }
}
1-4 app.ts 작성
import express, { Request, Response } from 'express';
import cors from 'cors';

const app = express();
const PORT = 3099;

app.use(cors({ credentials: true, origin: 'http://localhost:3000' })); //localshot:3000에 대한 cors허용
app.use(express.json());
app.use(express.urlencoded({ extended: false }));

app.get('/hello', (req: Request, res: Response) => {
	res.json({ msg: 'hello from server' });
}); // 테스트 api msg를 담고있는 json 을 응답

app.listen(PORT, () => {
	console.log(`-------------SERVER LISTENING ON PORT ${PORT}-------------`);
});
1-5 package.json 에 script 추가
...
  "scripts": {
    "start": "node dist/app.js",
    "build": "tsc -p .",
    "dev": "nodemon --watch \"src/**/*.ts\" --exec \"ts-node\" src/app.ts"
  },
...
이후 yarn dev로 실행후 localhost:3099/hello 접속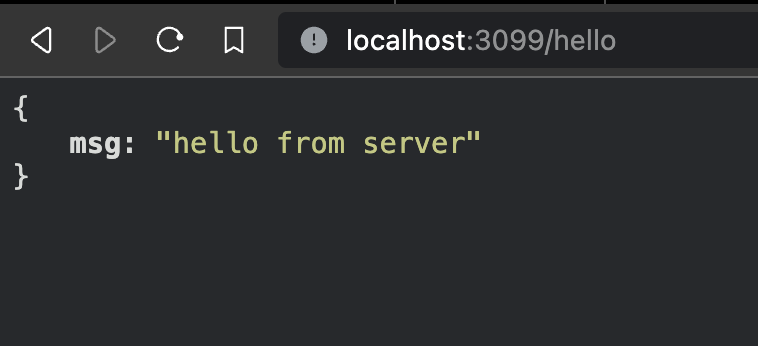
2. 프론트엔드(Next.js) 세팅
2-1 앱 생성
yarn create next-app frontend --template typescript명령어로 frontend란 이름을 가진 next.js앱을 생성합니다. typescript를 사용할 것이기에 --template typescript 옵션을 붙여줍니다.
명령어를 실행하면
✔ Would you like to use TypeScript? … No / Yes
✔ Would you like to use ESLint? … No / Yes
✔ Would you like to use Tailwind CSS? … No / Yes
✔ Would you like to use `src/` directory? … No / Yes
✔ Would you like to use App Router? (recommended) … No / Yes
✔ Would you like to customize the default import alias (@/*)? … No / Yes
여러 질문이 뜨는데 상황에 맞게 선택하면됩니다. 저는 기본값으로 했고 eslint와 TailwindCSS를 사용할것이기에 yes를 선택했습니다.
2-2 디렉토리 수정
저는 app디렉토리 보다 pages 디렉토리를 선호하기 때문에 디렉토리 구조를 조금 수정했습니다. app 디렉토리를 그대로 사용해도 무방합니다.
project root
├── README.md
├── next-env.d.ts
├── next.config.js
├── node_modules/
├── package.json
├── pages
│   ├── _app.tsx
│   ├── _document.tsx
│   ├── globals.css
│   └── index.tsx
├── postcss.config.js
├── public
│   ├── next.svg
│   └── vercel.svg
├── tailwind.config.ts
├── tsconfig.json
└── yarn.lock
app 폴더를 지우고 pages폴더를 생성하고 index.tsx를 생성할 경우 app디렉토리를 찾을 수 없다고 에러가 발생할 텐데 _app.tsx 파일과 _document.tsx 파일을 생성해줘야 정상적으로 렌더링이 됩니다.
_app.tsx
import React from 'react';

const App = ({ Component, pageProps }: any) => {
  return(
          <Component {...pageProps}/>
  )
};

export default App;- _app은 로직, 전역 스타일 등 컴포넌트에 공통 데이터를 다룬다.
_document.tsx
import React from 'react';
import Document, { Html, Head, Main, NextScript } from "next/document";


export default class MyDocument extends Document {

    render() {
        return (
            <Html>
                <title>Persevi</title>
                <Head>
                    <meta charSet="utf-8"></meta>
                    <body>
                    <Main />
                    <NextScript />
                    </body>
                </Head>
            </Html>
        );
    }
}- _document는 공통적으로 적용할 HTML 마크업을 중심으로 다룬다.
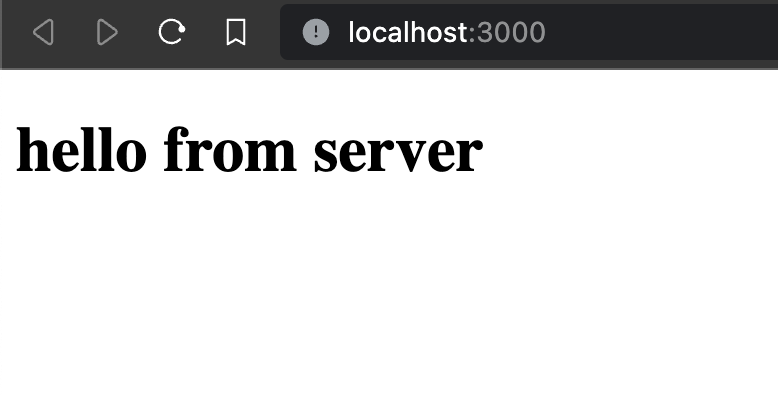
2-3 서버에서 메세지 받아와 화면에 출력
우선 통신을 위한 axios를 설치합니다.
yarn add axios그리고 localhost:3099/hello에서 응답을 받아와 msg에 저장하고 렌더링합니다.
import React, { useState } from 'react';
import axios from 'axios';

export default function Home() {
  const [msg, setMsg] = useState('');

  axios.get('http://localhost:3099/hello')
  .then(res => setMsg(res.data.msg)) //서버에서 json으로 응답, msg State에 저장
  .catch(e => console.log(e));

  return (
  <div>
      <h1>{msg}</h1>
  </div>
  )
}
3. 결과
지금은 회원가입과 로그인 까지 구현했으나 단계적으로 처음부터 다시 해보며 글을 작성 했습니다.
차근차근 포스팅 하며 프로젝트를 완성하도록 해보겠습니다.
참고한글 : https://velog.io/@qhgus/Node-Express-TypeScript-%ED%99%98%EA%B2%BD-%EC%84%B8%ED%8C%85