Graph
그래프를 사용하면 객체 간의 연결을 다양하게 나타낼 수 있다.
그래프는 객체 간의 연결을 시각적으로 표현한 것이다. 실생활의 많은 부분을 그래프로 적용해볼 수 있다.
| 사례 | 항목 | 연결 |
|---|---|---|
| 웹사이트 | 웹 페이지 | 링크 |
| 지도 | 교차로 | 도로 |
| 회로 | 부품 | 배선 |
| 소셜미디어 | 사람 | 친구 또는 팔로우 |
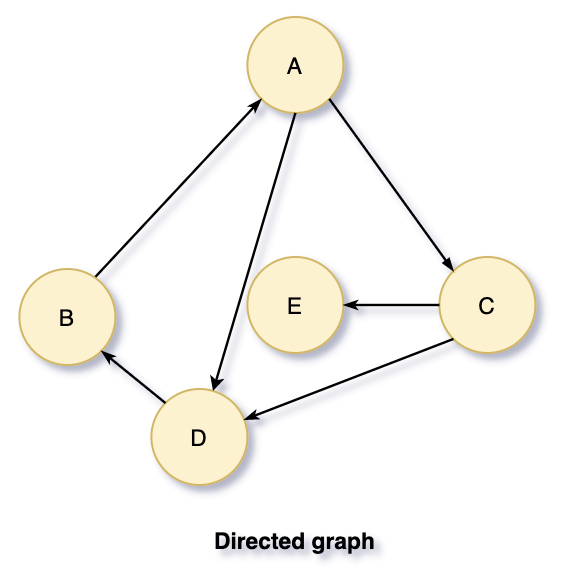
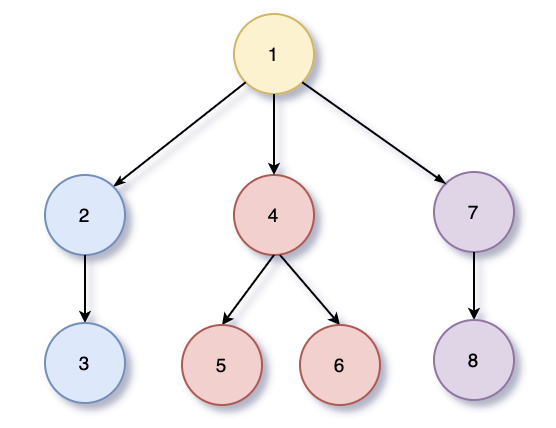
지향성 그래프
지향성 그래프는 정점 간에 방향이 있는 그래프다.
그림과 같이 지향성 그래프의 각 간선은 한 정점에서 다른 정점으로 향한다.
가중치가 있는 지향성 그래프 클래스를 구현해보자
지향성 그래프에서 간선을 추가하기 위해서는 가중치를 출발 정점에만 설정해야 한다.
class DirectedGraph {
  constructor() {
    this.edges = {};
  }

  addVertex(vertex) {
    this.edges[vertex] = {};
  }

  addEdge(fromVertex, toVertex, weight = 0) {
    this.edges[fromVertex][toVertex] = weight;
  }
}

const graph = new DirectedGraph();

graph.addVertex("a");
graph.addVertex("b");
graph.addVertex("c");

graph.addEdge("a", "b", 1);
graph.addEdge("b", "c", 2);
graph.addEdge("c", "a", 3);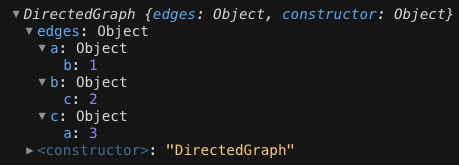
이번에는 정점과 간선을 삭제하는 기능을 추가하려는데 무지향성 그래프와 다르게 원점이 되는 정점만을 삭제하면 된다.
class DirectedGraph {
  constructor() {
    this.edges = {};
  }

  addVertex(vertex) {
    this.edges[vertex] = {};
  }

  addEdge(fromVertex, toVertex, weight = 0) {
    this.edges[fromVertex][toVertex] = weight;
  }

  removeEdge(fromVertex, toVertex) {
    if (
      this.edges[fromVertex] &&
      this.edges[fromVertex][toVertex] !== undefined
    ) {
      delete this.edges[fromVertex][toVertex];
    }
  }

  removeVertex(vertex) {
    for (let fromVertex in this.edges) {
      this.removeEdge(fromVertex, vertex);
    }
    delete this.edges[vertex];
  }
}

const graph = new DirectedGraph();

graph.addVertex("a");
graph.addVertex("b");
graph.addVertex("c");

graph.addEdge("a", "b", 1);
graph.addEdge("b", "c", 2);
graph.addEdge("c", "a", 3);

graph.removeVertex("c");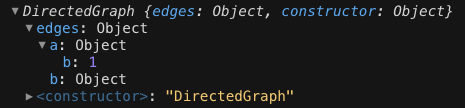
깊이 우선 검색 (DFS)
깊이 우선 검색 (Depth-First search)은 그래프에서 다른 연결을 방문하기 전에 하나의 연결을 끝까지 파고들어 순회하는 검색 알고리즘이다.
트리의 후순위 순회와 유사하다.
DFS 재귀로 구현
traverseDFS(vertex, cb) {
    let visited = {};
    this._traverseDFS(vertex, visited, cb);
  }

_traverseDFS(vertex, visited, cb) {
  visited[vertex] = true;
  cb(vertex);
  for (let adjacentVertex in this.edges[vertex]) {
    if (!visited[adjacentVertex]) {
      this._traverseDFS(adjacentVertex, visited, cb);
    }
  }
}

graph.addVertex("a");
graph.addVertex("b");
graph.addVertex("c");
graph.addVertex("d");
graph.addVertex("e");
graph.addVertex("f");
graph.addVertex("g");
graph.addVertex("h");
graph.addVertex("i");

graph.addEdge("a", "b");
graph.addEdge("a", "c");
graph.addEdge("a", "d");
graph.addEdge("b", "e");
graph.addEdge("c", "f");
graph.addEdge("f", "i");
graph.addEdge("c", "g");
graph.addEdge("d", "h");

graph.traverseDFS("a", value => console.log(value));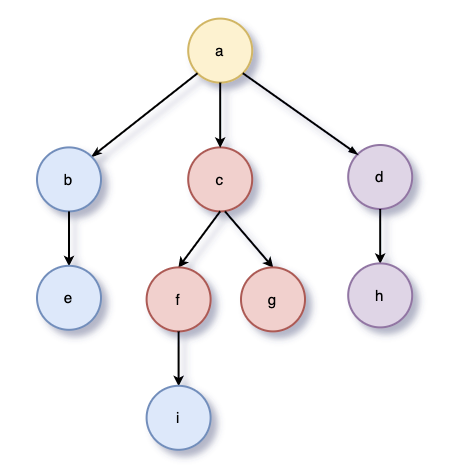
출력 순서
a -> b -> e -> c -> f -> i -> g -> d -> h
DFS는 재귀로 구현이 가능하지만 스택으로도 구현이 가능하다.
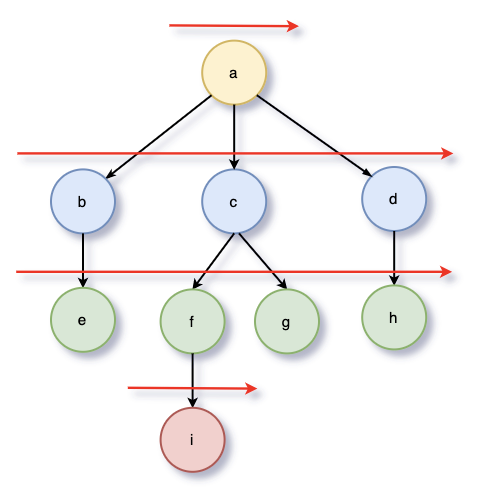
너비 우선 검색 (BFS)
너비 우선 검색 (Breadth-First search)은 level 단위로 검색을 하는 것이다.
BFS를 하기 위해서는 Queue가 필요하다.
traverseBFS(vertex, cb) {
    const queue = [];
    const visited = {};

    queue.push(vertex);

    while (queue.length) {
      vertex = queue.shift();
      if (!visited[vertex]) {
        visited[vertex] = true;
        cb(vertex);
        for (let adjacentVertex in this.edges[vertex]) {
          queue.push(adjacentVertex);
        }
      }
    }
  }

graph.traverseBFS("a", value => console.log(value));
출력 순서
a -> b -> c -> d -> e -> f -> g -> h -> i
