캐시 적용에 대해 생각하다보니 3가지 의문이 생겼다.
- 어느 타이밍에 캐시를 처리할 것인가?
- 처리는 어떻게 할 것인가?
- 캐시 데이터의 만료 기간은 어떻게 설정할 것인가? 변경이 일어났는데 캐시 데이터의 만료 기간이 남았다면?
캐시 처리 타이밍에 대해 알아보자
그러려면 우선 NestJS의 요청 처리 과정에 대해 알 필요가 있다. (그래야 어느 부분에 추가할지 알 수 있으니)
요청
→ 미들웨어(글로벌 → 모듈)
→ 가드(글로벌 → 컨트롤러 → 라우트)
→ 인터셉터(글로벌 → 컨트롤러 → 라우터, pre-controller)
→ 파이프(글로벌 → 컨트롤러 → 라우트 → 라우트 매개변수)
→ 컨트롤러 → 서비스
→ 인터셉터(라우트 → 컨트롤러 → 글로벌, post-request)
→ 예외 필터(라우트 → 컨트롤러 → 글로벌)
→ 응답
이 중 어느곳에서 캐싱을 처리해야 할까?
일단 가드는 지나야 하고, 컨트롤러 전이어야 하니 인터셉터 혹은 파이프일 거라는 추측이 가능하다.
하지만 파이프는 transform/validation 목적이기 때문에 땡
NestJS 공식문서를 확인해보면 인터셉터 파트에 캐싱 목적으로 사용할 수 있음이 나와있다.
캐시 처리는 어떻게?
요청이 들어왔을 때 캐시 데이터를 확인한 후
- 없으면 서비스 로직을 실행한 후 결과를 캐시에 추가한 후 반환
- 있으면 캐시 데이터 반화
검색해보니 캐시 인터셉터를 사용할 수 있도록 Nest가 제공하고 있다.
https://docs.nestjs.com/techniques/caching#caching
이제 위 문서를 읽어보면, 왜 캐싱이 인터셉터를 사용하는지 이해할 수 있다.
캐싱 구현 따라하기
문서 왈
Nest provides a unified API for various cache storage providers. The built-in one is an in-memory data store. However, you can easily switch to a more comprehensive solution, like Redis.
목표는 redis를 이용하는 거지만, 일단 편하게 따라 해보자. 나중에 바꾸면 될듯
정리
-
AppModule에 imports
import { CacheModule, Module } from '@nestjs/common'; import { AppController } from './app.controller'; import { AppService } from './app.service'; @Module({ imports: [CacheModule.register()], controllers: [AppController], providers: [AppService], }) export class AppModule {} -
클래스 생성자에 추가
import { CACHE_MANAGER, Inject, Injectable } from '@nestjs/common'; import { Cache } from 'cache-manager'; @Injectable() export class AppService { constructor(@Inject(CACHE_MANAGER) private cacheManager: Cache) {} getHello(): string { return 'Hello World!'; } } -
get: 캐시에서 아이템을 검색, 없으면 null 리턴
const value = await this.cacheManager.get('key');
-
set
await this.cacheManager.set('key', 'value'); -
기본 만료 시간은 5초, TTL 설정 가능
await this.cacheManager.set('key', 'value', { ttl: 1000 });- TTL 비활성화 하려면 0으로 설정하면 댐
-
아이템 삭제
await this.cacheManager.del('key'); -
리셋
await this.cacheManager.reset();
Auto-caching responses
인터셉터를 추가하면 자동으로 캐싱됨
@Controller()
@UseInterceptors(CacheInterceptor)
export class AppController {
  @Get()
  findAll(): string[] {
    return [];
  }
}Using Redis Store

그렇기에 3.x.x로 받아준다.
그런 다음 설정을 변경해주면 됨
import { CacheModule, Module } from '@nestjs/common';
import { AppController } from './app.controller';
import { AppService } from './app.service';
import type { ClientOpts } from 'redis';
import * as redisStore from 'cache-manager-redis-store';

@Module({
  imports: [
    CacheModule.register<ClientOpts>({
      store: redisStore,
      host: 'localhost',
      port: 6379,
    }),
  ],
  controllers: [AppController],
  providers: [AppService],
})
export class AppModule {}
+) 당연하지만 redis 서버를 실행시켜둬야 연결됨
확인해보자!
import { CACHE_MANAGER, Controller, Get, Inject } from '@nestjs/common';
import { Cache } from 'cache-manager';
import { AppService } from './app.service';

@Controller()
export class AppController {
  constructor(
    private readonly appService: AppService,
    @Inject(CACHE_MANAGER) private cacheManager: Cache,
  ) {}

  @Get()
  async getHello(): Promise<string> {
    const value: string = await this.cacheManager.get('hello');
    if (value === null) {
      await this.cacheManager.set('hello', 'cache item', 60);
      return 'no cache exists';
    }
    return value;
  }
}
redis-cli -h localhost -p 6379 로 접속 후 monitor 명령어를 실행한다.
그리고 curl http://localhost:3000/ 명령어로 요청을 보내자.
아래와 같이 로그가 찍히는 것을 확인할 수 있다.
중간 두 줄이 get → if (value === null) true → set으로 흐르는 로직이고 마지막은 캐시값이 있으니 get 후 리턴하는 로직이다.

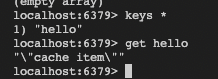
이렇게 다른 명령어(keys *, get [key])로도 확인 가능
현재 cache-manager가 5버전으로 업데이트된지 얼마 지나지 않아서, 오류가 존재하는 것 같다. 해당 내용은 여기서 확인
폴라에 적용해보자
1. 멘토 컨트롤러
import { CacheModule, Module } from '@nestjs/common';
import * as redisStore from 'cache-manager-redis-store';

@Module({
  imports: [
    CacheModule.register({
      store: redisStore,
      host: 'localhost',
      port: 6379,
      ttl: 0,
    }),
})
export class MentorsModule {} @Get(':intraId')
@UseInterceptors(CacheInterceptor)
@ApiBearerAuth('access-token')
@ApiOperation({
summary: 'Get mentor details',
description: '멘토에 대한 모든 정보를 반환합니다.',
})
@ApiCreatedResponse({
description: '멘토 정보',
type: MentorDto,
})
async getMentorDetails(
@Param('intraId') intraId: string,
): Promise<MentorDto> {
return this.mentorsService.findMentorByIntraId(intraId);
}이렇게 경로마다 설정 가능 (캐시 키는 /api/v1/mentors/{intraId}로 기본 설정됨 - 요청 라우트)
모듈에 등록할 때 TTL에 0을 설정했기 때문에 자동 삭제가 사라짐
→ 멘토 정보가 수정되는 곳(PATCH /join, PATCH /:intraId)에서 캐시를 삭제해주는 로직 추가
export class MentorsController {
  constructor(
    @Inject(CACHE_MANAGER) private cacheManager: Cache,

  @Patch('join')
  @Roles('mentor')
  @UseGuards(JwtGuard, RolesGuard)
  @ApiBearerAuth('access-token')
  @ApiOperation({
    summary: 'Post join mentor',
    description:
      '멘토 필수정보(이름, 이메일, 슬랙아이디, 가능시간, 멘토링 가능 상태, 회사, 직급)를 받아서 저장합니다.',
  })
  async join(
    @Body() body: JoinMentorDto,
    @User() user: JwtUser,
  ): Promise<boolean> {
    await this.mentorsService.updateMentorDetails(user.intraId, body);
    await this.cacheManager.del(`/api/v1/mentors/${user.intraId}`);
    return true;
  }
핸들러 내부에서 캐시를 직접 조작하려면 생성자에 캐시매니저를 추가해야 한다.
2. 카테고리 컨트롤러
카테고리 컨트롤러에서는 주로 카테고리/키워드를 받아오는 역할이고, 수정 api가 존재하진 않지만.. 수정이 언젠간 일어날 수도 있기 때문에 일단 TTL을 한시간으로 주었다.
import { CacheInterceptor, CacheModule, Module } from '@nestjs/common';
import { APP_INTERCEPTOR } from '@nestjs/core';

@Module({
  imports: [
    CacheModule.register({
      store: redisStore,
      host: 'localhost',
      port: 6379,
      ttl: 60 * 60,
    }),
...
  providers: [
    KeywordsService,
    {
      provide: APP_INTERCEPTOR,
      useClass: CacheInterceptor,
    },
  ],
})
export class CategoriesModule {}
요런식으로 프로바이더에 추가하면 컨트롤러 전체에 캐싱이 적용된다. (당연히 GET 메소드에만 적용)
하지만 카테고리 컨트롤러에서 멘토 리스트를 받아오게 되는데, 여기서 문제가 발생한다.
- 멘토 리스트는 멘토의 자기소개/키워드처럼 변경될 수 있는 값을 가지고 있는 데다가
- 키워드나 검색단어에 따라 결과가 달라지기 때문에 수많은 캐시 데이터가 생성됨
→ TTL을 0으로 설정하고, 변경을 추적해서 캐시 데이터를 알맞게 지워줄 수가 없음
그리고 한시간은 너무 긺 → 얘만 따로 TTL을 짧게 설정해주었다.
  @Get(':category')
  @CacheTTL(60)
  @ApiOperation({
    summary: 'Get mentor list',
    description:
      '카테고리(+ keywords, mentorName)를 포함하는 멘토의 리스트를 반환합니다.',
  })
@CacheTTL 데코레이터를 이용하면 모듈에 설정해둔 TTL값을 오버라이드한다.
