프로젝트 구성😀
- node.js 및 npm 설치
https://nodejs.org/ko/
이제 여기서 2가지 방법으로 구성을 할 수 있다 😆
- create-react-app 이용하기
npx create-react-app <app-name>

- 위와 같은 명령어를 통해, 초기 react 프로젝트를 쉽게 구성이 가능하다.- 직접 한땀한땀 구성하겠다😅
npm init
npm i -S react react-dom
npm i -D @babel/core babel-loader @babel/preset-env @babel/preset-react
npm i -D webpack webpack-dev-server webpack-cli html-webpack-plugin

- react / react-dom 모듈 설치
- react 모듈만 설치했다고 끝이 아니다. babel / webpack 모듈 설치
- 만약에 typescript 로 구성을 하고싶다면 몇가지 더 설치가 필요하지만, 여기서는 다루지 않겠다.

scss 를 사용하고 몇가지 모듈 추가

npm i -D node-sass sass-loader css-loader style-loader
- react : react 개발에 필요한 코어 라이브러리
- react-dom : react 로 제작된 UI 를 view 에 랜더링을 해주는 라이브러리
- @babel/core : babel 트랜스파일러(변환) 코어 라이브러리
- babel-loader : webpack loader 에서 사용할 로더
- @babel/preset-env : plugin 그룹을 한번에 모아둔 기능(최신 JS 문법을 변환해줄 플러그인 집합)
- @babel/preset-react : plugin 그룹을 한번에 모아둔 기능(react 구문을 변환해줄 플러그인 집합)
모듈 설치를 완료했으면, 프로젝트 루트 경로에
- webpack.config.js 생성
- babel 설정은 package.json 에서 진행 (이게 싫다면, .babelrc 파일 생성)
// webpack
const path = require('path');
const HtmlWebpackPlugin = require('html-webpack-plugin')
module.exports = {
entry: './src/index.js',
output: {
path: path.join(__dirname, '/dist'),
filename: 'bundle.js'
},
module: {
rules: [
{
test: /\.(js|jsx)/,
exclude: /node_module/,
use: {
loader: 'babel-loader'
}
},
{
test: /\.(scss)/,
exclude: /node_modules/,
use: [
"style-loader",
"css-loader",
"sass-loader"
]
}
]
},
plugins: [
new HtmlWebpackPlugin({
template: './src/index.html',
filename: './index.html'
})
],
devServer: {
compress: true, // enable gzip compression
hot: true, // hot module replacement. Depends on HotModuleReplacementPlugin
https: false, // true for self-signed, object for cert authority
noInfo: false, // only errors & warns on hot reload
},
}- webpack : 번들러(모듈들을 하나의 파일로 묶어버린다)
// babel
// package.json 에서 설정

"babel": {
    "presets": [
      "@babel/env",
      "@babel/react"
    ],
    "plugins": []
},
npm script 수정
"scripts": {
    "test": "echo \"Error: no test specified\" && exit 1",
    "dev": "webpack-dev-server --mode development --open --hot",
    "build": "webpack --mode production"
},- 명령어에 입력한 옵션들은 webpack.config.js 에서도 설정이 가능
- npm run dev : webpack 개발 서버로 개발 모드로 실행 open 은 브라우저를 오픈하는걸 의미하며 hot 은 hotreload 하겠다는 거다
- npm run build : webpack 을 사용하여 프러덕션 모드로 빌드를 하겠다는거다
몇가지 파일생성
- /src/index.html
<!DOCTYPE html>
<html lang="kr">
<head>
    <meta charset="utf-8">
    <meta name="viewport" content="width=device-width, initial-scale=1.0">
    <title>my react example</title>

</head>

<body>

    <div id="app">
    </div>

</body>

</html>- /src/index.js
import React from 'react';
import ReactDOM from 'react-dom';

import App from './components/App'

ReactDOM.render(<App name='zero86' age='20'/>, document.getElementById('app'));- /src/components/App.js
import React, { useState } from 'react';

import '../scss/App.scss';

function App({name, age}) {

    // state
    // 컴포넌트가 가지고 있는 상태
    const [number, setNumber] = useState(1);

    return (
        <div className="hello-wrap">
            <p className="hello-wrap-content">Hello React World!!!!</p>
            <p>{`${name}은 ${age}살`}</p>
            <p>{number}</p>
            <button onClick={() => setNumber(number+1)}>add number(click event)</button>
        </div>
    );

}


export default App
- /src/scss/App.scss
.hello-wrap {
    border: 1px solid black;

    &-content {
        color: green;
        font-weight: 600;
        font-size: 20px;
    }

    button {
        outline: none;
        border: none;
        padding : 8px;
        background-color: skyblue;
        font-size: 15px;
        cursor: pointer;
    }
}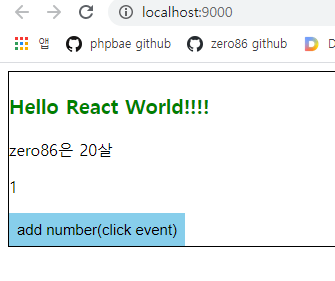
기본포트는 8080 인데, 변경을 하고싶다면
// webpack.config.js

devServer: {
  port: 9000,
},

현재 Velog 는 운영하지 않습니다 :) 가끔 와서 눈팅