Springboot 에서 제공되는 Unit Test
JUnit이란
- JVM 위에서 돌아가는 Unit Test 프레임워크
- 자바 개발자의 93%가 사용하고 있다.
- Annotation 기반 테스트 지원
- JUnit5는 2017년 10월 공개
- 스프링 부트 2.2버전 이상부터 기본 제공
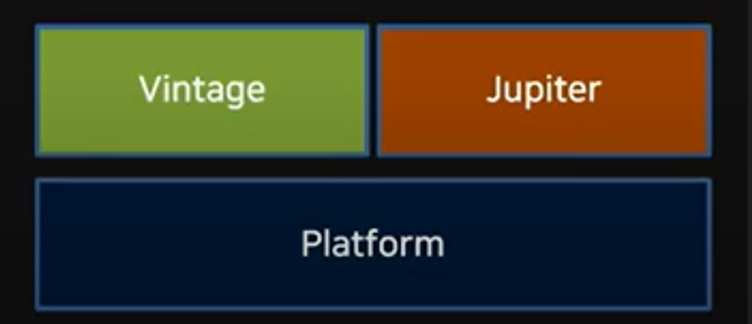
JUnit5 = JUnit Platform + JUnit Jupiter + JUnit Vintage
- JUnit5 는 런타임에 Java8이상이 필요하지만 이전 버전의 JDK로 컴파일 된 코드도 테스트 가능
JUnit Jupiter
- JUnit5를 위한 테스트 API와 실행 엔진 제공
JUnit Vintage
- JUnit 3,4으로 작성된 테스트를 JUnit5에서 실행하기 위한 모듈 제공
JUnit Platform
- 테스팅 프레임워크를 구동하기 위한 Launcher와 TestEngine을 위한 API 제공
- 각종 IDE 연동 보조 역할
Gradle에 JUnit5 의존 추가
스프링 부트 2.2버전 이상 부터는 기본적으로 JUnit5 의존성 추가된다.
스프링 부트 프로젝트가 아닐 경우에는
junit-jupiter-api를 테스트 구현으로 사용하고, JUnit Platform을 이용하여 테스트를 실행하도록 설정
dependencies {
	testImplementation("org.junit.jupiter:junit-jupiter:5.8.2")
}

test{
	useJUnitPlatform {
        includeTags("fast", "smoke & feature-a")
        // excludeTags("slow", "ci")
        includeEngines("junit-jupiter")
        // excludeEngines("junit-vintage")
    }
	testLogging {
		events "passed", "skipped", "failed"
	}
}
Build.gradle dependencies에 spring-boot-starter-test 추가(기본적으로 추가 되어있음)
dependencies {
    testImplementation 'org.springframework.boot:spring-boot-starter-test'
}

test {
    useJUnitPlatform()
}
spring-boot-starter-test에 존재하는 라이브러리들
JUnit LifeCycle Annotation
@Test -> 테스트용 메소드를 표현

@BeforeEach -> 각 테스트 메소드가 시작되기 전, 실행되어야하는 메소드 표현

@AfterEach -> 각 테스트 메소드가 시작된 후, 실행되어야 하는 메소드 표현

@BeforeAll -> 테스트 시작 전에 실행되어야 하는 메소드를 표현

@AfterAll -> 테스트 종료 후에 실행되어야 하는 메소드를 표현

 @BeforeAll -> @BeforeEach ->  @Test -> @AfterEach -> @BeforeEach
 -> @Test -> @AfterEach ->  @AfterAll
JUnit 편리한 Annotation
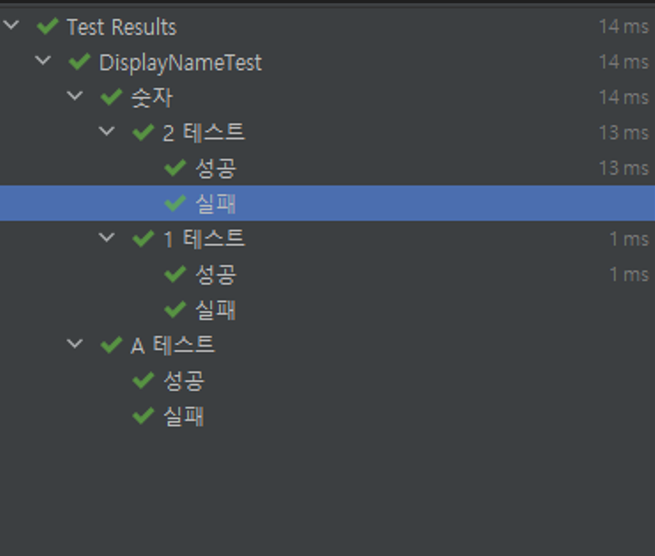
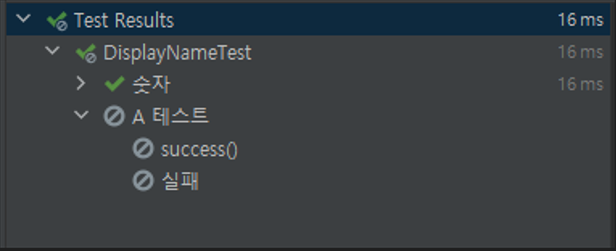
// @DiplayName -> 테스트의 이름을 지정 가능, 공백, Emoji, 특수문자 등을 모두 지원

public class DisplayNameTest {

    @Nested
    @DisplayName("A 테스트")
    class testA {

        @Test
        @DisplayName("성공")
        public void success() { /* */ }

        @Test
        @DisplayName("실패")
        public void fail() { /* */ }
    }

    @Nested
    @DisplayName("숫자")
    class testNumber {

        @Nested
        @DisplayName("1 테스트")
        class test1 {

            @Test
            @DisplayName("성공")
            public void success() { /* */ }

            @Test
            @DisplayName("실패")
            public void fail() { /* */ }
        }

        @Nested
        @DisplayName("2 테스트")
        class test2 {

            @Test
            @DisplayName("성공")
            public void success() { /* */ }

            @Test
            @DisplayName("실패")
            public void fail() { /* */ }

        }
    }
}
// 물론 함수명 자체를 한글로 작성해서 사용할 수 도 있다.
				@Test
        public void 성공() { /* */ }

        @Test
        public void 실패() { /* */ }

// @Nested
// -> 테스트 클래스 안에서 내부 클래스를 정의해서 테스트를 계층화 할 때 사용
// -> 내부 클래스는 부모클래스의 멤버 필드에 접근 가능
// -> Before / After 와 같은 테스트 생명주기에 관계된 메소드들도 계층에 맞춰 동작
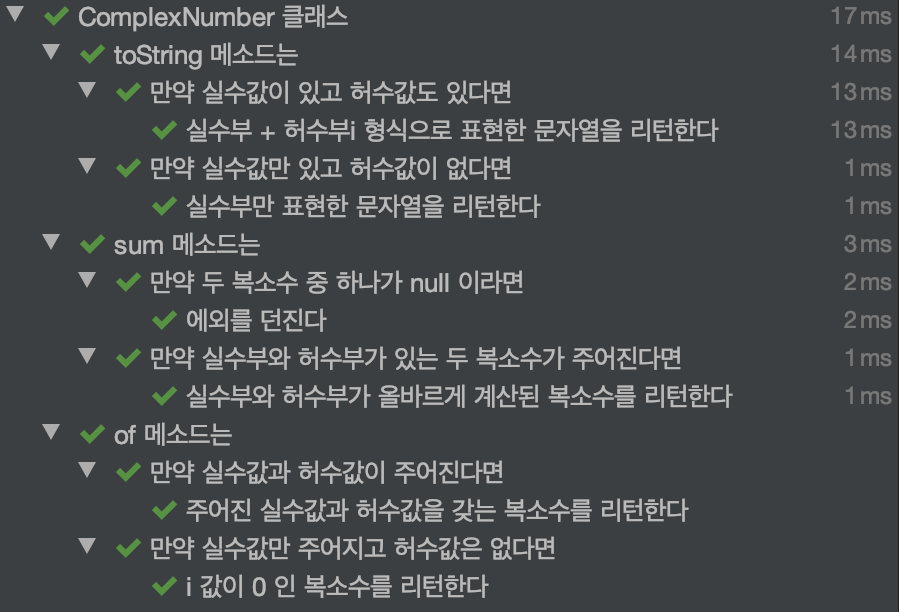
package com.johngrib.example;
import org.junit.jupiter.api.*;
import static org.junit.jupiter.api.Assertions.assertTrue;
@SuppressWarnings({"InnerClassMayBeStatic", "NonAsciiCharacters"})
@DisplayName("ComplexNumber 클래스")
class ComplexNumberKoTest {
@Nested
@DisplayName("toString 메소드는")
class Describe_toString {
@Nested
@DisplayName("만약 실수값만 있고 허수값이 없다면")
class Context_with_real {
private final double givenNatual = 3d;
private final String expectPattern = "^3(?:\\.0+)?$";
private ComplexNumber given = ComplexNumber.of(givenNatual);
@Test
@DisplayName("실수부만 표현한 문자열을 리턴한다")
void it_returns_a_valid_string() {
Assertions.assertTrue(given.toString().matches(expectPattern));
}
}
@Nested
@DisplayName("만약 실수값이 있고 허수값도 있다면")
class Context_with_real_and_imagine {
private final double givenNatual = 3d;
private final double givenImagine = 7d;
private ComplexNumber given = ComplexNumber.of(givenNatual, givenImagine);
private String expectPattern = "^3(?:\\.0+)?\\+7(?:\\.0+)?i$";
@Test
@DisplayName("실수부 + 허수부i 형식으로 표현한 문자열을 리턴한다")
void it_returns_a_valid_string() {
assertTrue(given.toString().matches(expectPattern));
}
}
@Nested
@DisplayName("sum 메소드는")
class Describe_sum {
@Nested
@DisplayName("만약 실수부와 허수부가 있는 두 복소수가 주어진다면")
class Context_with_two_complex {
private ComplexNumber a, b;
@BeforeEach
void prepareNumbers() {
a = ComplexNumber.of(1d, 2d);
b = ComplexNumber.of(32d, 175d);
}
ComplexNumber subject() {
return ComplexNumber.sum(a, b);
}
@Test
@DisplayName("실수부와 허수부가 올바르게 계산된 복소수를 리턴한다")
void it_returns_a_valid_complex() {
Assertions.assertEquals(a.getReal() + b.getReal(), subject().getReal(),
"리턴된 복소수는 두 실수 값의 합을 실수로 갖는다");
Assertions.assertEquals(a.getImagine() + b.getImagine(), subject().getImagine(),
"리턴된 복소수는 두 허수 값의 합을 허수로 갖는다");
}
}
}
@Nested
@DisplayName("of 메소드는")
class Describe_of {
private final double givenReal = 3d;
private final double givenImagine = 3d;
@Nested
@DisplayName("만약 실수값만 주어지고 허수값은 없다면")
class Context_with_real {
@Test
@DisplayName("i 값이 0 인 복소수를 리턴한다")
void it_returns_a_valid_complex() {
final ComplexNumber result = ComplexNumber.of(givenReal);
Assertions.assertEquals(result.getImagine(), 0d, "리턴된 복소수는 허수 값으로 0 을 갖는다");
Assertions.assertEquals(result.getReal(), givenReal, "리턴된 복소수는 실수 값으로 주어진 실수 값을 갖는다");
}
}
@Nested
@DisplayName("만약 실수값과 허수값이 주어진다면")
class Context_with_real_and_i {
@Test
@DisplayName("주어진 실수값과 허수값을 갖는 복소수를 리턴한다")
void it_returns_a_valid_complex() {
final ComplexNumber result = ComplexNumber.of(givenReal, givenImagine);
Assertions.assertEquals(result.getReal(), givenReal, "리턴된 복소수는 실수 값으로 주어진 실수 값을 갖는다");
Assertions.assertEquals(result.getImagine(), givenImagine, "리턴된 복소수는 허수 값으로 주어진 허수 값을 갖는다");
}
}
}
}
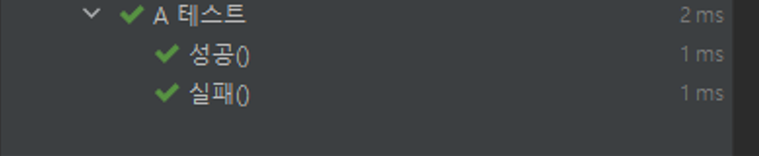
// @Disabled -> 특정 테스트를 실행하지 않음

public class DisplayNameTest {

    @Disabled
    @Nested
    @DisplayName("A 테스트")
     class testA {

        @Test
        public void success() { /* */ }

        @Test
        @DisplayName("실패")
        public void fail() { /* */ }
    }

    @Nested
    @DisplayName("숫자")
    class testNumber {

        @Nested
        @DisplayName("1 테스트")
        class test1 {

            @Test
            @DisplayName("성공")
            public void success() { /* */ }

            @Test
            @DisplayName("실패")
            public void fail() { /* */ }
        }

        @Nested
        @DisplayName("2 테스트")
        class test2 {

            @Test
            @DisplayName("성공")
            public void success() { /* */ }

            @Test
            @DisplayName("실패")
            public void fail() { /* */ }

        }
    }
}
Assertions
- 테스트 케이스의 수행 결과를 판별하는 메서드
assertEquals(expected, actual) -> 실제 값(actual)이 기대하는 값(expected)과 같은지 검사한다.

assertNotEquals(unexpected, actual) -> 실제 값(actual)이 특정 값(unexpected)과 같지 않은지 검사한다.

assertSame(Object expected, Object actual) -> 두 객체가 동일한 객체인지 검사한다.

assertNotSame(Object unexpected, Object actual) -> 두 객체가 동일하지 않은 객체인지 검사한다.

assertTrue(boolean condition) -> 값이 true인지 검사한다.

assertFalse(boolean condition) -> 값이 false인지 검사한다.

assertNull(Object actual) -> 값이 null인지 검사한다.

assertNotNull(Object actual) -> 값이 null이 아닌지 검사한다.

fail() -> 테스트를 실패 처리한다.

assertTimeout(duration, executable) -> 특정 시간 안에 실행이 완료되는지 확인
ex) assertTimeout(ofMinutes(2), () -> Thread.sleep(10));

assertThrows(Class<T> expectedType, Executable executable)
-> executable을 실행한 결과로 지정한 타입의 익셉션이 발생하는지 검사한다.
ex) assertThrows(IllegalArgumentException.class,
	() -> {
        AuthService authService = new AuthService();
        authService.authenticate(null, null);
    });

assertDoesNotThrow(Executable executable) -> executable을 실행한 결과로 익셉션이 발생하지 않는지 검사한다.
org.assertj.core.api.Assertions;
- assertThat에서 반환되는 클래스를 사용하기에, 메소드 자동완성이 지원된다.
- assertThat에서 인자의 타입에 맞는 Assert 클래스를 반환하기 때문에, 필요한 메소드만 분류되어있다.
- 체이닝 메소드 패턴으로 작성 가능하기에, 조건 추가를 위한 추가 작업 없고 가독성이 좋다.
import static org.assertj.core.api.Assertions.assertThat;

@Test
  void a_few_simple_assertions() {
    assertThat("The Lord of the Rings").isNotNull()
                                       .startsWith("The")
                                       .contains("Lord")
                                       .endsWith("Rings");
  }

@Test
void filter_test2() {
    List<Human> list = new ArrayList<>();
    Human kim = new Human("Kim", 22);
    Human park = new Human("Park", 25);
    Human lee = new Human("Lee", 25);
    Human amy = new Human("Amy", 22);
    Human jack = new Human("Jack", 22);

    list.add(kim);
    list.add(park);
    list.add(lee);
    list.add(amy);
    list.add(jack);

    assertThat(list).filteredOn("age", 25).containsOnly(park, lee);
}
JUnit Main Annotation
@SpringBootTest
-> 통합 테스트 용도로 사용됨 @SpringBootApplication을 찾아가 하위의 모든 Bean을 스캔하여 로드함
그 후 Test용 Application Context를 만들어 Bean을 추가하고, MockBean을 찾아 교체
@Transactional
-> 기본적으로 Transactional을 테스트에서 사용하면, 테스트가 끝날 경우 강제로 롤백이 된다.
-> 롤백을 시키고 싶지 않을 경우에는 Rollback(false)를 추가하면 된다.
ex)
@Test
@Transactional
@Rollback(false)
======================================================================
@ExtendWith
-> JUnit4에서 @RunWith로 사용되던 어노테이션이 ExtendWith로 변경됨
@ExtendWith는 메인으로 실행될 Class를 지정할 수 있음
ex)
@ExtendWith(MockitoExtension.class)
class DataServiceTests {
@InjectMocks
private DataService service;
@Mock
private WpasDataMapper mapper;
@BeforeEach
public void setUp() {
System.out.println("setUp");
mockMapper();
service.initQcStepItem();
}
@Test
void test_InspectQcData() {
service.inspectQcData();
}
}
=====================================================================
@WebMvcTest(Class명.class)
-> @Controller, @RestController가 설정된 클래스들을 찾아 메모리에 생성한다.
-> @Service나 @Repository가 붙은 객체들은 테스트 대상이 아닌 것으로 처리되기 때문에 생성되지 않는다.
-> @WebMvcTest가 설정된 테스트 케이스에서는 서블릿 컨테이너를 모킹한 MockMvc타입의 객체를 목업하여 컨트롤러에 대한 테스트코드를 작성할 수 있다.
-> @WebMvcTest 어노테이션을 사용하면 MVC 관련 설정인
@Controller, @ControllerAdvice, @JsonComponent와 Filter, WebMvcConfigurer,
HandlerMethodArgumentResolver만 로드되기 때문에,
실제 구동되는 애플리케이션과 똑같이 컨텍스트를 로드하는
@SpringBootTest 어노테이션보다 가볍게 테스트 할 수 있다.
@AutoConfigureMockMvc
-> spring.test.mockmvc의 설정을 로드하면서 MockMvc의 의존성을 자동으로 주입
-> MockMvc 클래스는 REST API 테스트를 할 수 있는 클래스
MockMvc
-> Controller의 API를 테스트하는 용도인 MockMvc 객체를 주입 받음
Perform()메소드를 활용하여 컨트롤러의 동작을 확인할 수있음
andExpect(), andDo(), andReturn() 등의 메소드를 같이 활용함
ex)
andExpect() -> 응답 결과를 검증할 수 있는 메서드
status() 메소드 -> isOK(), isNotFound(), isMethodNotAllowed(), isInternalServerError(),
is(int status)
view()
-> 컨트롤러가 리턴하는 뷰를 검증할 때는 view() 메소드를 사용
-> andExpect(view().name("hello"))
model()
-> attributeExists(String name) = name에 해당하는 데이터가 Model에 포함되어있는지 검증한다.
-> attribute(String name, Object value) = name에 해당하는 데이터가 value 객체인지 검증한다.
@ExtendWith(SpringRunner.class)
@SpringBootTest(webEnvironment=WebEnvironment.MOCK)
@AutoConfigureMockMvc
public class MockTest {
@Autowired
private MockMvc mockMvc;
@Test
public void testHelloWith둘리() throws Exception {
mockMvc.perform(get("/hello").param("name", "둘리"))
.andExpect(status().isOK())
.andExpect(content().string("Hello : 둘리"))
.andDo(print());
}
}
======================================================================
@MockBean
-> 기존에 사용되던 Bean이 아닌 MockBean을 주입한다.
-> Bean의 어떤 메소드/어떤 값이 입력 되면 어떤 값이 리턴 되어야 한다는 내용을
개발자 필요에 의해서 조작이 가능
ex)
@MockBean(name="httpSession")
private HttpSession httpSession;
@Test
public void Test() {
Customer customre = new Customer();
given(httpSession.getAttribute("loginUser").willReturn(customer));
...
}
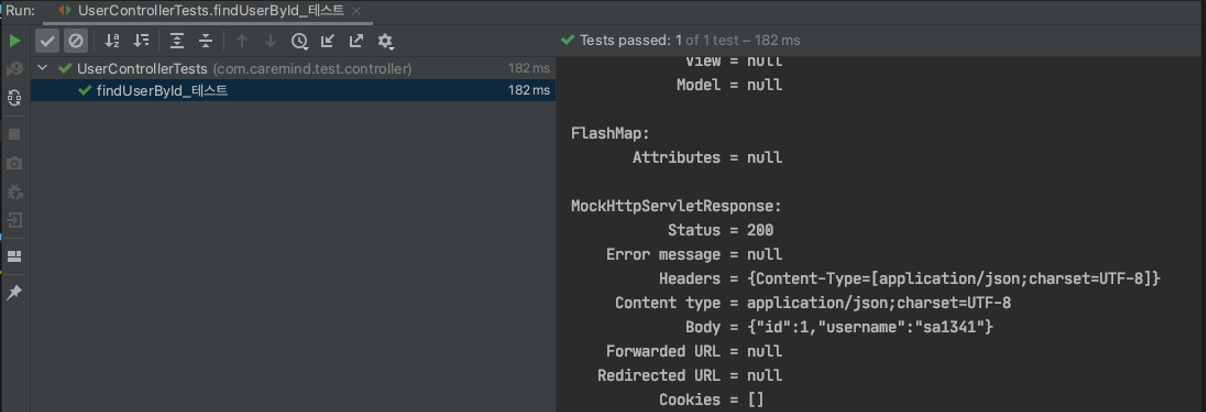
@RunWith(SpringRunner.class)
@WebMvcTest({UserController.class, JwtAuthenticationInterceptor.class})
public class UserControllerTests {
@MockBean
private UserService userService;
@Autowired
MockMvc mockMvc;
@Test
public void findUserById_테스트() throws Exception {
UserDto userDto = new UserDto();
userDto.setUsername("sa1341");
userDto.setPassword("wnsdud2");
UserResponseDto responseDto = new UserResponseDto();
responseDto.setId(1);
responseDto.setUsername("sa1341");
//given
given(userService.findUser(any())).willReturn(responseDto);
ObjectMapper objectMapper = new ObjectMapper();
String json = objectMapper.writeValueAsString(userDto);
//when
ResultActions resultActions = mockMvc.perform(post("/api/users")
.contentType(MediaType.APPLICATION_JSON)
.content(json))
.andDo(print());
//then
resultActions
.andExpect(status().isOk())
.andExpect(content().contentType(MediaType.APPLICATION_JSON_UTF8_VALUE))
.andExpect(jsonPath("$.username", is("sa1341")))
.andDo(print());
}
}
Unit Test testing 방법
- 각 클래스별, 메소드별 테스트 가능

- Directory 별로 테스트도 가능
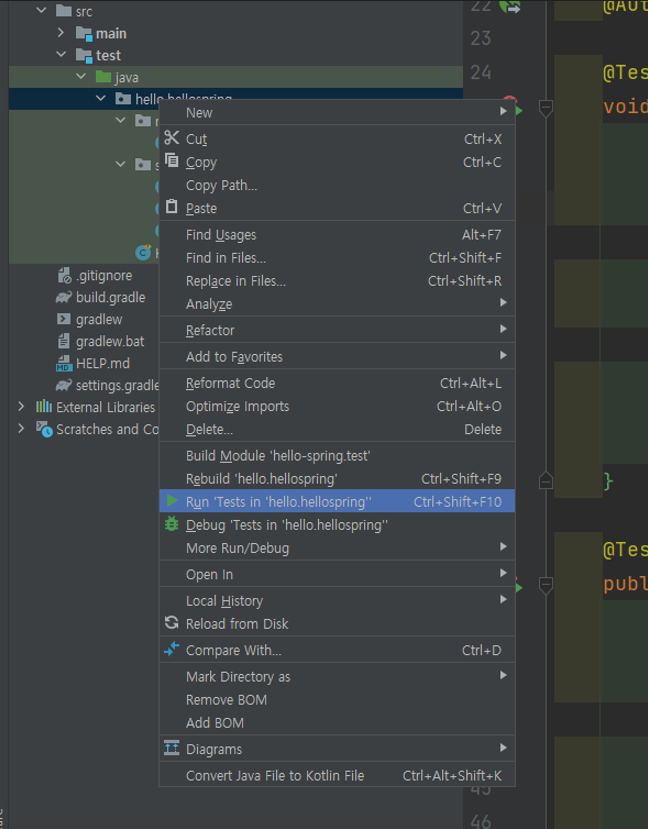
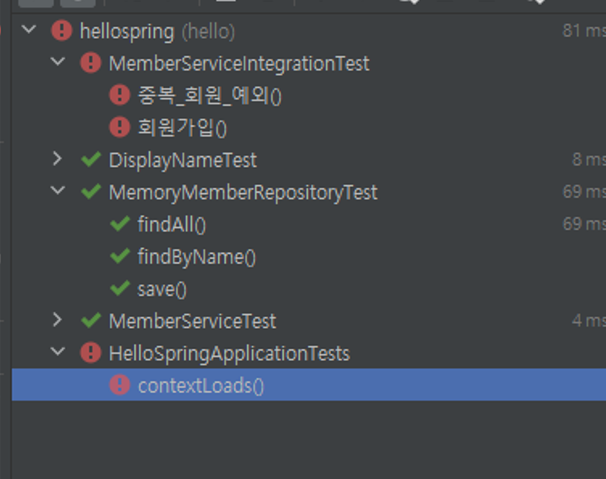
테스트시 결과는 아래와 같이 전체 확인이 가능하다.
참조
https://junit.org/junit5/docs/current/user-guide/#extensions-exception-handling