2023.02.16 HTTP와 RestController
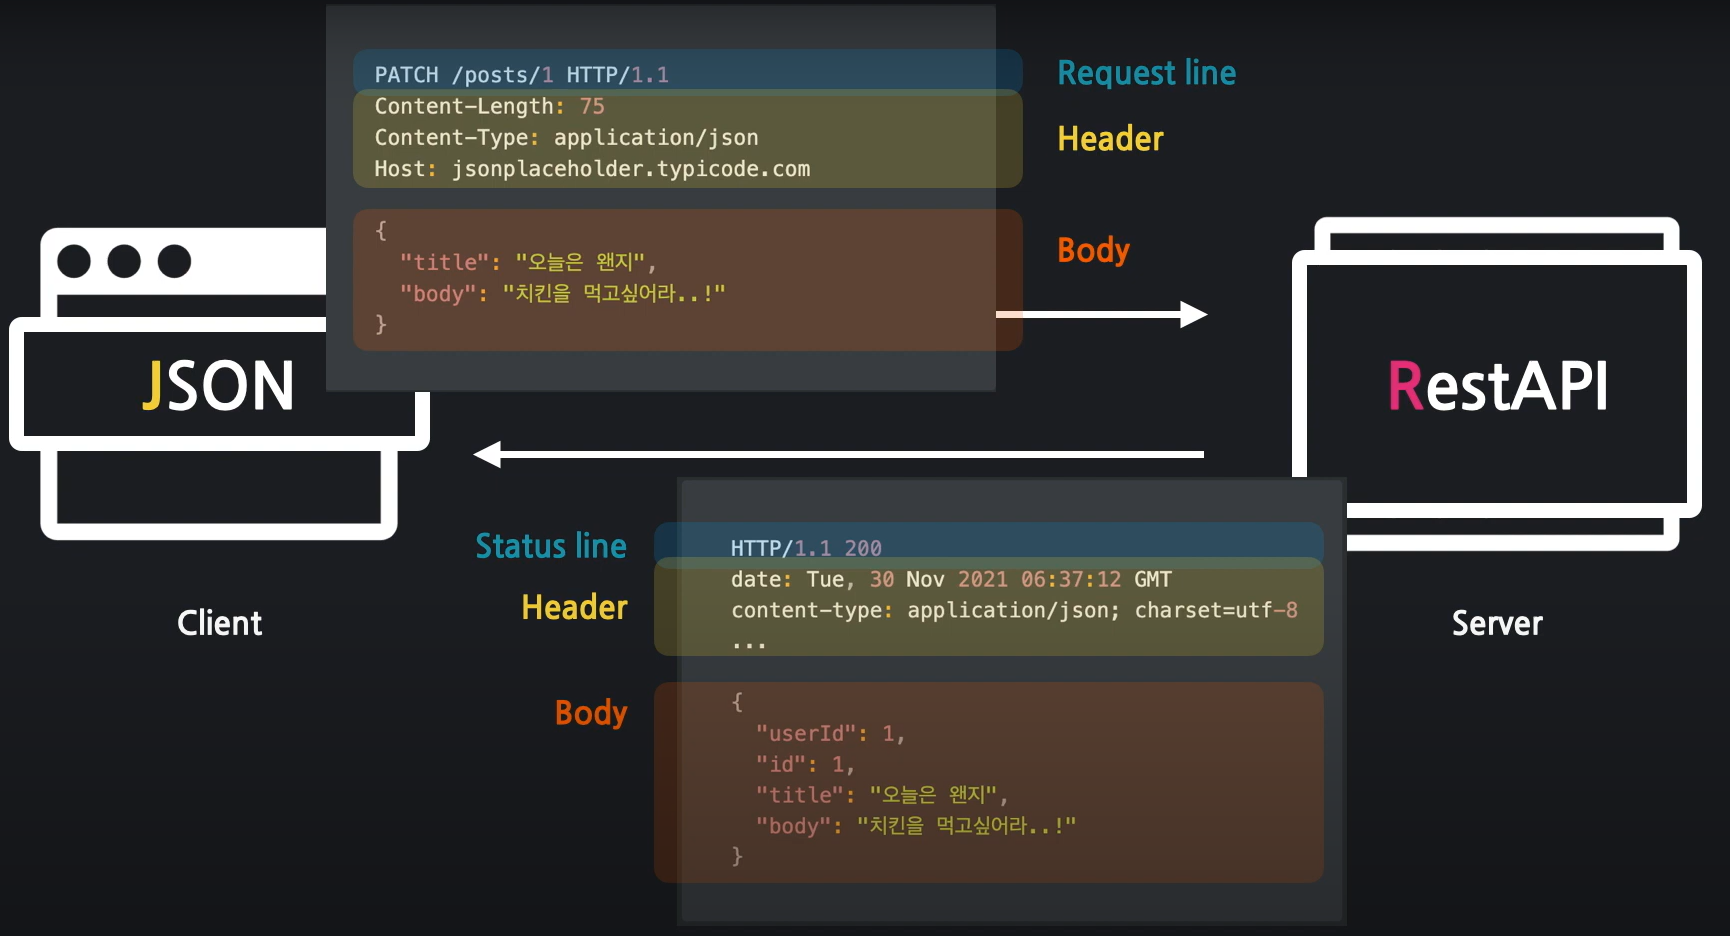
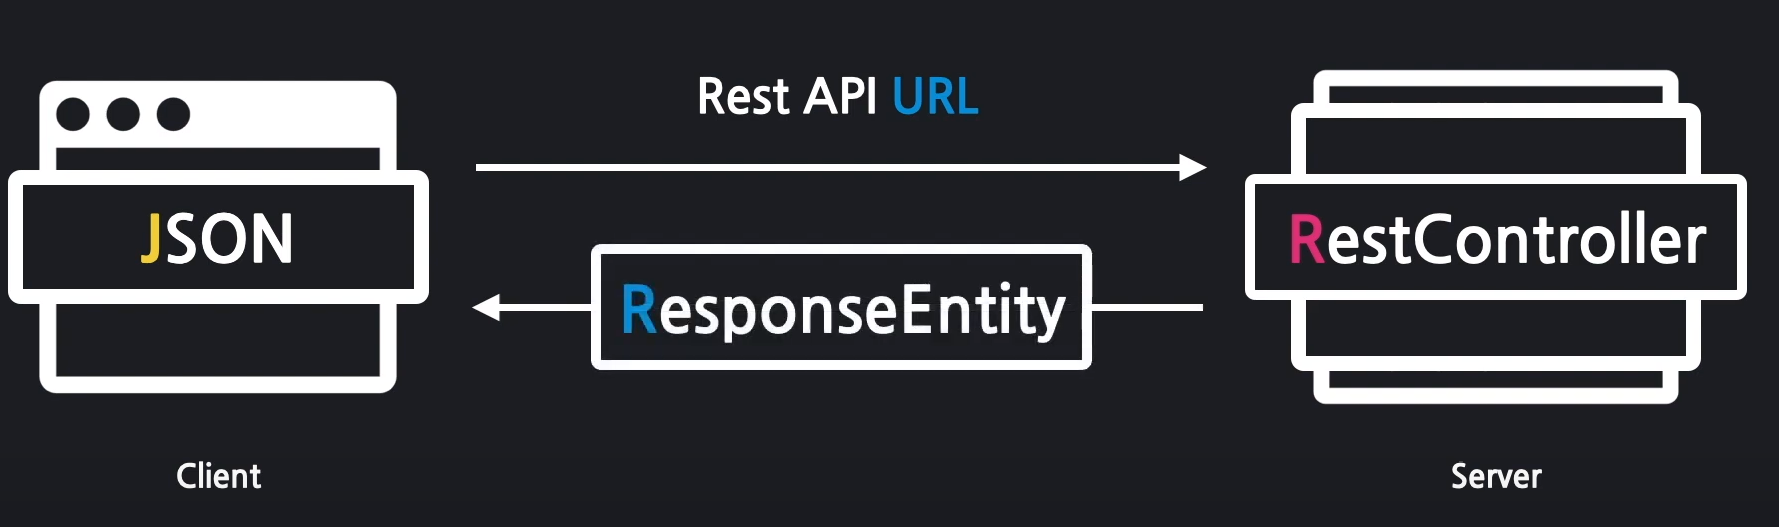
HTTP 요청,응답 구조
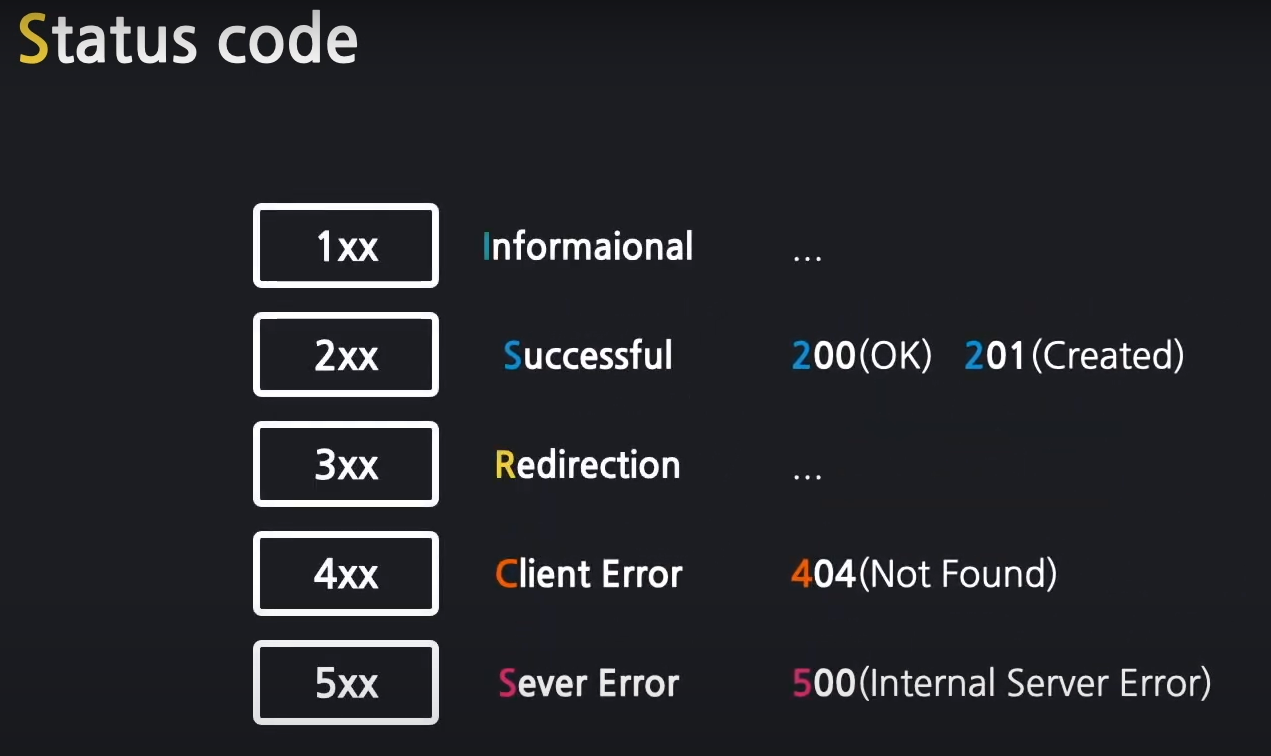
HTTP 상태코드
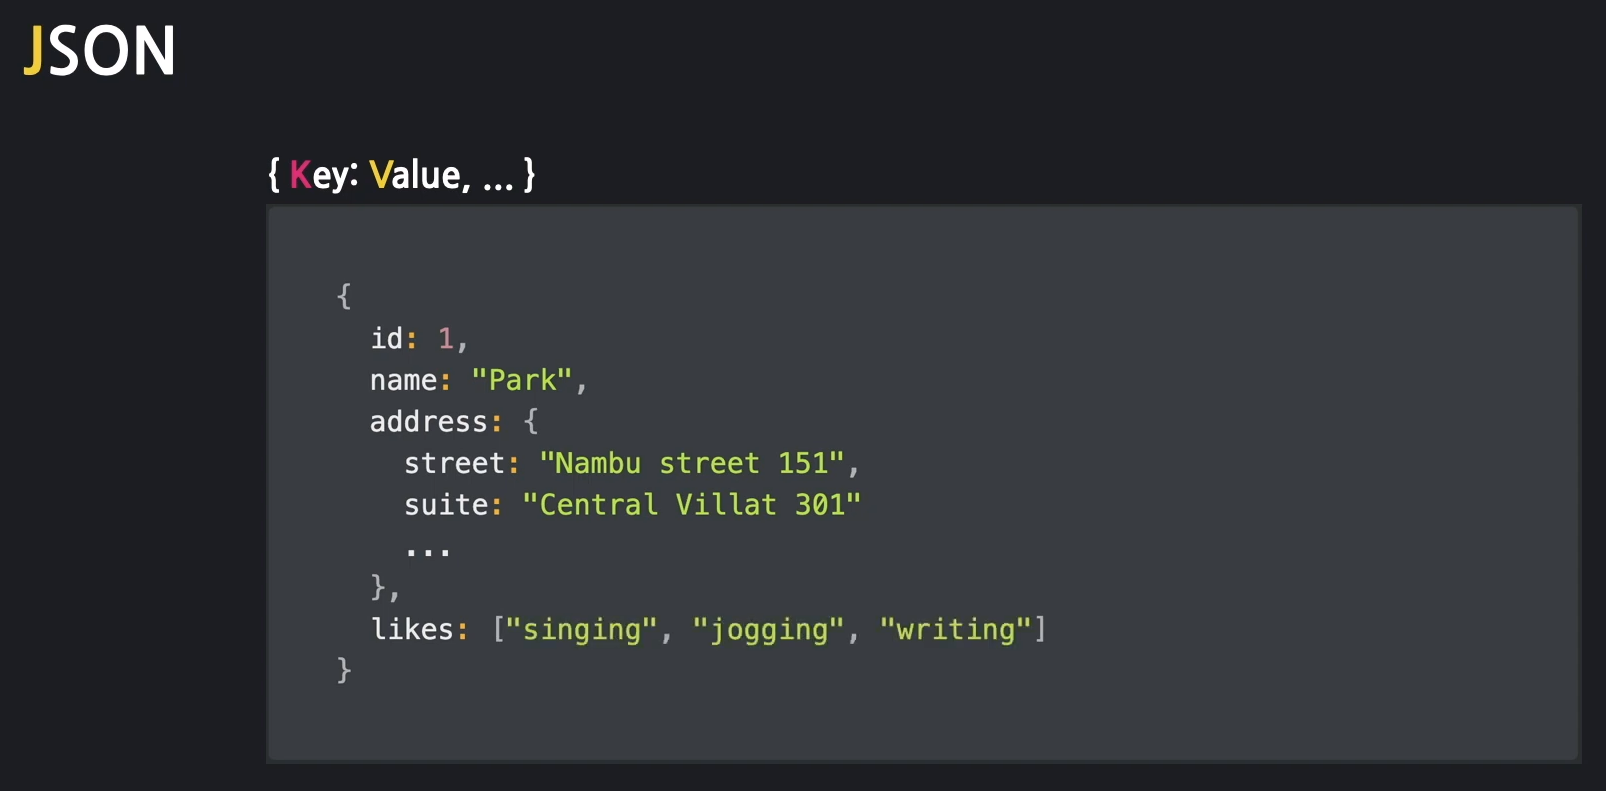
JSON의 구조
JSON안에는 다른 JSON이나 배열의 구조를 담을 수 있다.
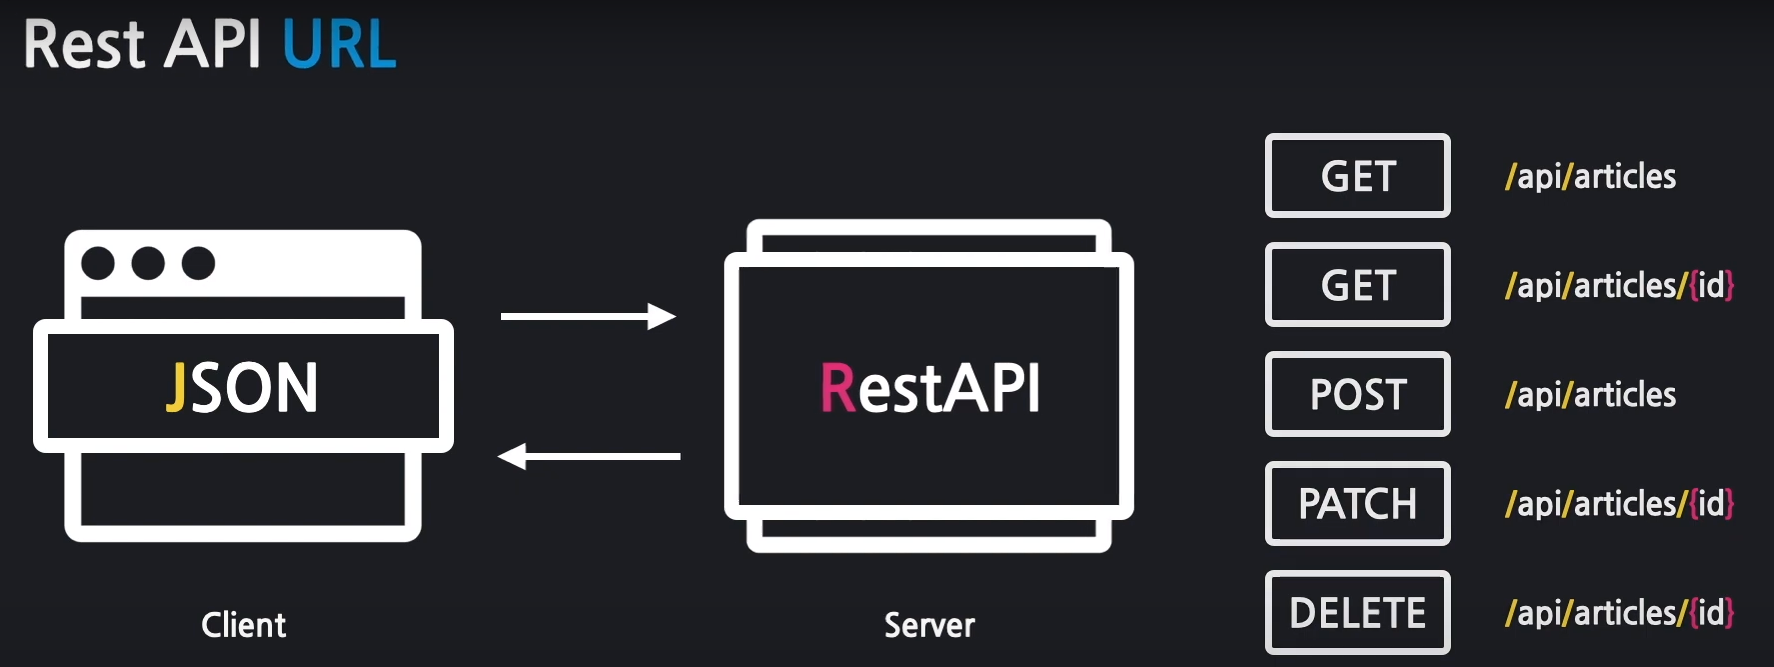
REST API 주소설계
RestController와 ResponseEntity 사용
실습
FirstController 생성
api 패키지 생성 - FirstContoller.java 생성 후
@Controller가 아닌
@RestController를 선언
RestAPI용 컨트롤러로 JSON을 반환한다.
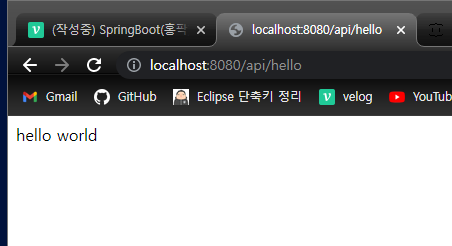
hello world 띄우기
리턴값으로 "hello world" 하면
브라우저에 "hello world"가 뜬다.
@RestController // RestAPI용 컨트롤러. JSON을 반환
public class FirstApiController {

    @GetMapping("/api/hello")
    public String hello() {
        return "hello world";
    }
}
http://localhost:8080/api/hello
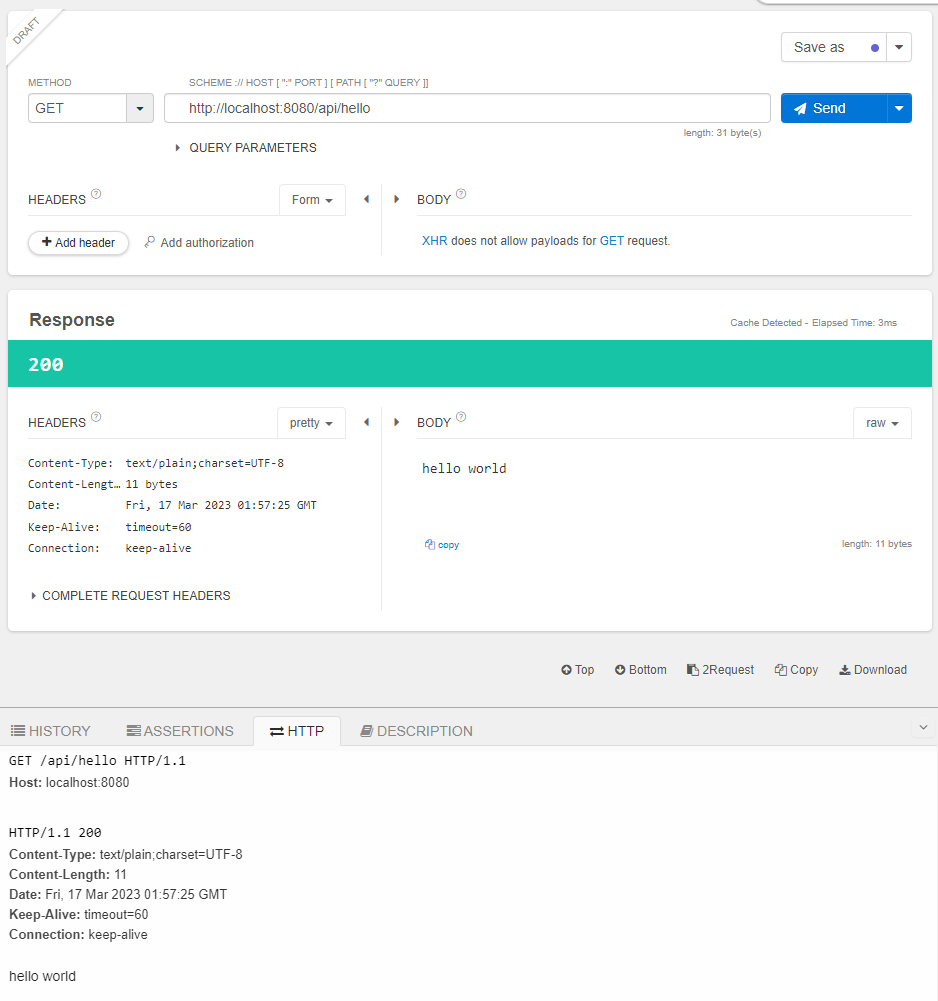
Talend API Tester로도 확인해보자
https 말고 http로 요청.
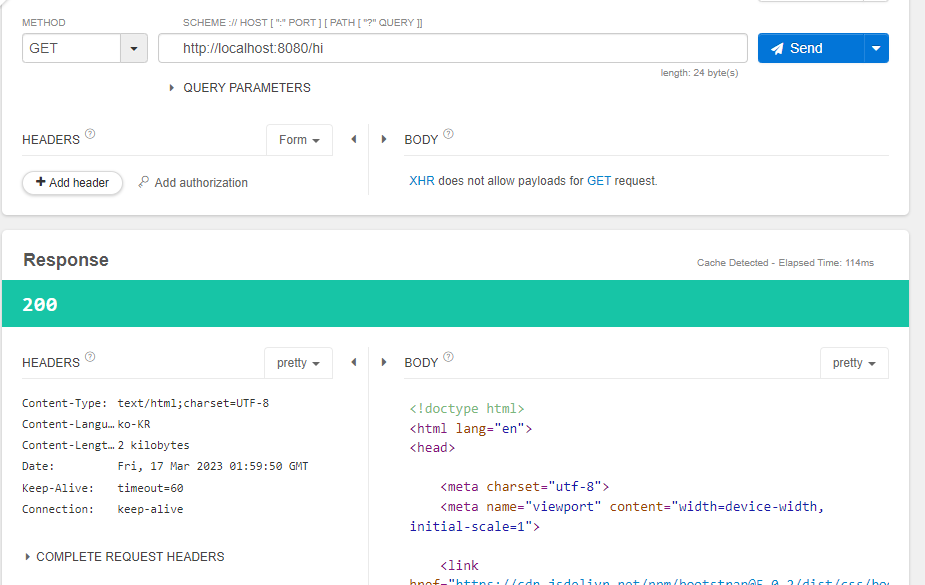
일반 컨트롤러와의 차이
@Controller
일반 @Controller는 뷰페이지를 리턴한다.
@Controller
public class FirstController {

    @GetMapping("/hi")
    public String niceToMeetYou(Model model) {
        model.addAttribute("username","jungwon");
        return "greetings";
    }
Talend API Tester로요청을 보내면 HTML코드가 반환된다.
@RestController
RestController는 JSON,TEXT 등 데이터를 반환한다는 차이점이 있다.
@RestController
public class FirstApiController {

    @GetMapping("/api/hello")
    public String hello() {
        return "hello world";
    }
}
return 값에 적힌 값이 그대로 브라우저에 출력된다.
REST-API GET
ArticleController 생성
전체 게시글 가져오기.
@RestController // RestAPI용 컨트롤러, 데이터(JSON)을 반환
public class ArticleApiController {
@Autowired //ArticleRepository를 스프링 부트에서 땡겨와야하기 때문에 @Autowired 사용 (DI)
private ArticleRepository articleRepository;
// GET
// 전체게시글 불러오기
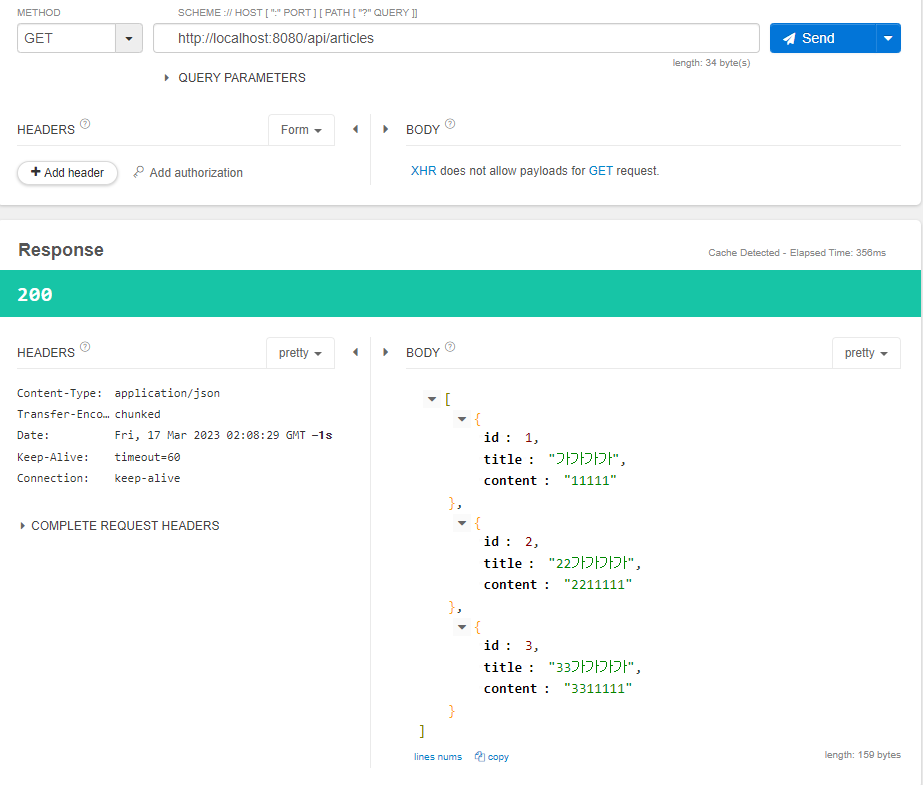
@GetMapping("/api/articles")
public List<Article> index() {
return articleRepository.findAll();
}
// POST
// PATCH
// DELETE
}Talend API에 요청 보내서 확인하기.
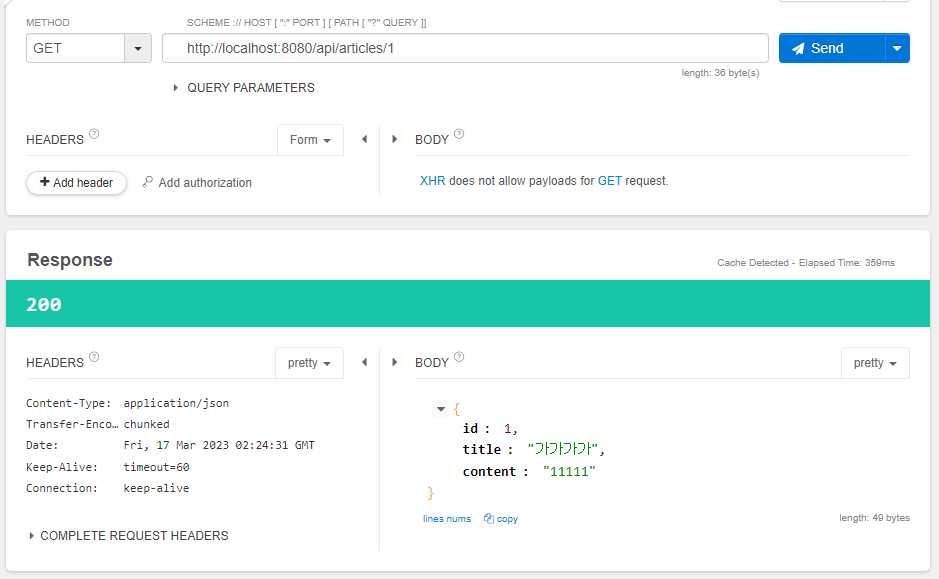
게시글 하나 가져오기
// 게시글 하나 불러오기
    @GetMapping("/api/articles/{id}")
    public Article index(@PathVariable Long id) {
        return articleRepository.findById(id).orElse(null);
    }
Rest API POST 구현
// POST
    @PostMapping("/api/articles")
    public Article index(ArticleForm dto) {
        Article article= dto.toEntity();
        return articleRepository.save(article);
    }
POST 메소드를 추가하고 Talend API로 BODY에 데이터를 넣어서 POST요청을 보내보자.
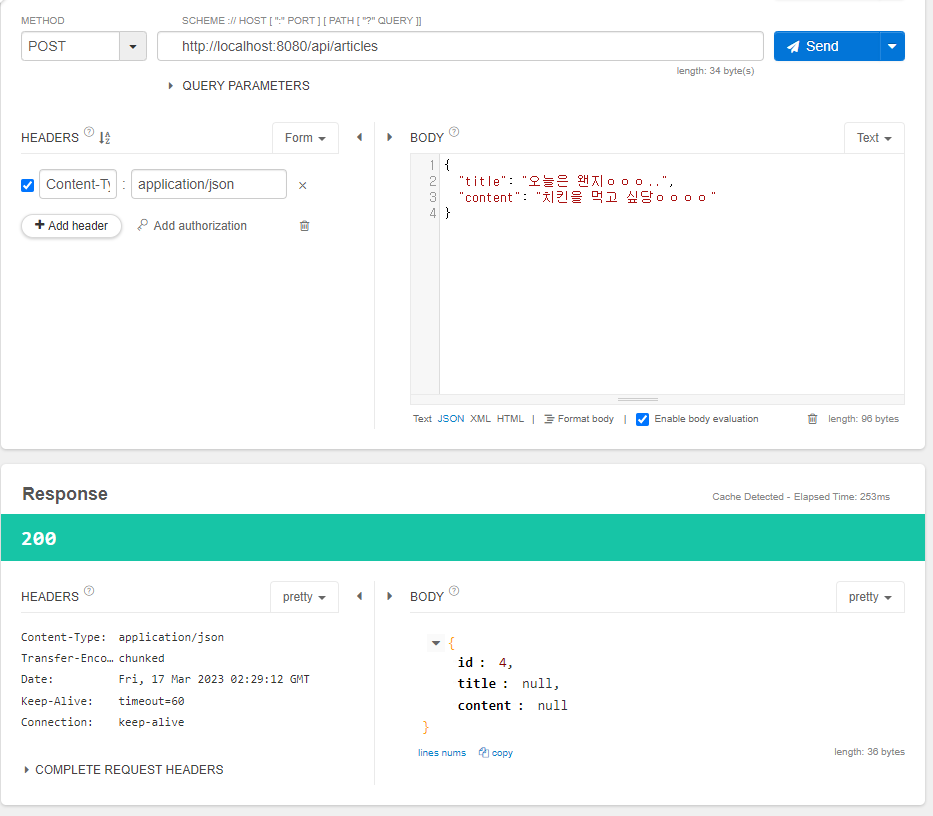
👋 응답요청이 200이 떳지만 title,content에 null이 들어갔다.
왜일까???
@RequestBody
이전에는 form에서 데이터를 던질때는 그냥 파라미터에 추가만하면 받아와 졌는데,
(ArticleForm dto)RestAPI에서 JSON으로 데이터를 던질때는 그냥 받아지지 않는다.
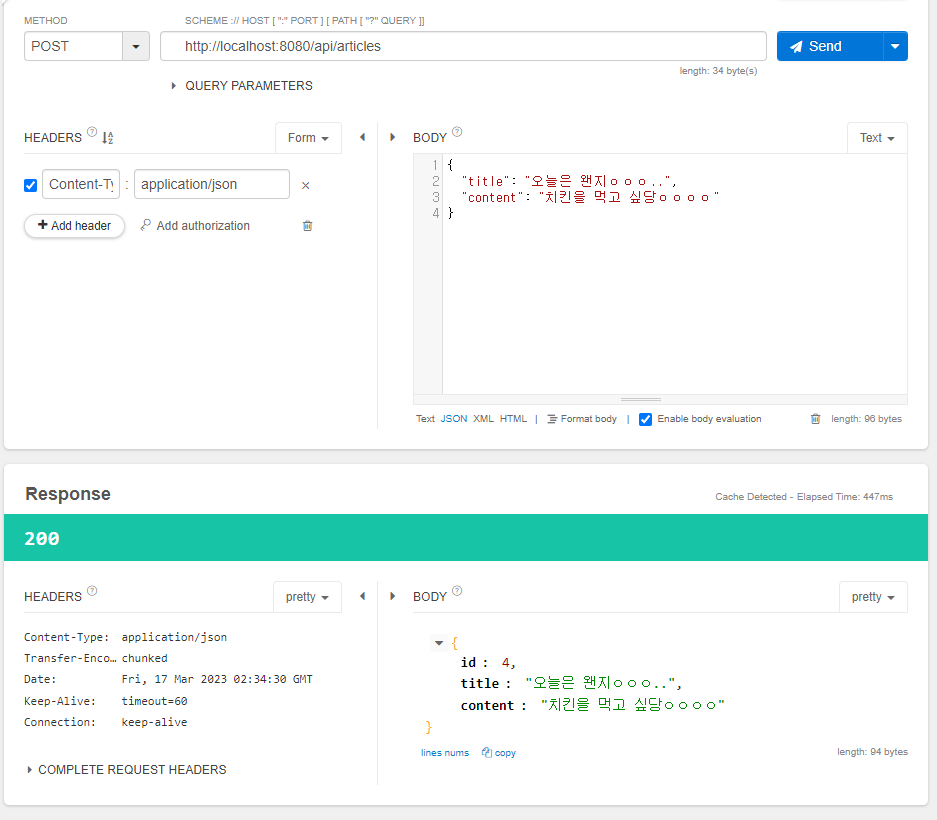
그래서 @RequestBody를 사용해야한다!!
(@RequestBody ArticleForm dto)이제 데이터를 잘 받아온당 ✨👌
RestAPI PATCH 구현
log.info
순서대로 { } 안에 들어간다.
log.info("id: {}, article: {}", id, article.toString()); ArticleController
dto를 받아서 Entity로 변환하고
대상 엔티티를 조회한다.
요청이 잘 들어오면 업데이트를 진행한다.
@PatchMapping("/api/articles/{id}")
    public Article update(@PathVariable Long id, @RequestBody ArticleForm dto) {

        // 1: 수정용 엔티티 생성
        Article article = dto.toEntity();
        log.info("id: {}, article: {}", id, article.toString());
        // 순서대로 {} 안에 들어간다.

        // 2: 대상 엔티티를 조회
        Article target = articleRepository.findById(id).orElse(null);

        // 3: 잘못된 요청 처리(대상이 없거나, id가 다른 경우)

        // 4: 업데이트 및 정상 응답(200)
        Article updated = articleRepository.save(article);

        return updated;
    }
ResponseEntity
3: 잘못된 요청 처리(대상이 없거나, id가 다른 경우)
target이 null이거나,
url 요청아이디와 article의 id가 다른경우
응답상태를 리턴하기 위해 ResponseEntity를 사용한다.
ResponseEntity를 사용하기 위해 메소드 리턴타입 변경해준다.Article을 ResponseEntity에 담아서 보내준다.
ResponseEntity<Article>로 변경.
이렇게 하면 상태코드를 전달할 수 있다.
public ResponseEntity<Article> updateResponseEntity로 상태를 전달할 때 같이 전달할 데이터가 있으면 .body()에 넣어서 전달한다.
return ResponseEntity.status(HttpStatus.OK).body(updated); // PATCH
@PatchMapping("/api/articles/{id}")
public ResponseEntity<Article> update(@PathVariable Long id,
@RequestBody ArticleForm dto) {
...
// 3: 잘못된 요청 처리(대상이 없거나, id가 다른 경우)
if(target == null || id != article.getId()) {
// 400, 잘못된 요청 응답
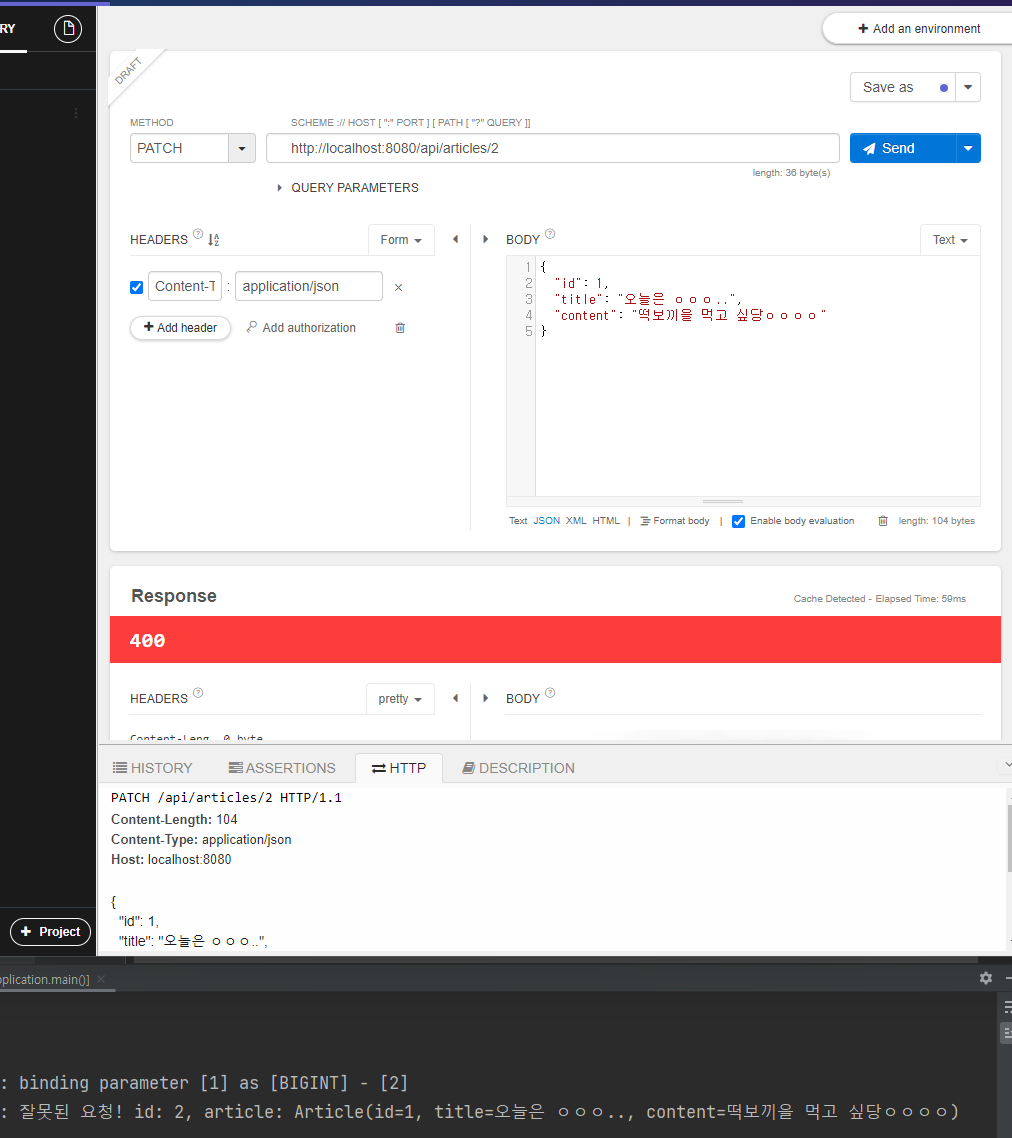
log.info("잘못된 요청! id: {}, article: {}", id, article.toString());
return ResponseEntity.status(HttpStatus.BAD_REQUEST).body(null);
// HttpStatus.BAD_REQUEST = 400
}
// 4: 업데이트 및 정상 응답(200)
Article updated = articleRepository.save(article);
return ResponseEntity.status(HttpStatus.OK).body(updated);
// status(HttpStatus.OK = 200
}잘못된 요청
url의 id와 body의 id가 다르기 때문에 400 에러가 난다.
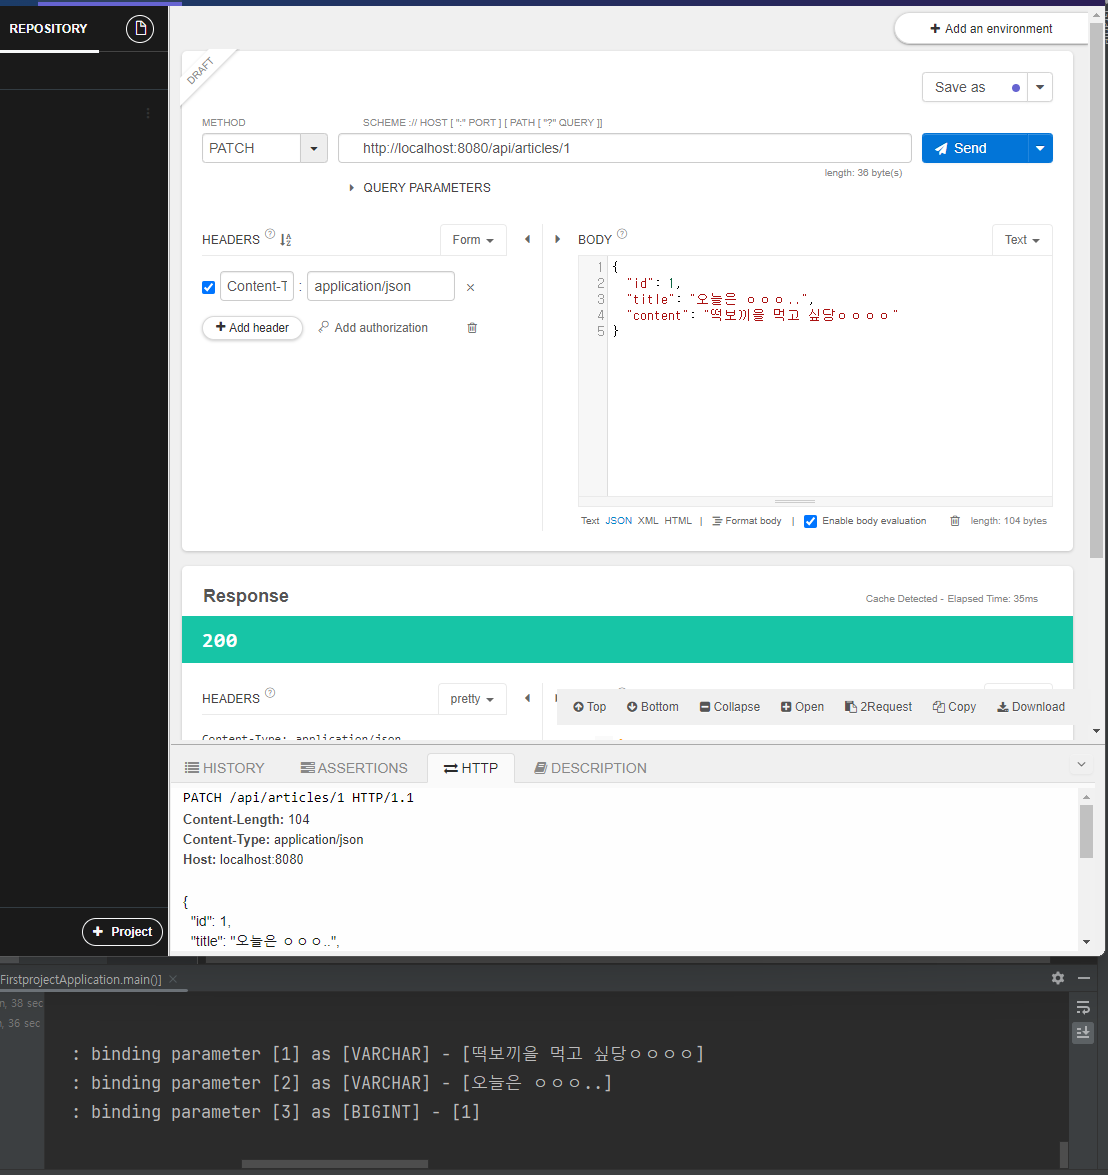
정상 요청
정상요청시에는 200 응답 성공.
✨ 수정할때 값을 안넣고 보냈을때!!
null이 들어간다.!!
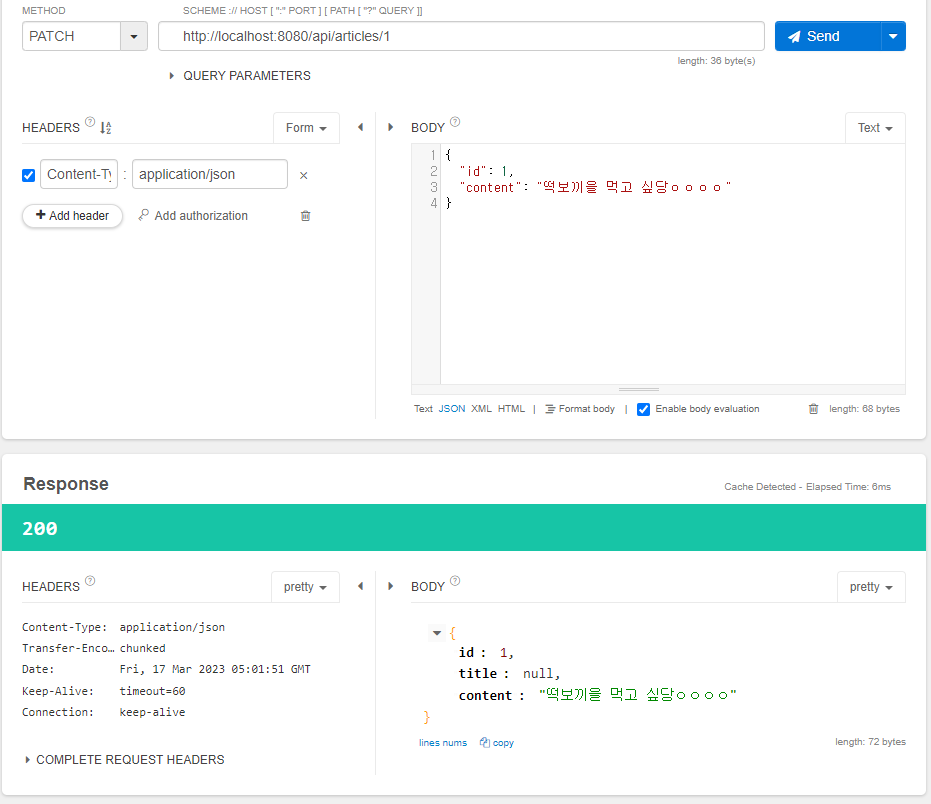
이를 수정해보자.
기존 데이터에 새로운 부분만 추가
Article에 patch 메소드 추가.
새로운 값이 있으면 새로운 값으로 수정.
public void patch(Article article) {
        if(article.title != null) {
            this.title = article.title;
        }
        if(article.content != null) {
            this.content = article.content;
        }
    }
ArticleController 내용 수정
// 4: 업데이트 및 정상 응답(200)
target.patch(article); // 기존 데이터에 새로운 부분만 추가한다.
Article updated = articleRepository.save(target);
//article말고 target을 전달
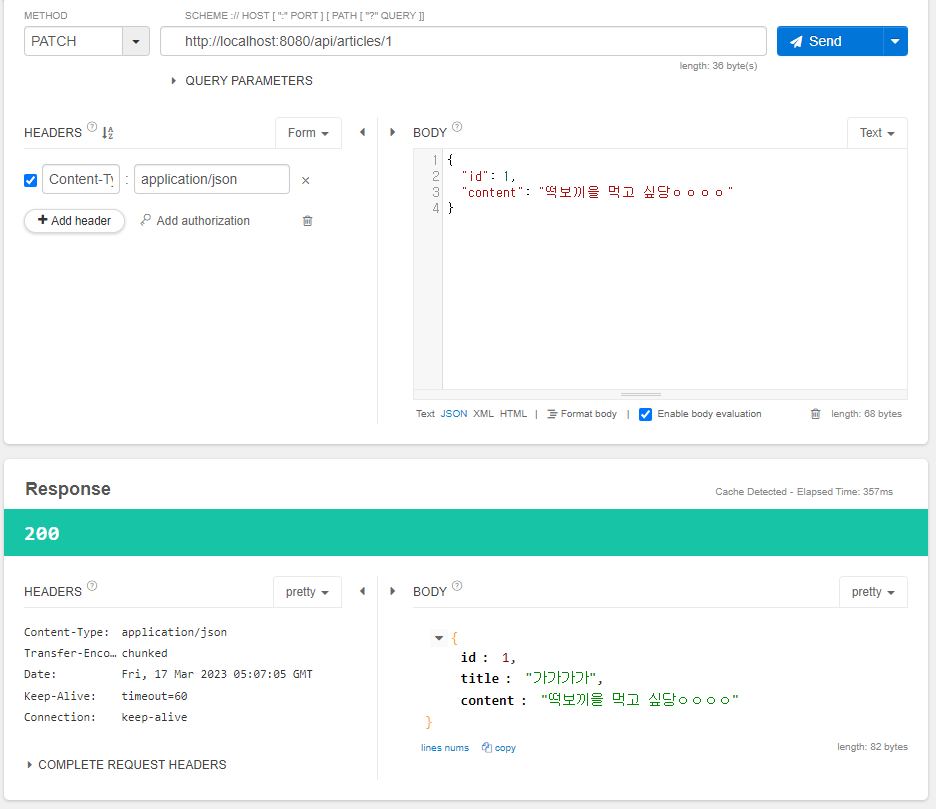
return ResponseEntity.status(HttpStatus.OK).body(updated);✨ 결과확인
이제 title을 빼고 수정해도 기존 데이터가 남아있는 것을 확인할 수 있다.
RestAPI - DELETE
// DELETE
    @DeleteMapping("/api/articles/{id}")
    public ResponseEntity<Article> delete(@PathVariable Long id) {
        // 대상 찾기
        Article target = articleRepository.findById(id).orElse(null);

        // 잘못된 요청 처리
        if(target == null) {
            return ResponseEntity.status(HttpStatus.BAD_REQUEST).body(null);
        }

        // 대상 삭제
        articleRepository.delete(target);

        // 데이터 반환
//        return ResponseEntity.status(HttpStatus.OK).body(null); 아래와 같음
        return ResponseEntity.status(HttpStatus.OK).build();
    }
ArticleApiController.java 전체 코드
package com.example.firstproject.api;

import com.example.firstproject.dto.ArticleForm;
import com.example.firstproject.entity.Article;
import com.example.firstproject.repository.ArticleRepository;
import lombok.extern.slf4j.Slf4j;
import org.springframework.beans.factory.annotation.Autowired;
import org.springframework.http.HttpStatus;
import org.springframework.http.ResponseEntity;
import org.springframework.web.bind.annotation.*;

import java.util.List;

@Slf4j
@RestController // RestAPI용 컨트롤러, 데이터(JSON)을 반환
public class ArticleApiController {

    @Autowired //ArticleRepository를 스프링 부트에서 땡겨와야하기 때문에 @Autowired 사용 (DI)
    private ArticleRepository articleRepository;

    // GET
    // 전체게시글 불러오기
    @GetMapping("/api/articles")
    public List<Article> index() {
        return articleRepository.findAll();
    }

    // 게시글 하나 불러오기
    @GetMapping("/api/articles/{id}")
    public Article index(@PathVariable Long id) {
        return articleRepository.findById(id).orElse(null);
    }

    // POST
    @PostMapping("/api/articles")
    public ResponseEntity<Article> create(@RequestBody ArticleForm dto) {
        Article saved = articleRepository.save(dto.toEntity());
        return ResponseEntity.status(HttpStatus.CREATED).body(saved);
    }
    // PATCH
    @PatchMapping("/api/articles/{id}")
    public ResponseEntity<Article> update(@PathVariable Long id,
                                          @RequestBody ArticleForm dto) {

        // 1: 수정용 엔티티 생성
        Article article = dto.toEntity();
        log.info("id: {}, article: {}", id, article.toString());
        // 순서대로 {} 안에 들어간다.

        // 2: 대상 엔티티를 조회
        Article target = articleRepository.findById(id).orElse(null);

        // 3: 잘못된 요청 처리(대상이 없거나, id가 다른 경우)
        if(target == null || id != article.getId()) {
            // 400, 잘못된 요청 응답
            log.info("잘못된 요청! id: {}, article: {}", id, article.toString());

            return ResponseEntity.status(HttpStatus.BAD_REQUEST).body(null);
            // HttpStatus.BAD_REQUEST = 400
        }

        // 4: 업데이트 및 정상 응답(200)
        target.patch(article); // 기존 데이터에 새로운 부분만 추가한다.

        Article updated = articleRepository.save(target);

        return ResponseEntity.status(HttpStatus.OK).body(updated);
        // status(HttpStatus.OK = 200
    }

    // DELETE
    @DeleteMapping("/api/articles/{id}")
    public ResponseEntity<Article> delete(@PathVariable Long id) {
        // 대상 찾기
        Article target = articleRepository.findById(id).orElse(null);

        // 잘못된 요청 처리
        if(target == null) {
            return ResponseEntity.status(HttpStatus.BAD_REQUEST).body(null);
        }

        // 대상 삭제
        articleRepository.delete(target);

        // 데이터 반환
//        return ResponseEntity.status(HttpStatus.OK).body(null); 아래와 같음
        return ResponseEntity.status(HttpStatus.OK).build();
    }
}
Article 전체코드
package com.example.firstproject.entity;

import lombok.AllArgsConstructor;
import lombok.Getter;
import lombok.NoArgsConstructor;
import lombok.ToString;

import javax.persistence.*;

@Getter
@AllArgsConstructor
@NoArgsConstructor // 디폴트 생성자 추가!
@ToString
@Entity // 1.DB가 해당 객체를 인식 가능하게 됨.
public class Article {

    @Id // 3.Entity  대표값 추가
    @GeneratedValue(strategy = GenerationType.IDENTITY) // DB가 id를 자동 생성 어노테이션
    private Long id;

    @Column // 2.Column 어노테이션 추가
    private String title;
    @Column
    private String content;


    public void patch(Article article) {
        if(article.title != null) {
            this.title = article.title;
        }
        if(article.content != null) {
            this.content = article.content;
        }
    }
}