다른 타입에는 다른 변수 사용하기
-
타입이 다를 경우 변수를 재활용해서 쓰지 말자.
let a = 'string'
a = 3 // 에러 발생, a는 타입 추론으로 string 형태를 갖기 때문에 타입 에러 발생한다

let b: string | number = 'string'
b = 3 // 에러 X
onlyStringFunction(b) // 에러 발생, b는 union Type 이기때문에 string type의 파라미터만 받아오는 함수에 사용하지 못한다.
let str = 'string'; let num = 3; 이런 식으로, 타입이 다를 경우 변수를 재활용 해서 사용하지 않는 것이 좋다.
타입 넓히기와 타입 좁히기
타입스크립트에서 타입 추론을 할때, 내가 예상 한 타입보다 넓은 타입이 추론 될 수도, 좁은 타입이 추론 될 수도 있다. 이를 언제 좁혀지고 언제 넓혀지는지 아는 것이 중요하다.
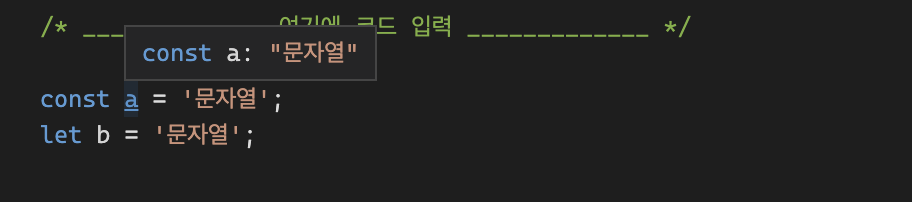
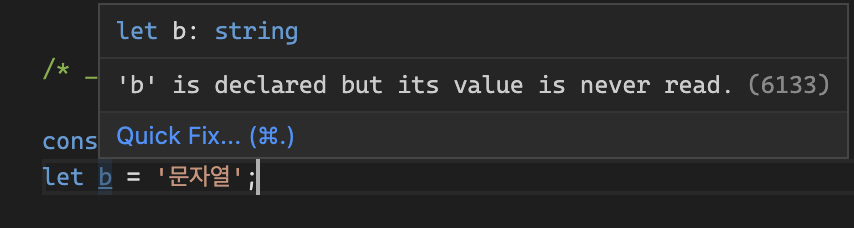
let의 경우 타입이 넓혀진다.let b = '문자열' // type === stringconst의 경우 타입이 좁혀진다.const a = '문자열' // type === '문자'
as const를 통해 타입을 좁힐 수 있다.
const obj = {
  age: 4,
  gender: 'Male',
  name: "Hello"
}

/*
const obj: {
  age: number;
  gender: string;
  name: string;
} = { ... }
*/

const obj2 = {
  age: 4 as const,
  gender: 'Male',
  name: "Hello"
}

/*
const obj2: {
  age: 4;
  gender: string;
  name: string;
} = { ... }
*/

const obj3 = {
  age: 4,
  gender: 'Male',
  name: "Hello"
} as const


/*
const obj3: {
  readonly age: 4;
  readonly gender: "Male";
  readonly name: "Hello";
}
*/

obj.age = 3; // Success
obj2.age = 3; // Type '3' is not assignable to type '4'.(2322)
obj3.age = 3; // Cannot assign to 'age' because it is a read-only property.(2540)
타입을 좁히는 많은 방법
- null 체크로 타입 좁히기
// null 체크로 타입 좁히기
const render = () => {
  const $button = document.getElementById('button'); //$button: HTMLElement | null
  if ($button) {
    $button.setAttribute('class', 'bg-[#fff]') // $button: HTMLElement
  } else {
    throw new Error("button is" + `${$button}`) // $button: null
  }
}- instanceof 로 타입 좁히기
// instanceof 로 타입 좁히기
const contain = (text: string, search: string | RegExp) => {
  if (search instanceof RegExp) {
    return search.exec(text) ? true : false; // search: RegExp
  }

  return text.includes(search); // search: string
}
- 속성 체크로 타입 좁히기
// 속성 체크로 타입 좁히기

type Person = {
  age: number;
  name: string;
}

type Dog = {
  bark: boolean;
} & Person

type Animal = Person | Dog

const checkPerson = (animal: Animal) => {
  if ("bark" in animal) {
    console.log(animal.name + '은 Dog 입니다.') // animal: Dog
    return false;
  }
    console.log(animal.name + '은 Person 입니다.') // animal: Person
  return true;
}- 태그 기법을 통해 타입 좁히기
// 태그 기법을 이용해 타입 좁히기

type Person2 = {
  age: number;
  name: string;
  bark: false,
}

type Dog2 = {
  bark: true;
} & Person

type Animal2 = Person2 | Dog2

const checkPerson2 = (animal: Animal2) => {
  if (animal.bark === true) {
    console.log(animal.name + '은 Dog2 입니다.') // animal: Dog2
    return false;
  }
    console.log(animal.name + '은 Person2 입니다.') // animal: Person2
  return true;
}- 타입 가드를 통해 타입 좁히기
// 타입 가드를 이용해 타입 좁히기

// 타입 가드를 통하면 T 타입 처럼 사용이 가능하다.
function isDefined <T>(x: T | undefined): x is T {
   return x !== undefined
  };

const a: number | undefined = 3;
if (isDefined(a)) {
  console.log("a is", typeof a) // a: number
} else {
  console.log("a is undefined")
}
객체 생성하기
- 일반적으로 객체를 생성 할때는 객체 생성과 동시에 타입을 지정 해주는 것이 좋다 (잉여 속성 체크)
- 기존에 있는 객체 들을 이용해 객체를 생성 할때에는
...spread 연산자를 이용 해주면 좋다. (타입 추론을 자동으로 해줌)
- 객체 마다 새로운
Type을 추론 해준다
 const point1 = { x: 3 };
 const point2 = { y: 2 };
 const vector = { ...point1, ...point2 };

 /*
 const point1: {
    x: number;
} = {...}

 const point2: {
    y: number;
} = {...}

 const vector: {
    y: number;
    x: number;
} = {...}
*/- 타입에 안전한 방식으로
조건부 속성을 추가하려면, 속성을 추가하지 않는null또는{}을 이용하자.
let hasDates: boolean = true;

const title = { title: 'Hello World', name: "TS" };
const navigation = { ...title, ...(hasDates ? { month: 3, day: 20 } : {}) };

/*
const navigation: {
  month?: number | undefined;
  day?: number | undefined;
  title: string;
  name: string;
}
*/- 생성된 객체를 핼퍼 함수를 통해 선택적 필드 방식으로 표현하기
let hasDates: boolean = true;

const title = { title: 'Hello World', name: "TS" };

function makeOptional<T, U>(a: T, b: U | null): T & Partial<U> {
  return { ...a, ...b };
}

const naivigation = makeOptional(title, hasDates ? { month: 3, day: 20 } : null);

/**
const naivigation: {
  title: string;
  name: string;
} & Partial<{
  month: number;
  day: number;
}>
 */
비동기 통신 코드에는 async 사용 하기
Promise.race를 이용해timeout걸기
function timeOut(ms: number): Promise<Error> {
  return new Promise((_, reject) => {
    setTimeout(() => {
      reject(new Error("timeOut"))
      // throw new Error("time Out") // reject 동일하게 작동
    }, ms)
  })
}

// const fetchWithTimeOut: (url: RequestInfo | URL, init: RequestInit, ms?: number) => Promise<Error | Response>
const fetchWithTimeOut = async (url: RequestInfo | URL, init: RequestInit, ms = 4000) => {
  return Promise.race([fetch(url, init), timeOut(ms)])
}- async 함수를 사용하면 항상 return 값은 Promise 로 감싸진다.
// const getNumber: () => Promise<number>

const getNumber = async () => {
  return 2;
}

console.log(getNumber()) // [LOG] Promise: ~

const getPromise = async () => {
  const num = await getNumber();
  console.log(num);
}

getPromise() // [LOG] 2
DFF (Development For Fun)