1. 장소 상세에서 지도로 이동
장소 상세 정보에 있는 주소를 통해 지도 페이지로 이동할 수 있게 했다.
1) 주소가 담긴 PlaceData를 InfoViewController로 전달
장소의 주소만 담았던 Lable에서 Button으로 변경하고 누르면 MapView로 넘어가게 했다.
btnPosition.setTitle(rePositon + " >", for: .normal)
btnPosition.setTitleColor(.white, for: .normal)
btnPosition.contentHorizontalAlignment = .left
주소를 Button의 Title로 설정하고 글자를 하얀색, 왼쪽정렬로 설정했다.
if segue.identifier == "showMap"{
    let addressController = segue.destination  as! MapViewController
    addressController.onePlace = editData!
}
이미 MapViewController에서 지도뷰와 마커 표시는 되어 있기 때문에 InfoView에서 MapController로 segue를 만들고 PlaceData를 전달하게 했다.
2) 선택된 주소에 해당하는 마커 그리기
func showAddressMarker(placeData : PlaceData){
    let oneList = [placeData]
    let camera = GMSCameraPosition.camera(
        withLatitude: (placeData.geopoint.latitude) as Double,
        longitude: (placeData.geopoint.longitude) as Double,
            zoom: 15
     )
    mapView?.clear()
    mapView?.camera = camera
    mark(oneList)
}
넘겨받은 장소 정보를 onePlace로 전달받으면 마커로 표시하고 카메라 위치를 이동시켰다.
3) Google Map 카메라 설정
let latitude = (coor?.latitude ?? 37.566508) as Double
let longitude = (coor?.longitude ?? 126.977945) as Double
let camera = GMSCameraPosition.camera(withLatitude: latitude, longitude: longitude, zoom: 12.0)

mapView = GMSMapView.map(withFrame: self.view.frame, camera: camera)
MapView를 설정할 때 이런 방식으로 했어서 같은 방식으로 주소만 바꾸면 카메라 시점이 바뀔 줄 알았는데 이건 카메라 위치를 정하는 코드였다.
4) Google Map 카메라 위치 변경
let camera = GMSCameraPosition.camera(
            withLatitude: (placeData.geopoint.latitude) as Double,
            longitude: (placeData.geopoint.longitude) as Double,
            zoom: 15
          )

 mapView?.camera = camera
카메라 위치를 이동하기 위해선 위와 같은 코드를 사용해야 했다.
2. 주소 상세 지도
전체 장소의 마커를 모두 표시하던 MapView를 그대로 사용했기 때문에 상세페이지에서 들어온건지 아닌지 구분할 필요가 있었다.
예를 들어 전체 마커를 계속 표시하기 위해 viewWillAppear에서 지도 초기화와 다시 전체 마커 그리기를 실행했는데 그러다보니 장소 상세에서 주소를 클릭해 지도로 넘어가도 지도가 초기화돼버렸다...
장소 상세 페이지 vs 지도뷰
1) viewWillAppear
장소 상세가 아닌 지도로 들어왔을 때만 전체 마커 그리기
override func viewWillAppear(_ animated: Bool) {
        if onePlace == nil{
            mark(places)
        }
    }
2) 마커 선택
장소 상세에서 왔을 때만 표시한 마커를 선택해서 타이틀 보이게 하기
mapView?.selectedMarker = marker3) 마커 클릭
지도뷰에서 클릭하면 장소 상세 페이지로 segue, 이미 장소 상세 페이지에서 넘어왔을 경우 다시 장소 상세로 이동
if onePlace == nil{
	placeTitle = marker.title!
	self.performSegue(withIdentifier: "sgMapInfo", sender: self)
}else{
	 _ = navigationController?.popViewController(animated: true)
}
4) 마커 필터 검색
지도뷰에서만 필터 검색이 가능하고 장소 상세 페이지에서는 전체 장소 목록인 places가 없기 때문에 필터 검색을 할 수 없다는 알림을 띄워준다.
3. Navigation으로 변경
다른 화면들은 모두 NavigationController로 된 반면 MapView만 그냥 ViewController였다.
InfoView에서 주소를 클릭하면 PopView로 뜨는데 아래로 슬라이드 하면 창을 없앨 수 있지만 google map은 슬라이드 대신 지도 이동이 돼서 창을 닫을 수가 없었다.
자동으로 뒤로가기 버튼이 생기도록 MapView 역시 NavigationController로 변경하여 fullscreen과 밀어서 창 닫기를 가능하게 했다.
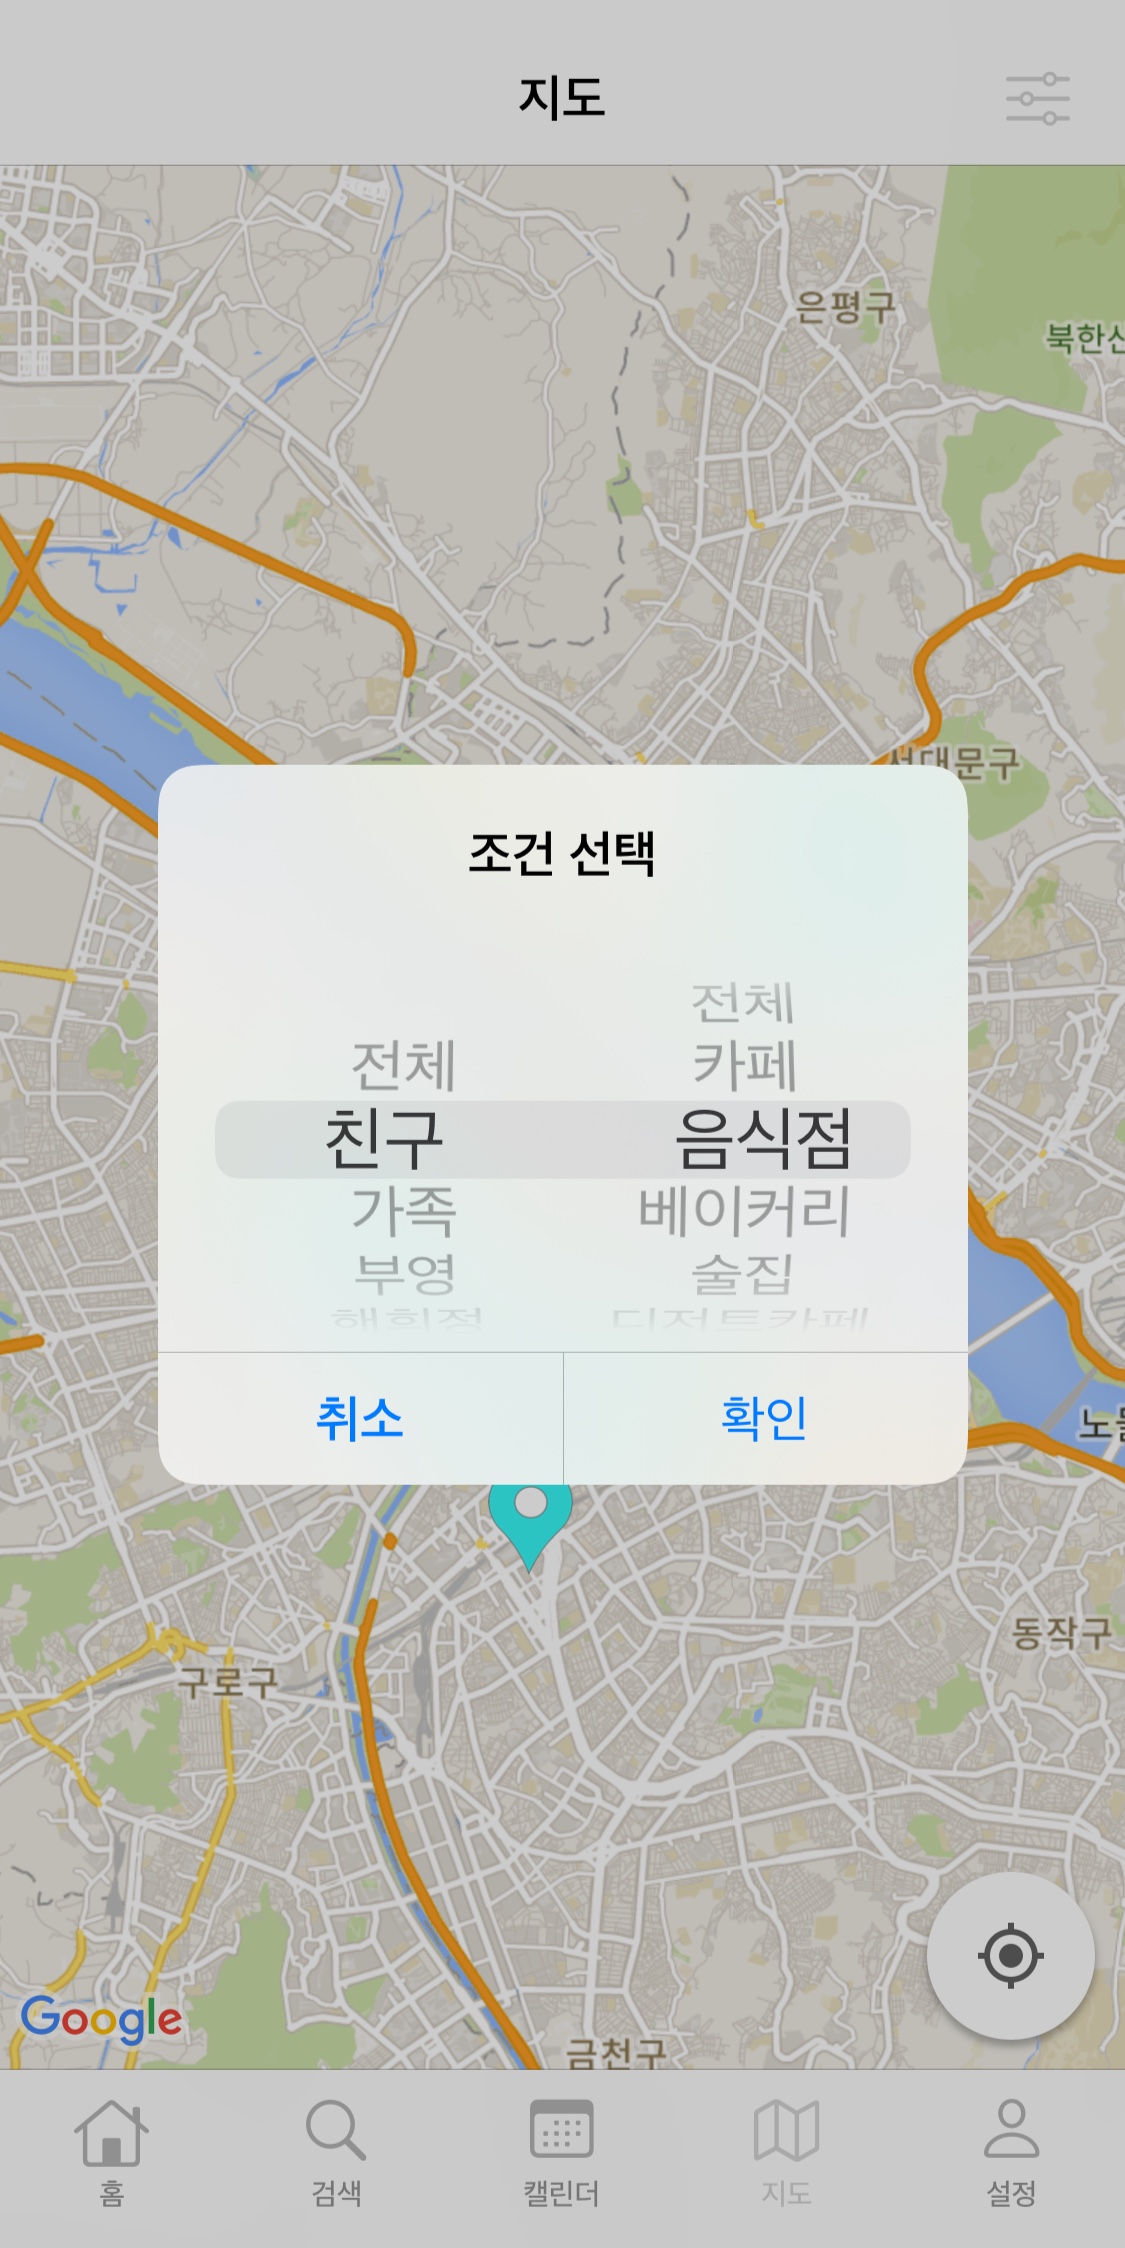
4. 필터 선택 방법 Alert로 변경
필터 선택 방법을 TextField에 InputView를 넣는 방식으로 했었다가 TextField를 사용하지도 않고 넣는 위치도 애매했다.
NavigationController로 바꾸면서 ToolBar가 생겨 Bar Button으로 넣기로 했다.
하지만 Button에는 InputView를 넣을 수 없기 때문에 UIPcikerView를 포함한 Alert를 띄워 선택하는 방식으로 변경했다.
@IBAction func addFilter(_ sender: UIButton){
        let optionPicker = UIPickerView(frame: CGRect(x: 10, y: 50, width: 250, height: 150))
        optionPicker.delegate = self
        optionPicker.dataSource = self
        optionPicker.reloadAllComponents()

        let filterAlert = UIAlertController(title: "조건 선택", message: "\n\n\n\n\n\n\n\n", preferredStyle: .alert)
        filterAlert.view.addSubview(optionPicker)

        filterAlert.addAction(UIAlertAction(title: "취소", style: .default, handler: nil))
        filterAlert.addAction(UIAlertAction(title: "확인", style: .default, handler: { UIAlertAction in
            self.mapView?.clear()
            self.mark(self.optionedPlaces)
        }))

        self.present(filterAlert, animated: true, completion: nil)
}
5. UIpickerview 첫 번째 선택
UIPickerView를 띄우면 처음에 첫 번째 row가 선택되어 있기 때문에 완료를 누르면 첫 row가 선택될 줄 알았다.
func pickerView(_ pickerView: UIPickerView, didSelectRow row: Int, inComponent component: Int)하지만 picker를 사용하지 않으면 아예 선택 함수가 호출되지 않아 아무 값도 넘어가지 않게 된다.
굳이 picker를 건드려서 선택하는건 너무 불편하기 때문에 아무것도 선택되지 않았다면 기본으로 첫 번째 row가 선택되도록 했다.
pickerView(optionPicker, didSelectRow: 0, inComponent:0)'필터 선택' 버튼을 누르면 실행하는 함수에 0번째 값이 선택되도록 하면 값이 없으면 그대로 진행하고 picker 값이 변경되면 바로 필터 된 장소 목록인 optionedPlaces에 적용되기 때문에 선택 완료하면 바뀐 값으로 필터 검색이 된다.
앱에서 또 다른 UIPickerVeiw가 쓰이는 기능은 장소 추가에서 그룹과 분류 선택이다.
InputView에서 사용하기 때문에 미리 값을 넣을 순 없고 같은 선택 완료 함수를 그룹과 분류를 각자 나누어 사용했다.
    @objc func groupPickerDone(){
        if tfGroup.text == ""{
            tfGroup.text = groupItem[0]
        }
        self.view.endEditing(true)
    }

    @objc func categoryPickerDone(){
        if tfCategory.text == ""{
            tfCategory.text = categoryItem[0]
        }
        self.view.endEditing(true)
    }
picker가 변경 될 때마다 각 TextField에 입력되기 때문에 비어있다면 아무 선택이 안 된것으로 첫 항목을 넣도록 했다.