커맨드 패턴
정의 : 요청 내역을 객체로 캡슐화해서 객체를 서로 다른 요청 내역에 따라 매개변수화 하는 것.
위의 이미지를 보면 리모컨에 단순히 on, off만 있는 리모컨을 만들어서 상태를 핸들링 하는 것은 어렵지 않다. 하지만 리모컨에 다양한 값들이 추가되야 한다거나 이 값을 다른 리모컨에서도 같은 상태를 다뤄야 한다거나 on,off 이외에도 다른 값들을 핸들링한다라고하면 이 값들을 다루기가 힘들어 진다.
그래서 이런 다양한 핸들러 들을 하나로 모아서 처리하는 개념으로 이해했다.
interface Command {
  execute(): void;
}
command 패턴은 여러 명령어를 하나의 command 인터페이스의 execute에 모아서 처리한다
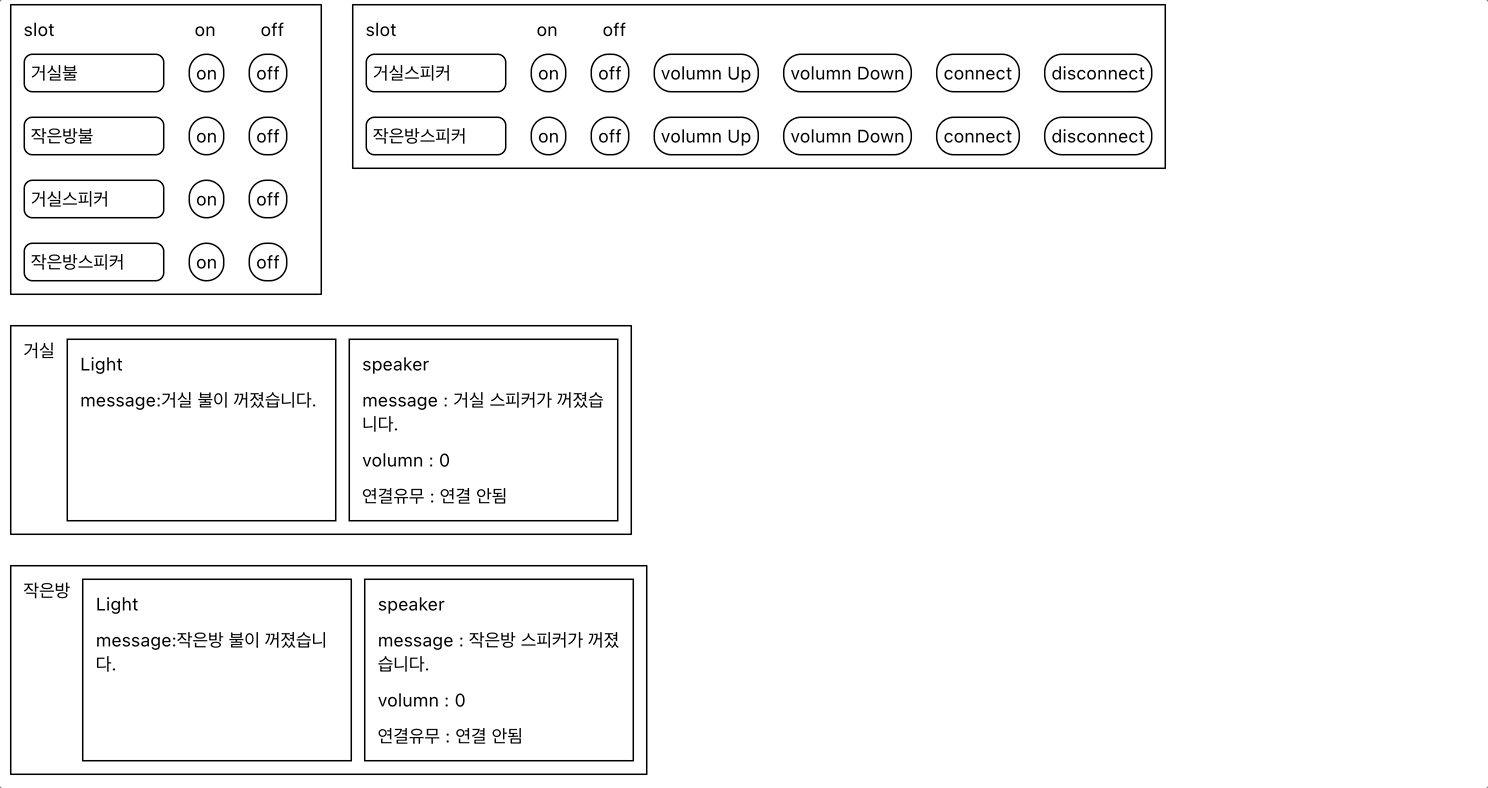
위의 이미지를 구현해보자
거실, 작은방에 각각 light, speaker가 있고
그것들을 통제하는 리모컨이 2개 있다.
하나는 전원의 on,off만
다른 하나는 speaker의 전체 기능을 담당한다.
light는 불을 끄고 키는 두가지의 명령어가 있다.
그리고 light의 구체클레스는 어느장소에 있는 light인지와 react 상태값을 바꿔주는 함수가 들어가 있다.
interface Light {
  on(): void;
  off(): void;
}

class RoomLight implements Light {
  constructor(
    private readonly where: string,
    private readonly commandPatternData: (message: string) => void
  ) {}
  on() {
    this.commandPatternData(`${this.where} 불이 켜졌습니다.`);
  }
  off() {
    this.commandPatternData(`${this.where} 불이 꺼졌습니다.`);
  }
}
이 light를 command 객체로 만들어 주자
class LightOnCommand implements Command {
  constructor(private readonly light: Light) {}
  execute(): void {
    this.light.on();
  }
}

class LightOffCommand implements Command {
  constructor(private readonly light: Light) {}
  execute(): void {
    this.light.off();
  }
}
그다음 speaker를 만들고 command 객체로 만들어 주자
speaker는 전원을 켰다 컸다, 블루투스 연결, 볼륨을 켰다 줄였다 할 수 있는 방식들이 있고
구체 클레스에는 speaker에 관련된 react 상태값을 바꿔주는 함수가 들어가 있다.
export interface Speaker {
  on(): void;
  off(): void;
  volumnUp(): void;
  volumnDown(): void;
  connect(): void;
  disconnect(): void;
}

export class BluetoothSpeaker implements Speaker {
  constructor(
    private readonly where: string,
    private readonly setMessage: (message: string) => void,
    private readonly setVolumn: (control: "up" | "down") => void,
    private readonly setConnect: (isConnect: boolean) => void
  ) {}
  on() {
    this.setMessage(`${this.where} 스피커가 켜졌습니다.`);
  }
  off() {
    this.setMessage(`${this.where} 스피커가 꺼졌습니다.`);
  }

  volumnUp() {
    this.setVolumn("up");
  }
  volumnDown() {
    this.setVolumn("down");
  }
  connect() {
    this.setConnect(true);
  }

  disconnect() {
    this.setConnect(false);
  }
}

class SpeakerOnCommand implements Command {
  constructor(private readonly speaker: Speaker) {}
  execute(): void {
    this.speaker.on();
  }
}

class SpeakerOffCommand implements Command {
  constructor(private readonly speaker: Speaker) {}
  execute(): void {
    this.speaker.off();
  }
}

class SpeakerVolumnUpCommand implements Command {
  constructor(private readonly speaker: Speaker) {}
  execute(): void {
    this.speaker.volumnUp();
  }
}

class SpeakerVolumnDownCommand implements Command {
  constructor(private readonly speaker: Speaker) {}
  execute(): void {
    this.speaker.volumnDown();
  }
}

class SpeakerConnectCommand implements Command {
  constructor(private readonly speaker: Speaker) {}
  execute(): void {
    this.speaker.connect();
  }
}

class SpeakerdisconnectCommand implements Command {
  constructor(private readonly speaker: Speaker) {}
  execute(): void {
    this.speaker.disconnect();
  }
}
이렇게 되면 이 커멘드 객체를 받아 처리하는 객체는 커맨드 객체가 무엇을 처리하는지 알 필요 없이 execute만 처리하면 될 것이다.
이 커맨드 객체를 받아 처리하는 객체를 invoker라고 한다.
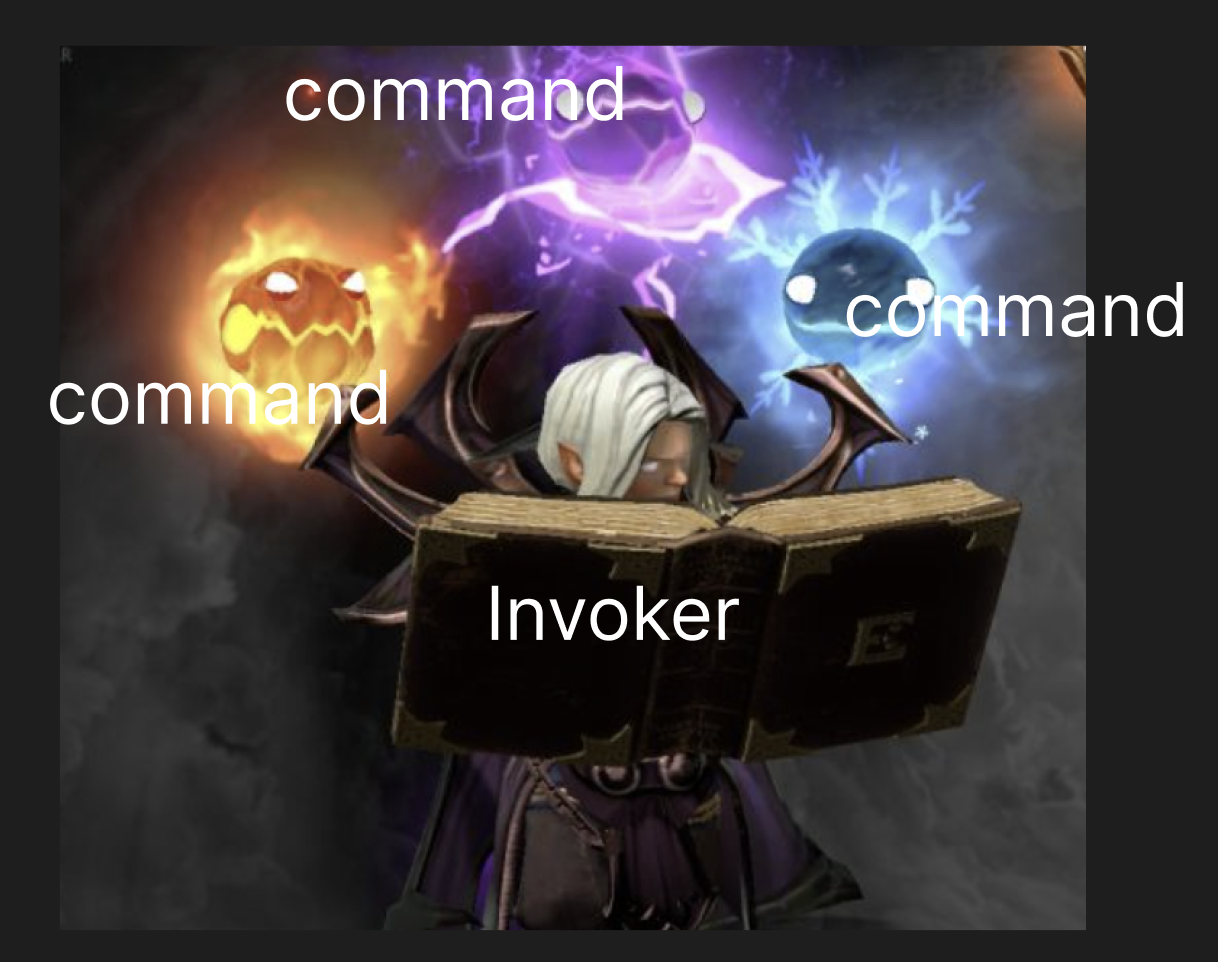
(출처: https://robots.net/gaming/dota-2-invoker-guide-for-every-mid-player/)
구글에 invoker라고 치면 위의 캐릭터가 나온다. 도타를 해본적은 없지만 위 그림만 본다면 이 캐릭터는 여러 정령을 다루는 역할로 보인다.
이것처럼 command 패턴에서 invoker의 역할은 command를 등록하고 이것들을 실행시키는 역할을 한다.
전원을 켰다 껐다만 담당하는 invoker는
class RemoteControllerInvoker {
  private readonly onCommand = new Map<string, Command>();
  private readonly offCommand = new Map<string, Command>();

  setCommand(commandName: string, onCommand: Command, offCommand: Command) {
    this.onCommand.set(commandName, onCommand);
    this.offCommand.set(commandName, offCommand);
  }

  pushOnButton(commandName: string) {
    const command = this.onCommand.get(commandName);
    command?.execute();
  }

  pushOffButton(commandName: string) {
    const command = this.offCommand.get(commandName);
    command?.execute();
  }
}
전원을 끄는 명령어, 켜는 명령어들을 등록시키고 등록된 name에 따라 각 버튼을 눌렀을 때 실행시켜준다.
speaker의 전체적인 기능을 담당하는 invoker는
class SpeakerInvoker {
  private readonly onCommand = new Map<string, Command>();
  private readonly offCommand = new Map<string, Command>();
  private readonly volumnUpCommand = new Map<string, Command>();
  private readonly volumnDownCommand = new Map<string, Command>();
  private readonly connectCommand = new Map<string, Command>();
  private readonly disconnectCommand = new Map<string, Command>();

  setCommand(
    commandName: string,
    onCommand: Command,
    offCommand: Command,
    volumnUpCommand: Command,
    volumnDownCommand: Command,
    connectCommand: Command,
    disconnectCommand: Command
  ) {
    this.onCommand.set(commandName, onCommand);
    this.offCommand.set(commandName, offCommand);
    this.volumnUpCommand.set(commandName, volumnUpCommand);
    this.volumnDownCommand.set(commandName, volumnDownCommand);
    this.connectCommand.set(commandName, connectCommand);
    this.disconnectCommand.set(commandName, disconnectCommand);
  }

  pushOnButton(commandName: string) {
    const command = this.onCommand.get(commandName);
    command?.execute();
  }

  pushOffButton(commandName: string) {
    const command = this.offCommand.get(commandName);
    command?.execute();
  }

  pushVolumnUpButton(commandName: string) {
    const command = this.volumnUpCommand.get(commandName);
    command?.execute();
  }

  pushVolumnDownButton(commandName: string) {
    const command = this.volumnDownCommand.get(commandName);
    command?.execute();
  }

  pushConnectButton(commandName: string) {
    const command = this.connectCommand.get(commandName);
    command?.execute();
  }

  pushdisconnectButton(commandName: string) {
    const command = this.disconnectCommand.get(commandName);
    command?.execute();
  }
}
command를 등록하고
전원 on,off
볼륨줄였다 올렸다
연결을 했다 끊었다
동작을 어떤 command가
해당 커맨드의 명령이 왔을 때 처리한다.
그리고 리액트에서 상태를 위해서 zustand로 값들을 만들어 주자
interface ICommandPatternDataState {
  bigLightMessage: string;
  smallLigthMessage: string;
  bigSpeakerMessage: string;
  bigSpeakerVolumn: number;
  bigSpeakerIsConnect: boolean;
  smallSpeakerMessage: string;
  smallSpeakerVolumn: number;
  smallSpeakerIsConnect: boolean;
}

const initState: ICommandPatternDataState = {
  bigLightMessage: "",
  smallLigthMessage: "",
  bigSpeakerMessage: "",
  bigSpeakerVolumn: 0,
  bigSpeakerIsConnect: false,
  smallSpeakerMessage: "",
  smallSpeakerVolumn: 0,
  smallSpeakerIsConnect: false,
};

const useCommandPatternData = create(
  combine(initState, (set, get) => ({
    setBigLightMessage: (message: string) => {
      set((state) => ({ bigLightMessage: message }));
    },
    setSamllLightMessage: (message: string) => {
      set((state) => ({ smallLigthMessage: message }));
    },
    setBigSpeakerMessage: (message: string) => {
      set((state) => ({ bigSpeakerMessage: message }));
    },
    setSmallSpeakerMessage: (message: string) => {
      set((state) => ({ smallSpeakerMessage: message }));
    },
    setSmallSpeakerVolumn: (controll: "up" | "down") => {
      set((state) => {
        if (controll === "up") {
          return { smallSpeakerVolumn: get().smallSpeakerVolumn + 1 };
        }
        return {
          smallSpeakerVolumn:
            get().smallSpeakerVolumn > 0 ? get().smallSpeakerVolumn - 1 : 0,
        };
      });
    },
    setBigSpeakerVolumn: (controll: "up" | "down") => {
      set((state) => {
        if (controll === "up") {
          return { bigSpeakerVolumn: get().bigSpeakerVolumn + 1 };
        }
        return {
          bigSpeakerVolumn:
            get().bigSpeakerVolumn > 0 ? get().bigSpeakerVolumn - 1 : 0,
        };
      });
    },
    setBigSpeakerIsConnect: (isConnect: boolean) => {
      set((state) => ({ bigSpeakerIsConnect: isConnect }));
    },
    setSmallSpeakerIsConnect: (isConnect: boolean) => {
      set((state) => ({ smallSpeakerIsConnect: isConnect }));
    },
  }))
);
이제 커멘드를 등록시키고 실행시키 전에 필자는 command 객체를 직접 만드는것보다 factory 패턴을 통하면 좀더 쉽게 등록할 수 있을 것 같아서 팩토리 객체를 만들었다
class LightFactory {
  constructor(private readonly light: Light) {}
  on() {
    return new LightOnCommand(this.light);
  }
  off() {
    return new LightOffCommand(this.light);
  }
}

class SpeakerFactory {
  constructor(private readonly speaker: Speaker) {}
  on() {
    return new SpeakerOnCommand(this.speaker);
  }
  off() {
    return new SpeakerOffCommand(this.speaker);
  }
  connect() {
    return new SpeakerConnectCommand(this.speaker);
  }
  disconnect() {
    return new SpeakerdisconnectCommand(this.speaker);
  }
  volumnUp() {
    return new SpeakerVolumnUpCommand(this.speaker);
  }
  volumnDown() {
    return new SpeakerVolumnDownCommand(this.speaker);
  }
}
이제 invoker에 command들을 등록하고 handler함수들을 만들어보자
handler함수들도 한곳에서 관리하면 편하니까 hook을 만들어서 빼서 만들자
const bigSpeaker = new BluetoothSpeaker(
  "거실",
  useCommandPatternData.getState().setBigSpeakerMessage,
  useCommandPatternData.getState().setBigSpeakerVolumn,
  useCommandPatternData.getState().setBigSpeakerIsConnect
);

const samllSpeaker = new BluetoothSpeaker(
  "작은방",
  useCommandPatternData.getState().setSmallSpeakerMessage,
  useCommandPatternData.getState().setSmallSpeakerVolumn,
  useCommandPatternData.getState().setSmallSpeakerIsConnect
);

const bigLight = new RoomLight(
  "거실",
  useCommandPatternData.getState().setBigLightMessage
);

const smallLight = new RoomLight(
  "작은방",
  useCommandPatternData.getState().setSamllLightMessage
);

const bigSpeakerFactory = new SpeakerFactory(bigSpeaker);
const samllSpeakerFactory = new SpeakerFactory(samllSpeaker);
const bigLightFactory = new LightFactory(bigLight);
const smallLightFactory = new LightFactory(smallLight);
const slotRemoteControllerInvoker = new RemoteControllerInvoker();
slotRemoteControllerInvoker.setCommand(
  "거실_light",
  bigLightFactory.on(),
  bigLightFactory.off()
);
slotRemoteControllerInvoker.setCommand(
  "거실_speaker",
  bigSpeakerFactory.on(),
  bigSpeakerFactory.off()
);
slotRemoteControllerInvoker.setCommand(
  "작은방_light",
  smallLightFactory.on(),
  smallLightFactory.off()
);
slotRemoteControllerInvoker.setCommand(
  "작은방_speaker",
  samllSpeakerFactory.on(),
  samllSpeakerFactory.off()
);

const speakerInvoker = new SpeakerInvoker();
speakerInvoker.setCommand(
  "거실_speaker",
  bigSpeakerFactory.on(),
  bigSpeakerFactory.off(),
  bigSpeakerFactory.volumnUp(),
  bigSpeakerFactory.volumnDown(),
  bigSpeakerFactory.connect(),
  bigSpeakerFactory.disconnect()
);

speakerInvoker.setCommand(
  "작은방_speaker",
  samllSpeakerFactory.on(),
  samllSpeakerFactory.off(),
  samllSpeakerFactory.volumnUp(),
  samllSpeakerFactory.volumnDown(),
  samllSpeakerFactory.connect(),
  samllSpeakerFactory.disconnect()
);

export const useRemoteContollerHandler = () => {
  const handleSlotOnButtonClick = (buttonName: string) => {
    slotRemoteControllerInvoker.pushOnButton(buttonName);
  };

  const handleSlotOffButtonClick = (buttonName: string) => {
    slotRemoteControllerInvoker.pushOffButton(buttonName);
  };

  const handleSpeakerVolumnUpButtonClick = (buttonName: string) => {
    speakerInvoker.pushVolumnUpButton(buttonName);
  };

  const handleSpeakerVolumnDownButtonClick = (buttonName: string) => {
    speakerInvoker.pushVolumnDownButton(buttonName);
  };

  const handleSpeakerConnectButtonClick = (buttonName: string) => {
    speakerInvoker.pushConnectButton(buttonName);
  };

  const handleSpeakerdisconnectButtonClick = (buttonName: string) => {
    speakerInvoker.pushdisconnectButton(buttonName);
  };
  return {
    handleSlotOnButtonClick,
    handleSlotOffButtonClick,
    handleSpeakerVolumnUpButtonClick,
    handleSpeakerVolumnDownButtonClick,
    handleSpeakerConnectButtonClick,
    handleSpeakerdisconnectButtonClick,
  };
};
이것들을 컴토넌트 들에 등록만해주면 위와같은 예시를 만들 수 있다.
느낀점
이 패턴은 사실 그냥 예시만 봤을 때는 만들어 하는 객체들이 많아지기 때문에 굳이 이래야하나 하는 생각이 들었던 패턴이었다.
정확히 어떤 책인지 기억은 안나지만 택배물들을 한곳에 보아서 나오는 서비스가 처음 등장했을 때 그걸 본 사람들은 그 창업자를 비난했다고 들었다. 왜냐하면 내가 옆집에 물건을 보낼 때도 그 택배물을 굳이 또 먼곳으로 보냈다가 배송시키기 때문이다. 하지만 이런 택배 시스템은 관리를 용이하게 해서 지금 사람들은 이런 시스템을 당연하게 생각한다고 했다.
이 커맨드 패턴은 리액트로 이렇게 만들어보면서 그 창업자를 비난했던 사람들이 이해가 갔다. 더 복잡해보이만 객체가 하는 역할이 전부 분리되어 있어서 추후 다른 것이 추가 된다거나 이런 버튼의 매크로 기능을 만드는 함수가 필요한다거나 삭제한다거나 할 때 너무 편하다는 것을 알았다.
그냥 공부하고 안쓸 것 같았던 패턴이지만 사용할 수 있는 범위가 굉장히 큰 패턴이었다는 것을 깨닳았다.