
Data Fetching 이란?
Data를 Fetching하는 말 그대로 데이터를 가져오는 것이다.
화면에 무엇인가 그리려면 결국 어디선가 Data를 가져와야 한다.
그렇다면 Next.js가 제시하는 4가지의 Data Fetching 방법은 무엇일까?
SSR, CSR, SSG, ISR
하나씩 차례대로 살펴보자.
☝🏿 SSR(Server Side Render)
데이터를 가져와서 그리는 주체가 서버인 것이다.
Next.js에서 SSR을 담당하는 함수는 getServerSideProps이다.
코드를 통해 자세히 알아보자.
Next.js프로젝트의 pages > index.js안에 getServerSideProps 함수에 time이라는 props를 리턴해 그려보자.
import Head from 'next/head';
import styles from '../styles/Home.module.css';
export async function getServerSideProps() {
return {
props: { time: new Date().toISOString() }
}
}
export default function Home({ time }) {
return (
<div className={styles.contain
er}>
<Head>
<title>Create Next App</title>
<link rel="icon" href="/favicon.ico" />
</Head>
<main>
<h1 className={styles.title}>
{time}
</h1>
</main>
<footer>
...위의 코드를 실행하면 아래와 같이 그려진다.

🏷 그렇다면 위의 함수가 어디서 동작할까?
코드에 로그를 남겨 알아보자.
export async function getServerSideProps() {
  console.log('server');
  return {
    props: { time: new Date().toISOString() }
  }
}
위와 같이 코드를 수정했더니 클라이언트에는 아무런 로그도 남지 않고 아래와 같이 서버에서 동작하는 것을 확인할 수 있다.
서버

✌🏿 CSR(Client Side Render)
SSR의 반대 개념으로 클라이언트가 데이트를 가져와 그리는 주체가 되는 것을 의미한다.
Next.js에서 CSR을 담당하는 함수는 따로 없다. React에서 사용하는 것과 동일하다.
index.js에 csr로를 클릭하면 시간이 나오는 페이지를 코드로 구현해보자.
export default function Home({ time }) {
  return (
    <div className={styles.container}>
      <Head>
        <title>Create Next App</title>

        <link rel="icon" href="/favicon.ico" />
      </Head>

      <main>
        <h1 className={styles.title}>
          {time}
        </h1>
        <h1><Link href="/csr">CSR로</Link></h1>

      </main>
      <footer>
      ///
pages > csr.js
import Head from 'next/head';
import styles from '../styles/Home.module.css';
import Link from 'next/link';
import { useEffect, useState } from 'react';
export default function Home() {
const [time, setTime] = useState();
useEffect(() => {
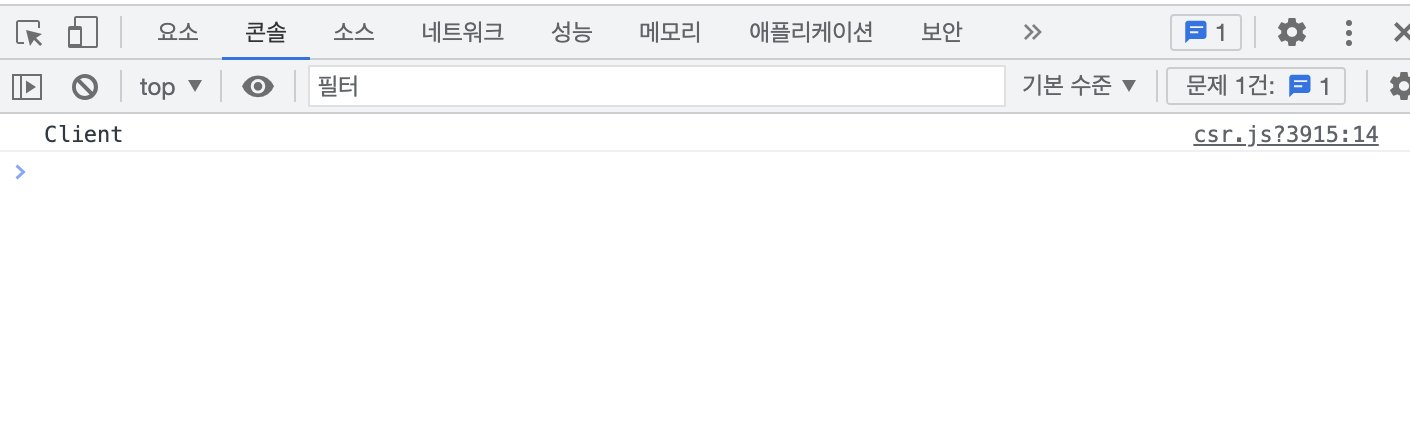
console.log('Client')
setTime(new Date().toISOString());
}, [])
return (
<div className={styles.container}>
<Head>
<title>Create Next App</title>
<link rel="icon" href="/favicon.ico" />
</Head>
<main>
<h1 className={styles.title}>
{time}
</h1>
</main>
///로그를 확인해보면 useEffect는 클라이언트에서 동작하는 것으로 확인할 수 있다. 서버에는 남지 않는다.
👆🏿✌🏿 SSG(Static-Site-Generation)
SSG는 정적인 사이트를 데이터를 가져와 그려두는 것이다.
SSG를 담당하는 함수는 getStaticProps(with getStaticPaths)이다.
SSG 페이지를 만들어 getStaticProps함수를 동작시켜 보자.
index.js
import Head from 'next/head';
import styles from '../styles/Home.module.css';
import Link from 'next/link';


export async function getServerSideProps() {
  console.log('server');
  return {
    props: { time: new Date().toISOString() }
  }
}


export default function Home({ time }) {
  return (
    <div className={styles.container}>
      <Head>
        <title>Create Next App</title>

        <link rel="icon" href="/favicon.ico" />
      </Head>

      <main>
        <h1 className={styles.title}>
          {time}
        </h1>
        <h1><Link href="/csr">CSR로</Link></h1>
        <h1><Link href="/ssg">SSG로</Link></h1>

      </main>
pages > ssg.js
import Head from 'next/head';
import styles from '../styles/Home.module.css';


export async function getStaticProps() {
    console.log('server');
    return {
        props: { time: new Date().toISOString() }
    }
}


export default function SSG({ time }) {


    return (
        <div className={styles.container}>
            <Head>
                <title>Create Next App</title>

                <link rel="icon" href="/favicon.ico" />
            </Head>

            <main>
                <h1 className={styles.title}>
                    {time}
                </h1>

            </main>
            <footer>
실행해보면 아래와 같이 서버에서 동작하는 걸 확인할 수 있다.
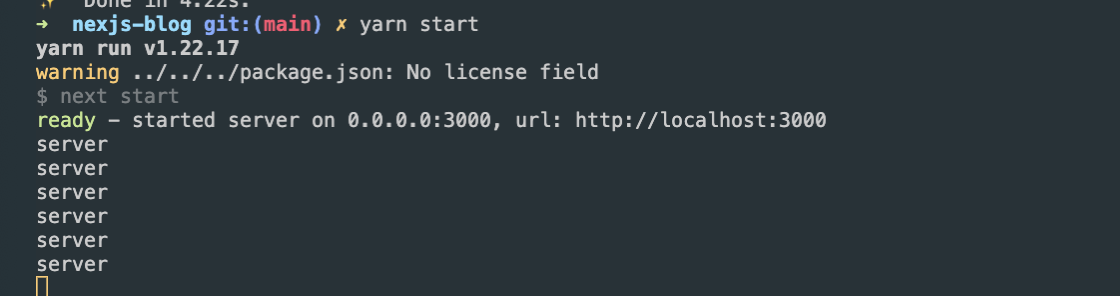
그렇다면 SSG를 생성하는 주체는 서버일까? 정답은 'No'. server에서 동작했던 이유는 개발환경에서 실행했기 때문이다. 개발환경에서는 ssg가 제대로 동작하지 않고 ssr처럼 동작한다. 그럼 build를 해 확인해보자.
yarn buildyarn startlocalHost:3000에서 확인해 보면 서버에서의 로그가 남지 않는 것을 확인할 수 있다.
빌드를 할 때 ssg페이지가 만들어져 화면에 찍힌 시간이 build 타임으로 찍혀 ssg가 만들어진 것이다.
요약하면 데이터 페칭을 ssg르 할 경우 빌드할 타임에 데이터를 다 가져와서 우리가 보여줄 static한 페이지를 생성해 버린 것이다.
그렇다면 이런 ssg는 언제 쓰일까?
CSR과 같이 새로 페이지를 그릴 때 마다 서버가 동작하면 여러 사용자가 사용할 경우 서버에 부하가 많이 걸릴 것이다. 블로그와 같이 정적인 페이지를 제공해도 문제가 없는 경우 ssg를 사용해 서버 부하를 낮추고 효율적인 페이지를 제공할 수 있다.
✌🏿✌🏿 IRS(incremental Static Regeneration)
증분 정적 사이트를 재생성하는, 다시 말해 특정 주기로 정적인 사이트의 데이터를 가져와서 다시 그려두는 것.
이것을 담당하는 함수는 getStaticPops (with revalidate)이다.
pages > isg.js 파일을 아래와 같이 생성해 보자.
import Head from 'next/head';
import styles from '../styles/Home.module.css';
export async function getStaticProps() {
console.log('server');
return {
props: { time: new Date().toISOString() },
revalidate: 1,
}
}
export default function ISR({ time }) {
return (
<div className={styles.container}>
<Head>
<title>Create Next App</title>
<link rel="icon" href="/favicon.ico" />
</Head>
<main>
<h1 className={styles.title}>
{time}
</h1>
</main>
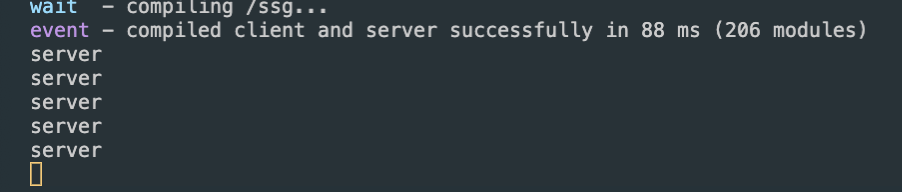
///서버를 실행했을 때 아래와 같이 1초 간격으로 server로그가 남는 것을 확인할 수 있다.
특정 시간 마다 revalidate옵션을 사용해 데이터를 새롭게 가져와 보일 수 있게 하는 장점이 있다. 상황에 맞춰서 SSG와 함께 사용하면 효과적일 수 있다.