.png)
Spring Legacy 프로젝트를 생성시 기본적으로 3개의 xml 파일이 생성된다 : web.xml, root-context.xml, servlet-context.xml
이 세가지 xml 파일을 자세히 알면 스프링 MVC 구조 이해시 많은 도움이 된다.
web.xml
전체 소스 코드
<?xml version="1.0" encoding="UTF-8"?>
<web-app version="2.5" xmlns="http://java.sun.com/xml/ns/javaee"
	xmlns:xsi="http://www.w3.org/2001/XMLSchema-instance"
	xsi:schemaLocation="http://java.sun.com/xml/ns/javaee https://java.sun.com/xml/ns/javaee/web-app_2_5.xsd">
	<!-- 공통적인거: 부모같은 개념 (크기상으로) -->
	<!-- The definition of the Root Spring Container shared by all Servlets and Filters -->
	<context-param>
		<param-name>contextConfigLocation</param-name>
		<param-value>/WEB-INF/spring/root-context.xml</param-value>
	</context-param>
	<!-- Creates the Spring Container shared by all Servlets and Filters -->
	<listener>
		<listener-class>org.springframework.web.context.ContextLoaderListener</listener-class>
	</listener>
	<!-- Processes application requests -->
	<!-- 개별적 -->
	<servlet>
		<servlet-name>appServlet</servlet-name>
		<servlet-class>org.springframework.web.servlet.DispatcherServlet</servlet-class>
		<init-param>
			<param-name>contextConfigLocation</param-name>
			<param-value>/WEB-INF/spring/appServlet/servlet-context.xml</param-value>
		</init-param>
		<load-on-startup>1</load-on-startup>
	</servlet>
	<servlet-mapping>
		<servlet-name>appServlet</servlet-name>
		<url-pattern>/</url-pattern>
	</servlet-mapping>
</web-app>
1. Root Context
<!-- The definition of the Root Spring Container shared by all Servlets and Filters -->
<context-param>
<param-name>contextConfigLocation</param-name>
<param-value>/WEB-INF/spring/root-context.xml</param-value>
</context-param>
<!-- Creates the Spring Container shared by all Servlets and Filters -->
<listener>
<listener-class>org.springframework.web.context.ContextLoaderListener</listener-class>
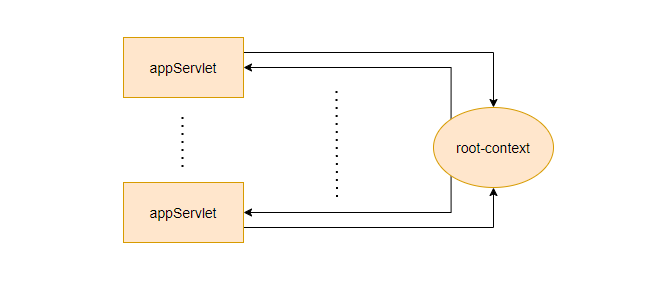
</listener>루트가 먼저 메모리에 올라가고, appservlet이 메모리에 올라갈 때, root-context에 있는 자원을 사용한다. root-context에는 <bean id = " " class = " "/> 이런 bean(객체)들이 들어있다.
 appServlet은 여러개 생성 가능하다.
2. App Servlet
appServlet
<servlet-mapping>
	<servlet-name>appServlet</servlet-name>
	<url-pattern>/</url-pattern>
</servlet-mapping>
url-pattern이 / 로 시작하는 애들은 appServlet을 호출시킨다.
ex: /board 또는 /list 등이 호출되었을 때, appServlet을 호출시킨다
Dispatcher
<servlet>
	<servlet-name>appServlet</servlet-name>
	<servlet-class>org.springframework.web.servlet.DispatcherServlet</servlet-class>
	<init-param>
		<param-name>contextConfigLocation</param-name>
		<param-value>/WEB-INF/spring/appServlet/servlet-context.xml</param-value>
	</init-param>
	<load-on-startup>1</load-on-startup>
</servlet>
그 후, Dispatcher Servlet의 service 메서드가 호출된다.
DipsatcherServlet: 사용자의 모든 요청을 받는다
따라서, DispatcherServlet을 Front Controller라고 한다. (앞에서 모든 요청을 다 받는 주문알바같은 존재)
<param-value>/WEB-INF/spring/appServlet/servlet-context.xml</param-value>위 코드는 Dispatcher가 알아야하는 환경설정이 담겨져 있는 servlet-context.xml의 위치를 알려준다. -> WEB/INF > spring > appServlet > servlet-context.xml 위치에 있다.
servlet-context.xml
전체 소스 코드
<?xml version="1.0" encoding="UTF-8"?>
<beans:beans xmlns="http://www.springframework.org/schema/mvc"
	xmlns:xsi="http://www.w3.org/2001/XMLSchema-instance"
	xmlns:beans="http://www.springframework.org/schema/beans"
	xmlns:context="http://www.springframework.org/schema/context"
	xsi:schemaLocation="http://www.springframework.org/schema/mvc https://www.springframework.org/schema/mvc/spring-mvc.xsd
		http://www.springframework.org/schema/beans https://www.springframework.org/schema/beans/spring-beans.xsd
		http://www.springframework.org/schema/context https://www.springframework.org/schema/context/spring-context.xsd">
	<!-- DispatcherServlet Context: defines this servlet's request-processing infrastructure -->
	<!-- Enables the Spring MVC @Controller programming model -->
	<annotation-driven />
	<!-- Handles HTTP GET requests for /resources/** by efficiently serving up static resources in the ${webappRoot}/resources directory -->
	<resources mapping="/resources/**" location="/resources/" />
	<!-- Resolves views selected for rendering by @Controllers to .jsp resources in the /WEB-INF/views directory -->
	<beans:bean class="org.springframework.web.servlet.view.InternalResourceViewResolver">
		<beans:property name="prefix" value="/WEB-INF/views/" />
		<beans:property name="suffix" value=".jsp" />
	</beans:bean>
	<context:component-scan base-package="com.study.lecture" />
</beans:beans>
1. resources mapping
<resources mapping="/resources/**" location="/resources/" />
위 코드에서 mapping="/resources/** "의 resources는 호출되는 url, **은 표현식으로, 만일 mapping="/resources/css/board/boardcss" 라면 css/board/boardcss가 **에 해당하는 부분이 된다.
그렇다면, 왜 resources를 맵핑시켜야 할까?
css, image등은 서버에서 실행되는게 아니라 클라이언트의 브라우저에서 실행된다.
즉, front controlle를 거치지 않고, Direct로 이동이 필요하다. 따라서, resources를 프론트컨트롤러를 거치지 않고 바로 이동시키기 위해 맵핑을 해주는 것이다.
<img src = "${root}/resources/image/a.jpg"> 가 호출되면 구지 Spring에게 요청하는게 아니라 위의 경로에 있는 이미지를 바로 보여주는 것이다.
2. View Resolver
<beans:bean class="org.springframework.web.servlet.view.InternalResourceViewResolver">
	<beans:property name="prefix" value="/WEB-INF/views/" />
	<beans:property name="suffix" value=".jsp" />
</beans:bean>
View Resolver는 사용자가 요청하게 되면,
아래 그림과 같이 Dispatcher(FrontController)에게 경로를 주게 된다.

만일 ViewResolver 에게 전달된 String 값이 "list"였다면 prefix인 WEB-INF/views/를 앞에 더하고 suffix인 .jsp를 뒤에 더하여 WEB-INF/views/list.jsp를 리턴하게 된다. 따라서, 이 경로에 list.jsp파일이 생성되어있는지 확인해야 한다
3. context: component-scan
만일 404가 뜬다면, 1순위로 의심해봐야한다
<context:component-scan base-package="com.study.lecture" />
context:component-scan은 Spring이 관리할 bean의 위치를 지정한다. 따라서, 사용할 패키지명을 잘 확인해야 하고, 위의 코드에선, com.study.lecture안의 사용할 컨트롤러에 @Controller 를 등록해 이 bean을 사용한다고 지정한다.
.jpeg)