import cv2
import numpy as np

img = cv2.imread('lett.jpg')

def mousehandler(event, x, y, flags, param):
    if event == cv2.EVENT_LBUTTONDOWN:
        print(x, y)
	# 클릭 시 원하는 좌표 출력
cv2.namedWindow('img')
cv2.setMouseCallback('img', mousehandler)
cv2.imshow('img', img)
cv2.waitKey(0)
cv2.destroyAllWindows()

import cv2
import numpy as np
points = []
color = (0, 255, 255)
img = cv2.imread('lett.jpg')
def mousehandler(event, x, y, flags, param):
if event == cv2.EVENT_LBUTTONDOWN: # 왼쪽 클릭 시 그림이 그려지는 핸들러
points.append((x, y)) # ((x, y)) -> 클릭 한 곳 좌표 뽑기 # list.append()이기에 (()) 사용
for point in points:
cv2.circle(img, point, 5, color, cv2.FILLED) # 왼쪽 클릭할 때 원형을 생성
if len(points) == 4: # 원형이 4개 그려지면
show_result() # 새로운 창으로 포인트 된 이미지 띄우기
cv2.imshow('img', img)
def show_result():
width, height = 530, 710
src = np.float32(points)# np.float(points) -> errors , np.float32(points)-> ex) [620. , 202.]
dst = np.array([[0, 0], [width, 0], [width, height], [0, height]], dtype = np.float32)
# 새로운 창에 좌상, 우상, 우하, 좌하
matrix = cv2.getPerspectiveTransform(src, dst)
# cv2.getPerspectiveTransform -> 좌표 x를 x'로 변환
# ex) 크기, 각도, 원근변환 -> 변환행렬 구하기
result = cv2.warpPerspective(img, matrix, (width, height))
# cv2.warpPerspective -> 변환 행렬값을 적용해 최종 이미지를 구하기
cv2.imshow('result', result)
cv2.namedWindow('img')
cv2.setMouseCallback('img', mousehandler)
cv2.imshow('img', img)
cv2.waitKey(0)
cv2.destroyAllWindows()
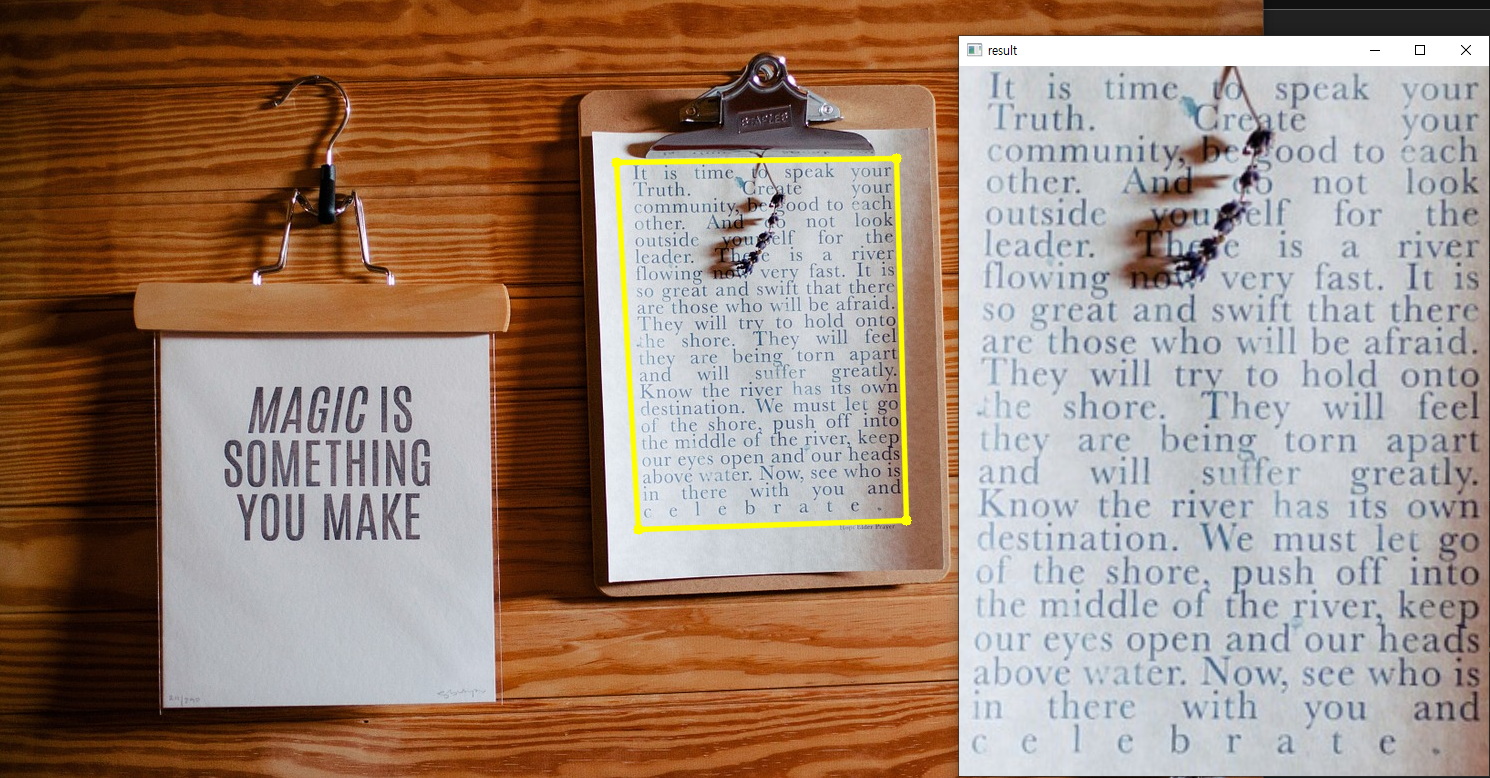
#왼쪽 상단부터 시계 방향으로 진행해야 이미지 제대로 추출
라인 그려 이미지 추출하기
import cv2
import numpy as np

points = []
color = (0, 255, 255)
thickness = 3
drawing = False

img = cv2.imread('lett.jpg')

def mousehandler(event, x, y, flags, param):
    global drawing
    img2 = img.copy() # 이미지를 카피해서 바로 진행 할 수 있게 준비

    if event == cv2.EVENT_LBUTTONDOWN: # 왼쪽 클릭 시 그림이 그려지는 핸들러
        drawing = True
        points.append((x, y))  # ((x, y)) -> 클릭 한 곳 좌표 뽑기 # list.append()이기에 (()) 사용

    if drawing:
        prev_point = None
        for point in points:
            cv2.circle(img2, point, 5, color, cv2.FILLED) # 왼쪽 클릭할 때 원형을 생성
            if prev_point:
                cv2.line(img2, prev_point, point, color, thickness, cv2.LINE_AA)
                # 원형을 생성하고 다음 원형을 생성하기 전까지 라인을 생성해놓음
            prev_point = point
            # 원형 좌표를 업데이트
        next_point = (x, y)

        if len(points) == 4: # 원형이 4개 그려지면
            show_result() # 새로운 창으로 포인트 된 이미지 띄우기
            next_point = points[0] # 마지막 포인트는 첫번째 포인트로 지정을 해서 원형 4개 찍자마자 바로 창을 띄우기
        cv2.line(img2, prev_point, next_point, color, thickness, cv2.LINE_AA)


    cv2.imshow('img', img2)

def show_result():
    width, height = 530, 710

    src = np.float32(points)# np.float(points) -> errors , np.float32(points)-> ex) [620. , 202.]
    dst = np.array([[0, 0], [width, 0], [width, height], [0, height]], dtype = np.float32)
    # 새로운 창에 좌상, 우상, 우하, 좌하
    matrix = cv2.getPerspectiveTransform(src, dst)
    # cv2.getPerspectiveTransform -> 좌표 x를 x'로 변환
    # ex) 크기, 각도, 원근변환 -> 변환행렬 구하기
    result = cv2.warpPerspective(img, matrix, (width, height))
    # cv2.warpPerspective -> 변환 행렬값을 적용해 최종 이미지를 구하기
    cv2.imshow('result', result)

cv2.namedWindow('img')
cv2.setMouseCallback('img', mousehandler)
cv2.imshow('img', img)
cv2.waitKey(0)
cv2.destroyAllWindows()

호기심천국