서버 지원 Template Engine
-
프로그램 로직과 프레젠테이션 계층을 분리하기 위한 수단
-
프레젠테이션 계층에서 로직을 쉽게 표현하고, 개발의 유연성을 향상 시키며 유지보수의 효율 또한 향상된다.
-
서버 템플릿 엔진 (SSR : Server Side Rendering) : 서블릿(서버)에서 동작하는 템플릿
-
템플릿 양식과 데이터를 이용해 html을 생성하여 브라우저에 전달한다.
-
정해진 템플릿 양식과 데이터가 매핑하여 html 문서를 만들어주는 SW로 그 종류는 다양하다
- 그중 Thymeleaf에 대해서 알아보자.
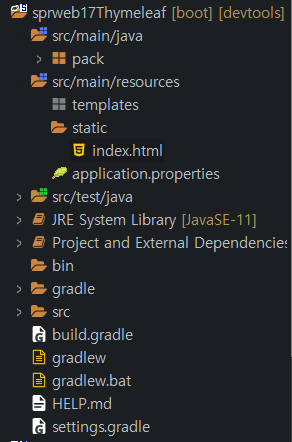
이클립스 thymeleaf 지원 설정
Thymeleaf
-
의존성에 Thymeleaf 추가. maven이 아닌 gradle로 빌드 할 예정
-
생성된 프로젝트를 확인해보면 pom.xml 대신 build.gradle로 바뀌었다.
마크업 언어를 버리면서 코드가 간결해지고 속도가 빨라졌다. -
이제 jsp를 사용하지 않고, html에서 Thymeleaf 문법을 이용하여 모두 처리 할 예정
-
요청을 받은 컨트롤러
testController
@Controller
public class TestController {

	@GetMapping("thymetest")
	public String abc(Model model) {
		model.addAttribute("msg","타임리프처리");
		return "test1";
	}
}
이전엔 test1.jsp 반환값과 모델을 전송했다. application.properties에서 prefix를 jsp와 경로지정을 하지 않았기에 자연스레 뷰 타겟은 templates의 test1.html로 지정된다.
test.html
<body>
	타임리프 연습
	<br> 메세지1 :
	<span th:text="${msg}">이 영역의 텍스트는 순수 html만 표시되나,
    boot로 실행하면 대체됨.</span>
</body>-
태그 속 텍스트내용이 타임리프의 문법에 의해 대체된것을 확인 할 수 있다.
viewresolver와 서버를 통해 뷰로 나올때 처리된것. -
단 브라우저가 타임리프를 지원하지않거나 서버를 통해 실행하지않고, 순수html로 확인한다면 태그속 내용이 그대로 출력된다.
-
디버깅이 편해지고
프론트와 백엔드 개발에 대해서 업무분장이 확실해진다.
타임리프가 지원되지않는 환경에서 처리가 될수도 있다고 예상되면, 그를 대체할 내용을 태그속에 써넣는 용도로도 생각할 수 있다.

변수 출력 / 처리
	* 타임리프 연습 메세지1 :
	<span th:text="${msg}">실행하면 대체됨.</span><br>

	* 메세지 출력 (인라인 처리 : 본문에 변수를 포함) :
	<span>[[${msg}]]</span><br>

	* 값 결합(문자열 + 사용) :
	<span th:text="'메세지는 '+${msg}+' 입니다'">문자열 더하기</span><br>

	* 값 결합(리터럴 치환):
	<span th:text="|메세지는 ${msg} 입니다.|">"|문자열|"형태 사용</span><br>

	* 지역변수 처리: <!-- th:with="변수명=값",... -->
	<span th:with="kor=90,eng=80">
		<span th:text="|${kor}+${eng}=${kor+eng}|">변수는 태그 내에서만 유효</span>
	</span><br>
조건,관계 연산
	* 관계 연산:
	<span th:text="3 >= 4"></span> <span th:text="3 < 4"></span> /
	<span th:text="a >= b"></span> <span th:text="a < b"></span> /
	<span th:text="a == b"></span> <span th:text="a != b"></span><br>

	* 조건 연산 (if,unless) :
	<span th:text="5 > 4?'참':'거짓'">삼항연산</span><br>

	* 조건 연산 (true/false) :
	<span th:if="5 > 4">
		<b>조건에 따라 수행이 결정</b>
	</span><br>

	* switch 조건문 :
	<div th:switch="${msg2}">
		<b th:case="james" th:text="|${msg2}님|"></b>
		<i th:case="tom" th:text="|${msg2}씨|"></i>
		<strong th:case="*">모르는 이름(else)</strong>
	</div><br>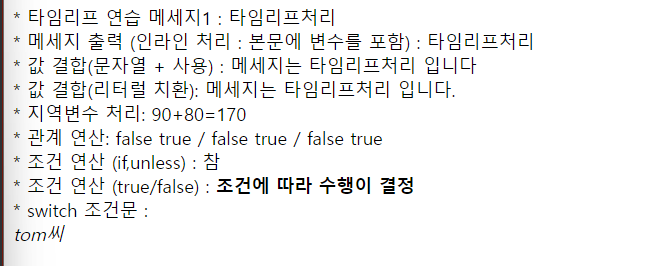
객체 자료(DTO / LIST) 출력
		//DTO 자료 출력용
		ArrayList<Sangpum> list = new ArrayList<Sangpum>();

		//DTO단일자료
		Sangpum sangpum = new Sangpum();
		sangpum.setCode("10");
		sangpum.setSang("마우스");
		sangpum.setPrice("1200");
		model.addAttribute("sangpum",sangpum);

		//List복수자료
		Sangpum sangpum2 = new Sangpum();
		sangpum2.setCode("10");
		sangpum2.setSang("키보드");
		sangpum2.setPrice("139000");

		list.add(sangpum);
		list.add(sangpum2);
		model.addAttribute("list",list);
		return "test1";
@ DTO자료 출력(getter참조) :
<span th:text="${sangpum.code}"></span>
<span th:text="${sangpum['sang']}"></span>
<span th:text="${sangpum.price}"></span><br>
@ 참조 기법 :
<span th:object="${sangpum}">
<span th:text="*{code}">자식요소에서는 *{필드명}</span>
<span th:text="*{sang}"></span>
<span th:text="*{price}"></span>
</span><br>
@ 리스트 출력
<div th:text="${list[0]}"></div>
<div th:text="${list[1]}"></div>
@ 반복처리
<table border="1">
<tr><th>CODE</th><th>NAME</th><th>PRICE</th></tr>
<!-- 세가지 방법 -->
<tr th:each="s:${list}">
<td th:text="${s.code}"></td>
<td>[[${s.sang}]]</td>
<td th:text="${s['price']}"></td>
</tr>
</table>- 객체를 꺼내쓰는 여러가지방법을 잘 확인하자
또다른 방법 (status)
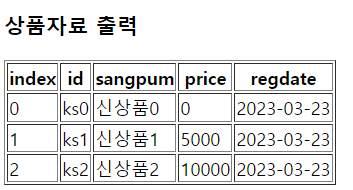
<table border="1">
	<tr>
		<th>index</th><th>id</th><th>sangpum</th><th>price</th><th>regdate</th>
	</tr>
    <!-- <tr th:each="dto:${dtos}"> -->
	<tr th:each="dto, status:${dtos}">
		<td th:text="${status.index}"></td>
		<td th:text="${dto.id}"></td>
		<td th:text="${dto.name}"></td>
		<td th:text="${dto['price']}"></td>
		<td>[[${dto.regDate}]]</td>
	</tr>
</table>-
status는 임의로 지정한 변수명. index기능을 사용했다.
-
odd, even으로 홀짝 조건, if와 switch를 사용해보았다.
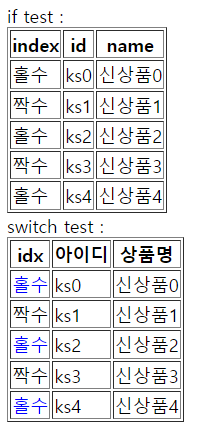
		<tr th:each="d, idx:${dtos}">
			<!-- 짝수는 even-->
			<td th:if="${idx.odd}" th:text="홀수"></td>
			<!-- 거짓이면 수행-->
			<td th:unless="${idx.odd}" th:text="짝수"></td>
			<td th:text="${d.id}"></td>
			<td th:text="${d.name}"></td>
		</tr>
       	<tr th:each="d, idx:${dtos}">
			<td th:switch="${idx.even}">
				<span th:case="true">짝수</span>
				<span th:case="false" style="color:blue">홀수</span>
			</td>
			<td th:text="${d.id}"></td>
			<td th:text="${d.name}"></td>
		</tr>
링크처리
<a href="/thleaf/ex1">show1로 이동(기존)</a>
<a href="thleaf/ex4?param1=불백¶m2=당면없음">test4</a>
<a th:href="@{/thleaf/ex1}">show1로 이동(th)</a>
<a th:href="@{/thleaf/ex4(param1=안녕,param2=반가워)}">show3로 이동(get파라미터)</a>
get요청 처리~출력
	@GetMapping("/ex4")
	public String ab4(String param1,String param2,Model model) {
		model.addAttribute("arg1",param1);
		model.addAttribute("arg2", param2);
		return "show4";
}<span th:text="${arg1}"></span>
<span>[[${arg2}]]</span>레이아웃 : 머리글 / 바닥글 flagment
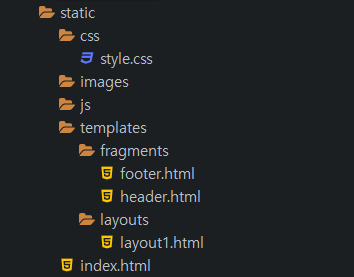
위 사진처럼 파일을 생성. 각각 코드 작성
fragment
- header : 머리글
- footer : 바닥글
<!DOCTYPE html>
<html xmlns:th="http://www.thymeleaf.org">
<div th:fragment="header">
	여기는 문서의 머리글 영역
</div>
</html>
<!DOCTYPE html>
<html xmlns:th="http://www.thymeleaf.org">
<div th:fragment="footer">
	여기는 문서의 바닥글 영역
</div>
</html>
layouts
- layout1.
<!DOCTYPE html>
<html xmlns:th="http://www.thymeleaf.org"
	xmlns:layout="http://www.ultraq.net.nz/thymeleaf/layout">
<head>
<meta charset="UTF-8">
<title>Insert title here</title>
<th:block layout:fragment="script"></th:block>
<th:block layout:fragment="css"></th:block>
</head>
<body>
	<div th:replace="flagments/header::header"></div>
	<div layout:fragment="content">

	</div>
	<div th:replace="flagments/footerr::footer"></div>
</body>
</html>- show에 네임스페이스 추가
<!DOCTYPE html>
<html xmlns:th="http://www.thymeleaf.org"
		xmlns:layout="http://www.ultraq.net.nz/thymeleaf/layout"
		layout:decorate="~{layouts/layout1}">
<head>
<meta charset="UTF-8">
<title>Insert title here</title>
</head>
<body>
<h2>레이아웃 결과</h2>
<div layout:fragment="content">
	본문 영역
</div>
</body>
</html>
수정폼 작성시 th:object~th:field

<form action="update" method="post" th:object="${data}">
	번호 : <span th:text="*{num}"></span>
			<input type="hidden" th:field="*{num}"><br>
	이름 : <input type="text" th:field="*{name}"><br>
	주소 : <input type="text" th:field="*{addr}"><br>
	<input type="submit">
</form>-
기존데이터를 로드할때의 문법과 hidden태그를 어떻게 사용했는지 잘 확인해야함.
-
th:object~th:field