views의 연결방법 3가지
- Function views
- Class-based views
- Including another URLconf
각 연결방법의 형식
urls
urlpatterns = [
    path("admin/", admin.site.urls),
    # 사용자 요청에 대한 컨트롤러 연결법3

    # Function views
    path("",views.MainFunc,name="MainFunc"),

    # Class-based views
    path("gpapp/callget",CallView.as_view()),  #import

    # Including another URLconf
    path('myapp/',include('gpapp.urls'))  #myapp/ 하위 요청. include app urls

]
views
def MainFunc(request):
    return render(request,"index.html")

class CallView(TemplateView): #TemplateView를 상속
    template_name = 'callget.html'

def selectFunc(request):
    return render
    ...
    .
- 여기서 URLconf의 방법은
django.urls.conf을 import해야하고,
해당하는 app파일에 urls.py파일을 생성한다.
urls.py(app)
from django.urls import path
from gpapp import views

urlpatterns = [
    path("insert",views.insertFunc),
    path("select",views.selectFunc),
    path("update",views.updateFunc),
    ]
GET/POST
- 같은 요청명에서도 다른 방식(GET/POST)에 따라 요청을 처리 할 수 있다
views - insert요청 (insertFunc)
def insertFunc(request):

    if request.method == 'GET':
        print('get 요청 처리')
        #get param 받기
        print(request.GET.get("name")) #또는 request.GET["name"]
        return render(request,"insert.html")

    elif request.method == 'POST':
        print('POST 요청 처리')
        irum = request.POST.get("name")
        return render(request,"list.html",{"irum":irum+'님'})

    else:
        print('요청오류')
insertFunc 요청시 요청 방식에 따라 if로 분기가 갈림.
- POST방식 요청시 주의점.
사이트 간 요청 위조 방지 (csrf)에 의해 반드시 해야할 예약어가 있다.
html에서의 form태그를 예로 보자
<form action="/myapp/insert" method="post">{%csrf_token%}
이름 : <input type="text" name="name"><br>
<input type="submit" value="OK">
</form>{%csrf_token%}를 작성
Session
setos?favorite_os=window"
setos 요청시 세션 관련 함수이다.
- 요청 형식에 따라 if에 의해 다른 페이지를 보인다.
def setOsFunc(request):

    if "favorite_os" in request.GET:
        # f_os라는 key로 세션 생성
        request.session["f_os"] = request.GET["favorite_os"]
        return HttpResponseRedirect("/showos")
    else: #세션이 없을때
return render(request, 'selectos.html')-
만약 favorite_os의 파라미터가 존재한다면 if블럭을 실행한다.
받아진 파라미터를 f_os 라는 키의 이름으로 세션이 등록됨.
등록할때와 읽을때 모두request.session["f_os"]를 사용했다.
파라미터 없을시 selectos.html로 redicect. -
request.GET는<QueryDict: {}>, 즉 키:값 형태의 dict타입으로 반환된다. -
HttpResponseRedirect(요청명)으로 redirect 방식 반환. main urls.py를 만난다.
f_os라는 세션을 등록을 완료했으니 이를 사용해보자
showos 요청
def showOsFunc(request):
    dict_content = {}
    if 'f_os' in request.session:
        print('유효시간',request.session.get_expiry_age())
        #키 : 값. 넘어가서 키의 이름을 사용
        dict_content['sel_os'] = request.session["f_os"]
        dict_content['message'] = '선택한 운영체제는%s'%request.session['f_os']
    else:
        dict_content['sel_os'] = none
        dict_content['message'] = '운영체제를 선택하지 않았습니다'
    #세션 삭제(특정 key)
    #del request.session['f_os']
    request.session.set_expiry(5) #유효시간 5초로 재 지정
return render(request, 'show.html',dict_content)- request.session에 f_os키를 가진 세션이 있으면 if를 실행한다.
dict타입 dict_content에 sel_os,message 키로 값을 넣고 render로 html에 반환시켰다.
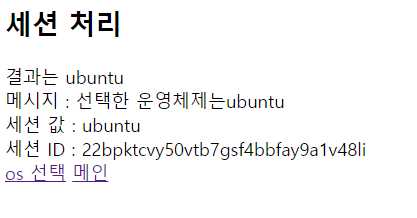
<body>
<h2>세션 처리</h2>
결과는 {{sel_os}} <br>
메시지 : {{message}} <br>
세션 값 : {{request.session.f_os}} <br>
세션 ID : {{request.session.session_key}} <br>
<a href="setos">os 선택</a>
<a href="/">메인</a>  <br>
</body>
dict타입에 담았을때 사용한 키값을 여기서 사용한다.
session관련 여러 함수도 있으니 잘 기억하는것이 좋겠다.
5초후

session 예제 장바구니
장바구니를 담는 form 버튼이다. 상품정보를 받아 세션에 추가해보자
			<form action="cart" name="frm" method="post">{%csrf_token%}
				<input type="hidden" name="name" value="오리">
				<input type="hidden" name="price" value="1249000">
				<input type="submit" value="장바구니에 물건담기">
				<input type="button" value="이전 화면" onclick="history.back()">
			</form>
views-cartFunc
- 상품의 이름과 가격이 넘어온 상태.
def cartFunc(request):
    name = request.POST.get("name")
    price = request.POST["price"]

    product = {'name':name, "price":price}
    productList = []

    if 'shop' in request.session: #기존에 담았던적이 있으면
        productList = request.session['shop'] #기존 내용을 가져옴
        productList.append(product)
        request.session['shop'] = productList #다시 shop세션 갱신
    else: #처음 담으면
        productList.append(product) #리스트에 물건정보담고
        request.session['shop'] = productList #shop세션에 올림

    context = {} #dict
    context['products'] = request.session['shop']
return render(request, 'cart.html',context)-
POST로 받은 두 자료를 변수에 추가.
-
product라는 dict에 두 자료를 키:값 형태로 저장한다.
-
if문에서 shop세션에 의해 분기가 나뉜다.
- 기존에 장바구니에 담았던적이 있다면,
'shop' in request.session - 처음담으면,
- 기존에 장바구니에 담았던적이 있다면,
-
먼저 기존에 담은적이 있다면 기존 shop세션에 존재하는 등록내용을 가져와 productList 리스트 변수에 저장한다. 새 상품 정보 dict를 담고 다시 shop세션에 갱신한다.
-
처음 담았다면 바로 productList 리스트에 저장 후 세션에 등록한다.
render로 보내야하는 내용은 dict이여야 하기때문에 context라는 전송용 dict를 만들었다. html에서 키값인 products를 이용하면 된다.
cart.html
- django templates 문법을 사용하여 넘어온 dict 객체를 사용했다.
<table border="1">
	<tr>
		<th>상품명</th><th>가격</th>
	</tr> <!-- django templates -->
	<tr>
	{%if products%}
		{%for pro in products%}
		<tr>
			<td>{{pro.name}}</td>
			<td>{{pro.price}}</td>
		</tr>
		{%endfor%}
	{%else%}
	<tr>
		<td colspan="2">주문 자료 없음</td>
	</tr>
	{%endif%}
</table>