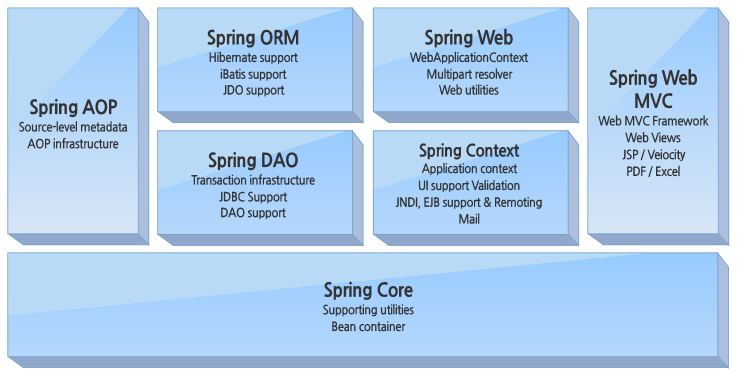
Spring
환경설정
<properties>
  <!-- Generic properties -->
  <java.version>11.0.5</java.version>
  <project.build.sourceEncoding>UTF-8</project.build.sourceEncoding>
  <project.reporting.outputEncoding>UTF-8</project.reporting.outputEncoding>
  <!-- Spring -->
  <spring-framework.version>5.1.5.RELEASE</spring-framework.version>
</properties>
<dependencies>
  <dependency>
    <groupId>org.springframework</groupId>
    <artifactId>spring-context</artifactId>
    <version>${spring-framework.version}</version>
  </dependency>
</dependencies>- 리소스에 init.xml 생성 후 bean 추가작성
	<bean id="mBean" class="pack.Message1" />
	<!-- pack.Message1 mBean = new pack.Message1();과
유사함. Singleton -->- 다형성 확인
	public static void main(String[] args) {
		Message1 message1 = new Message1();
		message1.sayHello("홍길동");
		Message2 message2 = new Message2();
		message2.sayHello("홍길동2");
		System.out.println("----");

		MessageInter inter;

		inter = message1;
		inter.sayHello("홍길동2");
		inter = message2;
		inter.sayHello("신기해");

		System.out.println("-------");
		ApplicationContext context =
        new ClassPathXmlApplicationContext("init.xml");
		MessageInter inter2 = (MessageInter)context.getBean("mBean");
		inter2.sayHello("홍길동3");
}- 프로젝트 빌드 도구 : Maven의 방법이다.
- 장점 - 의존성 설정을 간결히 함. 동일한 방식의 배포 가능
- 위의 코드는 순수 자바의 경우임
실습2 Spring DI(Dependency Injection)
-
MVN repository에서 Spring Context 설치 후 pom.xml에 추가 .
(해당 단계는 위에서 이미 적용해보았다. -
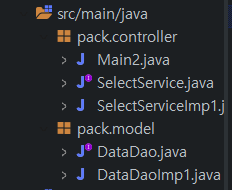
DB처리 용 DataDao 인터페이스 생성 .(model)
public interface DataDao {
	void selectData();
	//...
}
- DataDao를 구현한 DataDaoImp1 (model)
	public void selectData() {
		System.out.println("selectData수행");
}- Controller 인터페이스 SelectService생성 (Controller)
public interface SelectService {
	void selectProcess();
}- Controller 인터페이스 SelectService 를 구현한 SelectServiceImp1클래스.
public class SelectServiceImp1 implements SelectService{
	private DataDao dataDao; //

	//생성자 주입(constructor Injection) : private 인터페이스 멤버에 접근하기 위함
	public SelectServiceImp1(DataDao dataDao) {
		this.dataDao = dataDao;
	}
	public void selectProcess() {
		System.out.println("selectProcess가 DB처리를 위해 DataDao의 파생클래스 사용");
		dataDao.selectData();
	}
}- 의존성 주입 - 객체를 외부의 조립기(Spring)가 생성 후 특정 클래스에 주입.
- 시스템에 있는 각 객체를 조정하는 외부 객체가 의존관계로 주어짐. 약결합이 장점
- Main
	public static void main(String[] args) {
		//기존방법
		DataDaoImp1 daoImp1 = new DataDaoImp1();
		DataDao dataDao = daoImp1;

		SelectServiceImp1 imp1 = new SelectServiceImp1(dataDao);
		SelectService selectService = imp1;
		selectService.selectProcess();
}- 클래스 인스턴스를 생성하고
DataDao dataDao = daoImp1;에서 다형성의 특징을 살려 주소를 넘겼다. - 인터페이스 객체변수가 되었고 [5]번 코드의 DI 객체 생성자 파라미터에 넣었다.
- 완성한 객체를
SelectService에 넣어 select처리를 시작하도록 했다.
이제 해당과정을 java가 아닌 (Spring-xml) 으로써 구현해봤다.
- init.xml 에서
selectServiceImp1의 Bean을 생성한다.
<bean id="selectServiceImp1" class="pack.controller.SelectServiceImp1">
		<constructor-arg>
			<ref bean="dataDaoImp1" />
		</constructor-arg>
        <bean name="dataDaoImp1" class="pack.model.DataDaoImp1" />
</bean>
- 없으면 상관 없겠지만, 상기되어있듯 해당 객체는 생성자를 받으므로 파라미터를 줘야한다.
<constructor-arg>태그로 가능하다.
다만 DataDao라는 타입을 가진 파라미터이므로 추가로 인스턴스bean을 생성해야한다.
- Main.java
		//xml정보 넘김
		ApplicationContext context = new ClassPathXmlApplicationContext("init.xml");
		//xml속 bean명을 넘김
		SelectService selectService2 = (SelectService)context.getBean("selectServiceImp1");
selectService.selectProcess();- 직접 new 객체를 만들지 않는것이 특징.
ApplicationContextinit.xml 의 context객체를 만들고, context의 getBean으로 앞에서 선언한 bean id를 불렀다.
환경설정 xml을 class로 (Spring-class)
- 어노테이션 클래스를 사용하면 앞에서 bean사용을 위해 작성했던 xml파일을 클래스로 대체할수있다.
Config.java
@Configuration
public class Config {
	public DataDaoImp1 dataDaoImp1() { //싱글톤
		DataDaoImp1 dataDaoImp1 = new DataDaoImp1();
		return dataDaoImp1;
	}
	@Bean("selectServiceImp1") //getBean 호출시 불릴 이름. 생략됨.
	public SelectServiceImp1 selectServiceImp1() {
		SelectServiceImp1 selectServiceImp1 = new SelectServiceImp1(dataDaoImp1());
		return selectServiceImp1;
	}
}
- 자기자신 인스턴스를 반환하는 싱글톤패턴이 적용된 메소드
DataDaoImp1을 @Bean 이 적용된 컨트롤러 메소드에 넣었다.
- 이렇게 작성하면 앞의 xml파일과 역할이 똑같다. 이제 사용을 해본다.
		AnnotationConfigApplicationContext context2 =
        new AnnotationConfigApplicationContext(Config.class);
		SelectService selectService3 = (SelectService)context.getBean("selectServiceImp1");
selectService.selectProcess();- 방식은 똑같으나 사용하는 객체명과 파라미터가 약간다르다.