- 유튜브 "빵형의 개발도상국"을 보면서 공부 및 프로젝트를 진행하였습니다. https://youtu.be/tQeuPrX821w - 가운데 손가락 모자이크 알고리즘 만들기
https://youtu.be/udeQhZHx-00 - 가위바위보 기계 만들기 - 손가락 인식 인공지능- 참고한 깃허브 자료
https://github.com/kairess/Rock-Paper-Scissors-Machine
🖕 가운데 손가락 모자이크 알고리즘 만들기
본격적으로 만들어보자!
✅ 우리가 사용할 라이브러리
- openCV(cv2) : 이미지 처리 라이브러리, 웹캠 사용을 위해 가져옴!
- mediapipe : 구글에서 만든 크로스 플랫폼 프레임워크, 추론 모델과 미디어 처리 기능을 포함한 ML 솔루션 혹은 파이프라인들을 제공한다.(pip install mediapipe로 설치하면 됨)
MediaPipe에 대한 친절한 설명
영어로 된 친절한 설명 - numpy : 행렬 연산 라이브러리
STEP 1. 데이터셋 수집 코드 작성
이전의 가위바위보 코드에서 single.py를 모두 복사해서 gather_data.py라는 뻐큐 데이터를 수집하는 파일로 만든다.

그리고 손가락 마디의 각도를 계산하는 부분만 남겨둔다.
import cv2 # 웹캠 제어 및 ML 사용
import mediapipe as mp # 손 인식을 할 것
import numpy as np

max_num_hands = 1 # 손은 최대 1개만 인식
gesture = { # 제스처의 클래스를 정의하는 부분에서 11번:fy 클래스 만들기
    0:'fist', 1:'one', 2:'two', 3:'three', 4:'four', 5:'five',
    6:'six', 7:'rock', 8:'spiderman', 9:'yeah', 10:'ok', 11:'fy'
}

# MediaPipe hands model
mp_hands = mp.solutions.hands
mp_drawing = mp.solutions.drawing_utils

 # 손가락 detection 모듈을 초기화
hands = mp_hands.Hands(
    max_num_hands=max_num_hands, # 최대 몇 개의 손을 인식?
    min_detection_confidence=0.5, # 0.5로 해두는 게 좋다!
    min_tracking_confidence=0.5)

# 제스처 인식 모델
file = np.genfromtxt('gesture_train.csv', delimiter=',') # 각 제스처들의 라벨과 각도가 저장되어 있음, 정확도를 높이고 싶으면 데이터를 추가해보자!
print(file.shape)

cap = cv2.VideoCapture(0)

# **화면을 클릭했을 때만 데이터를 저장**
# 즉 클릭했을 때 현재 각도 data를 원본 file에 추가하도록 한다.
def click(event, x, y, flags, param): # clik 핸들러
    global data, file
    if event == cv2.EVENT_LBUTTONDOWN:
        file = np.vstack((file, data)) # numpy의 vstack을 사용해서 이어붙여준다.
        print(file.shape)
cv2.namedWindow('Dataset')
cv2.setMouseCallback('Dataset', click)

while cap.isOpened(): # 웹캠에서 한 프레임씩 이미지를 읽어옴
    ret, img = cap.read()
    if not ret:
        continue

    img = cv2.flip(img, 1)
    img = cv2.cvtColor(img, cv2.COLOR_BGR2RGB)

    result = hands.process(img)

    img = cv2.cvtColor(img, cv2.COLOR_RGB2BGR)

    if result.multi_hand_landmarks is not None:
        for res in result.multi_hand_landmarks:
            joint = np.zeros((21, 3))
            for j, lm in enumerate(res.landmark):
                joint[j] = [lm.x, lm.y, lm.z]

            # Compute angles between joints
            v1 = joint[[0,1,2,3,0,5,6,7,0,9,10,11,0,13,14,15,0,17,18,19],:] # Parent joint
            v2 = joint[[1,2,3,4,5,6,7,8,9,10,11,12,13,14,15,16,17,18,19,20],:] # Child joint
            v = v2 - v1 # [20,3]
            # Normalize v
            v = v / np.linalg.norm(v, axis=1)[:, np.newaxis]

            # Get angle using arcos of dot product
            angle = np.arccos(np.einsum('nt,nt->n',
                v[[0,1,2,4,5,6,8,9,10,12,13,14,16,17,18],:],
                v[[1,2,3,5,6,7,9,10,11,13,14,15,17,18,19],:])) # [15,]

            angle = np.degrees(angle) # Convert radian to degree

            # Inference gesture
            data = np.array([angle], dtype=np.float32)
            data = np.append(data, 11) # 각도 데이터의 마지막에 정답 라벨인 숫자 11을 추가

            mp_drawing.draw_landmarks(img, res, mp_hands.HAND_CONNECTIONS)

    cv2.imshow('Game', img)
    if cv2.waitKey(1) == ord('q'): #q를 눌러서 while 루프 빠져나오고 데이터 수집 종료
        break

np.savetxt('gesture_train_fy.csv', file, delimiter=",") # 수집한 데이터를 txt 파일로 저장 - 화면을 클릭했을 때만 데이터를 저장
현재 fy 모양 손가락에 해당하는 데이터를 수집
ㅋㅋㅋㅋㅋㅋㅋㅋㅋㅋㅋㅋㅋㅋㅋㅋ

나도 수집해보았다.
STEP 2. 메인 코딩
import cv2
import mediapipe as mp
import numpy as np

max_num_hands = 1
gesture = {
    0:'fist', 1:'one', 2:'two', 3:'three', 4:'four', 5:'five',
    6:'six', 7:'rock', 8:'spiderman', 9:'yeah', 10:'ok',
}

# MediaPipe hands model
mp_hands = mp.solutions.hands
mp_drawing = mp.solutions.drawing_utils
hands = mp_hands.Hands(
    max_num_hands=max_num_hands,
    min_detection_confidence=0.5,
    min_tracking_confidence=0.5)

# Gesture recognition model
file = np.genfromtxt('gesture_train_료.csv', delimiter=',')
angle = file[:,:-1].astype(np.float32)
label = file[:, -1].astype(np.float32)
knn = cv2.ml.KNearest_create()
knn.train(angle, cv2.ml.ROW_SAMPLE, label)

cap = cv2.VideoCapture(0)

while cap.isOpened():
    ret, img = cap.read()
    if not ret:
        continue

    img = cv2.flip(img, 1)
    img = cv2.cvtColor(img, cv2.COLOR_BGR2RGB)

    result = hands.process(img)

    img = cv2.cvtColor(img, cv2.COLOR_RGB2BGR)

    if result.multi_hand_landmarks is not None:
        for res in result.multi_hand_landmarks:
            joint = np.zeros((21, 3))
            for j, lm in enumerate(res.landmark):
                joint[j] = [lm.x, lm.y, lm.z]

            # Compute angles between joints
            v1 = joint[[0,1,2,3,0,5,6,7,0,9,10,11,0,13,14,15,0,17,18,19],:] # Parent joint
            v2 = joint[[1,2,3,4,5,6,7,8,9,10,11,12,13,14,15,16,17,18,19,20],:] # Child joint
            v = v2 - v1 # [20,3]
            # Normalize v
            v = v / np.linalg.norm(v, axis=1)[:, np.newaxis]

            # Get angle using arcos of dot product
            angle = np.arccos(np.einsum('nt,nt->n',
                v[[0,1,2,4,5,6,8,9,10,12,13,14,16,17,18],:],
                v[[1,2,3,5,6,7,9,10,11,13,14,15,17,18,19],:])) # [15,]

            angle = np.degrees(angle) # Convert radian to degree

            # Inference gesture
            data = np.array([angle], dtype=np.float32)
            ret, results, neighbours, dist = knn.findNearest(data, 3)
            idx = int(results[0][0])

            # 제스처 모델에서 추론한 결과가 뻐큐(11)면
            if idx == 11:
                # **손의 랜드마크 사각형 (바운딩 박스)영역 잡기**
                x1, y1 = tuple((joint.min(axis=0)[:2] * [img.shape[1], img.shape[0]] * 0.95).astype(int)) # 왼쪽 위
                x2, y2 = tuple((joint.max(axis=0)[:2] * [img.shape[1], img.shape[0]] * 1.05).astype(int)) # 오른쪽 아래

				# 모자이크 처리
                fy_img = img[y1:y2, x1:x2].copy() # 사각형 영역을 잘라서 복사
                fy_img = cv2.resize(fy_img, dsize=None, fx=0.05, fy=0.05, interpolation=cv2.INTER_NEAREST) # 이미지 크기를 0.05배 작게 만들고
                fy_img = cv2.resize(fy_img, dsize=(x2 - x1, y2 - y1), interpolation=cv2.INTER_NEAREST) # 이미지 크기를 다시 원본으로!

                img[y1:y2, x1:x2] = fy_img # 원본 이미지에 모자이크 붙이기

    cv2.imshow('Filter', img)
    if cv2.waitKey(1) == ord('q'):
break- 손의 랜드마크 사각형 (바운딩 박스)영역 잡기

❗ 결과 ❗
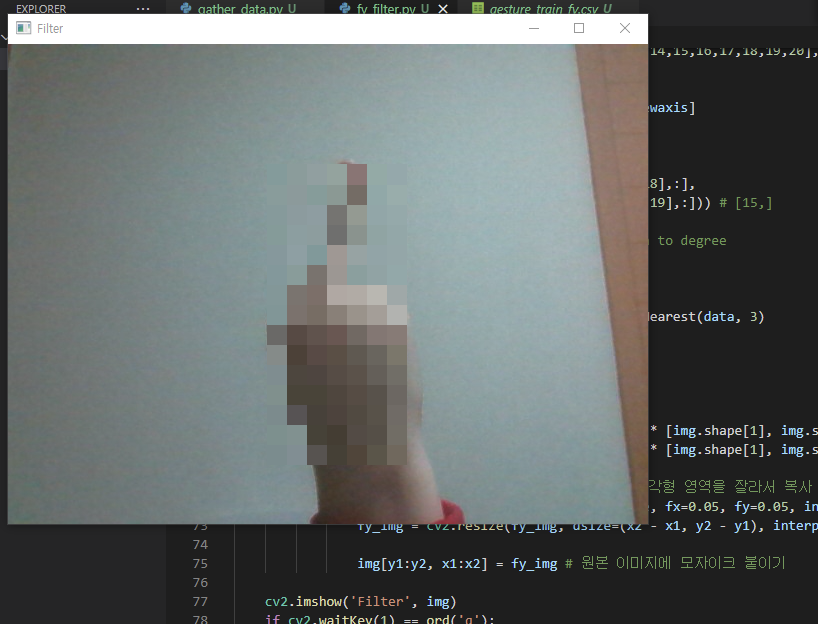
뻐큐!!! 잘 가려진다!!!

*2020~2023년까지의 기록 / Tistory로 이동합니다!