개요
프로젝트를 진행할때 api 정의서, 테스터 등 준비하고 설정해야 할 것들이 많아지는데 swagger 로 간편하게 사용해 보자
설치
1. swagger-jsdoc
$ npm install swagger-jsdoc패키지 이름대로 해당 라이브러리는 주석에 swagger태그를 작성해 api 를 문서화 하는 라이브러리이다.
2. swagger-ui-express
$ npm install swagger-ui-express마찬가지로 패키지 명을 보면 알 수 있듯이, 해당 라이브러리는 1.번에서 문서화된 api를 보기 편하게 UI로 그려주는 라이브러리이다.
설정
// app.js

const options = {
  definition: {
    openapi: '3.0.0',
    info: {
      title: '${SWAGGER_TITLE}',
      version: '1.0.0',
    },
  },
  apis: ['api들의 경로'],
};
const openapiSpecification = swaggerJsdoc(options);
expressServer.use('/api-docs', swaggerUi.serve, swaggerUi.setup(openapiSpecification));
swagger-jsdoc 을 사용하고있기 때문에 openapiSpecification 을 swagger.Ui.setup() 함수에 인자로 전달해주기만 하면 된다.
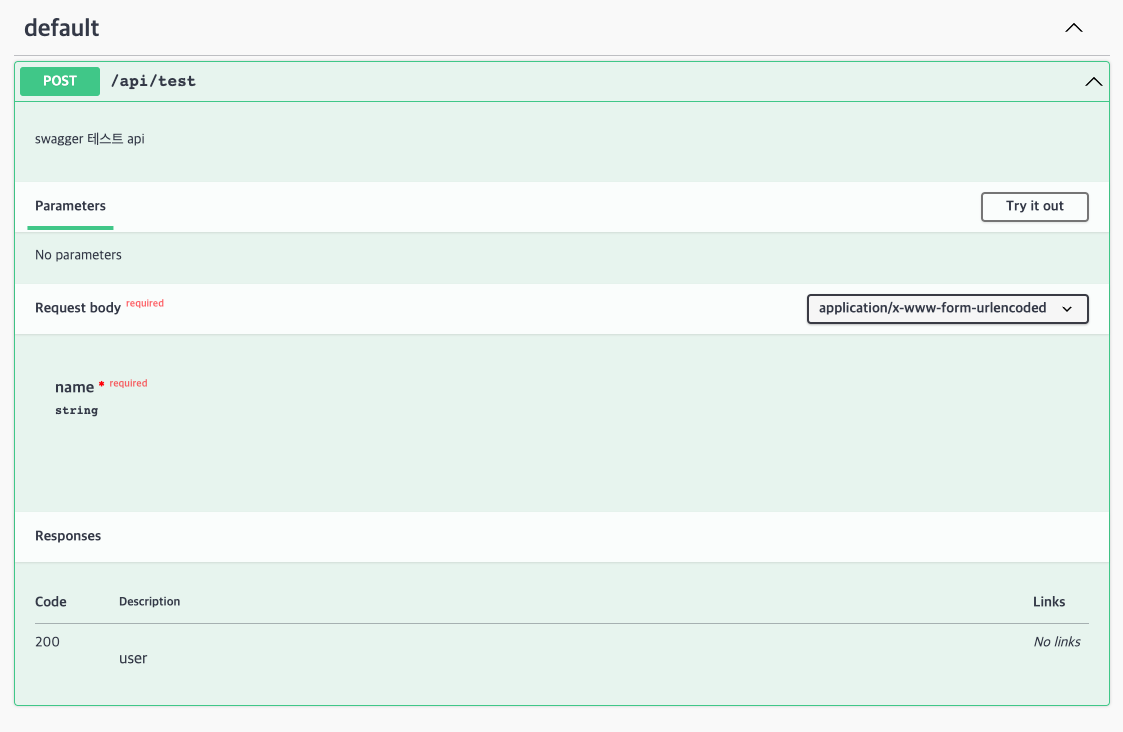
위와같이 설정하고 https://localhost:{port}/api-docs 로 접속하게되면 정상적으로 접속이 가능한것을 볼 수 있다. 그 후
/**
 * @openapi
 * /api/test:
 *   post:
 *     tag:
       - default
 *     description: swagger 테스트 api
 *     requestBody:
 *       required: true
 *       content:
 *         application/x-www-form-urlencoded:
 *           schema:
 *             type: object
 *             properties:
 *               name: { type: string }
 *             required: [name]
 *     responses: { 200: { description: user } }
 */
router.get("/test", async (req, res) => {

});
서버단에서 api 바로 윗줄에 위와같이 선언을한 후 재시동을해보면 아래와 같이 해당 api에 대한 정보가 나오는것을 볼 수 있다. 해당 문법은 JSDoc 문법을 따른다.
(문법 참조: jsdoc.app)
swagger-ui-express 옵션
Swagger Explorer
기본 옵션으로 검색창이 꺼져있는데 해당 옵션을 주게 되면 아래 사진과 같이 검색창이 활성화된다.
var swaggerUiOptions = {
  explorer: true
};

expressServer.use('/api-docs', swaggerUi.serve, swaggerUi.setup(openapiSpecification, swaggerUiOptions));
더 많은 옵션: Swagger UI Configuration
swagger-jsdoc 옵션
swagger 문서의 유효성 검사
해당 옵션은 swagger 문서가 단위테스트를 사용하여 유효성을 검사하는 경우에 유용하다
const swaggerJsdoc = require('swagger-jsdoc');

const options = {
  failOnErrors: true, // Whether or not to throw when parsing errors. Defaults to false.
  definition: {
    openapi: '3.0.0',
    info: {
      title: 'swagger-test',
      version: '1.0.0',
    },
  },
  apis: ['./src/routes*.js'],
};

const openapiSpecification = swaggerJsdoc(options);
Clean Code & Clean Architecture