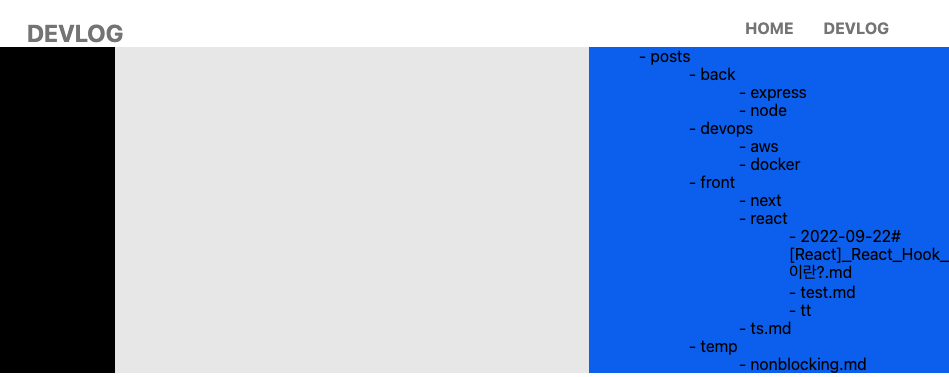
저번 포스트까진 서버단에서 디렉토리 구조를 가져와서 프론트단에서는 단순하게 목록들을 뿌려주기만 했는데 이번 포스트에선 메뉴 디자인을 해줄것이다. 필자는 개인 특성상 여러 디자인 라이브러리를 쓰는것을 별로 선호하지 않아 순수 css 로 디자인을 해줄 것이다.
또 이번 포스트에서 메뉴 디자인관련된부분은 끝낼 예정이기때문에 포스트가 길어질 수도 있다.
메뉴 깊이 표현
우선 기존 getMenuTree() 에서 menuDepth 만 추가해 준 후 styled-component 에 props 로 값을 넘겨 depth * 50만큼 마진을 띄워줬다
// MenuTreeDir
const MenuTreeDir = styled.div`
    ${props => props.menuDepth && {marginLeft: props.menuDepth * 50}};
`;

// getMenuTree()
const getMenuTree = (value, menuDepth = 0) => {
    menuDepth++;
    if (!value) {
        return;
    }
    let keyArr = getKeyArr(value);
    if (keyArr.length === 0) {
        return;
    }

    return (
        <div>
            {
                keyArr.map((v, i) => {
                    if (v !== "files") {
                        if (Object.keys(value[v]).length >= 1) {
                            return (
                                <div key={i}>
                                    <MenuTreeDir menuDepth={menuDepth}>- {v}</MenuTreeDir>
                                    {getMenuTree(value[v], menuDepth)}
                                </div>
                            );
                        }

                        return <MenuTreeDir key={i} menuDepth={menuDepth}>- {v}</MenuTreeDir>
                    } else {
                        return value[v].map((file, index) => {
                            return <MenuTreeFiles key={index} menuDepth={menuDepth}>- {file}</MenuTreeFiles>
                        })
                    }
                })
            }
        </div>
    );
};
결과 :::
근데 이렇게 탭으로만 표현을 하게되면 문제는 가시성이 매우 떨어진다는것이다. 그래서 메뉴아래에 세로줄로 시선 유도선? 어쨋든 가시적으로 보기 편하게 줄을 그어줄 것이다.
const MenuTreeDir = styled.div`
    ${props => props.menuDepth && {paddingLeft: props.menuDepth * 5}};
    ${props => props.menuDepth > 1 ? {borderLeft: "1px dashed black"} : null};
    margin-left: 10px;
`;
위와같이 첫 줄은 루트 폴더이므로 루트폴더의 border-left 는 없어야하니까 처음 요소를 제외한 나머지에 border-left 로 dashed 속성을 추가해줬다
결과 :::
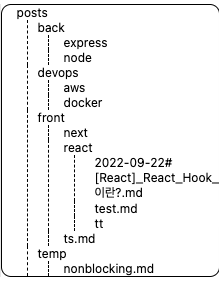
아직은 디렉토리와 파일을 구분할순 없지만한눈에봐도 매우 깔끔해진것을 볼 수 있다.
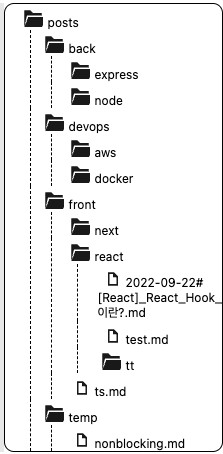
아이콘 추가
아이콘은 https://icon-icons.com/ko/pack/Libre-svg-icons/3002 여기서 무료로 다운받아서 svg파일로 추가해줬는데 생각보다 구리다... 나중에 바꿔주든지 해야겠다
<div key={i}>
  <FolderIcon style={{width: "23px", height: "23px", marginRight: "5px"}}/>{v}
</div>
결과 :::
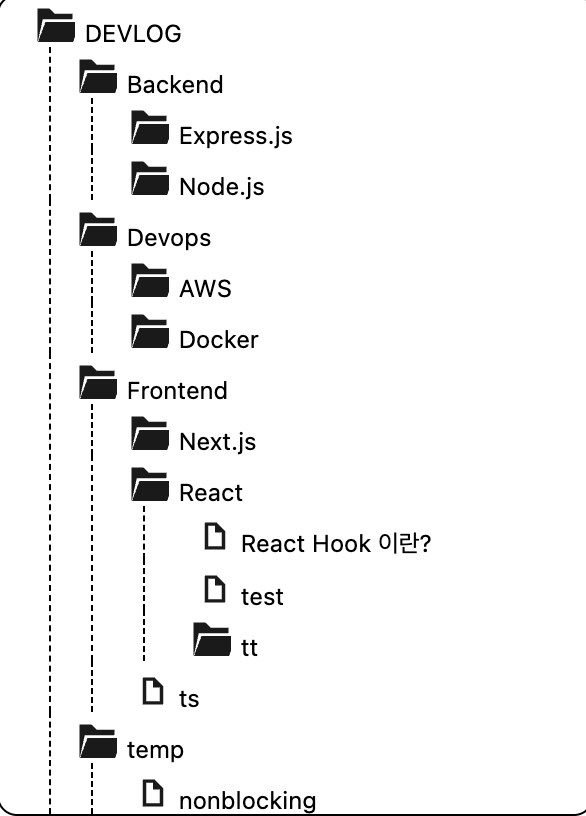
디렉토리 이름 변경
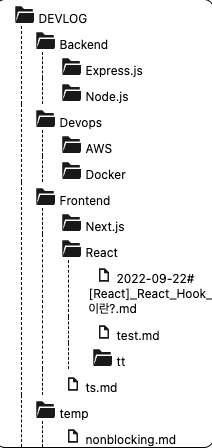
위처럼 단순하게 프로젝트 내의 디렉토리 명을 그대로 메뉴에 써도 상관이 없긴한데 좀 지저분하고 정리가 안된 느낌이 있어서 메뉴명을 소스단에서 바꿔주려고한다.
const menuList = {
    posts: "DEVLOG",
    back: "Backend",
    front: "Frontend",
    devops: "Devops",
    express: "Express.js",
    node: "Node.js",
    aws: "AWS",
    docker: "Docker",
    next: "Next.js",
    react: "React",
}

const menuNameConverter = f => menuList[f] ?? f;<MenuTreeDir menuDepth={menuDepth} key={i}>
<div key={i}><FolderIcon style={{width: "23px", height: "23px", marginRight: "5px"}}/>{menuNameConverter(v)}</div>
{getMenuTree(value[v], menuDepth)}
</MenuTreeDir>디렉토리명과 바꾸고싶은값을 키, 벨류값으로 두고 menuNameConverter에서 키값이 있으면 벨류값을 뱉도록 해줬다.
결과 :::
오 ! 이름만 바꿨는데 깔끔해진 느낌이다
파일 이름 변경
이제 디렉토리명도 변경을 해줬으니 파일명도 변경을 해줄 차례이다.기존에 생각해뒀던 형식은
{날짜}#{제목}.md 이다. 제목에 _(언더바) 가 들어가면 띄어쓰기로 치환해줄 예정이였지만 생각해보니 맨날 파일 만들때마다 날짜와 # 을 붙히는게 귀찮아서 간단하게 띄어쓰기만 치환해줬다.
const fileNameConverter = (file) => {
	const fileSubject = file.split(".md")[0].replace(/\_/g,' ');

    return fileSubject;
}
결과 :::