https://developer.hashicorp.com
위 가이드라인을 참고하여 Terraform EKS 클러스터를 구성한다.
AWS EKS는 $0.10/h의 비용을 발생시키기 때문에 요금을 주의하여 사용해야 한다.
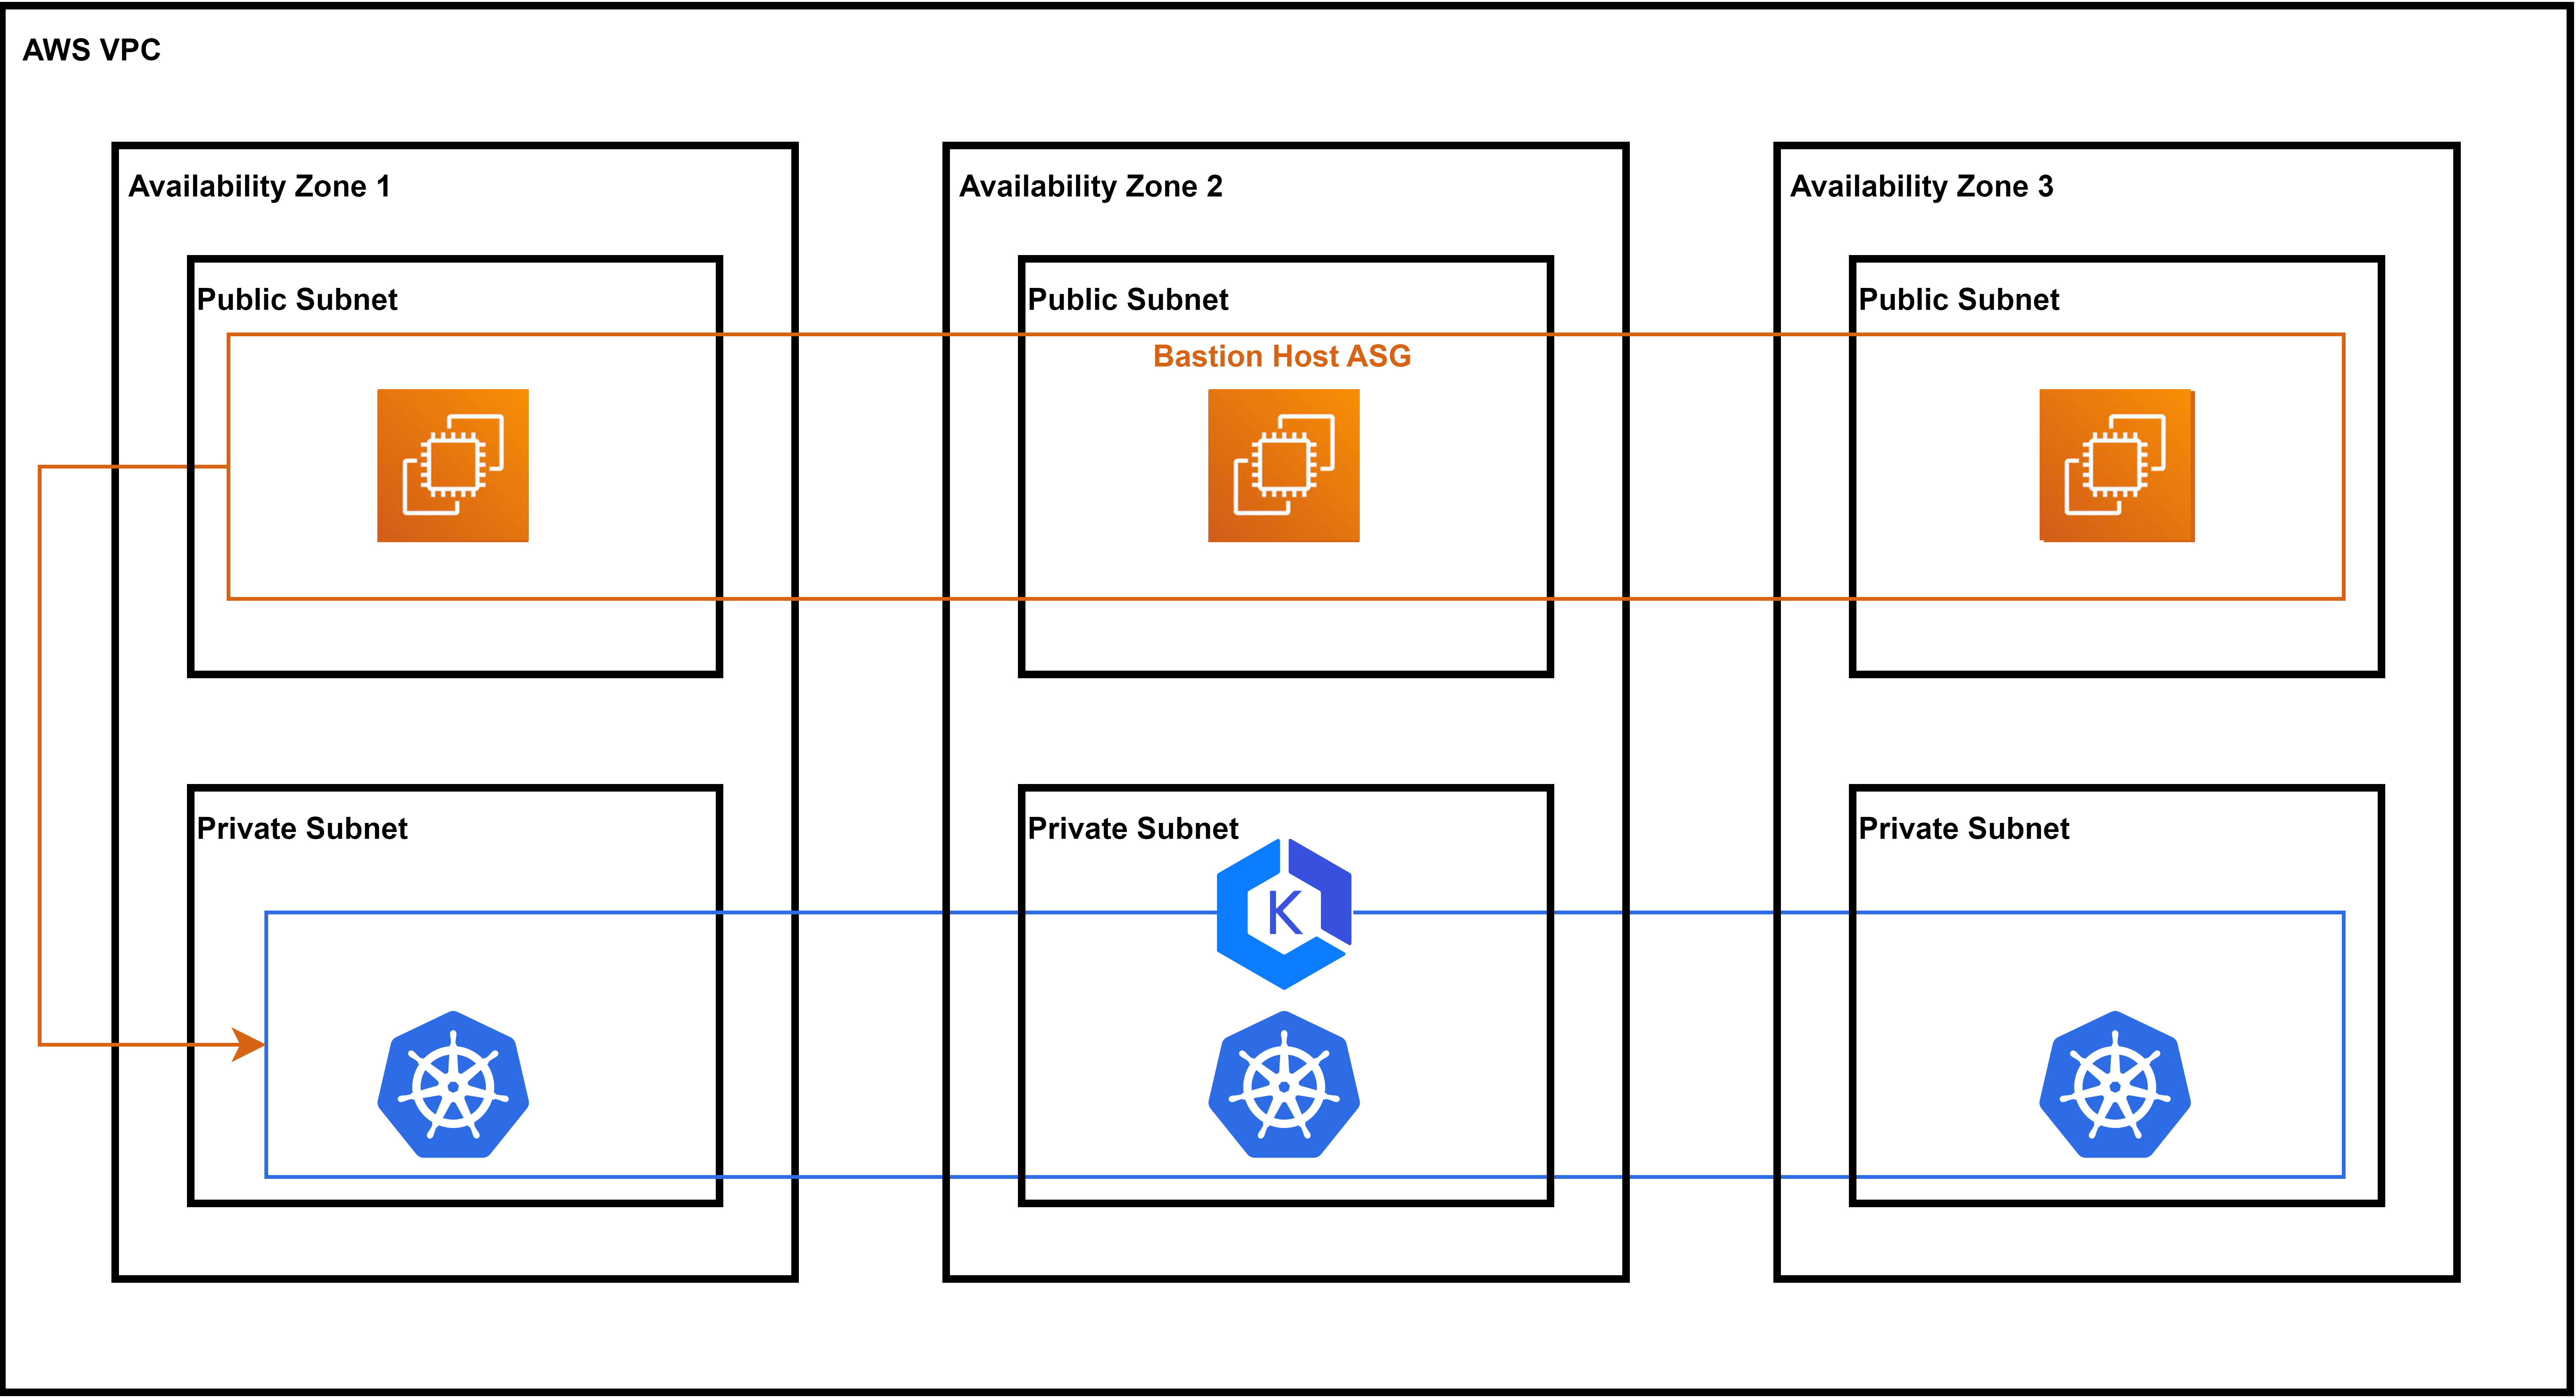 Bastion은 일종의 Proxy로 외부와 내부 네트워크 사이의 게이트 역할을 수행하는 호스트이다. EKS 클러스터는 이 Bastion을 이용해서 접근이 가능하도록 설계되었다.
Terraform IaC
main.tf
provider "aws" {
  region = var.region
}

# Filter out local zones, which are not currently supported
# with managed node groups
data "aws_availability_zones" "available" {
  filter {
    name   = "opt-in-status"
    values = ["opt-in-not-required"]
  }
}

locals {
  cluster_name = "goorm-eks-${random_string.suffix.result}"
}

resource "random_string" "suffix" {
  length  = 8
  special = false
}
network.tf
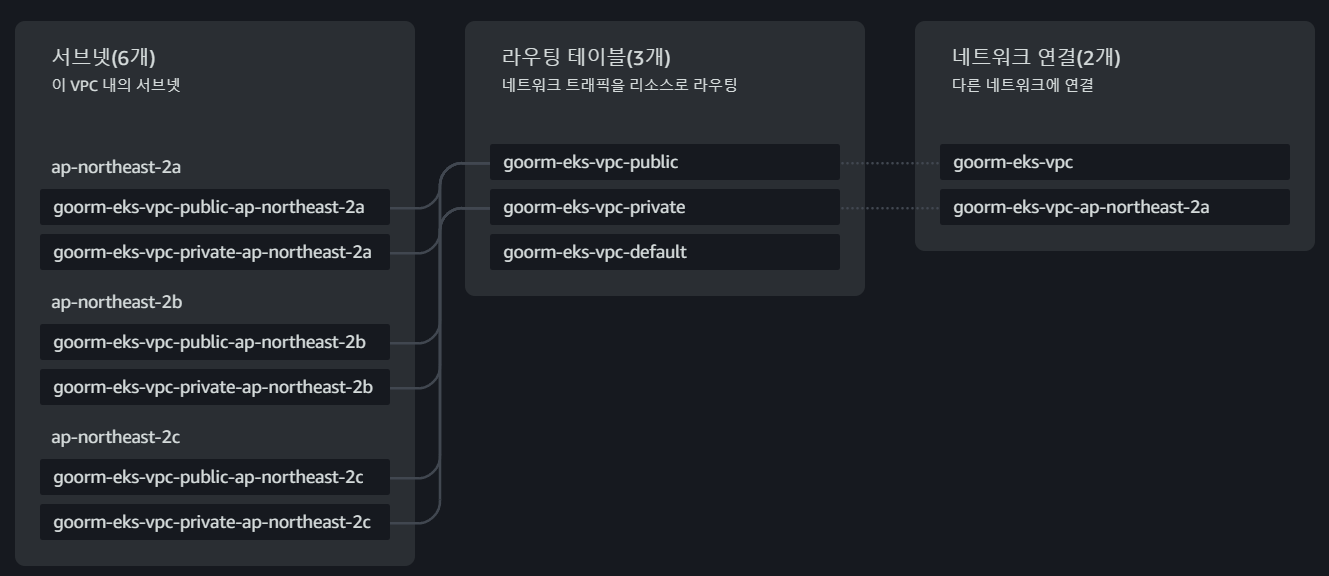
module "vpc" {
  source  = "terraform-aws-modules/vpc/aws"
  version = "5.0.0"

  name = "goorm-eks-vpc"

  cidr = "10.0.0.0/16"
  azs  = slice(data.aws_availability_zones.available.names, 0, 3)

  private_subnets = ["10.0.1.0/24", "10.0.2.0/24", "10.0.3.0/24"]
  public_subnets  = ["10.0.4.0/24", "10.0.5.0/24", "10.0.6.0/24"]

  enable_nat_gateway   = true
  single_nat_gateway   = true
  enable_dns_hostnames = true

  public_subnet_tags = {
    "kubernetes.io/cluster/${local.cluster_name}" = "shared"
    "kubernetes.io/role/elb"                      = 1
  }

  private_subnet_tags = {
    "kubernetes.io/cluster/${local.cluster_name}" = "shared"
    "kubernetes.io/role/internal-elb"             = 1
  }
}
eks.tf
module "eks" {
  source  = "terraform-aws-modules/eks/aws"
  version = "19.15.3"

  cluster_name    = local.cluster_name
  cluster_version = "1.27"

  vpc_id                         = module.vpc.vpc_id
  subnet_ids                     = module.vpc.private_subnets
  cluster_endpoint_public_access = true

  eks_managed_node_group_defaults = {
    ami_type = "AL2_x86_64"

  }

  eks_managed_node_groups = {
    one = {
      name = "node-group-1"

      instance_types = ["t3.small"]

      min_size     = 1
      max_size     = 3
      desired_size = 2
    }

    two = {
      name = "node-group-2"

      instance_types = ["t3.small"]

      min_size     = 1
      max_size     = 2
      desired_size = 1
    }
  }
}
policy.tf
data "aws_iam_policy" "ebs_csi_policy" {
  arn = "arn:aws:iam::aws:policy/service-role/AmazonEBSCSIDriverPolicy"
}

module "irsa-ebs-csi" {
  source  = "terraform-aws-modules/iam/aws//modules/iam-assumable-role-with-oidc"
  version = "4.7.0"

  create_role                   = true
  role_name                     = "AmazonEKSTFEBSCSIRole-${module.eks.cluster_name}"
  provider_url                  = module.eks.oidc_provider
  role_policy_arns              = [data.aws_iam_policy.ebs_csi_policy.arn]
  oidc_fully_qualified_subjects = ["system:serviceaccount:kube-system:ebs-csi-controller-sa"]
}

resource "aws_eks_addon" "ebs-csi" {
  cluster_name             = module.eks.cluster_name
  addon_name               = "aws-ebs-csi-driver"
  addon_version            = "v1.20.0-eksbuild.1"
  service_account_role_arn = module.irsa-ebs-csi.iam_role_arn
  tags = {
    "eks_addon" = "ebs-csi"
    "terraform" = "true"
  }
}
Amazon EBS CSI는 Amazon Elastic Block Store Container Storage Interface로 Amazon EBS 볼륨을 K8S 볼륨 유형인 일반 임시 볼륨 및 영구 볼륨에서 사용할 수 있도록 만들어주는 드라이버이다.
outputs.tf
# Copyright (c) HashiCorp, Inc.
# SPDX-License-Identifier: MPL-2.0

output "cluster_endpoint" {
  description = "Endpoint for EKS control plane"
  value       = module.eks.cluster_endpoint
}

output "cluster_security_group_id" {
  description = "Security group ids attached to the cluster control plane"
  value       = module.eks.cluster_security_group_id
}

output "region" {
  description = "AWS region"
  value       = var.region
}

output "cluster_name" {
  description = "Kubernetes Cluster Name"
  value       = module.eks.cluster_name
}
terraform.tf
# Copyright (c) HashiCorp, Inc.
# SPDX-License-Identifier: MPL-2.0

terraform {
  cloud {
    organization = "TF_CLOUD_ORG_EKS_PROJ"
    workspaces {
      name = "goorm-terraform-eks"
    }
  }

  required_providers {
    aws = {
      source  = "hashicorp/aws"
      version = "~> 5.7.0"
    }

    random = {
      source  = "hashicorp/random"
      version = "~> 3.5.1"
    }

    tls = {
      source  = "hashicorp/tls"
      version = "~> 4.0.4"
    }

    cloudinit = {
      source  = "hashicorp/cloudinit"
      version = "~> 2.3.2"
    }
  }

  required_version = "~> 1.3"
}
TF Cloud에 organization을 생성하고 terraform init 프로젝트를 생성한다
AWS Error: failed to refresh cached credentials,
no EC2 IMDS role found, operation error ec2imds: GetMetadata, request canceled, context deadline exceeded
또한 cloud를 통해 terraform init하면 위와 같은 AWS Credential 오류가 발생한다. 이는 Terraform cloud에서 AWS Credential을 따로 세팅해주거나 cloud 파트를 주석처리하여 로컬 환경에서 init과 plan을 진행해주면 된다.
variables.tf
# Copyright (c) HashiCorp, Inc.
# SPDX-License-Identifier: MPL-2.0

variable "region" {
  description = "AWS region"
  type        = string
  default     = "ap-northeast-2"
}
Stateful APP 배포
Verify Cluster
# make kubectl can control and deploy AWS EKS Cluster
aws eks --region $(terraform output -raw region) update-kubeconfig \
    --name $(terraform output -raw cluster_name)

# verify cluster
kubectl cluster-info
kubeclt get nodes
kustomization.yaml
cat <<EOF >./kustomization.yaml
secretGenerator:
- name: mysql-pass
  literals:
  - password=YOUR_PASSWORD
EOFoutputs.tf가 있는 폴더에 kustomization.yaml를 생성한다
curl -LO https://k8s.io/examples/application/wordpress/mysql-deployment.yaml
curl -LO https://k8s.io/examples/application/wordpress/wordpress-deployment.yaml

# add deployment files
cat <<EOF >>./kustomization.yaml
resources:
  - mysql-deployment.yaml
  - wordpress-deployment.yaml
EOF
이후 위와 같이 서비스할 yaml 파일들을 다운로드하여 추가한 후
$ kubectl apply -k ./
secret/mysql-pass-5m26tmdb5k created
service/wordpress created
service/wordpress-mysql created
persistentvolumeclaim/mysql-pv-claim created
persistentvolumeclaim/wp-pv-claim created
deployment.apps/wordpress created
deployment.apps/wordpress-mysql created

$ kubectl get secrets
NAME                    TYPE     DATA   AGE
mysql-pass-5m26tmdb5k   Opaque   1      16s

$ kubectl get pvc
NAME             STATUS   VOLUME                                     CAPACITY   ACCESS MODES   STORAGECLASS   AGE
mysql-pv-claim   Bound    pvc-ac80a194-63cd-4a42-9249-65608312ebd3   20Gi       RWO            gp2            58s
wp-pv-claim      Bound    pvc-ec75eb18-2b2f-4038-8373-bc429d249691   20Gi       RWO            gp2            58s

$ kubectl get pods
NAME                               READY   STATUS              RESTARTS   AGE
wordpress-c79cd455c-5bzvx          0/1     ContainerCreating   0          5s
wordpress-mysql-6fff848955-k2twv   0/1     ContainerCreating   0          5s

$ kubectl get svc
NAME              TYPE           CLUSTER-IP       EXTERNAL-IP                                                                   PORT(S)        AGE
kubernetes        ClusterIP      172.20.0.1       <none>                                                                        443/TCP        32m
wordpress         LoadBalancer   172.20.232.142   afa00fdeb1b8143ad9141bc868400b36-770460916.ap-northeast-2.elb.amazonaws.com   80:32426/TCP   86s
wordpress-mysql   ClusterIP      None             <none>                                                                        3306/TCP       86s
apply를 통해 정상적으로 서비스가 실행되는 것을 볼 수 있다.
kubectl delete -k ./마지막으로 리소스들을 모두 삭제하여 테스트를 끝마칠 수 있다.