Concept Review
⭐Linux Commands
cat <~> | base64 -w 0 # -w 0 으로 line wrapping을 0으로 만든다
echo <~> | base64 --decode
ls -al # 숨김 파일까지 표시 ex).kube
<~> --no-headers | wc -l #(헤더 숨기기, 개수 세기)
grep -i <text> # 대소문자 구분없이 grep
⭐Vim Commands
ESC + u #(undo, 되돌리기)
ESC + %d #(전체삭제)
ESC + dd #(한줄삭제)
ESC + / + <text> #(text 검색)
ESC + / + <text> + n #(단어 검색 이후 매칭 단어 찾아가기)
Scheduling
Service
kube-schduler가 없으면 pod는 영원히Pending상태에 머물게 된다.pod.spec.nodeName을 지정하여 manually schedule할 수 있다.
Label, Selector
,으로 multiple selector를 지정할 수 있다.
kubectl get all --selector env=prod,bu=finance,tier=frontendTaint, Toleration
-으로 node를 untaint할 수 있다
kubectl taint node <nodeName> <key>=<value>:NoSchedule-NodeAffinity
NodeSelector와 비슷하게 노드의 레이블을 기반으로 Pod를 스케줄링 한다
NodeAffinity는 Pod의 spec 레벨의 특성이다
Affinity와 Selector 모두 만족해야 한다
StaticPod
특정 경로에 존재하는 yaml 파일에 의해 kubelet이 자동으로 생성하는 Pod
기본적으로 /etc/kubernetes/manifest에 Static Pod가 위치한다.
ps -auf | grep /usr/bin/kubelet해당 위치가 아닐 경우 kubelet의 config 파일을 확인하여 위치를 확인할 수 있다.
Multiple Scheduler
pod.spec.schedulerName으로 Pod에 직접적으로 scheduler를 지정할 수 있다.
Logging, Monitoring
kubectl top pod --sort-by='memory' --no-headers | head -1Application Lifecycle Management
Command, Argument
Imperative하게 command를 적용할 수 있다
kubectl run <podName> ... --command -- sleep 1000Configmap
애플리케이션 설정값을 컨테이너에 주입하고 싶을 때 사용하는 리소스, Pod에서 관리하지 않는다.
Secret
Imperative하게 base64 형태로 데이터를 보관하게 생성할 수 있다
kubectl create secret generic db-service --from-literal=DB=sql1 --from-literal=...kubectl -n elastic-search exec -it app -- cat /log/app.logInitContainer
Pod내에 초기화만을 담당하는 컨데이너 생성, 요청수행 컨테이너로 재사용이 가능하다
Cluster Maintenance
OS Upgrade
kubectl drain node01 --ignore-daemonsets
kubectl uncordon node01
# Ensure only unschedulable
kubectl cordon node01
Cluster Upgrade
- Controlplane drain
- Upgrade controlplane
apt-get upgrade - apt-get install
kubeadm kubeadm upgrade apply v1.27.0-00apt-get install kubelet="1.27.0-00"systemctl rdaemon-reloadsystemctl restart kubelet
Security
View Certificate
- TLS : Transport Layer Securoty, 인터넷 정보 암호화 송수신 프로토콜
- SSL : Securit Socket Layer, 웹사이트와 브라우저 사이에 전송되는 데이터를 암호화
아래 코드로 crt의 CommonName를 보여줄 수 있다
openssl x509 -in file-path.crt -text -noout- kube-apiserver는 ClientCertificate 내용 중 CommonName으로 client를 구분할 수 있다
crictl ps -a
# CRI, Container Runtime Interface
crictl logs <container-id>
Certificate API
- CSR : Certificate API는 K8s API의 클라이언트가 x509를 요청하고 얻을 수 있도록 SA에서 인증자를 관리한다. 이때 CSR은 지정된 사용자가 인증서에 서명하도록 요청하는데 사용된다.
# csr 파일을 base64 형태로 encrypt한다
cat akshay.csr | base64 -w 0
# 이후 CSR Manifest의 request에 해당 encode 데이터를 주입한다
kubectl certificate approve <CSRName>

kubectl certifiate deny <CSRName>
kubeconfig
보통 /root/.kube 아래에 config 파일이 위치한다
kubectl config --kubeconfig=/root/<my-kube-config> current-context
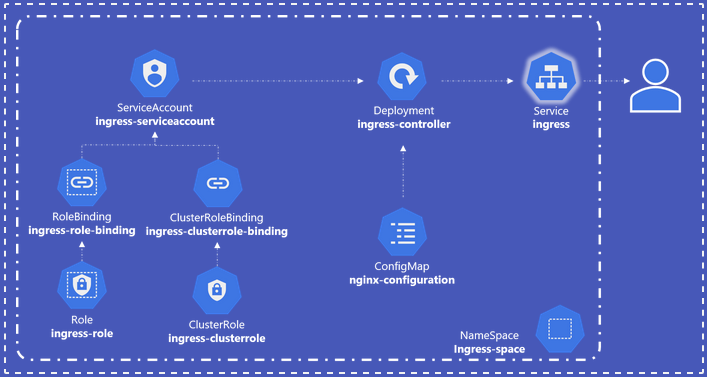
kubectl config --kubeconfig=/root/<my-kube-config> use-context <contextName>RBAC
User 클러스터 외부에 K8s를 조작하는 사용자 인증
Service Account Pod가 kube-api를 다룰때 사용하는 계정
Role 어떤 API를 이용할 수 있는지 정의, 여러 resource에 대한 정의르 추가할 수 있다
ClusterRole Namespace와 무관하게 Role을 정의
RoleBinding 사용자와 그룹에 Role을 Binding
kubectl get pods --as <user>ClusterRole
ClusterRole을 정의할 때 api리소스와 apiGroup을 확인하여 정의한다
kubectl api-resourcesrules 하위에 여러 apiGroup.resources.verbs를 둘 수 있다
kubectl auth can-i <list> <storageclass> --as <user>Service Account
kubectl create token <dashboard-sa>
kubectl set serviceaccount deploy/<web-dashboard> dashboard-sa
ImageSecurity
kubectl create secret --help
kubectl create secret docker-registry <registry-name-secret> \ ...
ImagePullSecurity는 Pod 레벨의 pod.spec.imagePullSecrets.name으로 설정할 수 있다
Security Context
root 권한에서의 컨테이너 실행 방지를 위해 Pod 또는 Container 단위의 실행 PID를 설정한다.
kubectl exec <ubuntu-sleeper> -- whoamipod의 pod.spec.securityContext.runAsUser: <UID>로 SecurityContext 설정이 가능하다.
Network Policy
K8s의 각 Pod는 기본적으로 상호통신이 가능하다.
보안적으로 중요한 Pod 접근 제어를 위해 NetworkPolicy를 활용한다.
Egress나 Ingress의 경우 여러개의 to, from을 가질 수 있다.
Storage
Persistent Volume
PersistentVolume : 관리자가 프로비저닝 하거나 StorageClass를 사용해 동적으로 프로비저닝한 클러스터 스토리지
PersistentVolumeClaim : 해당 PV 리소스에 대한 요청, 리소스에 대한 클레임 검사 역할
PersistentVolume.spec.hostPath.path로 hostPath 형태로 사용이 가능하다
StorageClass
Cloud환경에서는 미리 자원을 선점(할당)할 필요가 없다.
이는 필요할때 자원(volume)을 바로 할당할 수 있기 때문인데, 이러한 동적인 구조에서 volume을 직접 지정하는 persistent volume이 아니라 volume에 대한 요건(size, ssd, disk, type)만 정의하고, 요청시에 이 요건에 맞는 pv를 할당하기 위해 사용하는 리소스
DynamicProvisioning이라고도 불린다.
Networking
Explore Environment
MAC : Media Access Control address, 데이터 링크 계층에서 통신을 위한 네트워크 인터페이스에 할당된 고유 식별자
ETCD의 2379번 포트는 모든 controlplane 컴포넌트가 연결되는 포트이다
ip a
ip link
ip route show default
# n : port num
# : PID
# : listen 여부
# : tcp
netstat -nplt
# a : all
netstat -anp
CNI
/opt/cni/bin에 CNI 바이너리가 위치한다
# kubelet 프로세스를 볼 수 있다
ps -auf | grep kubelet | grep <~>
# weavenet의 ip 주소 대역을 보여준다
ip addr show weave
Securing Network
- weave pod을 보면 pod들의 ip range를 볼 수 있다
- kube-proxy는 Daemonset이다
- SVC를 위한 Ip range는
/etc/kubernetes/manifests/kube-apiserver에서 확인할 수 있다.
CoreDNS
클러스터를 지속적으로 모니터링하여 새로운 SVC,Pod을 도메인 서버에 업데이트
- kubelet은 새로운 Pod이 생성될 때 Pod의
/etc/resolv.conf파일에 ClusterDNS 서버의 IP 주소를 추가한다. - CodeDNS의 CoreFile은 ConfigMap을 통해 pass된다
Trouble Shooting
Controlplane Failure
/etc/kubernetes/manifests하위의 Static Pod를 수정하여 controlplane pod 문제를 해결한다- deployment의 replicaset scheduling은
kube-controller-manager에서 관리한다. /etc/kubernetes/pki에 PKI의 key 파일들이 위치한다kube-controller는 Volume을 통해 CA파일을 hostPath로 가져온다
Node Failure
node가 문제일 경우 kubelet의 문제일 가능성이 높다
systemctl status containerd

systemctl status kubelet
systemctl start kubelet

journalctl -u kubelet -f
각 node에서 kubelet은 /var/lib/kubelet/config.yaml에 config 파일을 보관한다.
kubelet은 kube-apiserver의 6443 포트로 정보를 요청한다
Troubleshooting Network
아래 명령어로 kube-proxy의 ConfigMap 위치를 알 수 있다.
kubectl -n kube-system derscribe configmap kube-proxykube-proxy config 파일은 /var/lib/kube-proxy/config.conf에 들어있다
Advanced kubectl commands
# json 형태로 데이터를 받아온다
kubectl get nodes -o json > /.../nodes.json
# custom kubeconfig 파일을 볼 수 있다
kubectl config view --kubeconfig=/root/my-kube-config

kubectl get pv --sort-by='spec.capacity.storage'
kubectl get nodes -o=custom-columns=NAME:.metadata.name,CAPACITY:spec.capacity.storage, ...
kubectl get nodes -o jsonpath="{.context[?(@.context.user=='answer')].name}"
Random Concepts
Service의 Endpoint
Endpoint는 SVC가 트래픽을 전달하고자 하는 pod의 집합이다.
EndpointController는 master node의 Controller Manager에 의해 관리된다.
kubectl expose deployment <dep-name> --type=<> --port=<> --name=<>Understanding CoreDNS and test nslookup by temporary busybox
Pod를 A/AAA 방식으로 접근할 때는 x.x.x.x인 IP를 x-x-x-x.default.pod로 접근한다
Service는 기본적으로 DNS에 저장되기 때문에 서비스 이름으로 접근이 가능하다.
# nslookup
kubectl run test-nslookup --image=busybox --rm -it --restart=Never -- nslookup <Domain>
# curl
kubectl run curl-test --image=alpine/curl --rm -it -- sh
CertificateSigningRequest
- CertificateSigningRequest를 요청하고 kubectl으로 approve
- RBAC에서 Role 생성
- RoleBinding으로 User와 Bound
kubectl auth can-i <update> <pod> --as=<user> --namespace=<ns>으로 테스트
Check the node status and the system logs for kubelet on the failing node.
kubectl describe node node01

# From node01 if reachable
sudo journalctl -u kubelet | grep -i error
Implement ETCD backup and restore methodologies
$ kubectl get all --all-namespaces -o yaml > all-services.yaml

etcd save it's all data here:

$ cat /etc/system.d/system/etcd.service

--data-dir=/var/lib/etcd

$ ETCDCTL_API=3 etcdctl snapshot save snapshot.db \
--endpoints=https://127.0.0.1:2379 \
--cacert=/etc/etcd/ca.crt \
--cert=/etc/etcd/etcd-server.crt \
--key=/etc/etcd/etcd-server.key

$ ETCDCTL_API=3 etcdctl snapshot status snapshot.db

$ service kube-apiserver stop
$ ETCDCTL_API=3 etcdctl \
snapshot restore snapshot.db \
--name=master \
--cert=/etc/kubernetes/pki/etcd/server.crt \
--key=/etc/kubernetes/pki/etcd/server.key \
--data-dir /var/lib/etcd-from-backup \
--initial-cluster master-1=https://127.0.0.1:2380 \
--initial-cluster-token etcd-cluster-1 \
--initial-advertise-peer-urls https://127.0.0.1:2380

$ cat /etc/system/system.d/etcd.service

--initial-cluster-token etcd-cluster-1
--data-dir /var/lib/etcd-from-backup

$ systemctl daemon-reload
$ service etcd restart
$ service kube-apiserver start
Access modes for volumes, persistent volume claims primitive
Persistent Volume Access Modes :
ReadWriteOnce – the volume can be mounted as read-write by a single node
ReadOnlyMany – the volume can be mounted read-only by many nodes
ReadWriteMany – the volume can be mounted as read-write by many nodes

Persistent Volume Reclaim Policies :
Retain: No other claims can claim this volume
Delete: Delete the volume
Recycle: Scrap the data and make the volume available again
Networking configuration of the cluster nodes
$ ip addr
$ ip link
$ ip link show ens3
$ arp node01
$ ip link show docker0
$ ip route show default
$ netstat -nplt
$ netstat -anp | grep etcd
Know how to configure and use the cluster DNS
$ curl http://web-service.apps.svc.cluster.local
$ curl http://10-10-10-5.apps.pod.cluster.local
$ cat /etc/coredns/Corefile
$ kubectl get configmap -n kube-system
$ kubectl get service -n kube-system
$ ps aux | grep coredns

-conf /etc/coredns/Corefile

$ kubectl exec <coredns pod> -n kube-system ps
$ kubectl describe configmap coredns -n kube-system
$ kubectl set env deployment/webapp DB_Host=mysql.payroll
$ kubectl exec -it hr nslookup mysql.payroll > /root/nslookup.out
ServiceAccount, Role, Deployment, Ingress
Worker node failure
$ kubectl get nodes
$ kubectl describe node <nodename>
$ top
$ df -h
$ service kubelet status
$ journalctl -u kubelet -f
$ openssl x509 -in /var/lib/kubelet/worker-1.crt -text
Exam Preperation
kubectl cheat sheet
kubectl auto completion
source <(kubectl completion bash)
echo "source <(kubectl completion bash)" >> ~/.bashrc
kubectl alias
alias k=kubectl
complete -o default -F __start_kubectl k
Change Cluster
kubectl config get-contexts
kubectl config set current-context <CONTEXT-NAME>
Random Dump
Q1.
Scale the deployment to 5 replicas and check the status again.
Then change the image tag of nginx container from 1.22 to 1.23.
Check the history of the deployment and rollback to previous revision.
Then check that the nginx image was reverted to 1.22.
Solution
# rollout history
kubectl rollout history deployment/nginx-deploy -n ns-nginx

# rollout undo
 kubectl rollout undo deployment/nginx-deploy -n ns-nginx
Q2.
Create a pod with the latest busybox image running a sleep for 1 hour, and give it an environment variable named PLANET with the value blue.
Then exec a command in the container to show that it has the configured environment variable.
Solution
apiVersion: v1
kind: Pod
metadata:
  creationTimestamp: null
  labels:
    run: busybox-env
  name: busybox-env
spec:
  containers:
  - image: busybox
    name: busybox-env
    command: ["sleep"]
    args: ["3600"]
    env:
    - name: PLANET
      value: "blue"
  dnsPolicy: ClusterFirst
  restartPolicy: Always
status: {}
kubectl exec envvar -- env | grep PLANETQ3.
Create a configmap named space with two values planet=blue and moon=white.
Create a pod similar to the previous where you have two environment variables taken from the above configmap and show them in the container.
Solution
apiVersion: v1
kind: ConfigMap
metadata:
  name: space
data:
  planet: blue
moon: whiteapiVersion: v1
kind: Pod
metadata:
name: space-pod
spec:
containers:
- name: demo
image: alpine
command: ["sleep", "3600"]
env:
- name: planet
valueFrom:
configMapKeyRef:
name: space
key: planet
- name: moon
valueFrom:
configMapKeyRef:
name: space
key: moonQ4.
Create a secret from files containing a username and a password.
Use the secrets to define environment variables and display them.
Mount the secret to a pod to admin-cred folder and display it.
Solution
piVersion: v1
kind: Secret
metadata:
  name: admin-cred
type: kubernetes.io/basic-auth
stringData:
  username: admin
password: paswrdapiVersion: v1
kind: Pod
metadata:
creationTimestamp: null
labels:
run: admin-cred
name: admin-cred
spec:
containers:
- image: nginx
name: admin-cred
resources: {}
env:
- name: SECRET_USERNAME
valueFrom:
secretKeyRef:
name: admin-cred
key: username
- name: SECRET_PASSWORD
valueFrom:
secretKeyRef:
name: admin-cred
key: password
dnsPolicy: ClusterFirst
restartPolicy: Always
status: {}apiVersion: v1
kind: Pod
metadata:
labels:
run: secretvolume
name: secretvolume
spec:
containers:
- image: busybox:latest
name: secretvolume
args:
- sleep
- "3600"
volumeMounts:
- name: admincred
mountPath: /etc/admin-cred
readOnly: true
volumes:
- name: admincred
secret:
secretName: admin-credQ5.
Autoscale a deployment to have a minimum of two pods and a maximum of 6 pods and that transitions when cpu usage goes above 70%.
Solution
Need metrics-server to autoscale
https://github.com/kubernetes-sigs/metrics-server#readme
kubectl create deployment autoscalable --image=nginx:latest
kubectl autoscale deployment autoscalable --min=2 --max=6 --cpu-percent=70metadata:
name: php-apache
spec:
selector:
matchLabels:
run: php-apache
template:
metadata:
labels:
run: php-apache
spec:
containers:
- name: php-apache
image: registry.k8s.io/hpa-example
ports:
- containerPort: 80
resources:
limits:
cpu: 500m
requests:
cpu: 200m
---
apiVersion: autoscaling/v1
kind: HorizontalPodAutoscaler
metadata:
creationTimestamp: null
name: php-apache
spec:
maxReplicas: 6
minReplicas: 2
scaleTargetRef:
apiVersion: apps/v1
kind: Deployment
name: php-apache
targetCPUUtilizationPercentage: 70
status:
currentReplicas: 0
desiredReplicas: 0Q6.
Create a DaemonSet with the latest busybox image and see that it runs on all nodes.
Solution
apiVersion: apps/v1
kind: DaemonSet
metadata:
  labels:
    type: daemon
  name: daemontest
spec:
  selector:
    matchLabels:
      run: daemon
  template:
    metadata:
      labels:
        run: daemon
      name: daemonpod
    spec:
      containers:
      - image: busybox:latest
        name: daemonpod
        args:
          - sleep
          - "3600"
Q7.
Create a pod with a busybox container that requests 1G of memory and half a CPU, and has limits at 2G of memory and a whole CPU.
Solution
apiVersion: v1
kind: Pod
metadata:
  name: busybox
spec:
  containers:
  - name: busybox
    image: busybox
    resources:
      requests:
        memory: "1Gi"
        cpu: "500m"
      limits:
        memory: "2Gi"
        cpu: "1"
    args:
      - sleep
      - "3600"
Q8.
Use antiaffinity to launch a pod to a different node than the pod where the first one was scheduled.
Solution
apiVersion: v1
kind: Pod
metadata:
  labels:
    run: podaff
  name: podaff
spec:
  containers:
  - image: busybox:latest
    name: podaff
    args:
      - sleep
      - "3600"
  affinity:
    podAntiAffinity:
      requiredDuringSchedulingIgnoredDuringExecution:
        - labelSelector:
            matchExpressions:
              - key: run
                operator: In
                values:
                  - podsel
          topologyKey: kubernetes.io/hostname
Q9.
Solution
k create deploy nginx --image=nginx --replicas=2apiVersion: v1
kind: Service
metadata:
creationTimestamp: null
labels:
app: nginx
name: nginx
spec:
ports:
- port: 80
protocol: TCP
targetPort: 80
nodePort: 30081
selector:
app: nginx
type: NodePort
status:
loadBalancer: {}IP address of controlplane node and the port allocated by the NodePort
controlplane ~ ➜  k describe node controlplane | grep -i ip
                    flannel.alpha.coreos.com/public-ip: 192.23.61.12
  InternalIP:  192.23.61.12

controlplane ~ ✖ curl http://192.23.61.12:30081
<!DOCTYPE html>
<html>
<head>
<title>Welcome to nginx!</title>
<style>
html { color-scheme: light dark; }
body { width: 35em; margin: 0 auto;
font-family: Tahoma, Verdana, Arial, sans-serif; }
</style>
</head>
<body>
<h1>Welcome to nginx!</h1>
<p>If you see this page, the nginx web server is successfully installed and
working. Further configuration is required.</p>

<p>For online documentation and support please refer to
<a href="http://nginx.org/">nginx.org</a>.<br/>
Commercial support is available at
<a href="http://nginx.com/">nginx.com</a>.</p>

<p><em>Thank you for using nginx.</em></p>
</body>
</html>
Q10.
Keep the previous deployment of nginx and add a new deployment using the image bitnami/apache with two replicas.
Expose its port 8080 through a service and query it.
Deploy nginx ingress controller
Create an ingress service that redirects /nginx to the nginx service and /apache to the apache service.
Solution
k create deploy apache --image=bitnami/apache --replicas=2
k expose deploy apache --port=8080 --target-port=8080apiVersion: networking.k8s.io/v1
kind: Ingress
metadata:
name: nginx-apache-ingress
annotations:
nginx.ingress.kubernetes.io/rewrite-target: /
spec:
rules:
- http:
paths:
- path: /nginx
pathType: Prefix
backend:
service:
name: nginx
port:
number: 80
- http:
paths:
- path: /apache
pathType: Prefix
backend:
service:
name: apache
port:
number: 8080Q11.
Create a busybox pod and resolve the nginx and apache services created earlier from within the pod.
Solution
<name>.<namnespace>.<kind>.<cluster>.<local>
controlplane ~ ➜  kubectl run test --image=busybox --rm -it --restart=Never -- nslookup nginx.default.svc.cluster.local

Server:         10.96.0.10
Address:        10.96.0.10:53


Name:   nginx.default.svc.cluster.local
Address: 10.103.114.157

pod "test" deleted

controlplane ~ ➜  kubectl run test --image=busybox --rm -it --restart=Never -- nslookup apache.default.svc.cluster.local
Server:         10.96.0.10
Address:        10.96.0.10:53


Name:   apache.default.svc.cluster.local
Address: 10.108.123.145

pod "test" deleted
Q12.
Create a pod and mount a volume with hostPath directory.
Check that the contents of the directory are accessible through the pod.
Solution
mkdir /home/ubuntu/data
touch data/file

kubectl apply -f pv-pod.yaml
kubectl exec pv-pod -- ls /dataapiVersion: v1
kind: Pod
metadata:
labels:
run: pv-pod
name: pv-pod
spec:
containers:
- image: busybox:latest
name: pv-pod
args:
- sleep
- "3600"
volumeMounts:
- name: data
mountPath: "/data"
volumes:
- name: data
hostPath:
path: "/root/data/"Q13.
Create a persistent volume from hostPath and a persistent volume claim corresponding tothat PV. Create a pod that uses the PVC and check that the volume is mounted in the pod.
Create a file from the pod in the volume then delete it and create a new pod with the same volume and show the created file by the first pod.
Solution
apiVersion: v1
kind: PersistentVolume
metadata:
  name: task-pv-volume
  labels:
    type: local
spec:
  capacity:
    storage: 100Mi
  accessModes:
    - ReadWriteMany
  hostPath:
    path: "/home/data"
---
apiVersion: v1
kind: PersistentVolumeClaim
metadata:
  name: task-pv-claim
spec:
  accessModes:
    - ReadWriteMany
  resources:
    requests:
      storage: 50Mi
---
apiVersion: v1
kind: Pod
metadata:
  labels:
    run: task-pv-pod
  name: task-pv-pod
spec:
  containers:
  - image: busybox:latest
    name: task-pv-pod
    args:
      - sleep
      - "3600"
    volumeMounts:
    - name: data
      mountPath: "/data"
  volumes:
  - name: data
    persistentVolumeClaim:
      claimName: task-pv-claim
Q14.
Create an nginx pod with a liveness and a readiness probe for the port 80.
Solution
apiVersion: v1
kind: Pod
metadata:
  name: nginx
  labels:
    run: nginx
spec:
  containers:
  - name: nginx
    image: nginx:latest
    readinessProbe:
      httpGet:
        path: /
        port: 80
      initialDelaySeconds: 5
      periodSeconds: 5
    livenessProbe:
      httpGet:
        path: /
        port: 80
Q15.
Create a role the will allow users to get, watch, and list pods and container logs
Create a role binding that binds to a role named pod-reader, applies to a user named dev
Solution
apiVersion: rbac.authorization.k8s.io/v1
kind: Role
metadata:
  namespace: default
  name: pod-reader
rules:
- apiGroups: [""]
  resources: ["pods", "pods/log"]
  verbs: ["get", "watch", "list"]
---
apiVersion: rbac.authorization.k8s.io/v1
kind: RoleBinding
metadata:
  name: read-pods
  namespace: default
subjects:
- kind: User
  name: dev
  apiGroup: rbac.authorization.k8s.io
roleRef:
  kind: Role   name: pod-reader
  apiGroup: rbac.authorization.k8s.io
Q16.
Get the external IP of all nodes
Solution
kubectl get nodes -o jsonpath='{.items[*].status.addresses[?(@.type=="ExternalIP")].address}'Q17.
List all API resources in your Kubernetes cluster
Solution
kubectl api-resourcesQ18.
Create a new pod named “ssd-pod” using the nginx image. Use node affinity to select nodes based on a weight of 1 to nodes labeled “disk=ssd”. If the selection criteria don’t match, it can also choose nodes that have the label “kubernetes.io/os=linux”
Solution
apiVersion: v1
kind: Pod
metadata:
  creationTimestamp: null
  labels:
    run: ssd-pod
  name: ssd-pod
spec:
  affinity:
    nodeAffinity:
      requiredDuringSchedulingIgnoredDuringExecution:
        nodeSelectorTerms:
        - matchExpressions:
          - key: kubernetes.io/os
            operator: In
            values:
            - linux
      preferredDuringSchedulingIgnoredDuringExecution:
      - weight: 1
        preference:
          matchExpressions:
          - key: disk
            operator: In
            values:
            - ssd
  containers:
  - image: nginx
    name: ssd-pod
Q19.
- Look up the value for the key cluster.name in the etcd cluster and backup etcd
- Reset etcd and remove all data from the etcd
- Restore an etcd store from backup.
Solution
ETCDCTL_API=3 etcdctl get cluster.name \
--endpoints=https://10.0.1.101:2379 \
--cacert=/home/cloud_user/etcd-certs/etcd-ca.pem \
--cert=/home/cloud_user/etcd-certs/etcd-server.crt \
--key=/home/cloud_user/etcd-certs/etcd-server.key

ETCDCTL_API=3 etcdctl snapshot save /home/cloud_user/etcd_backup.db \
--endpoints=https://10.0.1.101:2379 \
--cacert=/home/cloud_user/etcd-certs/etcd-ca.pem \
--cert=/home/cloud_user/etcd-certs/etcd-server.crt \
--key=/home/cloud_user/etcd-certs/etcd-server.key
sudo systemctl stop etcd
sudo rm -rf /var/lib/etcd# Spin up a temporary etcd cluster
# Save the data from the backup file to a new directory (/var/lib/etcd)
sudo ETCDCTL_API=3 etcdctl snapshot restore /home/cloud_user/etcd_backup.db \
--initial-cluster etcd-restore=https://10.0.1.101:2380 \
--initial-advertise-peer-urls https://10.0.1.101:2380 \
--name etcd-restore \
--data-dir /var/lib/etcd
# Set ownership of the new data directory
sudo chown -R etcd:etcd /var/lib/etcd
# Start etcd
sudo systemctl start etcd
# Verify the data was restored
ETCDCTL_API=3 etcdctl get cluster.name \
--endpoints=https://10.0.1.101:2379 \
--cacert=/home/cloud_user/etcd-certs/etcd-ca.pem \
--cert=/home/cloud_user/etcd-certs/etcd-server.crt \
--key=/home/cloud_user/etcd-certs/etcd-server.keyQ20.
Install the metrics server add-on and view resource usage by a pods and nodes in the cluster
Solution
# Install the metrics server
kubectl apply -f https://raw.githubusercontent.com/linuxacademy/content-cka-resources/master/metrics-server-components.yaml

# Verify that the metrics server is responsive
kubectl get --raw /apis/metrics.k8s.io/

# create random-pod.yaml
apiVersion: v1
kind: Pod
metadata:
  name: my-pod
  labels:
    app: metrics-test
spec:
  containers:
  - name: busybox
    image: radial/busyboxplus:curl
    command: ['sh', '-c', 'while true; do sleep 3600; done']

kubectl apply -f random-pod.yaml

# View resources usage by the pods in the cluster
kubectl top pod

# View resource usage by the nodes in the cluster
kubectl top node
Q21.
Create a pod with an nginx container exposed on port 80. Add a busybox init container which downloads a page using "wget -O /work-dir/index.html http://neverssl.com/online". Make a volume of type emptyDir and mount it in both containers. For the nginx container, mount it on "/usr/share/nginx/html" and for the initcontainer, mount it on "/work-dir".
Solution
apiVersion: v1
kind: Pod
metadata:
  labels:
    run: box
  name: box
spec:
  initContainers:
  - args:
    - /bin/sh
    - -c
    - "wget -O /work-dir/index.html http://neverssl.com/online"
    image: busybox
    name: box
    volumeMounts:
    - name: vol
      mountPath: /work-dir
  containers:
  - image: nginx
    name: nginx
    ports:
    - containerPort: 80
    volumeMounts:
    - name: vol
      mountPath: /usr/share/nginx/html
  volumes:
  - name: vol
    emptyDir: {}
Q22.
Create a pod that will be placed on node controlplane. Use nodeSelector and tolerations.
Solution
apiVersion: v1
kind: Pod
metadata:
  creationTimestamp: null
  labels:
    run: controlplane-nginx
  name: controlplane-nginx
spec:
  containers:
  - image: nginx
    name: controlplane-nginx
  nodeSelector:
    kubernetes.io/hostname: controlplane
  tolerations:
  - key: "node-role.kubernetes.io/control-plane"
    operator: "Exists"
    effect: "NoSchedule"
  dnsPolicy: ClusterFirst
  restartPolicy: Always
status: {}
Q23.
Create an nginx deployment of 2 replicas, expose it via a ClusterIP service on port 80. Create a NetworkPolicy so that only pods with labels 'access: granted' can access the deployment and apply it
flannel은 NetworkPolicy를 지원하지 않아서 해당 문제 테스트가 불가하다.
Solution
k create deploy expose-nginx --image=nginx --replicas=2
k expose deployment expose-nginx --type=ClusterIP --port=80 --target-port=80

controlplane ~ ➜  k get svc
NAME           TYPE        CLUSTER-IP       EXTERNAL-IP   PORT(S)   AGE
expose-nginx   ClusterIP   10.100.198.103   <none>        80/TCP    61s
kubernetes     ClusterIP   10.96.0.1        <none>        443/TCP   18m

controlplane ~ ➜  curl http://10.100.198.103
<!DOCTYPE html>
<html>
<head>
<title>Welcome to nginx!</title>
...apiVersion: networking.k8s.io/v1
kind: NetworkPolicy
metadata:
name: nginx-label-net-policy
namespace: default
spec:
podSelector:
matchLabels:
app: expose-nginx
policyTypes:
- Ingress
ingress:
- from:
- podSelector:
matchLabels:
access: grantedkubectl run busybox --image=busybox --rm -it --restart=Never -- wget -O- http://nginx:80 --timeout 2 # This should not work. --timeout is optional here. But it helps to get answer more quickly (in seconds vs minutes)
kubectl run busybox --image=busybox --rm -it --restart=Never --labels=access=granted -- wget -O- http://nginx:80 --timeout 2 # This should be fineQ24.
두 개의 컨테이너가 하나의 볼륨을 공유하도록 배포해야 합니다. 클러스터에는 nginx 싱글 컨테이너만 존재합니다. 해당 nginx의 로그 파일이 저장되는 경로에 컨테이너 볼륨을 마운트하고, 해당 볼륨을 log-conainer라는 이름의 새로운 컨테이너에도 마운트합니다. 두 컨테이너가 동일한 볼륨을 공유하게 되고, 따라서 log-container 컨테이너 접근 시 nginx의 로그를 조회할 수 있어야 합니다.
Solution
apiVersion: v1
kind: Pod
metadata:
  name: two-containers
spec:
  volumes:
  - name: shared-data
    emptyDir: {}
  containers:
  - name: nginx-container
    image: nginx
    volumeMounts:
    - name: shared-data
      mountPath: var/log/nginx
  - name: log-container
    image: centos
    command: ["/bin/sh"]
    args: ["-c", "while true; do ls log; sleep 5;done"]
    volumeMounts:
    - name: shared-data
      mountPath: log
controlplane ~ ➜ kubectl logs two-containers -c log-container
access.log
error.log
access.log
error.log⭐Q25.
Node Name을 k8s-node-01으로 세팅합니다.
Solution
ssh node01
hostnamectl set-hostname k8s-node01
kubeadm rejoin
Q26.
database 네임스페이스에서 인그레스 트래픽 5432 포트만 허용하는 NetworkPolicy를 생성합니다.
Solution
apiVersion: networking.k8s.io/v1
kind: NetworkPolicy
metadata:
  name: db-netpol
  namespace: database
spec:
  policyTypes:
  - Ingress
  ingress:
  - from:
    - ipBlock:
        cidr: 0.0.0.0/0
    ports:
    - protocol: TCP
      port: 5432
  podSelector: {}
Q27.
pod의 create 권한만을 가진 Role을 만들고 특정 namespace의 Service Account에 매핑되도록 설정한다. (CSR과정은 제외)
Solution
kubectl create serviceaccount john --dry-run=client -o yaml > sa.yaml
kubectl apply -f sa.yamlkubectl create role developer --resource=pods --verb=create --namespace=development

kubectl create rolebinding developer-role-binding --role=developer --user=john --namespace=development
Q28.
Taint 값을 확인해서 파일로 저장한다 ( NoSchedule 제외하고 node만 개수 파일로 저장)
또는 ready 상태인 Node의 수를 저장한다 ( 단 Taints로 NoSchedule가 걸려 있는 node는 제외)
Solution
kubectl describe nodes | grep TaintQ29.
사용률 제일 높은 pod 파일로 저장한다. 이때 특정 label 만 조회해야 한다
(ex. label=overloaded-cpu)
Solution
kubectl top pods -l name=overloaded-cpu > answer.txt⭐Q30.
Node 한 개가 NotReady 상태인데 Ready가 되도록 해결한다.
(kubelet이 가동되지 않은 상태였다)
Solution
sudo -i를 사용하는 것이 중요하다
ssh wk8s-node-0
sudo -i

systemctl status kubelet
systemctl restart kubelet
systemctl status kubelet
⭐Q31.
nginx 1.16으로 Delployment 생성하고 이미지 업그레이드를 진행
또한 히스토리를 파일에 저장
Solution
kubectl create deployment deploy-01 --image=nginx:1.16.0
kubectl set image deployment/deploy-01 nginx=nginx:1.17.0 --record
kubectl rollout undo deployment.v1.apps/deploy-01
kubectl rollout history deployment.v1.apps/deploy-01 > answer.file
⭐Q32.
List the InternalIP of all nodes of the cluster
Solution
jsonpath를 사용하여 문제를 해결해야만 한다
kubectl get nodes -o jsonpath='{.items[*].status.addresses[?(@.type=="InternalIP")].address}'⭐⭐Q33.
We have deployed a new pod called np-test-1 and a service called np-test-service. Incoming connections to this service are not working. Troubleshoot and fix it.
Create NetworkPolicy, by the name ingress-to-nptest that allows incoming connections to the service over port 80.
Important: Don't delete any current objects deployed.
Solution
ingress에 from을 설정하지 않아야 Applied to All sources 조건을 만족시킬 수 있다.
apiVersion: networking.k8s.io/v1
kind: NetworkPolicy
metadata:
  name: ingress-to-nptest
  namespace: default
spec:
  podSelector:
    matchLabels:
      run: np-test-1
  policyTypes:
  - Ingress
  ingress:
  - ports:
    - protocol: TCP
      port: 80
References
https://killercoda.com/killer-shell-cka
https://github.com/chadmcrowell/CKA-Exercises/blob/main/cluster-architecture.md
https://github.com/dgkanatsios/CKAD-exercises/blob/main/b.multi_container_pods.md