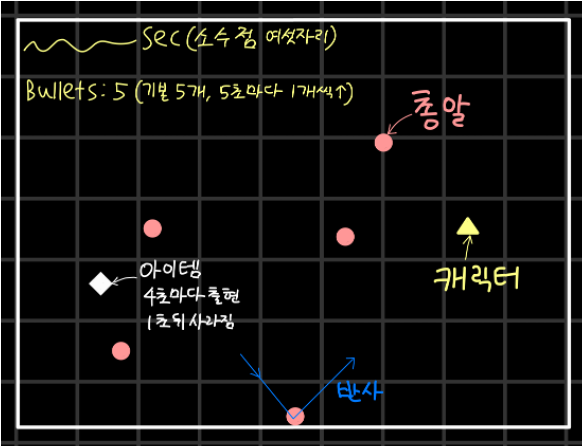
간단하게 끄적이면서 구상한거
3주내로 게임 하나 만드는 프로젝트를 맡게되었다!! 매우 좋은 경험이 될 것 같다
사용 언어 C++ / 사용 라이브러리 SFML
캐릭터 이동 구현 및 이탈 방지
if (Keyboard::isKeyPressed(Keyboard::Up)) {
	Character1.move(0, -Character1.getVelocity());
	Character1.posY += -Character1.getVelocity();
	if (Character1.posY <= 0)
		Character1.setPosition(Character1.posX, 0);
}
else if (Keyboard::isKeyPressed(Keyboard::Down)) {
	Character1.move(0, Character1.getVelocity());
	Character1.posY += Character1.getVelocity();
	if (Character1.posY >= 850)
		Character1.setPosition(Character1.posX, 850);
}
if (Keyboard::isKeyPressed(Keyboard::Left)) {
	Character1.move(-Character1.getVelocity(), 0);
	Character1.posX += -Character1.getVelocity();
	if (Character1.posX <= 0) // set character position (0, y) when moving through the window
		Character1.setPosition(0, Character1.posY);
}
else if (Keyboard::isKeyPressed(Keyboard::Right)) {
	Character1.move(Character1.getVelocity(), 0);
	Character1.posX += Character1.getVelocity();
	if (Character1.posX >= 1142)
		Character1.setPosition(1142, Character1.posY);
}
SFML의 Keyboard 클래스를 이용해 키를 누르면 그에 따라 이동하도록 한다.
또한 캐릭터의 위치가 일정 좌표를 벗어날 시 창을 이탈하지 않도록 좌표를 고정시킨다.
총알 이동 구현 / 벽 닿으면 튕기기
Bullet1.posX += Bullet1.getXVelocity();
Bullet1.posY += Bullet1.getYVelocity();
Bullet1.move(Bullet1.getXVelocity(), Bullet1.getYVelocity());
if (Bullet1.posY >= 850 || Bullet1.posY <= 0) {
	Bullet1.bulletYVelocity *= -1;
}
if (Bullet1.posX >= 1142 || Bullet1.posX <= 0) {
	Bullet1.bulletXVelocity *= -1;
}
총알의 위치에 속도만큼을 가감해 이동시킨다.
조건문을 통해 총알이 벽에 닿았을 경우 튕겨지도록 속도에 -1을 곱한다.
타이머 구현
Text text;
Font font;
int t = 0;

if (!font.loadFromFile("폰트 경로")) {
	return 42; // Robust error handling!
}

text.setFont(font);
text.setString(to_string(t) + " sec");
text.setCharacterSize(50);
text.setFillColor(Color::Yellow);
text.setPosition(0, 0);

clock_t time = clock();
위와같이 기초 설정
time = clock();
time = time / CLOCKS_PER_SEC;
text.setString(to_string(time) + " sec");

window.draw(text);
게임을 roop시키는 while 반복문 안에 적어 계속 시간이 늘어나도록 해준다.
총알 개수 적는거는 위랑 똑같이 하면 되서 생략
총알의 위치를 랜덤 생성하기
random_device rd; // create random_device to receive seed value
mt19937 gen(rd()); // reset random-number create engine via random_device
uniform_int_distribution<int> dis_x(0, 1100); // create random_number (posX)
uniform_int_distribution<int> dis_y(0, 800); // creat random_number (posY)
random 라이브러리 include 필요
기존의 srand를 사용하는 방식도 있으나 기존의 방식은 진짜 난수가 아닌 난수처럼 보이게 하는 의사난수를 생성하는 코드이다. 이는 컴퓨터 알고리즘으로 만들내는 난수이기에 진짜 난수는 아니다. 또한 이러한 방식은 정해진 구간에서 난수가 균등히 분포되지 않기 때문에 총알을 랜덤 좌표에서 생성하기에는 적합하지 않다는 생각이 들었다.
먼저 시드값을 얻기 위해 std::random_device를 정의해주었다.
그리고 random_device를 통해 난수 생성 엔진을 초기화해준다. std::mt19937은 random 라이브러리에서 제공하는 난수 생성 엔진 중 하나이다.
그런 다음 어느 부분에서 수를 뽑을지 분포를 정의해주었다.
여러개의 총알을 쉽게 관리하기
vector<Bullet> bulletList;

for (int i = 0; i < 5; i++) {
	Bullet obj(dis_x(gen), dis_y(gen), bulletRadius);
	bulletList.push_back(obj);
}
매우 간단하다! 총알을 담을 벡터를 하나 만들어주고 총알 객체들을 벡터에 담으면 끝
for (int i = 0; i < 5; i++) {
	bulletList[i].posX += bulletList[i].getXVelocity();
	bulletList[i].posY += bulletList[i].getYVelocity();
	bulletList[i].move(bulletList[i].getXVelocity(), bulletList[i].getYVelocity());
}

for (int i = 0; i < 5; i++) {
	if (bulletList[i].posY >= 850 || bulletList[i].posY <= 0) {
		bulletList[i].bulletYVelocity *= -1;
	}
	if (bulletList[i].posX >= 1142 || bulletList[i].posX <= 0) {
		bulletList[i].bulletXVelocity *= -1;
	}
}
총알들의 움직임과 반사 방식도 똑같은 방식으로 관리해준다
for (int i = 0; i < 5; i++) {
	window.draw(bulletList[i].getBullet());
}
그러고 이렇게 출력해주면 끝
이번 주의 성과
이번 주는 여기서 마무리!