파이썬/장고 웹서비스 개발 완벽 가이드 with 리액트 강의를 듣고 정리한 글입니다.
일반적으로 리액트와 같은 프론트엔드 라이브러리를 쓸 때에는 화면의 기능단위로 컴포넌트를 분리해서 구현한다.
장고 템플릿을 활용 할 때에도 이와 비슷하게 구성해볼 수 있다.
본 포스팅에서는 장고 템플릿을 기능단위로 컴포넌트로 나누어서 구성하며 인스타그램의 타임라인을 구현해본다.
아래 이미지와 같이 index.html > timeline_sidebar.html > timeline_sidebar_user_follow.html 순서로 상위 html에서 하위 html을 include하도록 구성해본다.
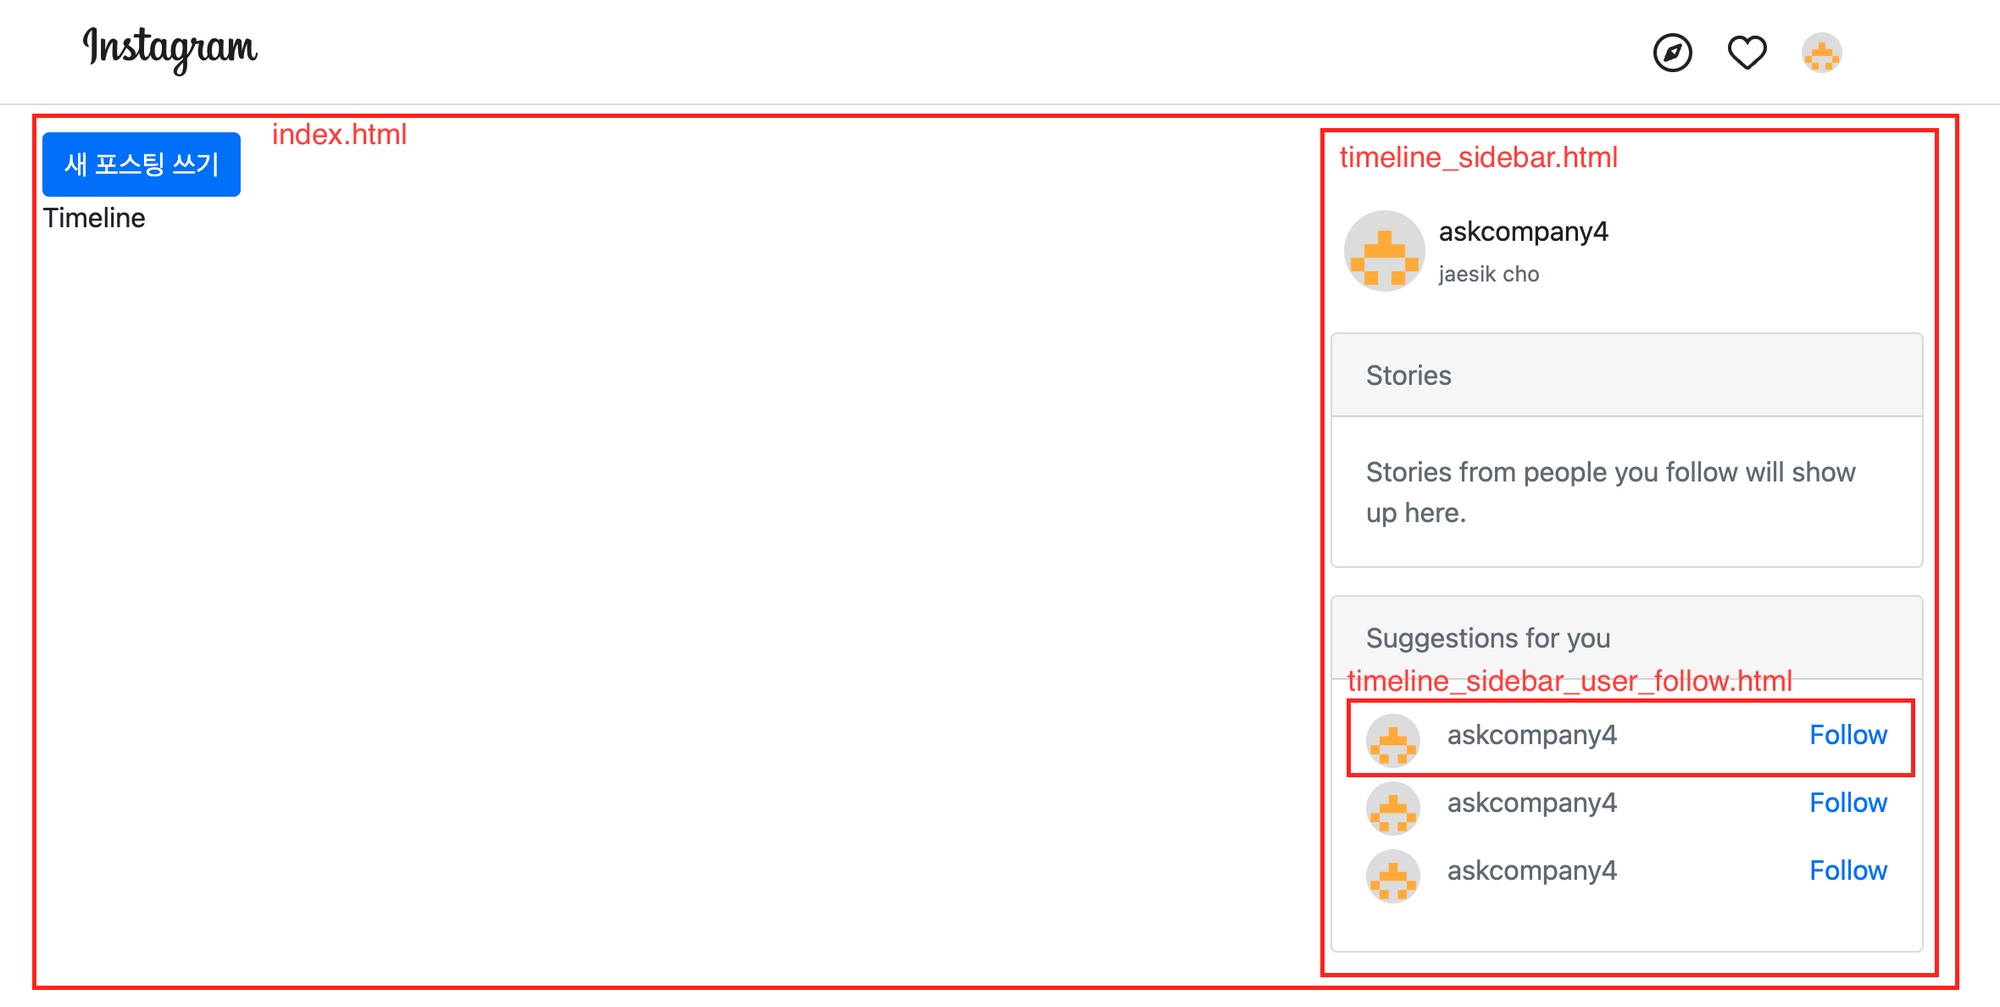
템플릿 구성
- index.html : 전체 페이지를 렌더한다. (timeline, timeline_sidebar)
- timeline_sidebar.html : timeline_sidebar를 렌더한다.
- timeline_sidebar_user_follow.html : timeline_sidebar 내에 출력할 follow user를 렌더한다.
구현
index.html
- 부트스트랩의 그리드를 활용해서 Timeline 및 Timeline_sidebar를 출력하도록 하였다.
- Timeline_sidebar는 별도의 템플릿에서 구현 후 include하였다.
{% extends "instagram/layout.html" %}
{% block content %}
  <div class="container">
  <div class="row">
    <div class="col-sm-12">
      <a href="{% url 'instagram:post_new' %}" class="btn btn-primary">새 포스팅 쓰기</a>
    </div>
  </div>
  <div class="row">
    <div class="col-sm-8">
      Timeline
    </div>
    <div class="col-sm-4">
      {% include 'instagram/timeline_sidebar.html' %}
    </div>
  </div>
  </div>
{% endblock %}
timeline_sidebar.html
- 이미지의 inline속성으로 인해 아바타 이미지 아래로 이름이 내려간다. 이 부분을 정리하기 위해 flex 속성을 활용했다. 부트스트랩의 d-flex를 활용하면 된다.
- 팔로우 유저는 timeline_sidebar_user_follow 템플릿에 별도로 구현하고 include 하였다. 또한 user 객체를 넘긴다.
PS. 아직 데이터베이스에 팔로우 유저를 구현하지 않아서 timeline_sidebar_user_follow 템플릿을 여러번 출력하도록 하였고 현재 인증된 유저 객체를 넘겼다.
<div class="d-flex p-2 mb-3">
  <div class="mr-2">
    <img src="{{ user.avatar_url }}" style="width: 48px; height: 48px" class="rounded-circle"/>
  </div>
  <div>
    {{ user.username }}<br>
    <small class="text-muted">{{ user.name }}</small>
  </div>
</div>

<div class="card mb-3">
  <div class="card-header text-muted">
    Stories
  </div>
  <div class="card-body text-muted">
    Stories from people you follow will show up here.
  </div>
</div>

<div class="card mb-3">
  <div class="card-header text-muted">
    Suggestions for you
  </div>
  <div class="card-body text-muted">
    {% include 'instagram/timeline_sidebar_user_follow.html' with friend_user=user %}
    {% include 'instagram/timeline_sidebar_user_follow.html' with friend_user=user %}
    {% include 'instagram/timeline_sidebar_user_follow.html' with friend_user=user %}
  </div>
</div>
timeline_sidebar_user_follow.html
- 여기서도 d-flex속성을 이용해서 css의 flex속성을 활용한다. 아바타URL, username은 좌측에 붙여서 구성하고 Follow버튼은 오른쪽 정렬로 구성되도록 하였다. (참고 링크)
<div class="d-flex mb-2">
  <div class="mr-3">
    <img src="{{ friend_user.avatar_url }}" style="width: 32px; height: 32px;" class="rounded-circle">
  </div>
  <div>
    {{ friend_user.username }}
  </div>
  <div class="ml-auto">
    <a href="#">Follow</a>
  </div>
</div>