간단한 정적 페이지나 웹 애플리케이션을 배포하는 데 있어서 NGINX 만한 게 없습니다.
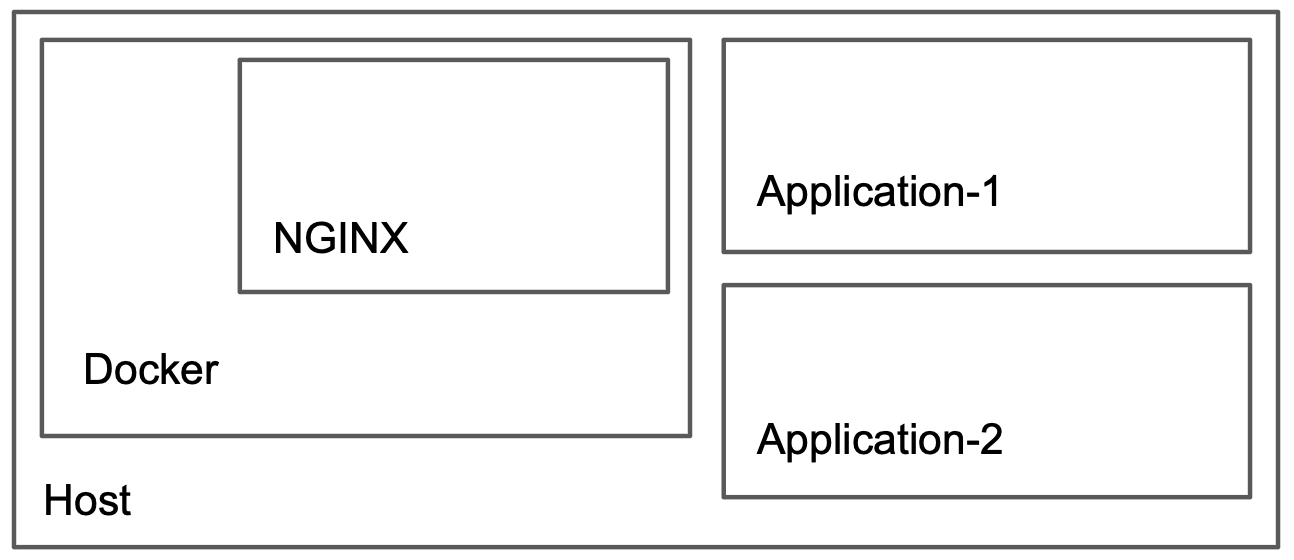
이번에는 NGINX 를 Docker 위에 올려서 구성해 보도록 하겠습니다.
도커 설치
패키지 다운로드
Linux Ubuntu 는 apt-get, Linux CentOS 는 yum 등의 패키지 매니저를 통한 설치도 있지만 가장 간단한 방법은 get.docker.com 를 사용한 방법입니다.
$ curl -fsSL https://get.docker.com | sh -
====
# Executing docker install script, commit: 3255aa3919e7281693f62855b9d543bb50f04957
+ sudo -E sh -c apt-get update -qq >/dev/null
+ sudo -E sh -c DEBIAN_FRONTEND=noninteractive apt-get install -y -qq apt-transport-https ca-certificates curl >/dev/null
+ sudo -E sh -c mkdir -p /etc/apt/keyrings && chmod -R 0755 /etc/apt/keyrings
+ sudo -E sh -c curl -fsSL "https://download.docker.com/linux/ubuntu/gpg" | gpg --dearmor --yes -o /etc/apt/keyrings/docker.gpg
+ sudo -E sh -c chmod a+r /etc/apt/keyrings/docker.gpg
+ sudo -E sh -c echo "deb [arch=amd64 signed-by=/etc/apt/keyrings/docker.gpg] https://download.docker.com/linux/ubuntu focal stable" > /etc/apt/sources.list.d/docker.list
+ sudo -E sh -c apt-get update -qq >/dev/null
+ sudo -E sh -c DEBIAN_FRONTEND=noninteractive apt-get install -y -qq --no-install-recommends docker-ce docker-ce-cli containerd.io docker-compose-plugin docker-scan-plugin >/dev/null
+ version_gte 20.10
+ [ -z  ]
+ return 0
+ sudo -E sh -c DEBIAN_FRONTEND=noninteractive apt-get install -y -qq docker-ce-rootless-extras >/dev/null
+ sudo -E sh -c docker version
Client: Docker Engine - Community
 Version:           20.10.16
 API version:       1.41
 ...

Server: Docker Engine - Community
 Engine:
  Version:          20.10.16
  API version:      1.41 (minimum version 1.12)
  ...
위 명령어는 도커를 설치해 주는 쉘 스크립트를 다운로드 한 후 스크립트를 실행 하도록 하는 명령어입니다.
도커 설치 확인
$ docker stats
===
Got permission denied while trying to connect to the Docker daemon socket at unix:///var/run/docker.sock: Get "http://%2Fvar%2Frun%2Fdocker.sock/v1.24/version": dial unix /var/run/docker.sock: connect: permission denied
Permission denied 오류가 발생합니다. 위 설치 스크립트는 docker 그룹을 생성하는데, 현재 사용자는 docker 그룹에 속해 있지 않아 발생하는 오류입니다.
$ sudo usermod -aG docker $USER명령어로 지금 사용자(root 사용자라면 일반 사용자로 전환해 주어야 합니다.)를 docker 그룹에 추가하고 로그아웃 후 다시 접속합니다.
그러면 사용자도 docker 명령어를 사용할 수 있습니다.
docker-compose 설치
docker-compose 는 도커 이미지를 쉽게 실행할 수 있도록 도와줍니다.
$ sudo apt-get update
$ sudo apt-get install docker-compose
$ docker-compose version
===
docker-compose version 1.25.0, build unknown
docker-py version: 4.1.0
CPython version: 3.8.2
OpenSSL version: OpenSSL 1.1.1f  31 Mar 2020
docker-compose.yml 파일 작성
적당한 위치에 파일을 작성합니다. 저는 홈 디렉터리에 docker 디렉터리(~/docker/)를 생성한 후 그 안에 작성하겠습니다.
$ cd ~/
$ mkdir docker
$ cd docker
$ vi docker-compose.ymlversion: "2.2"
services:
nginx:
image: nginx:latest
container_name: local_nginx
restart: always
extra_hosts:
- "host.docker.internal:host-gateway"
volumes:
- "./nginx/conf/:/etc/nginx/conf.d/:ro"
- "./nginx/log/:/var/log/nginx/"
ports:
- "80:80"
- "443:443"version 이 2.2인 이유는 호스트 리소스를 지정할 수 있는 마지막 버전이라 사용합니다. 리소스 지정이 필요없는 경우나 docker swarm을 사용하는 경우 >=3 버전을 사용하시면 됩니다.
extra_hosts 은 호스트의 네트워크를 가리킬 때 host.docker.internal 이라는 도메인 이름을 사용할 것이라는 선언입니다.
포트는 http/https 의 그것을 사용하며, 설정 파일과 로그 파일을 호스트에서 손쉽게 수정/열람 할 수 있도록 볼륨을 지정해 줍니다.
./nginx/conf/default.conf작성
nginx설정을 해당 위치에 작성합니다.
$ pwd
/home/ubuntu/docker
$ mkdir nginx
$ cd nginx
$ mkdir conf
$ cd conf
$ vi default.conf

# default.conf
upstream backend {
    least_conn;
    server host.docker.internal:8080; # 호스트의 애플리케이션으로 중계합니다
    server host.docker.internal:8081;
}

server {
  listen 80;
  server_name {domain};
  charset utf-8;
  server_tokens off;

  location / {
      proxy_pass http://backend;
  }
}
저장 후, ~/docker 위치에서 도커를 실행합니다.
$ docker-compose up -d
===
Creating network "docker_default" with the default driver
Creating local_nginx ... done
Attaching to local_nginx

$ docker ps
===
CONTAINER ID   IMAGE          COMMAND                  CREATED              STATUS         PORTS                                                                      NAMES
33910790bcba   nginx:latest   "/docker-entrypoint.…"   About a minute ago   Up 2 seconds   0.0.0.0:80->80/tcp, :::80->80/tcp, 0.0.0.0:443->443/tcp, :::443->443/tcp   local_nginx
외부에서 도메인 이름으로 접근하면 502 페이지가 표시됩니다. 호스트의 8080, 8081 포트에 아무런 진입점을 지정하지 않았기 때문에 정상입니다.
certbot 을 사용한 TLS 구현
default.conf 에 certbot 인증서 발급시 acme-challenge 핸드쉐이크를 위한 경로를 지정해 줍니다.
# default.conf

upstream backend {
    least_conn;
    server host.docker.internal:8080;
    server host.docker.internal:8081;
}

server {
  listen 80;
  server_name {domain};
  charset utf-8;
  server_tokens off;

  # 인증서 발급을 위한 challenge 저장소
  location /.well-known/acme-challenge/ {
  	  allow all;
      root /var/www/certbot;
  }

  location / {
      proxy_pass http://backend;
  }
}
docker-compose.yml 에 certbot 서비스를 추가해 줍니다.
version: "2.2"
services:
  certbot:
    container_name: local_certbot
    image: certbot/certbot:latest
    volumes:
      - "./certbot/www/:/var/www/certbot/:rw"
      - "./certbot/conf/:/etc/letsencrypt/:rw"
      - "./certbot/log/:/var/log/letsencrypt/"

  nginx:
    container_name: local_nginx
    image: nginx:latest
    restart: always
    extra_hosts:
      - "host.docker.internal:host-gateway"
    volumes:
      - "./nginx/conf/:/etc/nginx/conf.d/:ro"
      - "./nginx/log/:/var/log/nginx/"
      - "./certbot/www/:/var/www/certbot/:ro"
      - "./certbot/conf/:/etc/letsencrypt/:ro"
    ports:
      - "80:80"
      - "443:443"
certbot 을 사용한 인증서 발급은 꽤 복잡하므로 이를 간단히 처리하기 위해 쉘 스크립트를 제공해 주고 있습니다.
$ curl -L https://raw.githubusercontent.com/wmnnd/nginx-certbot/master/init-letsencrypt.sh > init-letsencrypt.sh
$ vi init-letsencrypt.sh
===
if ! [ -x "$(command -v docker-compose)" ]; then
  echo 'Error: docker-compose is not installed.' >&2
  exit 1
fi

domains=(example.org www.example.org)
rsa_key_size=4096
data_path="./data/certbot"
email="" # Adding a valid address is strongly recommended
staging=0 # Set to 1 if you're testing your setup to avoid hitting request limits

if [ -d "$data_path" ]; then
  read -p "Existing data found for $domains. Continue and replace existing certificate? (y/N) " decision
  if [ "$decision" != "Y" ] && [ "$decision" != "y" ]; then
    exit
  fi
fi
domains 와 data_path 및 email 을 본인의 환경에 맞게 수정합니다.
그 후 컨테이너 적용을 위해 docker-compose 를 재시작합니다.
$ docker-compose down --remove-orphans
$ docker-compose up -d
도메인에 접근하여 502 페이지가 노출되면 init-letsencrypt.sh 스크립트를 실행합니다. sudo 가 필요하며 sh 명령어가 아닌 bash 명령어로 실행하여야 합니다.
$ sudo bash init-letsencrypt.sh
===
...

Successfully received certificate.
Certificate is saved at: /etc/letsencrypt/live/{domain}/fullchain.pem
Key is saved at:         /etc/letsencrypt/live/{domain}/privkey.pem
This certificate expires on 2022-08-26.
These files will be updated when the certificate renews.

NEXT STEPS:
- The certificate will need to be renewed before it expires. Certbot can automatically renew the certificate in the background, but you may need to take steps to enable that functionality. See https://certbot.org/renewal-setup for instructions.
We were unable to subscribe you the EFF mailing list because your e-mail address appears to be invalid. You can try again later by visiting https://act.eff.org.

- - - - - - - - - - - - - - - - - - - - - - - - - - - - - - - - - - - - - - - -
If you like Certbot, please consider supporting our work by:
 * Donating to ISRG / Let's Encrypt:   https://letsencrypt.org/donate
 * Donating to EFF:                    https://eff.org/donate-le
- - - - - - - - - - - - - - - - - - - - - - - - - - - - - - - - - - - - - - - -

### Reloading nginx ...
2022/05/28 04:32:39 [notice] 25#25: signal process started
인증서 발급이 성공하게 되면 ~/docker/certbot/conf/live/{domain}/ 디렉터리에 인증서 및 비밀 키 등이 생성되고, ~/docker/certbot/conf/ 디렉터리에 options-ssl-nginx.conf, ssl-dhparams.pem 파일이 생성됩니다.
default.conf 에서 인증서 체인, 비밀키, 생성된 두 파일을 명시해 주면 작업은 끝이 납니다.
# default.conf

# 80 포트는 443 리다이렉트 수행을 담당합니다.
server {
    listen 80;
    server_name {domain};
    return 301 https://$host$request_uri;
}

server {
    listen 443 ssl;
    server_name {domain};
    charset utf-8;
    server_tokens off;

    ## 추가
    ssl_certificate /etc/letsencrypt/live/{domain}/fullchain.pem;
    ssl_certificate_key /etc/letsencrypt/live/{domain}/privkey.pem;
    include /etc/letsencrypt/options-ssl-nginx.conf;
    ssl_dhparam /etc/letsencrypt/ssl-dhparams.pem;

    location / {
        proxy_pass backend;
    }
}
certbot 인증서는 3개월 정도로 짧으므로 자동갱신을 위한 커맨드를 docker-compose.yml 추가해 주시면 편합니다.
# docker-compose.yml
services:
  certbot:
    container_name: local_certbot
    image: certbot/certbot:latest
    volumes:
      - "./certbot/www/:/var/www/certbot/:rw"
      - "./certbot/conf/:/etc/letsencrypt/:rw"
      - "./certbot/log/:/var/log/letsencrypt/"
    entrypoint: "/bin/sh -c 'trap exit TERM; while :; do certbot renew; sleep 12h & wait $${!}; done;'"

  nginx:
    container_name: local_nginx
    image: nginx:latest
    restart: always
    extra_hosts:
      - "host.docker.internal:host-gateway"
    volumes:
      - "./nginx/conf/:/etc/nginx/conf.d/:ro"
      - "./nginx/log/:/var/log/nginx/"
      - "./certbot/www/:/var/www/certbot/:ro"
      - "./certbot/conf/:/etc/letsencrypt/:ro"
    ports:
      - "80:80"
      - "443:443"
    command: "/bin/sh -c 'while :; do sleep 6h & wait $${!}; nginx -s reload; done & nginx -g \"daemon off;\"'"
이상입니다.
요즘 떠오르고 있는 traefik 이라는 웹 서버도 공부해 봐야 겠네요.
위 내용은 Medium 블로그 포스트 를 참고하여 작성되었습니다.
