
- Binary Search Tree란 Search를 쉽게 하기 위한 자료구조로, 원소들을 아래 조건과 같이 정렬해 놓은 binary tree다.
특징
- tree의 모든 원소는 중복된 key값을 갖지 않는다.
- root node 기준 left sub tree는 root key값보다 작은 값을 갖고 있다.
- root node 기준 right sub tree는 root key값보다 큰 값을 갖고 있다.
- left sub tree, right sub tree 모두 binary search tree다.
class Node
data class Node(var key: Int, var left: Node? = null, var right: Node? = null)Search
- root node에서 출발한다.
- 찾고자 하는 key값이 현재 node key 값보다 큰 경우 현재 node의 right child를 방문한다.
- 찾고자 하는 key값이 현재 node key 값보다 작은 경우 현재 node의 left child를 방문한다.
- 위 과정을 찾고자 하는 값이 등장할 때 까지 반복한다.
현재 node 기준 left or right child를 방문하는 순간 반대 child를 root node로 하는 sub tree는 search 대상에서 제거된다. 따라서 이상적인 binary search tree의 경우 탐색이 에 수행 가능하다.
fun search(root: Node, target: Int): Node?{
    var p: Node? = root

    while (p!=null){
        p = when {
            p.key == target -> return p
            p.key < target -> p.right
            else -> p.left
        }
    }
    return null
}
Insert
- binary search tree의 key값들은 중복되지 않는다.
- 따라서 search를 우선적으로 수행한다.
- search 수행시, insert 하고자 하는 node의 key값과 중복된 key가 없는 경우 search를 통해 반환된 말단 node의 child에 insert 하면 된다.
- 말단 node의 key보다 insert node의 key가 큰 경우 right child로 insert
- 말단 node의 key보다 insert node의 key가 작은 경우 left child로 insert
fun insert(root: Node?, target: Int): Node? {
    var p: Node? = root
    var parent: Node? = null

    while (p!=null){
        parent = p
        p = when {
            p.key == target -> return p
            p.key < target -> p.right
            else -> p.left
        }
    }

    val newNode = Node(target)
    if (parent!=null){
        if (parent.key < target) parent.right = newNode
        else if (parent.key > target) parent.left = newNode
    }
    return newNode
}
Delete
- delete node가 root node or not root node이다.
- root node의 주소값이 변경 될 여지가 있다.
- 따라서 delete method는 root node를 return 한다.
- delete node는 최종적으로 null 처리 해준다. (degree == 0, degree == 1 의 경우 한정)
degree == 0
- root node
- root node = null 처리
- not root node
- parent node의 left child or right child가 delete node일 것이다.
- 따라서 left or right child = null 처리
degree == 1
- root node
- delete node의 child를 root node로 설정 해준다.
- not root node
- parent node의 left child or right child를 delete node의 child로 설정 해준다.
degree == 2
- delete node의 left sub tree에서 delete node 값을 고르는 경우
- left sub tree중 제일 큰 key 값을 delete node의 key 값으로 설정 한다.
- 제일 큰 key 값을 갖는 node의 parent node left or right 주소값을 제일 큰 key 값을 갖는 node의 left로 변경해준다. (여기서 left는 null 일 수 있고, null이 아닐 수 있다.)
- key 값을 delete node의 key로 복사 했으므로, 제일 큰 key 값을 갖는 node는 null 처리 해준다.
- left sub tree의 제일 큰 값은 right 값이 존재하지 않게 된다. 만약 존재하게 된다면 left sub tree에서 가장 큰 값이 아닐 것이기 때문이다.
- delete node의 right sub tree에서 delete node 값을 고르는 경우
- right sub tree중 가장 작은 key 값을 delete node의 key 값으로 설정 한다.
- 제일 작은 key 값을 갖는 node의 parent node left or right 주소값을 제일 작은 key 값을 갖는 node의 right로 변경 해준다.
- key값 복사가 이뤄 졌으므로, 제일 작은 key 값을 갖는 node는 null 처리 해준다.
- 마찬가지로, right sub tree중 가장 작은 값을 갖는 node는 left가 존재하지 않게 된다.
실제 구현시는, left sub tree or right sub tree의 height가 큰 sub tree를 선택해서 진행하면 된다.
fun delete(root: Node?, target: Int): Node? {
    var p: Node? = root
    var parent: Node? = null

    while (p!=null && p.key != target){
        parent = p
        p = when {
            p.key < target -> p.right
            else -> p.left
        }
    }

    if (p == null) {
        println("delete 불가능")
    }else{
        if (p.left==null && p.right==null){
            if (parent==null){
                return null
            }else{
                if (parent.left == p) parent.left = null
                else parent.right = null
            }
        }else if (p.left == null || p.right == null){
            val child = p.left ?: p.right

            if (parent == null){
                root?.run {
                    key = child!!.key
                    left = child.left
                    right = child.right
                }
            }else{
                if (parent.left == p) parent.left = child
                else parent.right = child
            }
        }else {
            var rightSubMinNode = p.right
            var rightSubMinNodeParent = p

            while (rightSubMinNode?.left != null){
                rightSubMinNodeParent = rightSubMinNode
                rightSubMinNode = rightSubMinNode.left
            }

            p.key = rightSubMinNode!!.key
            if (rightSubMinNodeParent?.left == rightSubMinNode){
                rightSubMinNodeParent.left = rightSubMinNode.right
            }else{
                rightSubMinNodeParent?.right = rightSubMinNode.right
            }
            p = rightSubMinNode
        }
        p = null
    }
    return root
}
Tree Traversal
Inorder Traversal
- root 부터 시작
- left sub tree traversal
- 자신 처리
- right sub tree traversal
- 위 과정을 재귀적으로 반복 한다
쉽게 말해서 inorder traversal은 left sub tree → 자기 자신 → right sub tree 순으로 자기 자신을 중간에 처리하는 traversal 방법이다.
fun inorderTraversal(root: Node?){
    if (root == null) return
    inorderTraversal(root.left)
    println(root.key)
    inorderTraversal(root.right)
}
Traversal 결과
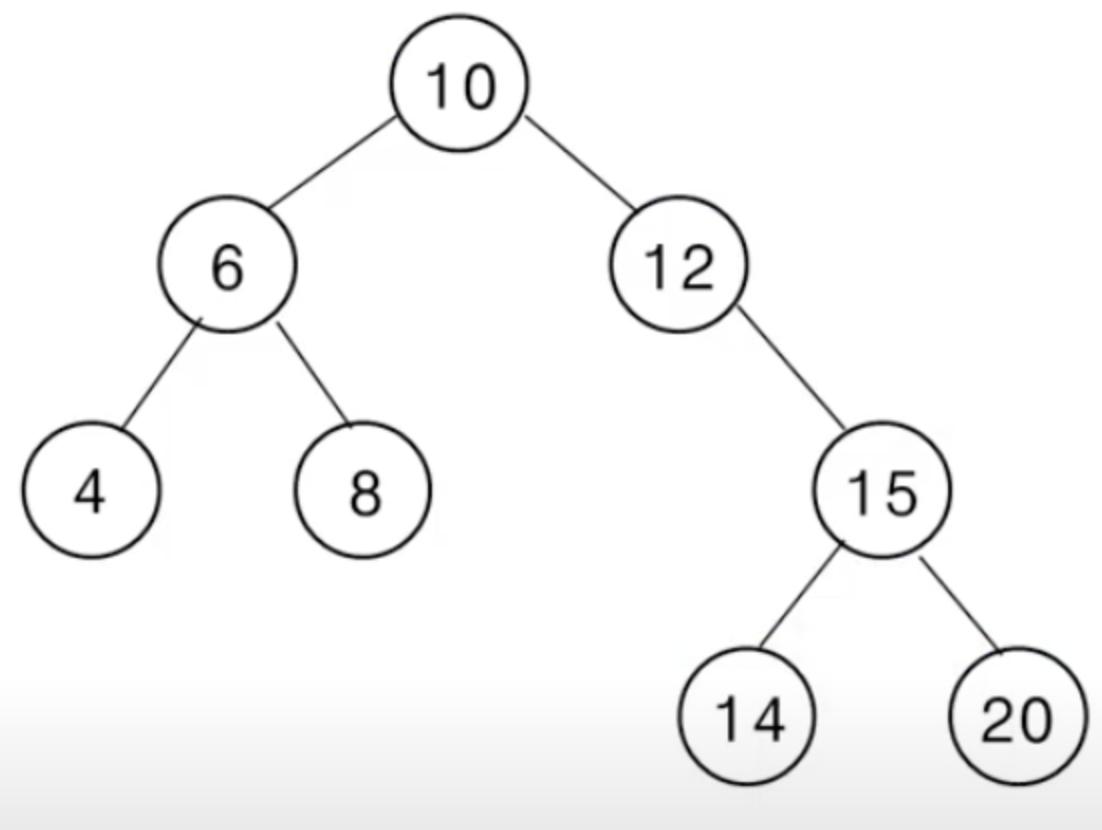
- root 10 방문
- 10의 left 6 방문
- 6의 left 4 방문 → 4 출력
- 6의 left sub tree 출력 완료 → 6 출력
- 6의 right 8 방문 → 8 출력
- 10의 left sub tree 출력 완료 → 10 출력
- 10의 right 12 방문 → 12 출력 (left sub tree가 없으므로)
- 12의 right 15 방문
- 15의 left 14 방문 → 14 출력
- 15의 left sub tree 출력 완료 → 15 출력
- 15의 right 20 방문 → 20 출력
최종 출력 결과: 4 → 6 → 8 → 10 → 12 → 14 → 15 → 20
오름차순으로 출력된 것을 확인할 수 있다.
Preorder Traversal
- root부터 시작
- 자기 자신 출력
- left sub tree traversal
- right sub tree traversal
- 위 과정을 재귀적으로 반복한다.
자기 자신을 젤 먼저 처리하고 left sub tree → right sub tree를 처리해서 말 그대로 preorder이다.
fun preorderTraversal(root: Node?){
    if (root == null) return
    print("${root.key} ")
    preorderTraversal(root.left)
    preorderTraversal(root.right)
}
최종 출력 결과: 10 → 6 → 4 → 8 → 12 → 15 → 14 → 20
Postorder Traversal
- root부터 시작
- left sub tree traversal
- right sub tree traversal
- 자기 자신 출력
- 위 과정을 재귀적으로 반복한다.
자기 자신을 젤 나중에 처리해서 말 그대로 Postorder이다.
fun preorderTraversal(root: Node?){
    if (root == null) return
    print("${root.key} ")
    preorderTraversal(root.left)
    preorderTraversal(root.right)
}
최종 출력 결과: 4 → 8 → 6 → 14 → 20 → 15 → 12 → 10
Bineary Search Tree Check Algorithm
Inorder Traversal with array
- tree size 만큼의 배열을 할당 한다
- Inorder traversal를 진행 하면서 print할 때, 해당 들이 오름 차순으로 출력 되는지 여부를 확인하면 된다.
var i = 0
val arr = IntArray(8)
fun checkBSTInorderTraversal(root: Node?, arr: IntArray){
    if (root == null) return
    checkBSTInorderTraversal(root.left, arr)
    arr[i++] = root.key
    checkBSTInorderTraversal(root.right, arr)
}

fun checkBST(arr:IntArray):Boolean{
    for (i in 0 until arr.size-1){
        if (arr[i]>=arr[i+1]) return false
    }
    return true
}
위의 방법은 tree의 size 만큼 배열을 할당해야 하므로 메모리 측면에서 낭비를 초래할 수 있다. 아래에 소개할 방법은 배열을 할당하지 않고 하나의 int 변수만 할당하여 확인하는 방법이다
Inorder Traversal with no array
- Int의 MIN_VALUE 값으로 traversal을 통해 출력될 값과 비교할 value를 초기화 한다.
- node == null 인 경우 BST 이므로 return true
- left sub tree에서 오름차순 출력에 있어 문제가 되는 경우 return false
- 현재 node의 key값이 value보다 크다면 오름차순 출력에 있어 문제가 되므로 return false
- 문제가 되지 않는 경우 value update
- right sub tree에서 문제가 되는 경우 return false
- 위의 모든 과정이 통과가 된다면 BST 이므로 return true
var value: Int = Int.MIN_VALUE
fun checkBSTInorderTraversalNoArr(root: Node?):Boolean{
    if (root == null) return true
    if (!checkBSTInorderTraversalNoArr(root.left)) return false
    if (root.key < value){
        return false
    }
    value = root.key
    if (!checkBSTInorderTraversalNoArr(root.right)) return false
    return true
}
Using Lower Bound and Upper Bound
- root node의 left sub tree의 모든 key값은 root node key보다 작다.
- root node의 right sub tree의 모든 key값은 root node key보다 크다.
- 위 두가지의 성질을 이용하여 주어진 tree가 Binary Search Tree임을 확인하는 방법이다.
- 첫번째로 재귀호출의 end 부분을 정의 해준다. 즉, node가 null인 경우이다.
- 두번째로 재취호출을 통해 BST임의 확인하는 구간이다. 만약 특정 node의 left node를 호출하는 경우 left node의 key값은 호출한 node의 key값보다 작아야 한다. 즉, upper bound 값이 세팅 되는 것이다.
- 특정 node의 right node를 호출하는 경우 해당 node의 key 값은 호출한 node의 key값보다 커야 한다. 즉, lower bound 값이 생기는 것이다.
- 만약에 root node로부터 계속 left node를 호출한 경우, lower bound값은 존재하지 않을 수 있다.
- 반대로 계속 right node를 호출한 경우, upper bound값은 존재하지 않을 수 있다.
- 따라서 각 각의 bound 값이 존재하는 경우, node의 key 값이 lower bound보다 작거나 같은 경우, upper bound 보다 크거나 같은 경우 BST의 규칙에 어긋나므로 false를 return 한다.
- 위의 과정을 root node의 left sub tree와 right sub tree 모두 true를 return 하는 경우 BST 이므로, && 연산을 통해 결과를 return 했다.
fun checkBST(root: Node?, lowerBoundExist: Boolean,
             upperBoundExist: Boolean, lowerBound: Int, upperBound: Int): Boolean{
    if (root == null) return true

    if (lowerBoundExist && root.key <= lowerBound) return false
    if (upperBoundExist && root.key >= upperBound) return false

    return checkBST(root.left, lowerBoundExist, true, lowerBound, root.key)
            && checkBST(root.right, true, upperBoundExist, root.key, upperBound)
}
3가지 방법 모두 tree의 모든 원소를 재귀적으로 탐색 한다. 따라서 에 수행 가능한 알고리즘 이다.

jodaehyeon