이전 포스팅에서 코루틴 동작 원리의 기본이 되는 CPS에 대해 알아보았다.
이번 포스팅에서는 코루틴의 동작 원리에 대해 알아보자.
Direct Style vs CPS
이전 포스팅에서 작성한 Direct Sylte과 CPS에 대해 다시 한번 보고가자.
Direct Style
무언가 결과를 얻기 위해 잠시 기다리고, 후행 작업을 수행
fun postItem(item: Item){
    val token = requestToken() // Wait
    val post = createPost(token, item) // 후행 작업 (Continuation)
    processPost(post) // 후행 작업 (Continuation)
}
위 예시에서는
processPost(post)를 수행하기 위해 createPost(token, item) 를 기다리고,
createPost(token, item)을 수행하기 위해 requestToken() 을 기다린다.
CPS (Continuation-Passing-Style)
후행 작업 (Continuation)을 전달하는 기법
fun postItem(item: Item){
    requestToken { token ->
        createPost(token, item) { post ->
            processPost(post)
        }
    }
}
위 예시에서는 createPost()는 requestToken()의 결과값인 token을 필요로 하기 때문에 requestToken()의 후행 작업으로 createPost()를 넘겼고,
processPost()는 createPost()의 결과값인 post를 필요로 하기 때문에
createPost()의 후행 작업으로 processPost()를 넘겼다.
Coroutines Direct Style
Kotlin의 Coroutine은 비동기 코드를 Direct Style 로 작성할 수 있게 해준다.
우리는 비동기 작업을 위해 CPS를 별도로 사용하지 않고, 동기 코드처럼 작성함으로써 코드의 가독성을 높여준다.
Kotlin의 Coroutine을 사용하기 위해 fun 앞에 suspend 키워드를 붙이면 된다.
kotlin의 suspend fun (중단 함수)는 IntelliJ IDE 기준으로, 코드 좌측에 화살표 아이콘 (~>)이 만들어진다.
* suspend fun을 호출하는 함수 또한 suspend fun이어야 한다.
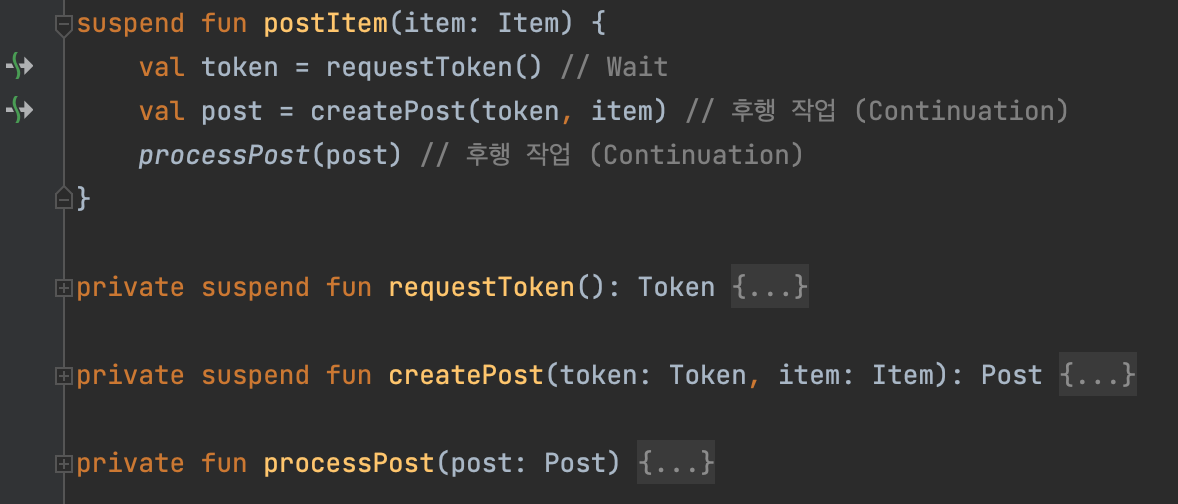
위 코드는 Direct style로 작성됐지만, ~> 아이콘이 생성된 곳은 코틀린 컴파일러에 의해 CPS로 변환되면서 비동기 작업이 가능하다.
CPS Transformation
kotlin의 suspend fun이 java로 변환될 때 CPS로 어떻게 변환되는지 확인해보자.
Kotlin
suspend fun createPost(token: Token, item: Item): Post {...}Java
Object createPost(Token token, Item item, Continuation<Post> cont) {...}우선, 기존과 비슷한 형태로 변환이 되지만 Java 코드에 Continuation<T> 파라미터가 추가된다.
따라서, createPost() 의 마지막 부분에서 cont.resumeWith() 을 통해 후행작업을 실행할 수 있다.
@SinceKotlin("1.3")
public interface Continuation<in T> {
    // 이 Continuation 에 해당하는 CoroutineContext
    public val context: CoroutineContext

    // 마지막 중단점의 반환값으로 성공 또는 실패한 결과를 전달하는 해당 코루틴을 재시작한다.
    public fun resumeWith(result: Result<T>)
}
이전 포스팅에서도 소개했지만, 코틀린의 Continuation 객체는 다음에 수행할 작업을 가지고 있는, Callback Interface를 일반화한 객체라고 할 수 있다.
Direct to CPS
이제 Coroutines Direct Style을 CPS로 변환하는 과정에 대해 이론적으로 알아보자.
 최초에 postItem() 이 실행될 때는 위 3줄이 continuation 이 된다.
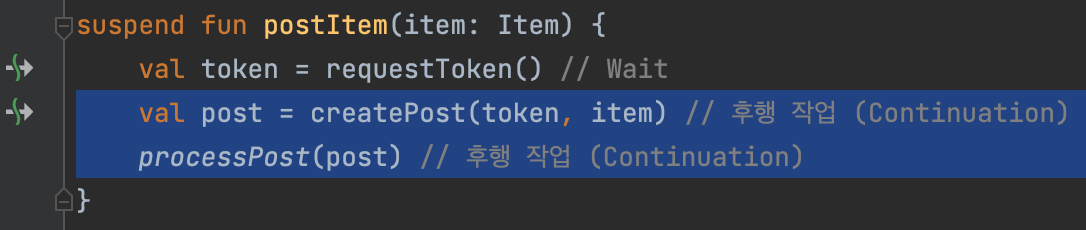 이후에 requestToken() 이 실행되는 시점에서는, 위 2줄이 requestToken()에 대한 continuation이 된다.
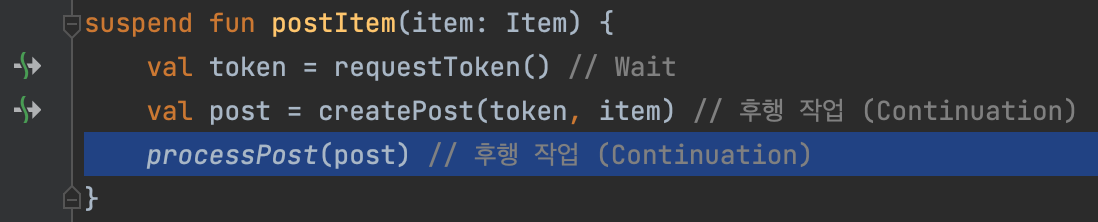 마지막으로, createPost()이 실행되는 시점에서는, 위 1줄이 createPost()에 대한 continuation이 된다.
Callbacks?
위와 같은 Continuation은 아래와 같은 Callback Style로도 작성 및 동작이 가능하다.
하지만, 이러한 코드 스타일은 compiler가 다음에 어떤 작업이 일어날 지 예측하기 힘들다.
fun postItem(item: Item){
    requestToken { token ->
        createPost(token, item) { post ->
            processPost(post)
        }
    }
}
그래서 코틀린 컴파일러는 위와 같은 Callback Style이 아닌 다른 방식으로 변환한다.
* 참고로, 아래 나올 코드는 실제 동작하는 코드가 아닌 수도코드로 작성되는 개념들이다.
Labels
우선, Callback 작업에 해당하는 각 suspend 지점을 식별하여 논리적인 label 개념으로 나눈다.
suspend fun postItem(item: Item){
    val token = requestToken()           // Label 0
    val post = createPost(token, item)   // Label 1
    processPost(post)     				 // Label 2
}
이후에, label에 따라 실행될 구문을 switch (when)문으로 분기한다.
switch(when) 문으로 분기함에 따라, 어느 label로든 코드 실행이 가능해진다.
suspend fun postItem(item: Item){
    when (label) {
        0 -> { val token = requestToken() }
        1 -> { val post = createPost(token, item) }
        2 -> { processPost(post) }
    }
}
State
현재 진행중인 label(상태, state)을 저장하기 위해, state machine을 만들어보자.
suspend fun postItem(item: Item){
    val sm = object : CoroutineImpl {...} // state machine 추가
    when (sm.label) { // 실행 순서는 state machine이 관리
        0 -> { val token = requestToken() }
        1 -> { val post = createPost(token, item) }
        2 -> { processPost(post) }
    }
}
* CoroutineImpl은 Continuation을 상속받는다.
internal abstract class ContinuationImpl public constructor(completion: kotlin.coroutines.Continuation<kotlin.Any?>?, _context: kotlin.coroutines.CoroutineContext?) : kotlin.coroutines.jvm.internal.BaseContinuationImpl {...}

internal abstract class BaseContinuationImpl public constructor(completion: kotlin.coroutines.Continuation<kotlin.Any?>?) : kotlin.coroutines.Continuation<kotlin.Any?>, kotlin.coroutines.jvm.internal.CoroutineStackFrame, java.io.Serializable {...}
CPS Transform
이제 postItem을 위에서 본 CPS 형태로 바꿔보자.
각 중단 지점에는 현재 상태를 저장하기 위한 sm을 전달한다.
suspend fun postItem(item: Item, cont: Continuation){
    val sm = object : CoroutineImpl {...}
    when (sm.label) {
        0 -> val token = requestToken(sm)
        1 -> val post = createPost(token, item, sm)
        2 -> processPost(post)
    }
}
-> postItem에 Continuation 파라미터를 추가한다.
-> 메소드 내부 중단 지점(requestToken, createPost)에도 Continuation 파라미터를 추가한다.
Save state
requestToken과 같은 어떠한 suspend fun이 실행되기 전에,
우리는 requestToken이 비동기 함수라는 것을 기억해야 한다.
requestToken은 코드의 실행을 잠시 멈추고 나중에 결과를 얻기 때문에, state를 잃어버릴 수 있다. 그래서 requestToken이 실행되기 전에 state를 저장해두어야 한다.
suspend fun postItem(item: Item, cont: Continuation){
    val sm = object : CoroutineImpl {...}
    when (sm.label) {
        0 -> {
            sm.item = item
            sm.label = 1
            requestToken(sm)
        }
        1 -> val post = createPost(token, item, sm)
        2 -> processPost(post)
    }
}
위 예제에서는, postItem의 인자로 받은 item이 requestToken에서는 사용되지 않지만, 그 다음에 수행되어야 할 1번 레이블의 createPost에서 사용돼야 하기 때문에, sm에 함께 저장한다.
그리고 다음에 수행되어야 할 레이블이 1번 레이블임을 sm에 저장한다.
(현재 수행중인 0번 label을 저장하는게 아니라, 다음에 수행되어야 할 레이블을 저장함에 유의하자.)
이후에 이렇게 저장한 sm을 requestToken에 Continuation 으로써 전달한다.
(위에서도 설명했지만, sm : CoroutineImpl 에서 CoroutineImpl은 Continuation을 상속받는다.)
Callback
위에서도 소개했듯, sm(Continuation)은 단지 callback을 일반화한 인터페이스이기 때문에 requestToken에 sm을 전달함으로써 'requestToken이 미래에 완료되면, sm을 통해 다음 작업을 수행해라'는 명령을 전달할 수 있다.
그러면, 'sm을 통해 다음 작업을 수행' 해야함을 구현해보자.
Continuation 인터페이스에 resumeWith() 메소드를 구현함으로써 콜백 기능을 구현할 수 있다.
resumeWith()가 수행되면, 다시 postItem()이 수행되도록 하는데,
이 때 postItem의 continuation에 sm 자기 자신을 전달하여 상태를 유지하여 다음 작업(label)을 수행할 수 있다.
suspend fun postItem(item: Item, cont: Continuation){
    val sm = object : CoroutineImpl {
        override fun resumeWith(...) {
            postItem(null, this)
        }
    }
    when (sm.label) {
        0 -> {
            sm.item = item
            sm.label = 1
            requestToken(sm)
        }
        1 -> val post = createPost(token, item, sm)
        2 -> processPost(post)
    }
}
postItem이 실행될 때, continuation이 존재한다면
'내가 다음에 실행할 작업이 있구나?!' 를 인지할 수 있도록 SM으로 형변환을 시켜주고,
continuation이 없다면 postItem이 최초 실행된 것이니 새로운 Continuation 객체를 만들어주도록 한다.
suspend fun postItem(item: Item, cont: Continuation){
    val sm = cont as? ThisSM ?: object : CoroutineImpl {
        override fun resume(...) {
            postItem(null, this)
        }
    }
    when (sm.label) {
        0 -> {
            sm.item = item
            sm.label = 1
            requestToken(sm)
        }
        1 -> val post = createPost(token, item, sm)
        2 -> processPost(post)
    }
}
Restore state
continuation에 sm을 전달했기 때문에, requestToken이 수행된 이후에는
sm에 저장된 label을 통해 어느 작업을 수행할 차례인지 알 수 있다.
requestToken이 수행된 이후인 createPost에서, sm을 통해 이전 상태값을 복원하여 사용한다.
suspend fun postItem(item: Item, cont: Continuation){
    val sm = cont as? ThisSM ?: object : CoroutineImpl {
        override fun resume(...) {
            postItem(null, this)
        }
    }
    when (sm.label) {
        0 -> {
            sm.item = item
            sm.label = 1
            requestToken(sm)
        }
        1 -> {
            val item = sm.item
            val token = sm.result as Token
            val post = createPost(token, item, sm)
        }
        2 -> processPost(post)
    }
}
Continue
createPost에서도, requestToken때와 마찬가지로
다음에 수행할 레이블을 2번으로 지정하고 createPost의 continuation으로 sm을 전달한다.
suspend fun postItem(item: Item, cont: Continuation){
    val sm = cont as? ThisSM ?: object : CoroutineImpl {
        override fun resume(...) {
            postItem(null, this)
        }
    }
    when (sm.label) {
        0 -> {
            sm.item = item
            sm.label = 1
            requestToken(sm)
        }
        1 -> {
            val item = sm.item
            val token = sm.result as Token
            sm.label = 2
            createPost(token, item, sm)
        }
        2 -> processPost(post)
    }
}
State machine vs Callback
재사용성
State machine
Closure와 State Object의 재사용이 가능하다.
suspend fun postItem(item: Item){
    val token = requestToken()
    val post = createPost(token, item)
    processPost(post)
}
Callback
매 콜백 블럭에서 새로운 Closure를 생성하여 사용한다.
fun postItem(item: Item){
    requestToken { token ->
        createPost(token, item) { post ->
            processPost(post)
        }
    }
}
콜백지옥
State machine
반복이 쉬우며, 고차 함수이다.
suspend fun postItem(items: List<Item>){
    for (item in items) {
        val token = requestToken()
        val post = createPost(token, item)
        processPost(post)
    }
}
Callback
수많은 콜백 블럭을 만들어낸다.
fun postItem(items: List<Item>){
    ...
}
실제 코드로 분석하기
위에서 이론적으로 kotlin coroutines direct style에 대한 코드를 알아보았다.
이제, 실제로 컴파일러에 의해 java byte code로 어떻게 변환되는지 확인해보자.
* 위에서 이론적으로 다룬 내용과 실제로 변환된 내용이 조금씩 다를 수 있다.
Kotlin 코드
suspend fun postItem(item: Item) {
    val token = requestToken() // Wait
    val post = createPost(token, item) // 후행 작업 (Continuation)
    processPost(post) // 후행 작업 (Continuation)
}

private suspend fun requestToken(): Token {
    delay(10)
    return Token()
}

private suspend fun createPost(token: Token, item: Item): Post {
    println("[createPost] token: $token, item: $item")
    delay(10)
    println("[createPost] success!")
    return Post()
}

private fun processPost(post: Post) {
    println("[processPost] post: $post")
    println("[processPost] ${post.postId} success!")
}
이런 코드를 Java Byte Code로 변환해보자.
JAVA 코드
-> postItem() 만 잘랐다.
@Nullable
public static final Object postItem(@NotNull Item item, @NotNull Continuation var1) {
    Object $continuation;
    label27: {
        if (var1 instanceof <undefinedtype>) {
            $continuation = (<undefinedtype>)var1;
            if ((((<undefinedtype>)$continuation).label & Integer.MIN_VALUE) != 0) {
                ((<undefinedtype>)$continuation).label -= Integer.MIN_VALUE;
                break label27;
            }
        }

        $continuation = new ContinuationImpl(var1) {
            // $FF: synthetic field
            Object result;
            int label;
            Object L$0;

            @Nullable
            public final Object invokeSuspend(@NotNull Object $result) {
                this.result = $result;
                this.label |= Integer.MIN_VALUE;
                return TE2Kt.postItem((Item)null, this);
            }
        };
    }

    Object var10000;
    label22: {
        Object $result = ((<undefinedtype>)$continuation).result;
        Object var6 = IntrinsicsKt.getCOROUTINE_SUSPENDED();
        switch(((<undefinedtype>)$continuation).label) {
            case 0:
                ResultKt.throwOnFailure($result);
                ((<undefinedtype>)$continuation).L$0 = item;
                ((<undefinedtype>)$continuation).label = 1;
                var10000 = requestToken((Continuation)$continuation);
                if (var10000 == var6) {
                    return var6;
                }
                break;
            case 1:
                item = (Item)((<undefinedtype>)$continuation).L$0;
                ResultKt.throwOnFailure($result);
                var10000 = $result;
                break;
            case 2:
                ResultKt.throwOnFailure($result);
                var10000 = $result;
                break label22;
            default:
                throw new IllegalStateException("call to 'resume' before 'invoke' with coroutine");
        }

        Token token = (Token)var10000;
        ((<undefinedtype>)$continuation).L$0 = null;
        ((<undefinedtype>)$continuation).label = 2;
        var10000 = createPost(token, item, (Continuation)$continuation);
        if (var10000 == var6) {
            return var6;
        }
    }

    Post post = (Post)var10000;
    processPost(post);
    return Unit.INSTANCE;
}
CPS Transform
public static final Object postItem(@NotNull Item item, @NotNull Continuation var1) {...}

requestToken((Continuation)$continuation);

createPost(token, item, (Continuation)$continuation)
각 suspend 지점의 마지막 파라미터에 continuation 이 추가됐다.
labels
switch(((<undefinedtype>)$continuation).label) {
    case 0:
        ...
    case 1:
        ...
    case 2:
        ...
    default:
        throw new IllegalStateException("call to 'resume' before 'invoke' with coroutine");
}
위와 같이 label로 나누어 동작된다.
state machine
label27: {
    if (var1 instanceof <undefinedtype>) {
        $continuation = (<undefinedtype>)var1;
        if ((((<undefinedtype>)$continuation).label & Integer.MIN_VALUE) != 0) {
            ((<undefinedtype>)$continuation).label -= Integer.MIN_VALUE;
            break label27;
        }
    }

    $continuation = new ContinuationImpl(var1) {
        // $FF: synthetic field
        Object result;
        int label;
        Object L$0;

        @Nullable
        public final Object invokeSuspend(@NotNull Object $result) {
            this.result = $result;
            this.label |= Integer.MIN_VALUE;
            return TE2Kt.postItem((Item)null, this);
        }
    };
}
인자로 받은 continuation이 존재하면 형변환을 해서 사용하고,
없다면 새로운 Continuation을 생성한다.
save state
switch(((<undefinedtype>)$continuation).label) {
    case 0:
        ResultKt.throwOnFailure($result);
        ((<undefinedtype>)$continuation).L$0 = item;
        ((<undefinedtype>)$continuation).label = 1;
        ...
    case 1:
        ...
    case 2:
        ...
    default:
        throw new IllegalStateException("call to 'resume' before 'invoke' with coroutine");
}
continuation에 item과 다음에 수행할 label을 지정한다.
callback
label27: {
    ...
    $continuation = new ContinuationImpl(var1) {
        ...
        @Nullable
        public final Object invokeSuspend(@NotNull Object $result) {
            this.result = $result;
            this.label |= Integer.MIN_VALUE;
            return TE2Kt.postItem((Item)null, this);
        }
    };
}
invokeSuspend() 를 통해 다음에 수행해야 할 작업을 구현하고 있다.
restore state
label22: {
    Object $result = ((<undefinedtype>)$continuation).result;
    Object var6 = IntrinsicsKt.getCOROUTINE_SUSPENDED();
    switch(((<undefinedtype>)$continuation).label) {
       ...
    }
전달받은 continuation을 통해 상태를 복원하여 사용한다.
continue
Token token = (Token)var10000;
((<undefinedtype>)$continuation).L$0 = null;
((<undefinedtype>)$continuation).label = 2;
var10000 = createPost(token, item, (Continuation)$continuation);
if (var10000 == var6) {
    return var6;
}
다음에 수행해야 할 label을 지정하고, createPost를 호출한다.
CPS의 장점?
이전 포스팅에서 소개한 CPS의 장점을 다시 한 번 적어본다.
- 재귀함수를 제거할 수 있다
-> 스택 프레임을 늘리지 않을 수 있다. - CPS는 복잡한 콜백을 switch문으로 단순하게 표현할 수 있다.
-> CPS는 콜백을 많이 사용하는 비동기 프로그래밍에서 유용하게 사용된다.
Reference