76. TestCase 하위 클래스를 사용해, 프로그램에서 연관된 행동 방식을 검증하라.
요약
- unittest 내장 모듈에 있는
TestCase클래스의 하위 클래스를 정의하고, 테스트하려는 동작마다 메서드를 정의함으로써 테스트를 정의할 수 있다.TestCase하위 클래스 안에서, 테스트 메서드 이름은test로 시작해야 한다.
- 테스트 안에서는 파이썬 내장
assert문을 사용하지 말고,assertEqual과 같이TestCase클래스에 정의된 여러 가지 도우미 메서드를 사용해 원하는 동작을 확인하라. - 준비 코드를 줄이려면
subTest도우미 메서드를 사용해, 데이터 기반 테스트를 정의하라. - 프로젝트의 복잡성과 테스트 요구 사항에 따라,
pytest(https://pytest.org) 오픈 소스 패키지와 관련 커뮤니티에서 개발한 다양한 플러그인이 특히 유용할 수 있따.
본문
# utils.py
def to_str(data):
    if isinstance(data, str):
        return data
    elif isinstance(data, bytes):
        return data.decode('utf-8')
    else:
        raise TypeError('str이나 bytes를 전달해야 합니다, '
                        '찾은 값: %r' % data)
# utils_test.py
from unittest import TestCase, main
from utils import to_str
class UtilsTestCase(TestCase):
def test_to_str_bytes(self):
self.assertEqual('hello', to_str(b'hello'))
def test_to_str_str(self):
self.assertEqual('hello', to_str('hello'))
def test_failing(self):
self.assertEqual('incorrect', to_str('hello'))
if __name__ == '__main__':
main()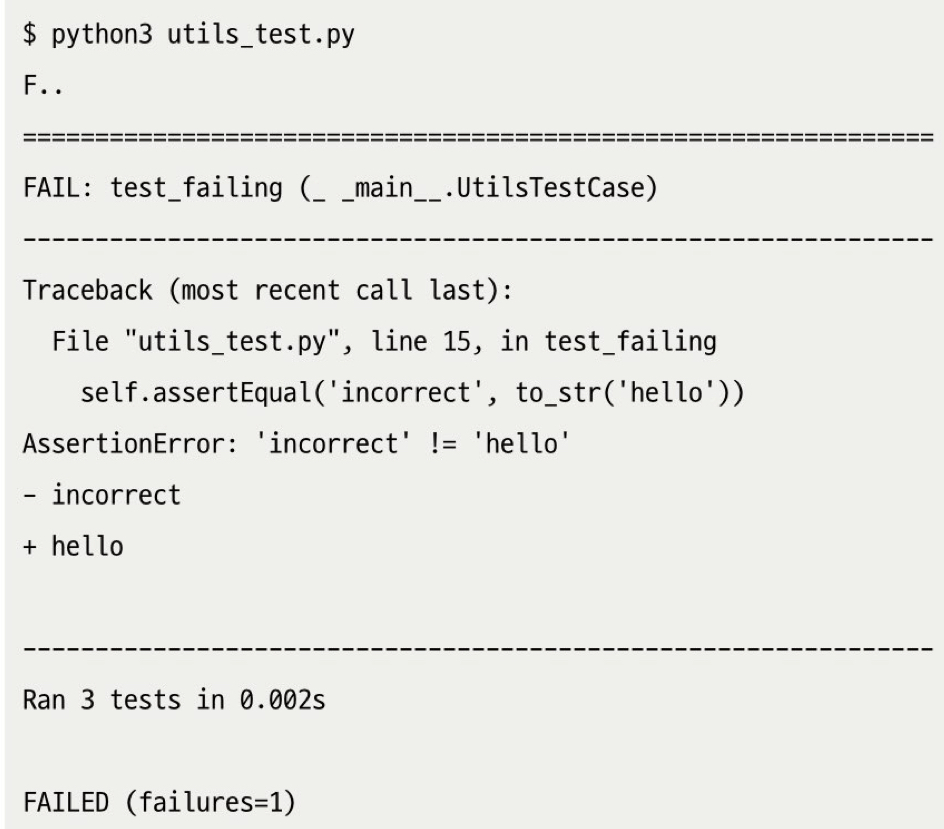
- 명령줄이서 테스트를 실행할 때, 테스트 모듈 내에서 해당 메서드의 경로를 지정해, 원하는 테스트만 실행할 수도 있다.
$ python3 utils_test.py UtilsTestCase.test_to_str_bytes

--------------------------
Ran 1 test in 0.000s

OK-
원한다면 테스트 메서드 내부에 있는 구체적인 중단점에서, 직접 디버거를 호출해 테스트가 실패한 원인을 더 깊게 파고들 수도 있다.
-
테스트 안에서는 파이썬 내장
assert문을 사용하지 말고,assertEqual과 같이TestCase클래스에 정의된 여러 가지 도우미 메서드를 사용해 원하는 동작을 확인하라. (그 결과가 더 좋다.) -
예외가 발생하는지 검증하기 위해,
with문 안에서 context manager로 사용할 수 있는assertRaises도우미 메서드도 있다.- 이 메서드를 사용한 코드는
try/except문과 비슷하므로, 테스트 케이스의 해당 부분에서 예외가 발생할 것으로 예상한다는 점을 아주 명확히 드러낸다.
- 이 메서드를 사용한 코드는
from unittest import TestCase, main
from utils import to_str

class UtilsErrorTestCase(TestCase):
    def test_to_str_bad(self):
        with self.assertRaises(TypeError):
            to_str(object())

    def test_to_str_bad_encoding(self):
        with self.assertRaises(UnicodeDecodeError):
            to_str(b'\xfa\xfa')

if __name__ == '__main__':
    main()
테스트 가독성을 높이기 위해(테스트 케이스를 더 짧고 읽기 좋게 만들기 위해), 그리고 오류 메시지를 더 쉽게 이해하기 위해-> TestCase 하위 클래스 안에 복잡한 로직이 들어가는 도우미 메서드를 직접 작성할 수도 있다.- 다만 도우미 메서드 이름이
test로 시작하지 않아야 한다. - 도우미 메서드는
TestCase가 제공하는 단언문 메서드(assert_)를 호출하지 않고,fail메서드를 호출해서- 어떤 가정이나 불변 조건을 만족하지 않았음을 확실히 표현할 수 있다.
- 다만 도우미 메서드 이름이
# helper_test.py
from unittest import TestCase, main
def sum_squares(values):
cumulative = 0
for value in values:
cumulative += value ** 2
yield cumulative
class HelperTestCase(TestCase):
def verify_complex_case(self, values, expected):
expect_it = iter(expected)
found_it = iter(sum_squares(values))
test_it = zip(expect_it, found_it)
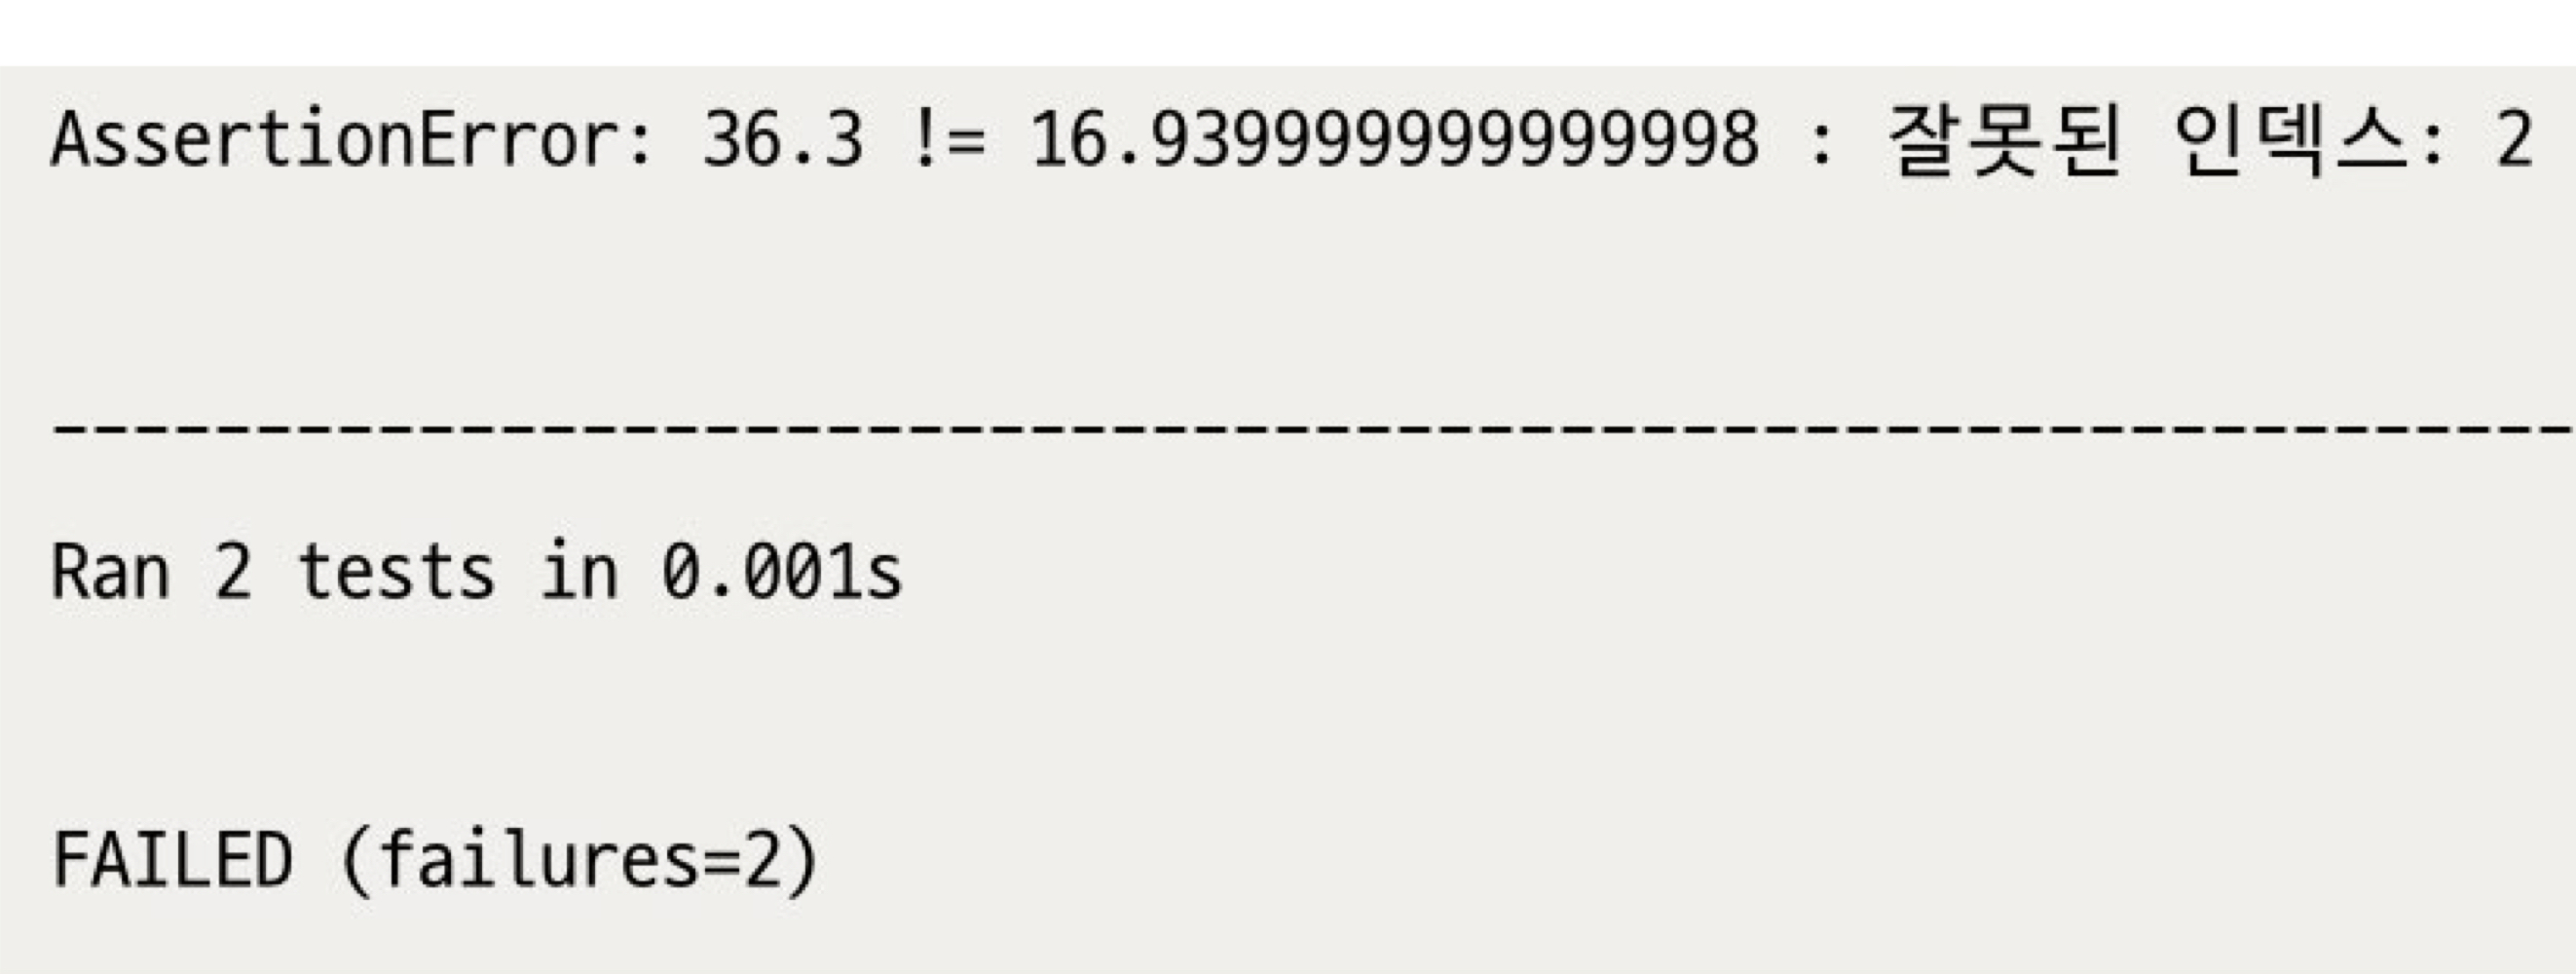
for i, (expect, found) in enumerate(test_it):
self.assertEqual(
expect,
found,
f'잘못된 인덱스: {i}')
# 두 제너레이터를 모두 소진했는지 검증
try:
next(expect_it)
except StopIteration:
pass
else:
self.fail('실제보다 예상한 제네레이터가 더 깁니다')
try:
next(found_it)
except StopIteration:
pass
else:
self.fail('예상한 제네레이터보다 실제가 더 깁니다')
def test_wrong_lengths(self):
values = [1.1, 2.2, 3.3]
expected = [
1.1 ** 2,
]
self.verify_complex_case(values, expected)
def test_wrong_results(self):
values = [1.1, 2.2, 3.3]
expected = [
1.1 ** 2,
1.1 ** 2 + 2.2 ** 2,
1.1 ** 2 + 2.2 ** 2 + 3.3 ** 2 + 4.4 ** 2,
]
self.verify_complex_case(values, expected)
if __name__ == '__main__':
main()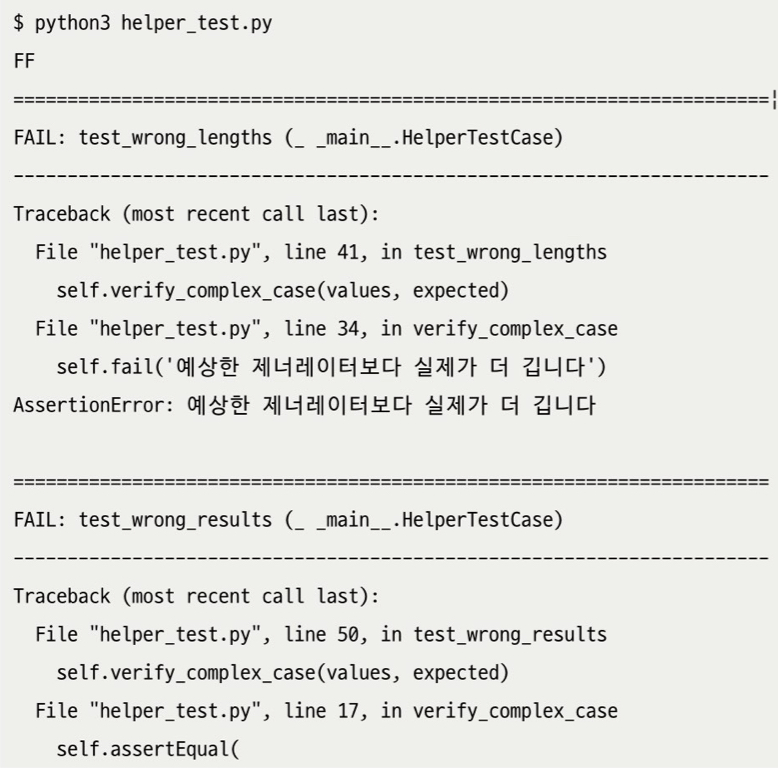
- 준비 코드를 줄이려면
subTest도우미 메서드를 사용해, 데이터 기반 테스트를 정의하라.- subTest를 사용하면, 하위 테스트 케이스 중 하나가 실패해도, 다른 테스트 케이스를 계속 진행할 수 있다.
# utils.py
def to_str(data):
    if isinstance(data, str):
        return data
    elif isinstance(data, bytes):
        return data.decode('utf-8')
    else:
        raise TypeError('str이나 bytes를 전달해야 합니다, '
                        '찾은 값: %r' % data)
# data_driven_test.py
from unittest import TestCase, main
from utils import to_str
class DataDrivenTestCase(TestCase):
def test_good(self):
good_cases = [
(b'my bytes', 'my bytes'),
('no error', b'no error'), # 이 부분에서 실패함
('other str', 'other str'),
]
for value, expected in good_cases:
with self.subTest(value):
self.assertEqual(expected, to_str(value))
def test_bad(self):
bad_cases = [
(object(), TypeError),
(b'\xfa\xfa', UnicodeDecodeError),
]
for value, exception in bad_cases:
with self.subTest(value):
with self.assertRaises(exception):
to_str(value)
if __name__ == '__main__':
main()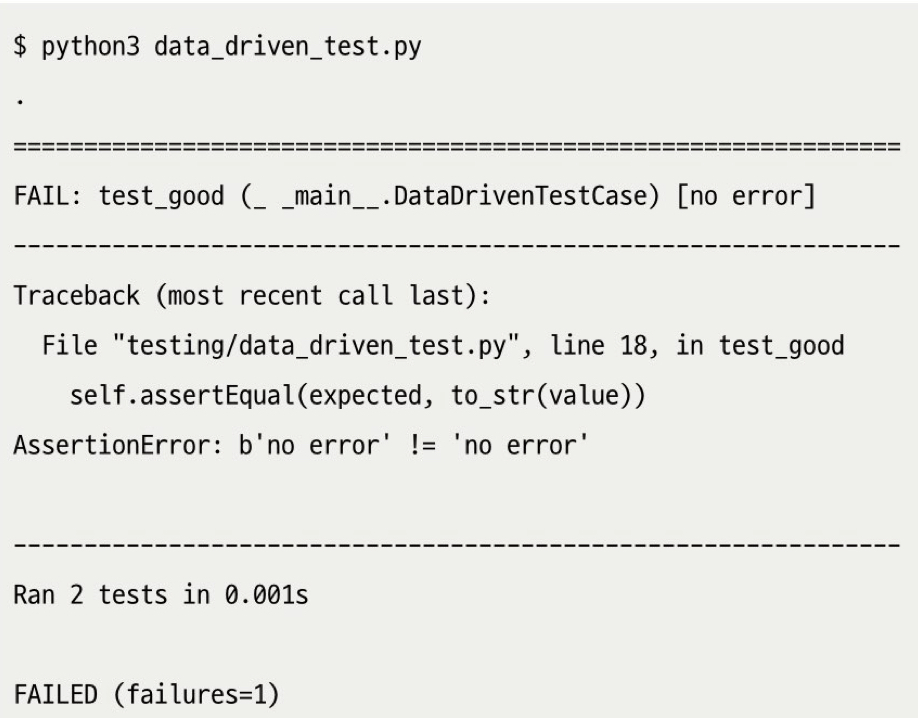
77. setUp, tearDown, setUpModule, tearDownModule을 사용해, 각각의 테스트를 격리하라.
요약
- 단위 테스트(함수/클래스 등의 기본 단위를 격리시켜 검증하는 테스트)와 통합 테스트(모듈 간의 상호작용을 검증하는 테스트)를 모두 작성하는 것이 중요하다.
setUp과tearDown메서드를 사용하면 테스트 사이를 격리할 수 있으므로, 더 깨끗한 테스트 환경을 제공할 수 있다.- 통합 테스트의 경우, 모듈 수준의 함수인
setUpModule과tearDownModule을 사용하면, 테스트 모듈과 모듈 안에 포함된 모든TestCase클래스의 전체 생명 주기 동안 필요한 하네스를 관리할 수 있다.
본문
test harness: 테스트 메서드를 실행하기 전에 테스트 환경을 구축하는 과정
from unittest import TestCase, main

def setUpModule():
    print('* 모듈 설정')

def tearDownModule():
    print('* 모듈 정리')

class IntegrationTest(TestCase):
    def setUp(self):
        print('* 테스트 설정')

    def tearDown(self):
        print('* 테스트 정리')

    def test_end_to_end1(self):
        print('* 테스트 1')

    def test_end_to_end2(self):
        print('* 테스트 2')

if __name__ == '__main__':
    main()

>>>
* 모듈 설정
* 테스트 설정
* 테스트 1
* 테스트 정리
* 테스트 설정
* 테스트 2
* 테스트 정리
* 모듈 정리
새로운 것이 들어오면 이미 있는 것과 충돌을 시도하라.