시작하며
iOS 개발때 스토리 보드 없이 시작하는 세팅에 대해서 정리합니다. YouTube에 개발하는 정대리님께서 올려 놓으신 영상을 따라 했으니 자세한 것은 유튜브 가보시면 됩니다.
세팅
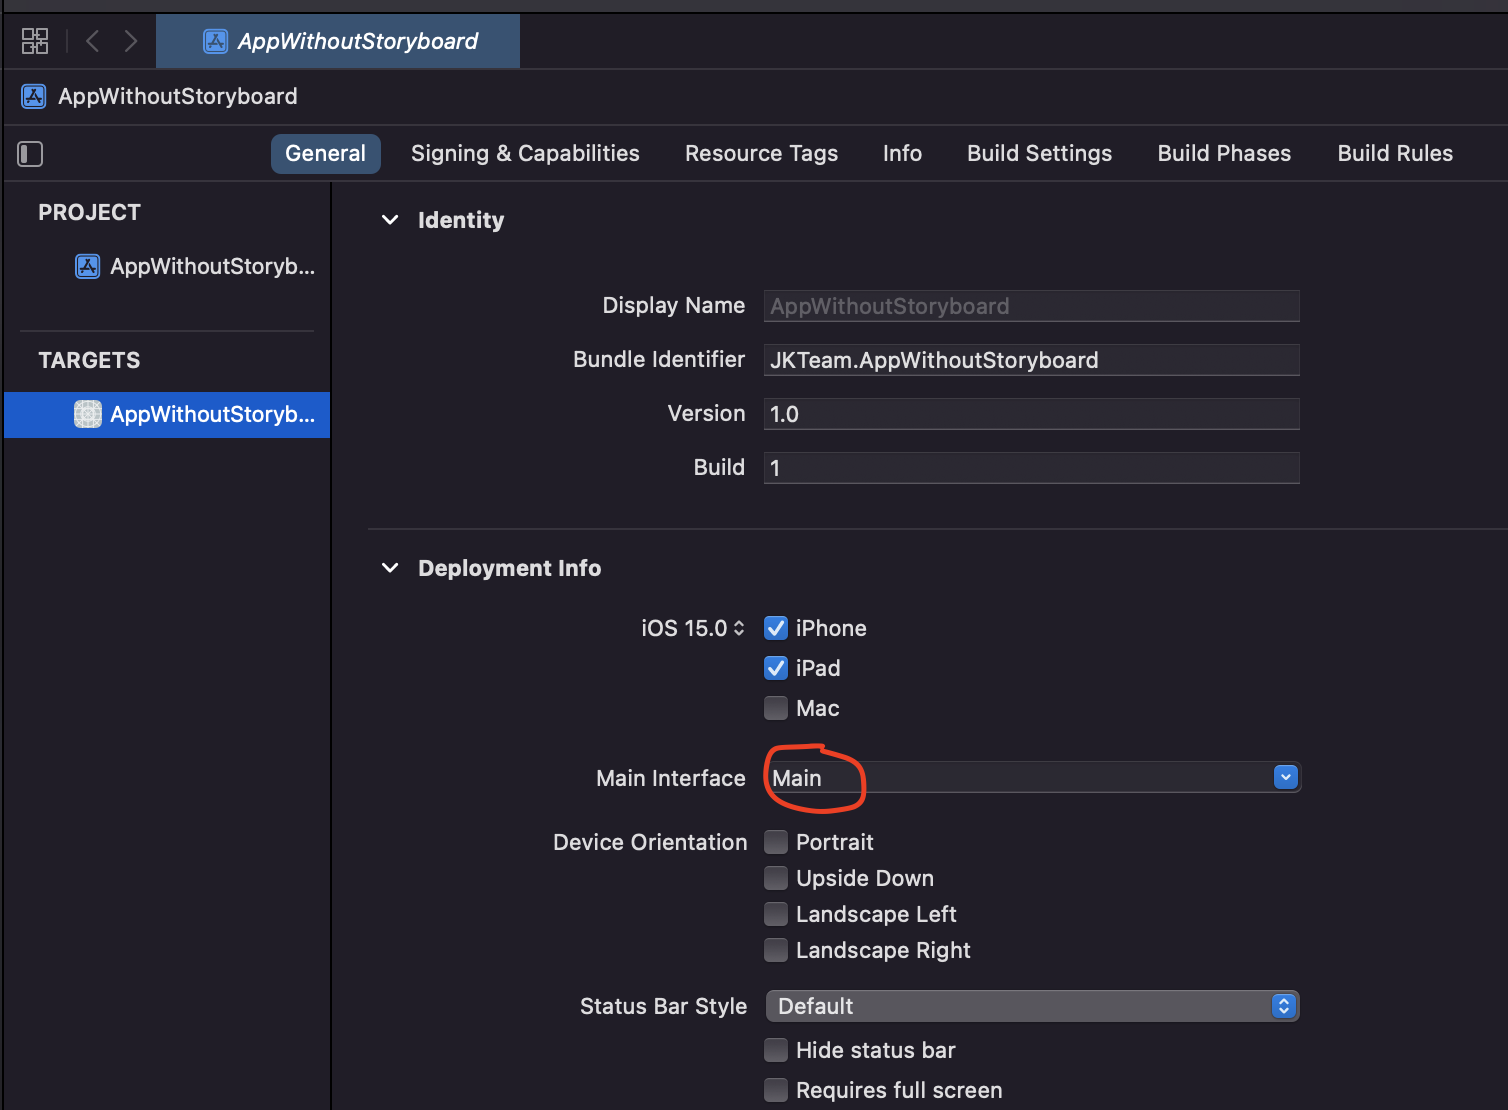
먼저 프로젝트를 만들고 Targets에 Genneral 부분에 Deployment Info 아래에 Main Interface의 Main을 지웁니다.
그리고 왼쪽 네비게이터 영역에서 Main.Storyboard를 삭제 합니다.
네비게이터에서 Info.plist파일을 선택해서 열어 준 후 아래 순서로 찾아 들어갑니다.
Application Scene Manifest --> Scene Configuration --> Application Session Role --> Item0(Default Configuration)
그러면 Storyboard Name이라는 것이 나오고 이것을 삭제해 줍니다.
SceneDelegate설정
여기까지가 기본으로 되어 있던 Main Storyboard를 사용하게 되어 있는 것을 삭제 하는 것입니다. 이제 세팅을 해주는데 SceneDelegate에서 설정을 해주면 됩니다.
화면이 연결되기 전에 세팅해주는 부분인 func secne에 있는 곳에 guard let _ = (scene as? UIWindowScene) else { return }를 주석 처리 하고, 새로 guard let으로 scene을 가져 옵니다.
guard let windowScene = (scene as? UIWindowScene) else {return}윈도우 크기를 설정 해 줍니다.
window = UIWindow(frame: UIScreen.main.bounds)ViewController 인스턴스를 가져 옵니다.
let vc = ViewController()네비게이션 stack을 쌓기 위해 navigation 컨트롤러를 가져 옵니다. rootview는 위에서 만든 vc로 해줍니다.
let navVC = UINavigationController(rootViewController: vc)window의 rootview를 위의 navVC로 설정해줍니다.
window?.rootViewController = navVC설정한 윈도우를 makeKeyAndVisible()로 보이게 끔 해 줍니다.
window?.makeKeyAndVisible()마지막으로 윈도우 Scene을 설정해서 실행합니다.
window?.windowScene = windowScene여기까지 SceneDelegate의 func scene의 전체 코드는 아래와 같다.
func scene(_ scene: UIScene, willConnectTo session: UISceneSession, options connectionOptions: UIScene.ConnectionOptions) {
        // Use this method to optionally configure and attach the UIWindow `window` to the provided UIWindowScene `scene`.
        // If using a storyboard, the `window` property will automatically be initialized and attached to the scene.
        // This delegate does not imply the connecting scene or session are new (see `application:configurationForConnectingSceneSession` instead).
//        guard let _ = (scene as? UIWindowScene) else { return }

        guard let windowScene = (scene as? UIWindowScene) else {return}
        window = UIWindow(frame: UIScreen.main.bounds)
        let vc = ViewController()
        let navVC = UINavigationController(rootViewController: vc)
        window?.rootViewController = navVC

        window?.makeKeyAndVisible()

        window?.windowScene = windowScene
    }
ViewController설정
이렇게 하고 실행을 하면 아무것도 안 나오는 것을 볼 수 있는데, ViewController가 아무 설정도 안되어 있기 때문이다. ViewController 부분을 화면에 나오게 설정해 주어야 한다.
ViewController를 아래와 같이 타이틀과 배경색을 바꿔 주고 실행하면 화면이 보이는 것을 볼 수 있다.
import UIKit

class ViewController: UIViewController {

    override func viewDidLoad() {
        super.viewDidLoad()
        // Do any additional setup after loading the view.
        self.title = "뷰컨트롤러"
        self.view.backgroundColor = .orange
    }


}