시작하며
iOS에서 uikit으로 테이블뷰를 만든 것을 정리하고자 한다. 컨테츠 내용에 따라 cell의 크기가 변하고, xib 외부 파일을 이용해서 cell을 구성한다. 개발하는 정대리라는 유튜브에 있는 내용을 정리 했다. 개발하는정대리 유튜브
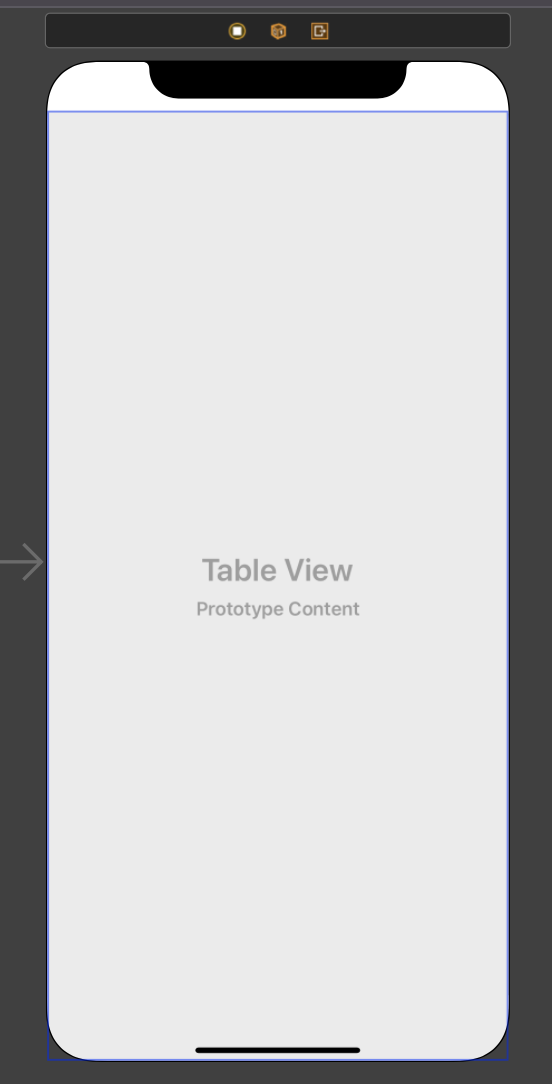
TableView Setting
Main Storyboard에 TableView를 불러서 붙여 놓고, Autolayout으로 화면 전체에 TableView가 차지하도록 설정한다. 유튜브에서는 아래 bottom을 safety area를 넘어 super view에 꽉차게 설정했다.
TableViewCell setting
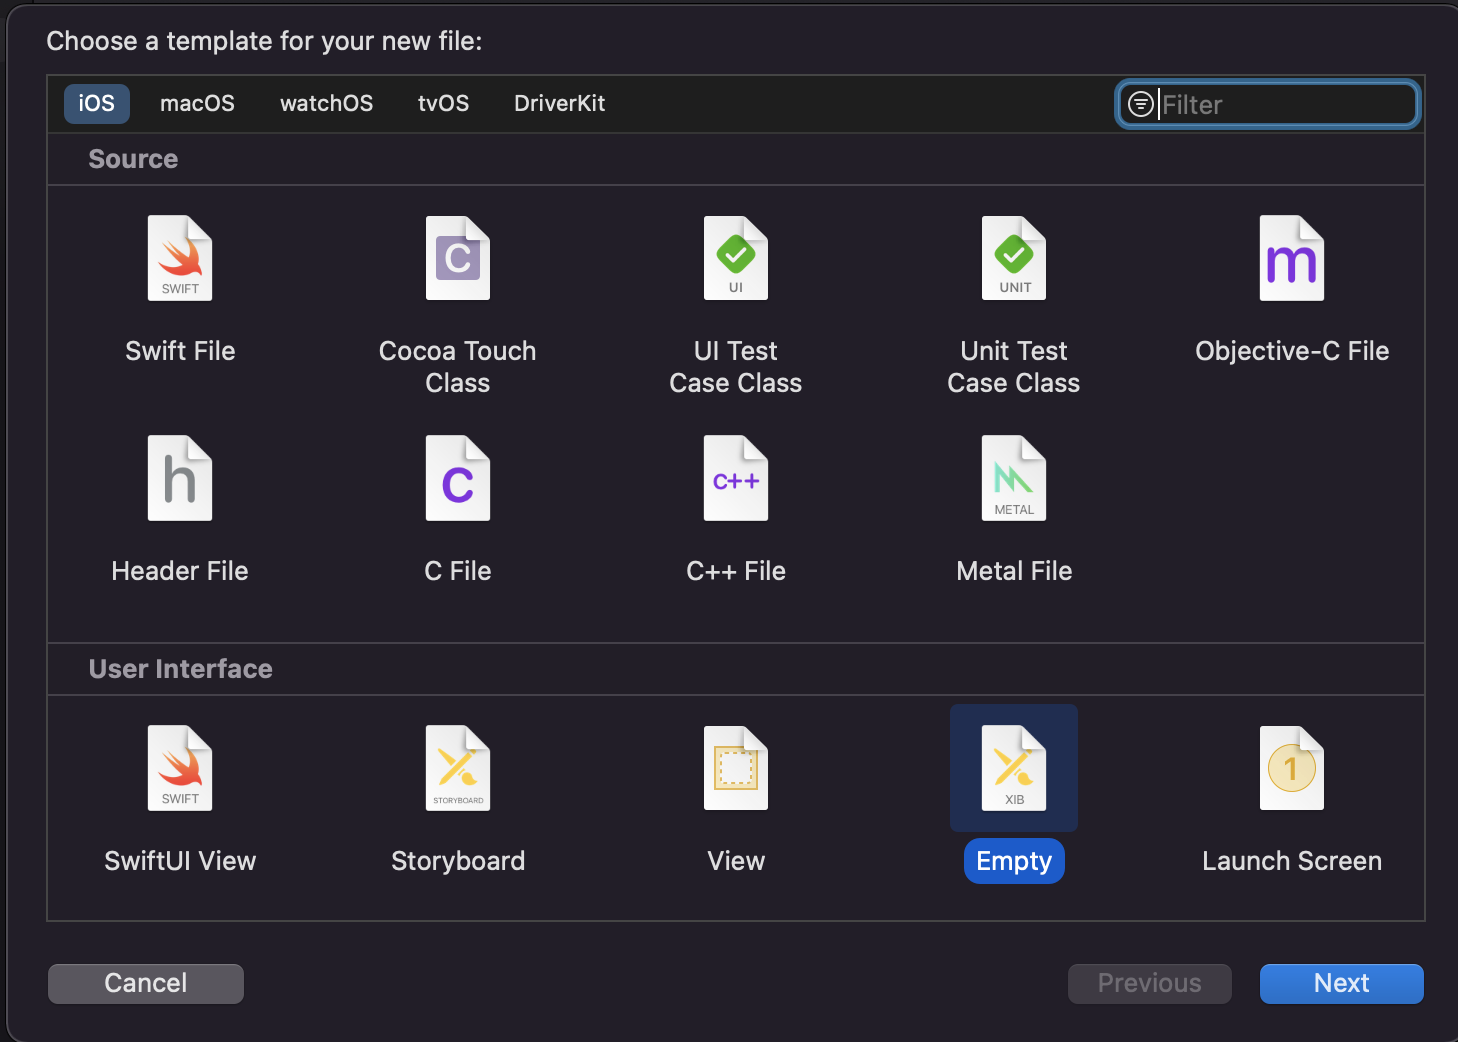
1. 외부파일 만들기
New file를 눌러서 user interface에 있는 xib 파일을 하나 만든다. 이름은 MyTableViewCell.xib로 한다.
MyTableViewCell.xib를 열고 TableViewCell을 끌어다 놓는다.
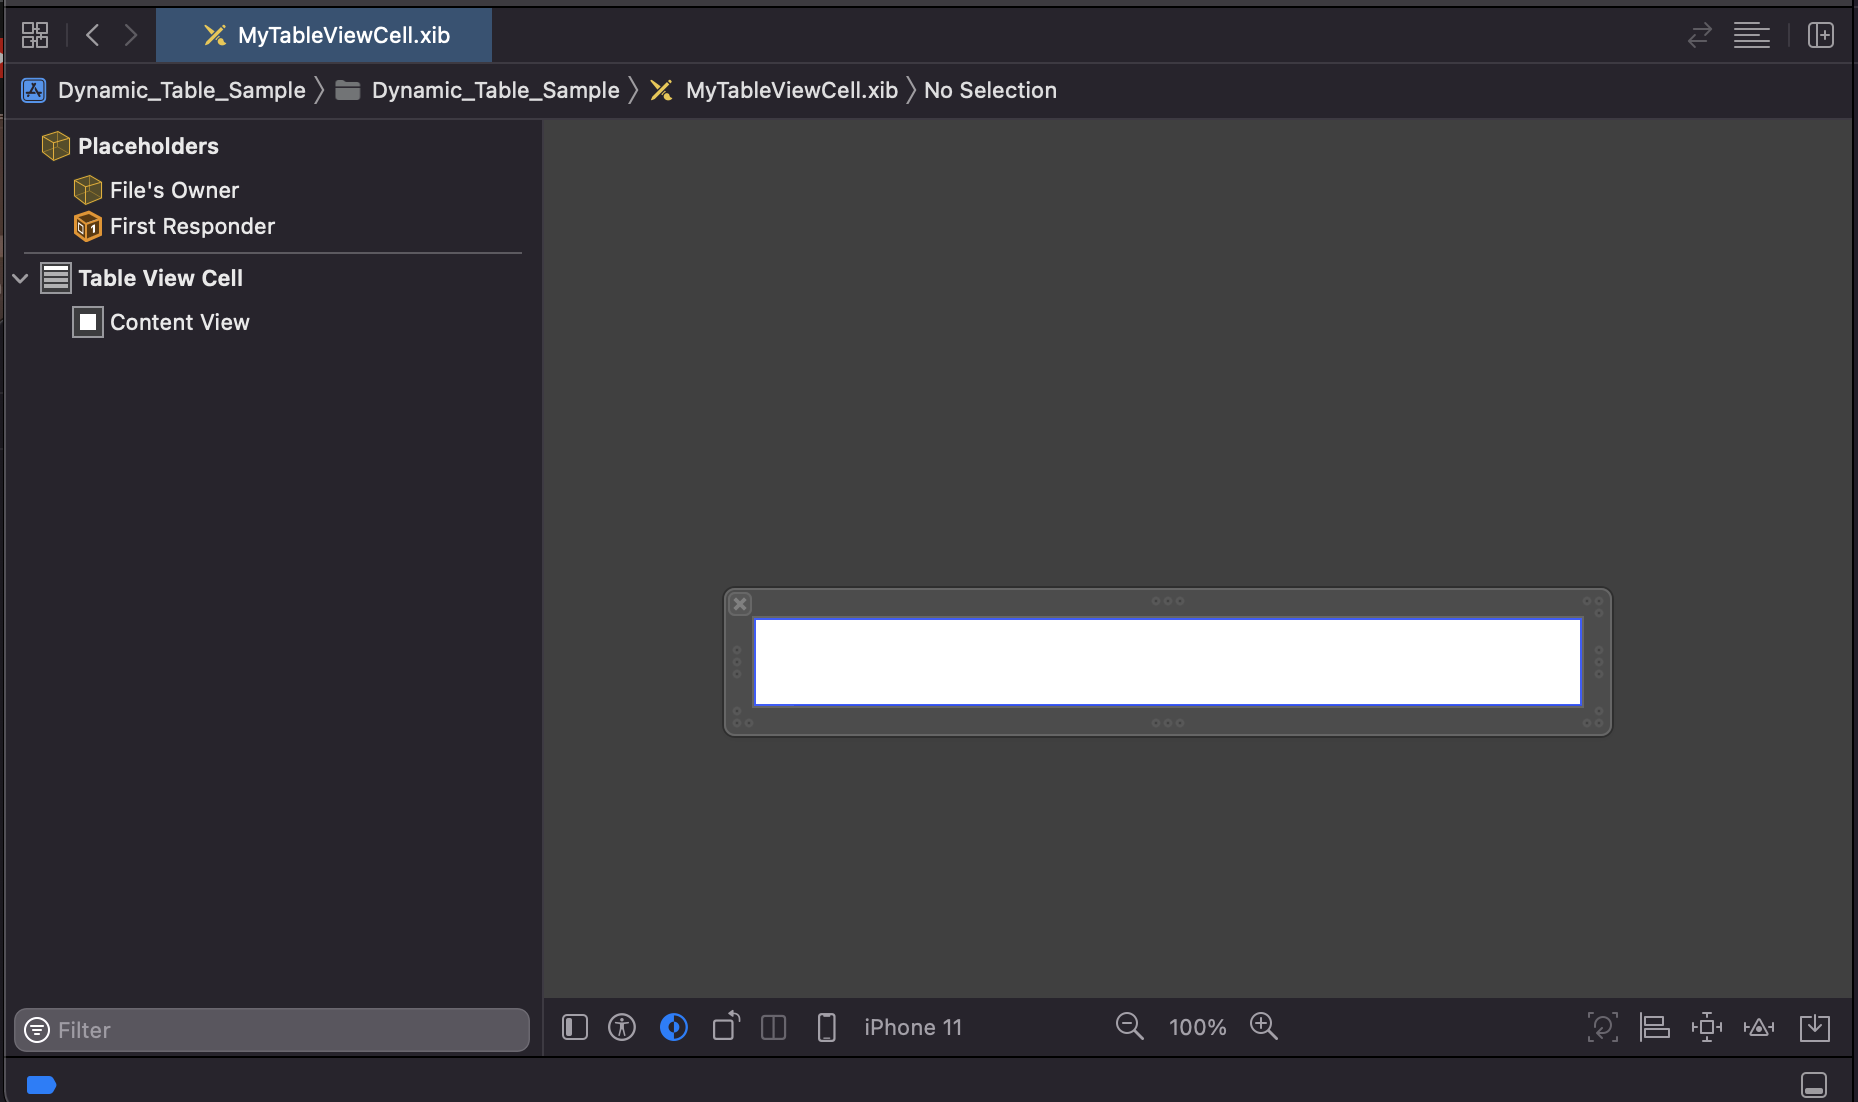
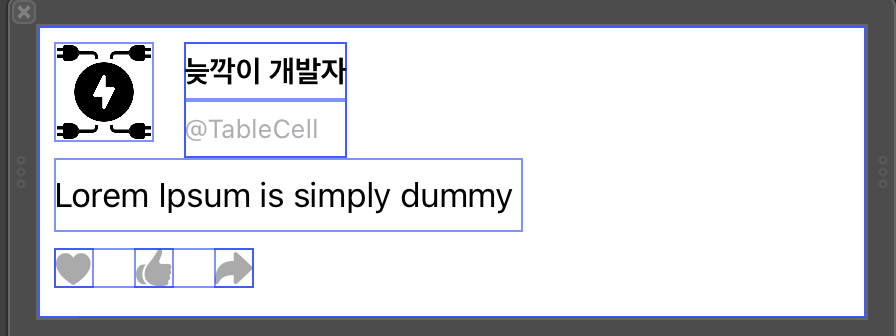
여기에 imageview, label, stack view등을 끌고 오고 autolayout으로 적용하여 완성한다.
2. ViewController에 TableView 세팅
UI 부분은 완료를 다 했고, TableView를 ViewController에서 나오게 하는 작업이 필요하다. extension으로 ViewController에 UITableViewDelegate, UITableViewDataSource를 선언해 준다. 필요한 func을 fix를 통해 추가까지 해준다.
extension ViewController: UITableViewDelegate, UITableViewDataSource {
    func tableView(_ tableView: UITableView, numberOfRowsInSection section: Int) -> Int {
        <#code#>
    }

    func tableView(_ tableView: UITableView, cellForRowAt indexPath: IndexPath) -> UITableViewCell {
        <#code#>
    }


}
ViewController.swift 파일에 라벨에 쓰일 문자열로된 Array를 하나 만들어 준다. 이것은 라벨에 쓰일 것이다.
Main.Stroybaord에서 TableView의 outlet을 ViewControle에 추가해 준다.
3. TableViewCell 파일 만들기
그 다음 새 파일을 하나 만든다. 유튜브에서는 일반 swift파일을 하나 여는데, Cocoa touch class로 UITableViewCell을 선택해서 만들어도 된다. 이름은 MyTableViewCell.swift라 한다. 그러면 awakeFromNib()이라는 파일이 자동으로 생성이 되어 있다. 그리고 xib파일안의 TableViewCell을 지금 만든 MyTableViewCell class와 연결시킨다.
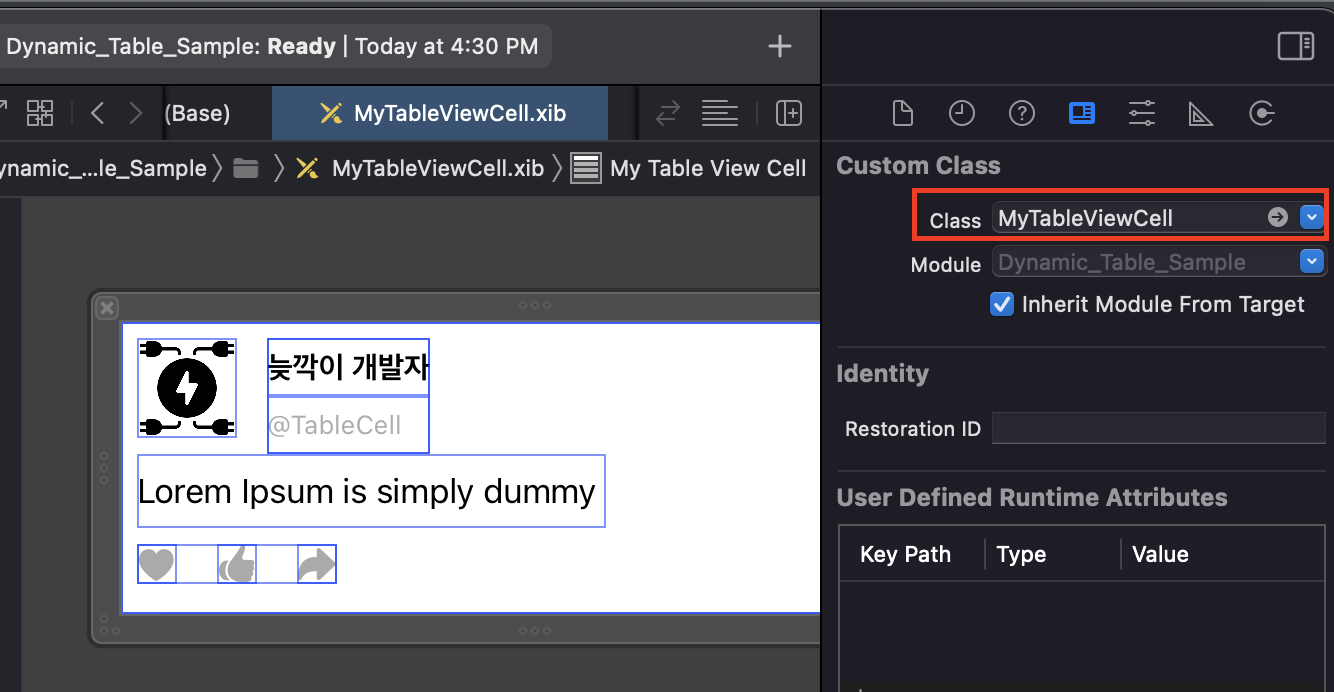
xib파일안에 TableViewCell의 imageView와 label을 MyTableViewCell.swift 파일에 outlet변수로 지정해 놓는다. Image를 동그랗게 만들기 위해서 awwakeFromNib() 안에 처리를 한다. awakeFromNib()은 Cell이 렌더링 될 때 처리가 되는 함수 이다.
userProfileImage.layer.cornerRadius = userProfileImage.frame.height / 2 ViewController에서 셀 리소스 파일을 가져와야 한다. viewDidLoad() function안에 아래와 같이 추가한다.
let myTableViewCellNib = UINib(nibName: "MyTableViewCell", bundle: nil)위와 같이 해도 되고, 아래와 같이 파일이름을 직접 불러 오게 할 수도 있다.
let myTableViewCellNib = UINib(nibName: String(describing: MyTableViewCell.self), bundle: nil)셀에 리소스를 등록해 준다. identifier이름은 'myTableviewCell'로 설정하여 준다.
self.tableView.register(myTableViewCellNib, forCellReuseIdentifier: "myTableviewCell")cell의 높이가 다이나믹하게 변하게 하기 위해서 아래와 같이 추가해 준다.
(estimatedRowHeight는 예상되는 높이로 추가하지 않아도 됨)
self.tableView.rowHeight = UITableView.automaticDimension
self.tableView.estimatedRowHeight = 120
delegate패턴이므로 ViewController를 연결 시키는 작업이 필요. 이것이 없으면 tableView가 나오지 않는다. (아주 중요!!!)
self.tableView.delegate = self
self.tableView.dataSource = self
extensiont에 있는 delegate 함수를 가지고 table 정의를 해준다. 먼저 셀의 갯수를 array의 갯수 만큼 해준다.
func tableView(_ tableView: UITableView, numberOfRowsInSection section: Int) -> Int {
        return self.contentArray.count
    }
각 셀에 대한 설정을 아래와 같이 해준다.
func tableView(_ tableView: UITableView, cellForRowAt indexPath: IndexPath) -> UITableViewCell {
let cell = tableView.dequeueReusableCell(withIdentifier: "myTableviewCell", for: indexPath) as! MyTableViewCell
cell.userContents.text = contentArray[indexPath.row]
return cell
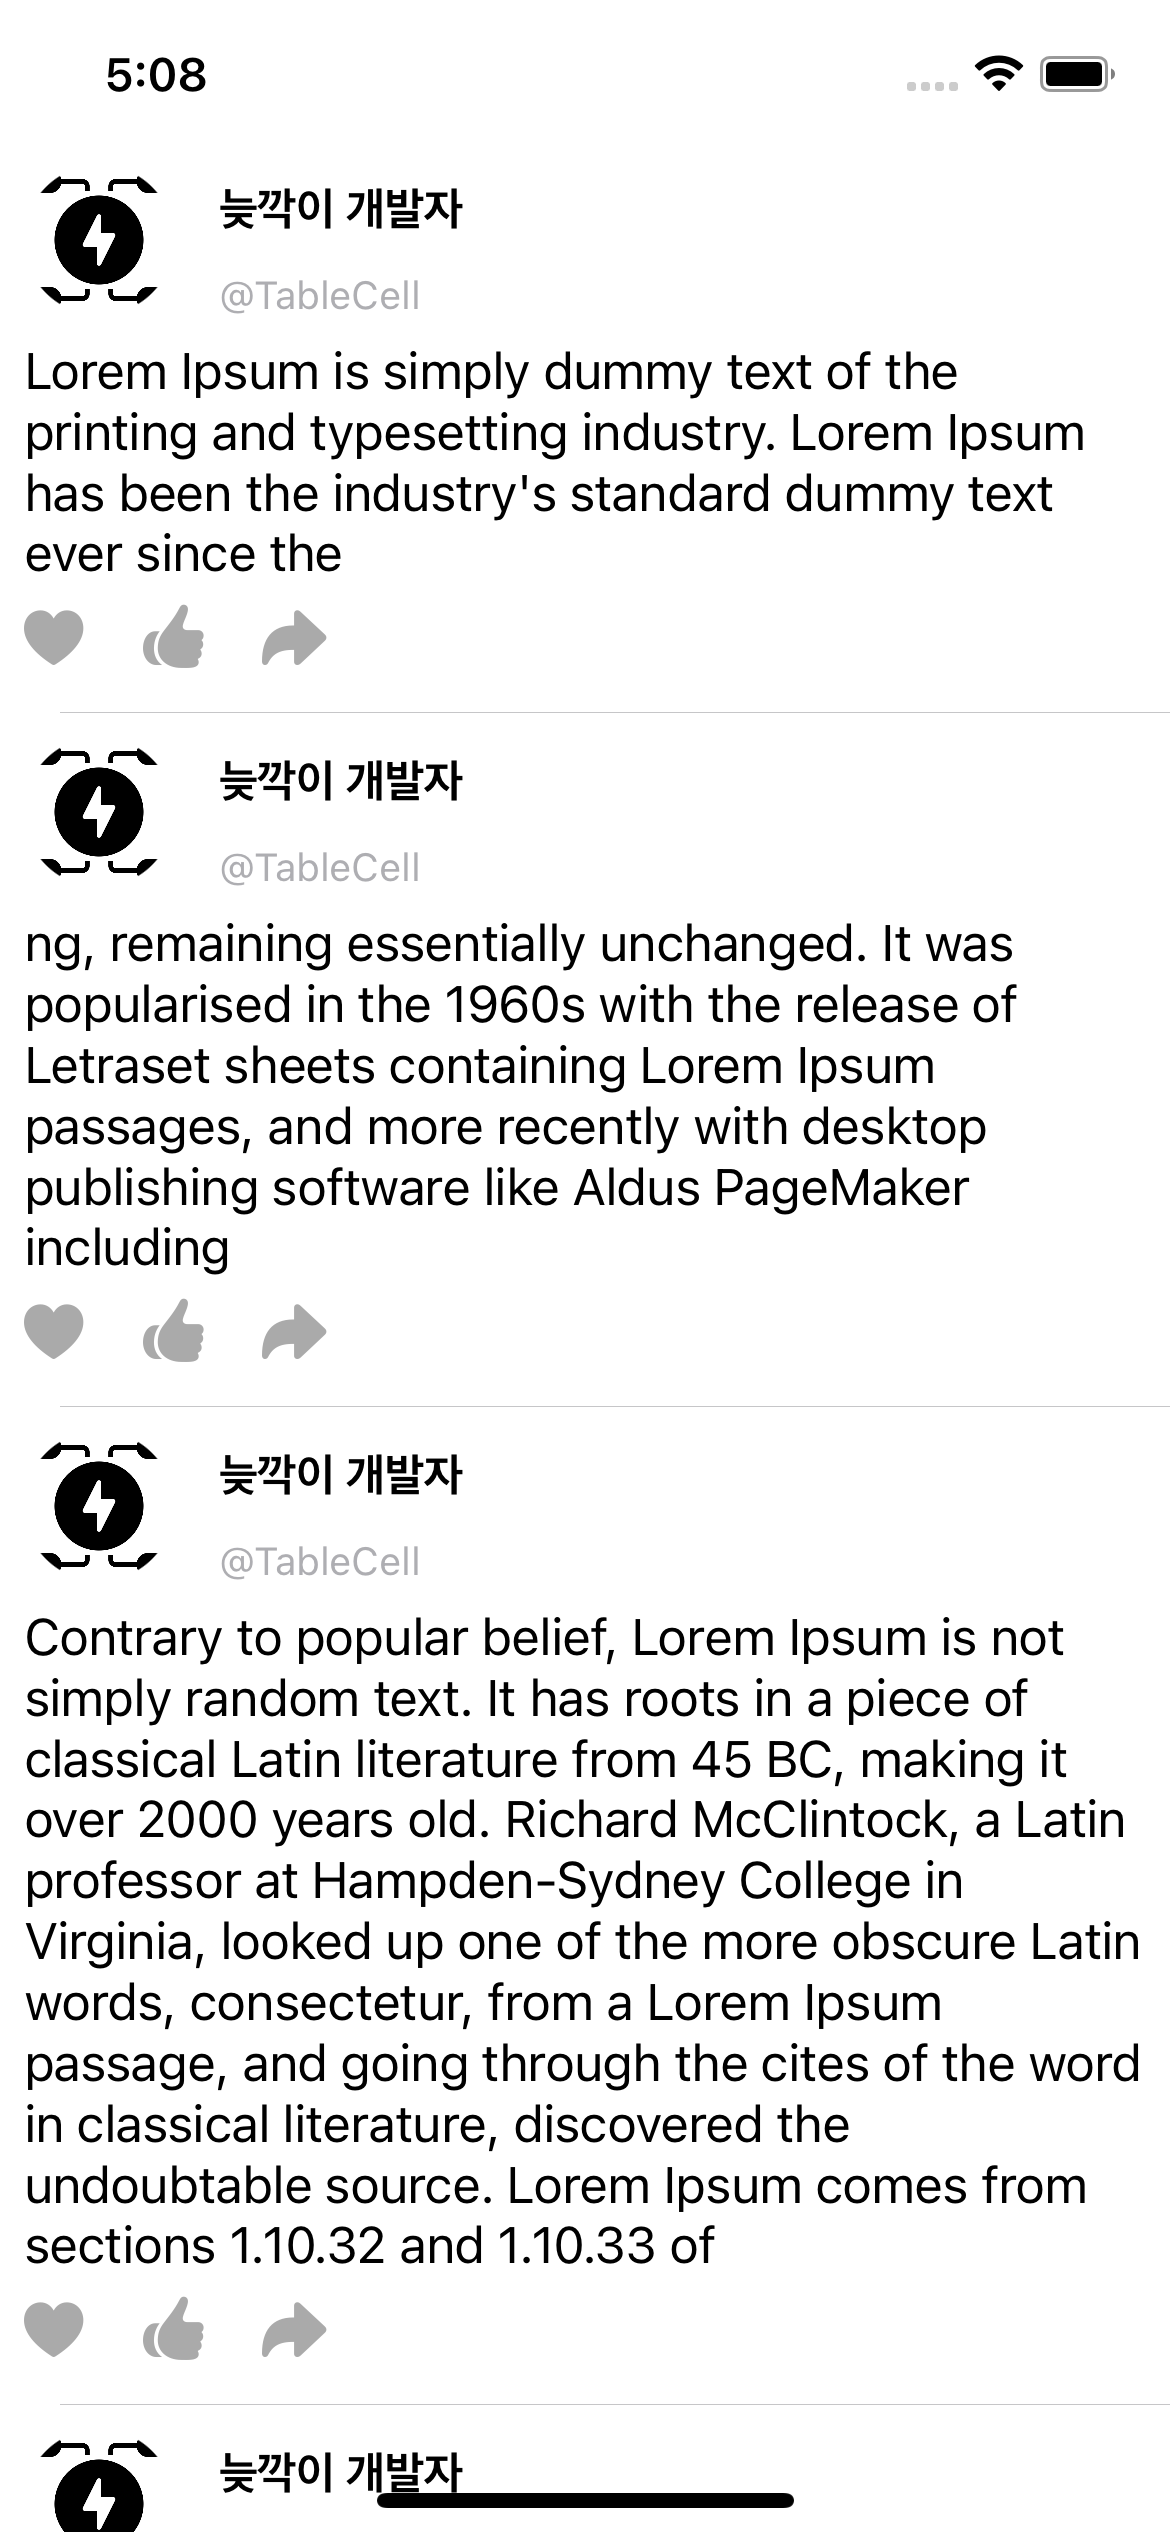
}실행을 하면 텍스트 양에 따라서 크기가 다른 cell을 가지는 TableView가 나오는 것을 확인 할 수 있다.
전체코드
1. ViewController.swift
import UIKit

class ViewController: UIViewController {

    let contentArray = [
       "Lorem Ipsum is simply dummy text of the printing and typesetting industry. Lorem Ipsum has been the industry's standard dummy text ever since the",
       "ng, remaining essentially unchanged. It was popularised in the 1960s with the release of Letraset sheets containing Lorem Ipsum passages, and more recently with desktop publishing software like Aldus PageMaker including",
       "Contrary to popular belief, Lorem Ipsum is not simply random text. It has roots in a piece of classical Latin literature from 45 BC, making it over 2000 years old. Richard McClintock, a Latin professor at Hampden-Sydney College in Virginia, looked up one of the more obscure Latin words, consectetur, from a Lorem Ipsum passage, and going through the cites of the word in classical literature, discovered the undoubtable source. Lorem Ipsum comes from sections 1.10.32 and 1.10.33 of ",
    "he standard chunk of Lorem Ipsum used since the 1500s is reproduced below for those interested. Sections 1.10.32 and 1.10.33 from  ",
    "adable content of a page when looking at its layout. The point of using Lorem Ipsum is that it has a more-or-less normal distribution of letters, as opposed to using 'Content here, content here', making it look like readable English. Many desktop publishing packages and web page editors now use Lorem Ipsum as their default model text, and a search for 'lorem ipsum' will uncover many web sites st",
    "There are many variations of passages of Lorem Ipsum available, but t"
    ]


    @IBOutlet weak var tableView: UITableView!


    override func viewDidLoad() {
        super.viewDidLoad()
        // Do any additional setup after loading the view.
//        let myTableViewCellNib = UINib(nibName: "MyTableViewCell", bundle: nil)
        let myTableViewCellNib = UINib(nibName: String(describing: MyTableViewCell.self), bundle: nil)
        //셀에 리소스 등록
        self.tableView.register(myTableViewCellNib, forCellReuseIdentifier: "myTableviewCell")
        //셀의 높이가 다이나믹하게 바뀌게 하는 부분
        self.tableView.rowHeight = UITableView.automaticDimension
        self.tableView.estimatedRowHeight = 120

        self.tableView.delegate = self
        self.tableView.dataSource = self

    }


}

extension ViewController: UITableViewDelegate, UITableViewDataSource {
    //셀 갯수 설정
    func tableView(_ tableView: UITableView, numberOfRowsInSection section: Int) -> Int {
        return self.contentArray.count
    }
    //각 셀에 대한 설정
    func tableView(_ tableView: UITableView, cellForRowAt indexPath: IndexPath) -> UITableViewCell {
        let cell = tableView.dequeueReusableCell(withIdentifier: "myTableviewCell", for: indexPath) as! MyTableViewCell
        cell.userContents.text = contentArray[indexPath.row]
        return cell
    }


}
2. MyTableViewCell.swift
import UIKit

class MyTableViewCell: UITableViewCell {

    @IBOutlet weak var userProfileImage: UIImageView!

    @IBOutlet weak var userContents: UILabel!


    override func awakeFromNib() {
        super.awakeFromNib()
        // Initialization code
        print("MyTableViewCell - awakeFromNib() called")
        userProfileImage.layer.cornerRadius = userProfileImage.frame.height / 2
    }

    override func setSelected(_ selected: Bool, animated: Bool) {
        super.setSelected(selected, animated: animated)

        // Configure the view for the selected state
    }

}