
최근 프로젝트를 진행하고 있는데 푸시 알림 기능을 구현해야 하는 일이 생겼다...
한 번도 구현해보지 않은 기능이기도 하고 자료를 찾아보는데 자료가 별로 없어서 직접 작성해보려고 한다.
SSE가 어떤 건지는 다음에 수정하면서 정리하도록 해야겠다.
Express에서 SSE 구현하기
Backend
node.js나 express 키워드를 달고 SSE를 검색해보면 보통 npm의 sse.js를 가져와서 사용한다.
직접 구현하는 것 보다 SSE를 보다 쉽게 사용할 수 있게 해준다.
// npm에 있는 Example
var SSE = require('sse')
  , http = require('http');

var server = http.createServer(function(req, res) {
  res.writeHead(200, {'Content-Type': 'text/plain'});
  res.end('okay');
});

server.listen(8080, '127.0.0.1', function() {
  var sse = new SSE(server);
  sse.on('connection', function(client) {
    client.send('hi there!');
  });
});
위 코드를 보면 SSE 객체를 생성하고, on 메소드로 커넥션을 생성한다.
이후 콜백에서 연결된 클라이언트를 받아서 메시지를 발송하는 방식으로 보인다.
하지만 막상 SSE를 구현하고 사용하려고 하면 문제가 발생한다.
🤔 SSE 커넥션을 생성하는 컨트롤러와 SSE에 push를 넣는 컨트롤러는 다른데 어떻게 하지?
그래서 직접 구현하기로 했다.
// controller
res.setHeader('Content-Type', 'text/event-stream');
res.setHeader('Cache-Control', 'no-cache');
res.setHeader('Connection', 'keep-alive');
생각보다 간단하다.
Header에 event-stream임을 알려주고 응답을 종료하지 않고 계속 유지하기만 하면 된다.
만약 다른 컨트롤러에서 이 커넥션을 사용하고 싶은 경우에는 위의 res를 그대로 가져가기만 하면 된다.
위 방법대로 구현 해보면,
const clients = [];

app.get('/', (req, res) => {
    clients.forEach(client => client.write(`data: ${req.query.data}\n\n`));
    res.setHeader('Access-Control-Allow-Origin', '*');
    res.json({ message: `server sent: ${req.query.data}` });
});

app.get('/sse', (req, res) => {
    res.setHeader('Content-Type', 'text/event-stream');
    res.setHeader('Cache-Control', 'no-cache');
    res.setHeader('Connection', 'keep-alive');
    res.setHeader('Access-Control-Allow-Origin', '*');

    clients.push(res);
});
대충 이렇게 작성할 수 있다.
CORS 헤더는 클라이언트와 테스트 하기 위해 추가했습니다.
Client
<html>
<head>
<script src="https://cdn.jsdelivr.net/npm/axios/dist/axios.min.js"></script>
</head>
<body>
입력 : <input type="text" name="data" id="data" /> <br />
<input type="submit" id="go" value="제출">
<div id="sse-data"></div>
<script>
	const sseDataElement = document.getElementById('sse-data');
	const eventSource = new EventSource(`${본인 서버 주소}/sse`);

	eventSource.addEventListener('message', (event) => {
		sseDataElement.innerHTML += event.data + '<br>';
	});

	eventSource.addEventListener('open', (event) => {
		console.log('open sse connection');
	});

	eventSource.onerror = (error) => {
		console.error('SSE Error:', error);
	};
</script>
<script>
	const getText = () => document.getElementById("data").value;
	document.getElementById("go").addEventListener("click", async () => {
		axios.get(`${본인 서버 주소}?data=${getText()}`)
		.then(res => console.log(res.data));
	});
</script>
</body>
</html>
input 태그에 입력한 값을 제출하면 axios로 위 서버의 '/' 경로로 요청하도록 했다.
서버에서는 받은 data를 연결된 모든 sse에 전송하도록 했으니 제출하면 div에 전송된 내용이 쌓이게 될거다.
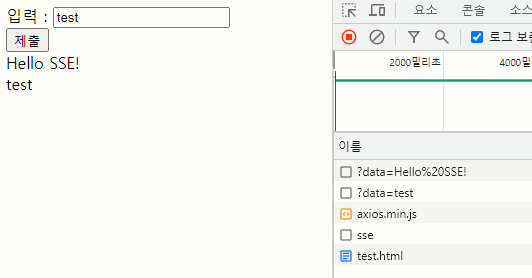
이런 식으로.
실제 서버에서는 어떻게 써야 할까?
실제 서버에서도 크게 다르지 않아 보인다.
위 예시처럼 SSE 커넥션을 열어주는 API 엔드포인트가 하나 필요해 보인다.
이후 본인이 푸시 알림을 보내고자 하는 서비스에서 클라이언트를 받아 사용하면 된다.
예시에선 간단하게 배열을 가지고 했는데 실제로 유저에게 푸시 알림을 전송하는 경우 HashMap으로 userId:response 쌍으로 구현하는게 관리하기에 좋아 보인다.