
2022.03.23
- 이산수학 강의 듣기
- 스프링 242 ~
스프링 삼각형과 설정 정보
스프링 없이 의존성 주입하기1 - 생성자를 통한 의존성 주입
- 운전자가 타이어를 생산한다 => Tire tire = new KoreaTire();
- 운전자가 자동차를 생산하면서 타이어를 장착한다. => Car car = new Car(tire);
- 의존성 주입 == 외부에서 new해서 주입해주는것
package com.heaven.mvc.expert001_02;

public class Car {
	Tire tire;

	//유연성 증가
	public Car(Tire tire) {
		this.tire = tire;
	}

	public String getTireBrand() {
		return "장착된 타이어: "+tire.getBrand();
	}
}
package com.heaven.mvc.expert001_02;

public class Driver {
	public static void main(String[] args) {
		Tire tire = new KoreaTire();
		//Tire tire = new AmericaTire();
		Car car = new Car(tire);

		System.out.println(car.getTireBrand());
	}
}
- 의존성 주입을 적용할 경우 해당 인터페이스를 구현한 어떤 객체가 들어오기만 하면 정상적으로 작동
- 확장성 좋아짐
스프링 없이 의존성 주입하기2 - 속성을 통한 의존성 주입
- 운전자가 타이어를 생산한다
=> Tire tire = new Tire(); - 운전자가 자동차를 생산하다
=> Car car = new Car(); - 운전자가 자동차에 타이어를 장착한다.
=> car.setTire(tire);
package com.heaven.mvc.expert001_03;

public class Car {
	Tire tire;

	public String getTireBrand() {
		return "장착된 타이어: "+tire.getBrand();
	}

	public Tire getTire() {
		return tire;
	}

	public void setTire(Tire tire) {
		this.tire = tire;
	}


}
package com.heaven.mvc.expert001_03;

public class Driver {
	public static void main(String[] args) {
		Tire tire = new KoreaTire();
		//Tire tire = new AmericaTire();
		Car car = new Car();
		car.setTire(tire);

		System.out.println(car.getTireBrand());
	}
}
스프링을 통한 의존성 주입 - XML 파일 사용
- 운전자가 종합 쇼핑몰에서 타이어를 구매한다
운전자가 종합 쇼핑몰에서 자동차를 구매한다.
운전자가 자동차에 타이어를 장착한다
		//스프링 프레임워크에 대한 정보
		//xml은 원하는 정보를 가진 파일
		ApplicationContext context = new ClassPathXmlApplicationContext("com/heaven/mvc/expert002/expert002.xml");

		Tire tire = context.getBean("tire", Tire.class);

		Car car = context.getBean("car",Car.class);

car.setTire(tire);- 스프링을 통한 의존성 주입은 생성자를 통한 의존성 주입과 속성을 통한 의존성 주입을 모두 지원
package com.heaven.mvc.expert002;

//스프링 프레임워크에 대한 정보를 가지고 있는 패키지
import org.springframework.context.ApplicationContext;
import org.springframework.context.support.ClassPathXmlApplicationContext;

public class Driver {
	public static void main(String[] args) {

		//스프링 프레임워크에 대한 정보
		//xml은 원하는 정보를 가진 파일
		ApplicationContext context = new ClassPathXmlApplicationContext("com/heaven/mvc/expert002/expert002.xml");

		Tire tire = context.getBean("tire", Tire.class);

		Car car = context.getBean("car",Car.class);

		car.setTire(tire);

		System.out.println(car.getTireBrand());
	}
}
<?xml version="1.0" encoding="UTF-8"?>
<beans xmlns="http://www.springframework.org/schema/beans"
	xmlns:xsi="http://www.w3.org/2001/XMLSchema-instance"
	xsi:schemaLocation="http://www.springframework.org/schema/beans http://www.springframework.org/schema/beans/spring-beans.xsd">

	<!-- 코드의 수정없이 xml수정 만으로도 실행 결과를 바꿀 수 있다. -->
	<bean id="tire" class="com.heaven.mvc.expert002.KoreaTire"></bean>
	<bean id="americaTire" class="com.heaven.mvc.expert002.AmericaTire"></bean>

	<bean id="car" class="com.heaven.mvc.expert002.Car"></bean>
</beans>
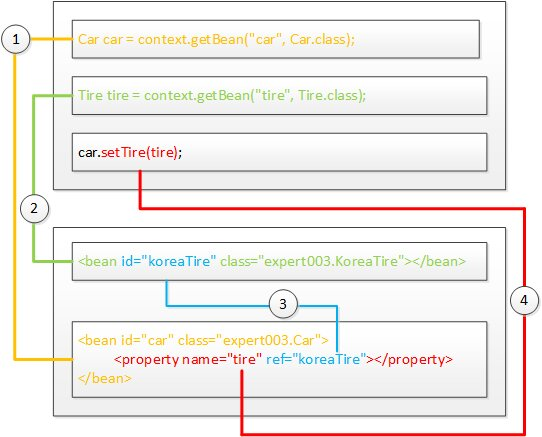
스프링을 통한 의존성 주입 - 스프링 설정 파일(XML)에서 속성 주입
- 의사코드(점점 더 현실 세계와 비슷해짐)
- 운전자가 종합 쇼핑몰에서 자동차 구매를 요청한다.
- 종합 쇼핑몰에서 타이어를 생산한다.
- 종합 쇼핑몰에서 자동차를 생산한다.
- 종합 쇼핑몰에서 자동차에 타이어를 장착한다
- 종합 쇼핑몰은 운전자에게 자동차를 전달한다.
//스프링 프레임워크에 대한 정보 //xml은 원하는 정보를 가진 파일 ApplicationContext context = new ClassPathXmlApplicationContext("com/heaven/mvc/expert003/expert003.xml"); Car car = context.getBean("car",Car.class);<bean id="koreaTire" class="com.heaven.mvc.expert003.KoreaTire"></bean> <bean id="americaTire" class="com.heaven.mvc.expert003.AmericaTire"></bean> <bean id="car" class="com.heaven.mvc.expert003.Car"> <!-- setTire()에 koreaTire를 주입 --> <property name="tire" ref="americaTire"></property> </bean>
스프링을 통한 의존성 주입 - @Autowired를 통한 주입
- import문 하나와 @Autowired 어노테이션을 이용하면 설정자 메서드를 이용하지 않고도 스프링 프레임워크가 설정 파일을 통해 설정자 메서드 대신 속성을 주입해준다.
- @Autowired
- 스프링 설정 파일 보고 자동으로 속성의 설정자 메서드(set)에 해당하는 역활을 해주겠다.
- bean config file에서 namespace - context를 추가
<?xml version="1.0" encoding="UTF-8"?>
<beans xmlns="http://www.springframework.org/schema/beans"
	xmlns:xsi="http://www.w3.org/2001/XMLSchema-instance"
	xmlns:context="http://www.springframework.org/schema/context"
	xsi:schemaLocation="http://www.springframework.org/schema/beans http://www.springframework.org/schema/beans/spring-beans.xsd
		http://www.springframework.org/schema/context http://www.springframework.org/schema/context/spring-context-3.1.xsd">

	<!-- anotation을 이용하겠다. -->
	<context:annotation-config/>

	<bean id="tire" class="com.heaven.mvc.expert004.KoreaTire"></bean>
	<bean id="americaTire" class="com.heaven.mvc.expert004.AmericaTire"></bean>

	<bean id="car" class="com.heaven.mvc.expert004.Car"></bean>
</beans>
package com.heaven.mvc.expert004;
import org.springframework.beans.factory.annotation.Autowired;
public class Car {
//자동주입
@Autowired
Tire tire;
public String getTireBrand() {
return "장착된 타이어: "+tire.getBrand();
}
}
package com.heaven.mvc.expert004;

//스프링 프레임워크에 대한 정보를 가지고 있는 패키지
import org.springframework.context.ApplicationContext;
import org.springframework.context.support.ClassPathXmlApplicationContext;

public class Driver {
	public static void main(String[] args) {

		//스프링 프레임워크에 대한 정보
		//xml은 원하는 정보를 가진 파일
		ApplicationContext context = new ClassPathXmlApplicationContext("com/heaven/mvc/expert004/expert004.xml");

		Car car = context.getBean("car",Car.class);

		System.out.println(car.getTireBrand());
	}
}

초보 개발자의 성장기💻