Spring Boot는 어플리케이션을 테스트할 때 유용한 많은 유틸리티, 어노테이션을 제공합니다.
Spring Boot Test
https://docs.spring.io/spring-boot/docs/current/reference/html/features.html#features.testing
Spring Boot에서 제공하는 Test관련 기능을 이용하기 위해서 spring-boot-starter-test 의존성을 추가해줘야합니다.
<dependency>
    <groupId>org.springframework.boot</groupId>
    <artifactId>spring-boot-starter-test</artifactId>
    <scope>test</scope>
</dependency><scope>test</scope>로 의존성 범위를 등록해서 테스트 할 때에만 의존성이 생깁니다.
spring-boot-starter-test는 아래의 라이브러리들을 포함합니다.
JUnit 5: The de-facto standard for unit testing Java applications.

Spring Test & Spring Boot Test: Utilities and integration test support for Spring Boot applications.

AssertJ: A fluent assertion library.

Hamcrest: A library of matcher objects (also known as constraints or predicates).

Mockito: A Java mocking framework.

JSONassert: An assertion library for JSON.

JsonPath: XPath for JSON.
만약 이 라이브러리들이 우리의 니즈에 맞지않는다면, 우리는 추가적인 테스트 의존성을 추가할 수 있습니다.
Spring Application을 테스트
의존성 주입의 주요한 장점 중 하나는 우리의 코드를 쉽게 단위테스트할 수 있도록 만들어줍니다. 스프링의 개입없이 new 연산자를 사용함으로써 객체를 인스턴스화할 수 있습니다.물론 우리는 실제 의존성 객체대신 mock 객체들을 사용할 수 있습니다.
unit testing을 넘어서 Spring ApplicationContext를 사용해서 통합 테스트를 시작할 필요가 있습니다. 어플리케이션을 배포하지않고 다른 체제를 연결할 필요없이 통합 테스트를 수행하는 것은 유용할 것입니다.
스프링 프레임워크는 그러한 통합 테스트를 위한 테스트 모듈을 포함하고 있습니다. 물론 직접적으로 org.springframework:spring-test 의존성을 선언하거나 spring-boot-starter-test를 의존성으로 추가해서 사용할 수 있습니다.
@SpringBootTest
스프링은 @SpringBootTest 어노테이션을 제공합니다. 이 어노테이션은 SpringApplication을 통해 테스트에 사용될ApplicationContext를 생성하면서 동작합니다.
@SpringBootTest 이외에도 많은 다른 어노테이션들도 어플리케이션의 더많은 특정 Slice(계층별로 분리된) 테스트를 위해 물론 제공된다.
@SpringBootTest는 서버를 띄우는 것이 아닙니다. 어떻게 테스트를 진행할지 webEnvironment속성을 사용할 수 있습니다.
SpringBootTest.WebEnvironment.MOCK(default)
@SpringBootTest(webEnvironment = SpringBootTest.WebEnvironment.MOCK)
@AutoConfigureMockMvc
class SampleServiceTest { ... }ApplicationContext를 로드하고 mock 웹 환경(servlet container)를 제공합니다. 이 어노테이션을 사용할 때 Embedded 서버들은 실행 되지않습니다. 그리고 우리의 웹 어플리케이션의 mock 기반의 테스트를 위해 @AutoConfigureMockMvc 또는 @AutoConfigureTestClient를 적용해서 사용될 수 있습니다.
SpringBootTest.WebEnvironment.RANDOM_PORT
WebServerApplicationContext 를 Load시키고 MOCK 세팅과 달리 해당 환경으로 테스트를 하게 되면 실제 Embedded Server를 실행시킵니다. Embedded server들은 시작되고 랜덤 포트로 listen 됩니다.
WebEnvironment.MOCK 환경에서 MockMvc class
WebEnvironment.MOCK 를 사용해서 테스트를할 때@AutoConfigureMockMvc를 적용할 경우, MockMvc Bean을 @Autowired를 통해 주입받을 수 있습니다.
MockMvc를 사용해서 웹서버의 요청을 테스트할 수 있습니다.
@SpringBootTest(webEnvironment = SpringBootTest.WebEnvironment.MOCK)
@AutoConfigureMockMvc
class SampleServiceTest {

    @Autowired
    MockMvc mockMvc;

    @Test
    public void hello() throws Exception {
        mockMvc.perform(get("/hello"))
                .andExpect(status().isOk())
                .andExpect(content().string("hello"))
                .andDo(print());
    }
}perform으로 요청을 만들고 andExpect 내부에서 결과를 검증할 수 있습니다.
꽤 다양한 것들을 검증할 수 있기 때문에 따로 정리를 하지않고 문서로 설정을 대체하겠습니다.
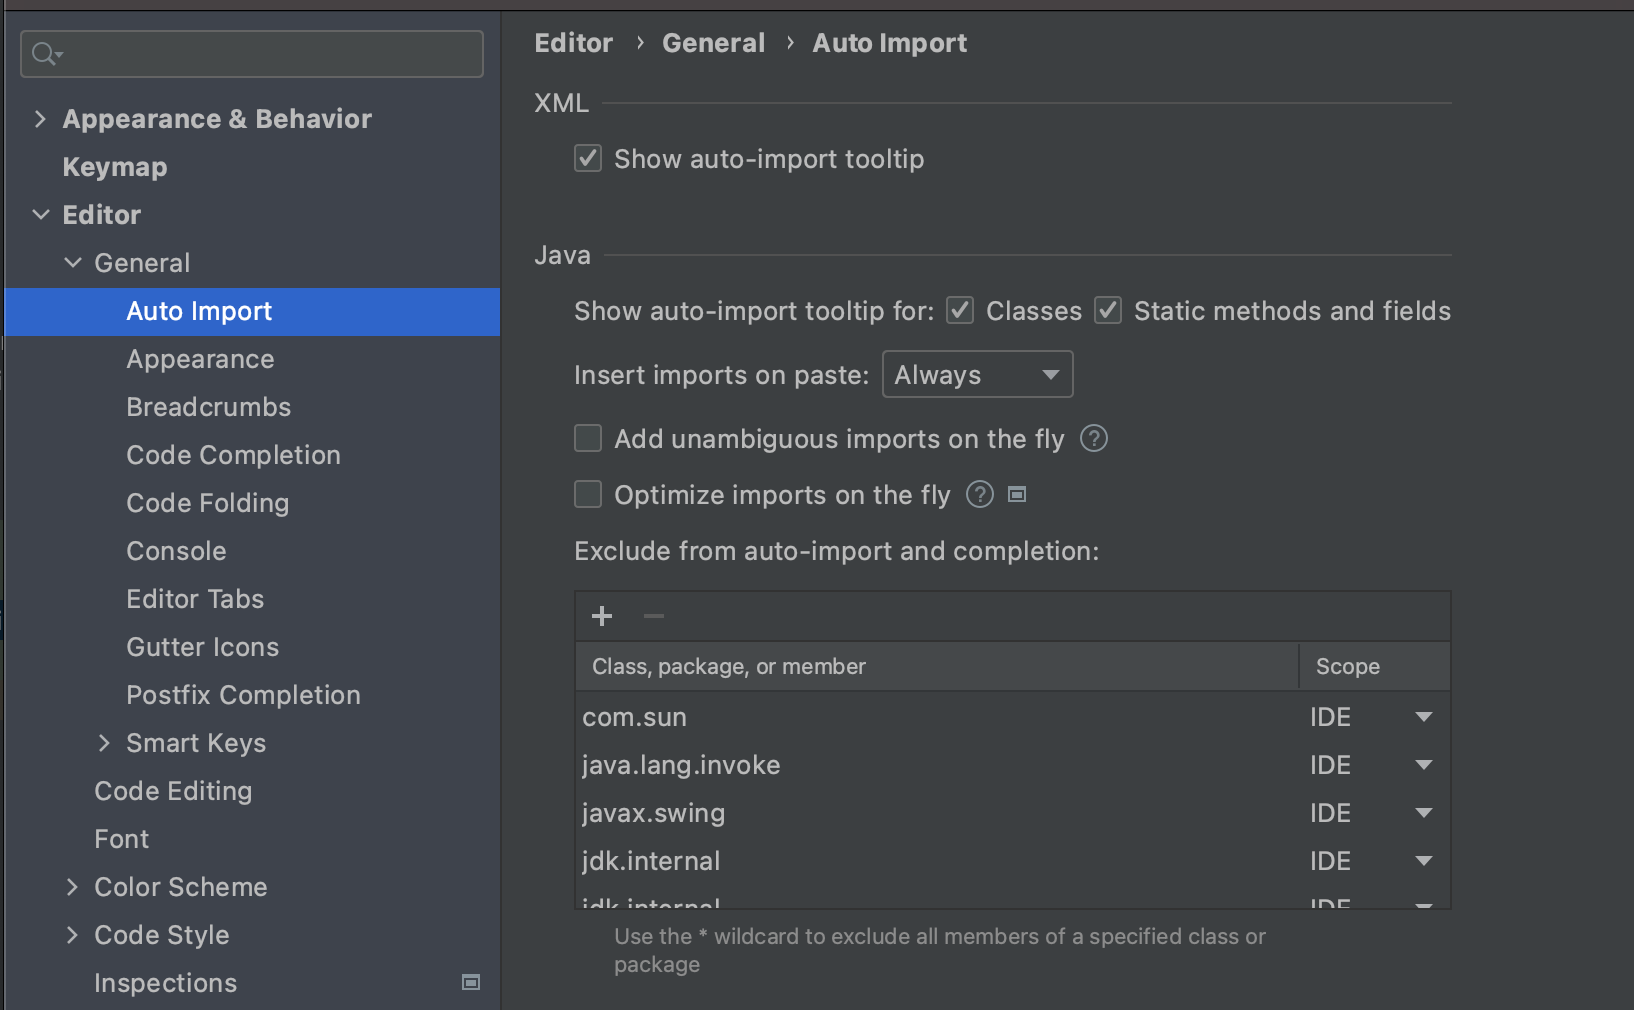
만약 IntelliJ를 사용할 경우, get static import를 자동으로 하려고하면 등록하려는 package는 안나오고 다른 패키지에 get static metho들만 나오곤 합니다.
여기서 auto import를 간단히 하기 위해서는 안쓰는 패키지를 아래와같이 IntelliJ Reference 설정 중 Auto Import에서 exclude로 사용하지않는 패키지들을 등록 해주면됩니다.
WebEnvironment.RANDOM_PORT 환경에서 RestTemplate
WebEnvironment.RANDOM_PORT 를 사용할 경우, 실제 servlet container가 동작하게 되어서 TestRestTemplate 를 주입받아서 사용해서 테스트할 수 있습니다.
@SpringBootTest(webEnvironment = SpringBootTest.WebEnvironment.RANDOM_PORT)
class SampleServiceTest {

    @Autowired
    TestRestTemplate testRestTemplate;

    @Test
    public void hello() throws Exception {

        String result = testRestTemplate.getForObject("/hello", String.class) ;
        assertThat(result).isEqualTo("hello");
    }
}
더 좁은 범위의 테스트가 필요하다.
앞에서 살펴본 테스트들은 통합 테스트 수준입니다. 테스트 범위를 줄일 필요가 있어보입니다.
@MockBean을 활용하면 원하는 Bean을 Mock으로 대체가능합니다.
SampleController에서 SampleService를 사용하는 API를 테스트해보겠습니다. 하지만 SampleController 동작만을 테스트하고 싶다면 Mock타입의 SampleService를 사용하면됩니다.
@SpringBootTest(webEnvironment = SpringBootTest.WebEnvironment.RANDOM_PORT)
class SampleServiceTest {

    @Autowired
    TestRestTemplate testRestTemplate;

    @MockBean
    SampleService mockSampleService;

    @Test
    public void hello() throws Exception {
        when(mockSampleService.getName()).thenReturn("Test");
        String result = testRestTemplate.getForObject("/hello", String.class) ;
        assertThat(result).isEqualTo("Test");
    }
}SampleService.getName()의 리턴값을 mock up해서 처리하면 Controller만 테스트하는 꼴이 됩니다.
잠시 지금까지 알아온 테스트방식을 몇가지 정리해보겠습니다.
- WebEnvironment를 Mock한 WebEnivronment.MOCK 을 적용했을 때,
MockMvc를 주입받아서 테스트 - WebEnvironment를 실제 Servlet Container로 설정해서 사용할 경우,
TestRestTemplate를 주입받아서 테스트 @MockBean으로 특정 빈을 Mocking해서 테스트
Slicing Test
@SpringBootTest는 모든 Bean들을 등록하기 때문에 전체 통합 테스트에 더욱 적합합니다. 이외에도 Spring 에서는 다양한 슬라이싱 테스트 방식을 제공합니다.
@JsonTest
우리가 만든 모델이 JSON으로 변환되는 것을 테스트 할 수 있는 방법입니다.
@WebMvcTest
컨트롤러 하나만을 테스트할 때 사용하는 방식입니다. 웹과 관련된 Bean과 지정한 Controller Bean만 등록됩니다. 그 이외의 의존성들은 모두 끊기기 때문에 @MockBean으로 의존성을 채워줘서 Slicing 테스트를 진행해야합니다.
@WebMvcTest(SampleController.class)
@AutoConfigureMockMvc
class SampleServiceTest {

    @Autowired
    MockMvc mockMvc;

    @MockBean
    SampleService mockSampleService;

    @Test
    public void hello() throws Exception {

        when(mockSampleService.getName()).thenReturn("test");

        mockMvc.perform(get("/hello"))
                .andDo(print())
                .andExpect(status().isOk())
                .andExpect(content().string("test"));
    }
}
이외에도 많은 스라이싱 테스트 방법들이 많이 있습니다.
@WebFluxTest@DataJpaTest