
expo에서는 여러가지 라이브러리들을 제공한다.
expo location 설치와 사용
expo install expo-location
import * as Location from 'expo-location';
App.js 에 expo location을 사용해주기 위해서 import하자
import { StatusBar } from 'expo-status-bar';
import React from 'react';
import * as Location from 'expo-location';

import Loading from "./Loading";

export default class extends React.Component{
  getLocation = async() => {
    const location = await Location.getCurrentPositionAsync();
    console.log(location);
  };
  componentDidMount(){
    this.getLocation();
  }
  render() {
    return <Loading />;
  }
}
위와같이 location 이라는 변수에 현재 위치값을 받아줘서 log에 출력하라고 하지만 앱에서 location services not authorized 라는 오류가 뜨면서 실행이안된다!
위치 사용 권한
export default class extends React.Component{
  getLocation = async() => {
    try{
      await Location.requestForegroundPermissionsAsync();
      const location = await Location.getCurrentPositionAsync();
      console.log(location);
    }catch(error){
      Alert.alert("Can't find you. ","So sad");
    }

  };
  componentDidMount(){
    this.getLocation();
  }
  render() {
    return <Loading />;
  }
}
위와 같이 await Location.reauestForegroundPermissionsAsync(); 를 이용하면

이렇게 권한을 부여할건지 물어보고 허용하면 log에 위치 정보가 뜬다 !!!
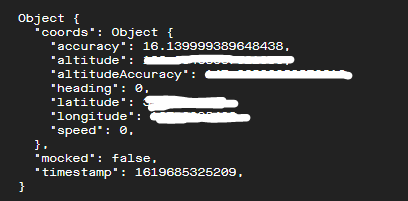
const {coords:{latitude,longitude}} = await Location.getCurrentPositionAsync();
      console.log(latitude,longitude);
{coords: {latitude, longitude}} 라고 하면 coords라는 object의 latitube와 longitude만 받아오는 것이다 !! 오랜만이라..기억이잘..
state 만들어주기
export default class extends React.Component{

  state ={
    isLoading :true
  }

  getLocation = async() => {
    try{
      // throw Error();  임의로 error 행성
      await Location.requestForegroundPermissionsAsync();
      const {coords:{latitude,longitude}} = await Location.getCurrentPositionAsync()
      this.setState({isLoading:false});
      console.log(latitude,longitude);
    }catch(error){
      Alert.alert("Can't find you. ","So sad");
    }

  };
  componentDidMount(){
    this.getLocation();
  }
  render() {
    const{ isLoading} = this.state;
    return isLoading?  <Loading />:null;
  }
}
위처럼 isLoading이라는 로딩중 state를 만든다음에 기본값을 true로 준다.
try문 안에 this.setState({isLoading: false});는 try문에서 사용자 위치를 받아오는게 끝나면 isLoading state를 false로 바꾸라는 것이고
render에서 return isLoading? :null; 은 isLoading이 true라면 을 return 아니라면 null 즉 빈화면을 return 하라는 것이다.
날씨 api가져오기
사이트에서 회원가입을 하고 개인 api key를 발급받아온다!
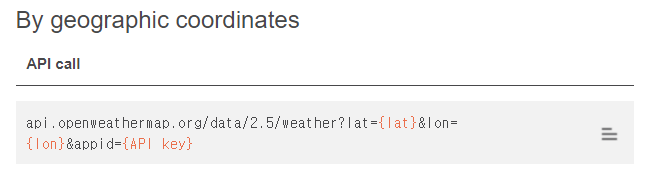
현재 날씨 정보 api중에서 좌표를 이용해서 정보를 받는게 있다!
lat , lon, api key에 맞는 값을 넣어서 요청하면 날씨값이 return 된다!
npm install axios
axios를 설치하고 getWeather 함수를 만든다. axios는 api 데이터를 받아올때 사용되는 비동기 통신 라이브러리이다. !
import axios from "axios";
const API_KEY = "9458c42145392ㅇㅇㅇㅇㅇ85d33";

export default class extends React.Component{

  state ={
    isLoading :true
  }

  getWeather = async(latitude,longitude) =>{
    const {data} = await axios.get(`http://api.openweathermap.org/data/2.5/weather?lat=${latitude}&lon=${longitude}&appid=${API_KEY}`
    );
    console.log(data);
  };
getLocation = async() => {
    try{
      // throw Error();  임의로 error 행성
      await Location.requestForegroundPermissionsAsync();
      const {coords:{latitude,longitude}} = await Location.getCurrentPositionAsync()

      this.getWeather(latitude,longitude);
      this.setState({isLoading:false});
      console.log(latitude,longitude);
    }catch(error){
      Alert.alert("Can't find you. ","So sad");
    }

  };
위처럼 axios를 import해주고 getWeather이라는 함수를 만드는데 인자를 latitude와 longitude로 하고 api주소에다가 넣어주는데 백틱으로 (```) 문자열을 감싸주어야 안에다가 문자열을 넣을수가 있다. ${latitude} 이런식으로 문자열을 넣어서 날짜 정보를 받아보고 정보는 data로 받아오게 된다.
console.log(data); 를 하게되면
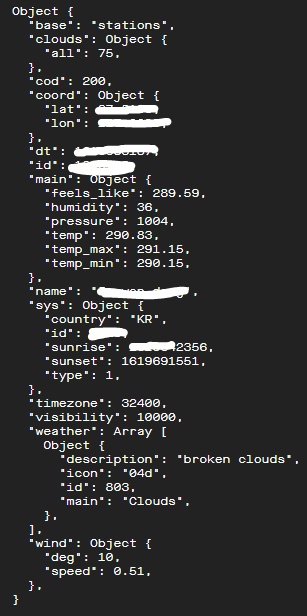
이렇게 log창에 날씨가 뜬다! api는 이용하면 할수록 재미있다 호호
끝!