[Kotlin_Android] 로 시작하는 코틀린 게시글은 졸업프로젝트 게시글이다!
정신이 없어서 졸업프로젝트 하는건 정리해서 올리느는게 어렵다..
패스트캠퍼스는 그냥 나중에 복습용으로 정리해놓는 개념이면..이건뭐랄까 많은 시행착오 끝에 만들어져서 정리할려면 너무 빡쎄지만 그래도 아자아자!
만들것
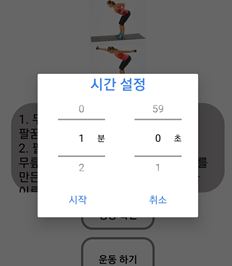
각자 운동 화면에서 운동하기 버튼을 누르면 얼마나(시간) 운동할지 정하는 팝업화면을 만들것이다!
안드로이드에서 지원하는 TimePicker같은게 있지만숫자 2개만 고르면되기때문에 NumberPicker로 만들기로 했다.
참고한 블로그
등등 여러곳을 참조해서 만들었다!
popup_settime.xml
<?xml version="1.0" encoding="utf-8"?>
<LinearLayout xmlns:android="http://schemas.android.com/apk/res/android"
    xmlns:app="http://schemas.android.com/apk/res-auto"
    xmlns:tools="http://schemas.android.com/tools"
    android:layout_width="wrap_content"
    android:layout_height="wrap_content"
    android:background="@color/white"

    android:orientation="vertical">

    <LinearLayout

        android:layout_width="match_parent"
        android:layout_height="match_parent"
        android:layout_weight="3"
        android:gravity="center">

        <TextView
            android:id="@+id/txt_exercise_name"
            android:layout_width="match_parent"
            android:layout_height="match_parent"
            android:gravity="center"

            android:text="시간 설정"
            android:textColor="@color/blue"
            android:textSize="20sp"
            android:textStyle="bold"
            android:visibility="visible"
            app:layout_constraintStart_toStartOf="parent" />
    </LinearLayout>


    <LinearLayout
        android:layout_width="match_parent"
        android:layout_height="match_parent"
        android:layout_weight="2"
        android:orientation="horizontal">

        <androidx.constraintlayout.widget.ConstraintLayout
            android:layout_width="match_parent"
            android:layout_height="match_parent">

            <NumberPicker
                android:id="@+id/numberPicker_min"
                android:layout_width="wrap_content"
                android:layout_height="120dp"
                android:layout_marginStart="15dp"
                android:layout_marginEnd="5dp"
                android:keepScreenOn="false"
                android:solidColor="@color/white"
                android:theme="@style/AppTheme.Picker"

                app:layout_constraintBottom_toBottomOf="parent"
                app:layout_constraintEnd_toStartOf="@id/guideline_settime_50"
                app:layout_constraintStart_toStartOf="parent"
                app:layout_constraintTop_toTopOf="parent" />

            <NumberPicker

                android:id="@+id/numberPicker_sec"
                android:layout_width="wrap_content"
                android:layout_height="120dp"
                android:layout_marginStart="15dp"
                android:layout_marginEnd="15dp"
                android:solidColor="@color/white"
                android:theme="@style/AppTheme.Picker"

                app:layout_constraintBottom_toBottomOf="parent"
                app:layout_constraintEnd_toEndOf="parent"
                app:layout_constraintStart_toEndOf="@id/guideline_settime_50"
                app:layout_constraintTop_toTopOf="parent" />

            <TextView
                android:layout_width="wrap_content"
                android:layout_height="wrap_content"
                android:layout_marginStart="5dp"
                android:text="분"
                android:textColor="@color/black"
                android:textSize="12sp"
                app:layout_constraintBottom_toBottomOf="parent"
                app:layout_constraintEnd_toEndOf="@id/numberPicker_min"
                app:layout_constraintTop_toTopOf="parent" />


            <TextView
                android:layout_width="wrap_content"
                android:layout_height="wrap_content"
                android:text="초"
                android:textColor="@color/black"
                android:textSize="12sp"
                app:layout_constraintBottom_toBottomOf="parent"
                app:layout_constraintEnd_toEndOf="@id/numberPicker_sec"
                app:layout_constraintTop_toTopOf="parent"

                />

            <androidx.constraintlayout.widget.Guideline
                android:id="@+id/guideline_settime_50"
                android:layout_width="wrap_content"
                android:layout_height="wrap_content"
                android:orientation="vertical"
                app:layout_constraintGuide_percent="0.5" />
        </androidx.constraintlayout.widget.ConstraintLayout>


    </LinearLayout>

    <LinearLayout
        android:layout_width="match_parent"
        android:layout_height="match_parent"
        android:layout_weight="3"
        android:orientation="horizontal">

        <Button
            android:id="@+id/btn_settime_ok"
            android:layout_width="match_parent"
            android:layout_height="match_parent"
            android:layout_weight="1"
            android:background="@color/white"

            android:text="시작"
            android:textColor="@color/blue"

            />

        <Button
            android:id="@+id/btn_settime_no"
            android:layout_width="match_parent"
            android:layout_height="match_parent"
            android:layout_weight="1"

            android:background="@color/white"
            android:text="취소"
            android:textColor="@color/blue" />

    </LinearLayout>


</LinearLayout>
한개의 큰 LinearLayout안에 3개의 LinearLayout을 넣고
중앙에 있는 LinearLayout에는 ConstraintLayout을 넣고 2개의 NumberPicker와 분과 초 text를 보여주는 TextView를 2개 만들어주었다.
결국 AlertDialog의 크기는 fragment에서 지정해줄거기 때문에 최상단레이아웃의 크기는 wrap content로 했다.
이 레이아웃을 만드는 더 좋은 방법이 있을수도 있다!!!
아그리고 모든 AlertDialog의 부정문을 오른쪽에다가 두기로 정했다!! (대부분 이렇게 되어있는거같다)
GuideSportsFragment.kt
각각 운동 하나하나씩 나와서 설명이 있고 운동하기 버튼이 있는 fragment이다.
fun showTimeSettingPopup() {

        val dialog = AlertDialog.Builder(context).create()

        val edialog: LayoutInflater = LayoutInflater.from(context)
        val mView: View = edialog.inflate(R.layout.popup_settime, null)

        val minute: NumberPicker = mView.findViewById(R.id.numberPicker_min)
        val second: NumberPicker = mView.findViewById(R.id.numberPicker_sec)

        val cancel: Button = mView.findViewById<Button>(R.id.btn_settime_no)
        val start: Button = mView.findViewById<Button>(R.id.btn_settime_ok)
        // editText 설정해제
        minute.descendantFocusability = NumberPicker.FOCUS_BLOCK_DESCENDANTS
        second.descendantFocusability = NumberPicker.FOCUS_BLOCK_DESCENDANTS
        //최소값 설정
        minute.minValue = 0
        second.minValue = 0

        //최대값 설정
        minute.maxValue = 30
        second.maxValue = 59
        //기본값 설정
        minute.value = 1
        second.value = 0


	//취소버튼
        cancel.setOnClickListener {
            dialog.dismiss()
            dialog.cancel()
        }
        start.setOnClickListener {
            Toast.makeText(context, "${minute.value}분 ${second.value}초", Toast.LENGTH_SHORT).show()
            (activity as PageActivity).startExcercise(exname)
            dialog.dismiss()
        }

        dialog.setView(mView)

        dialog.create()
        dialog.show()
        dialog.window!!.setLayout(750,WindowManager.LayoutParams.WRAP_CONTENT)
    }
타임 세팅 시간 팝업창이 뜨게 하는 함수다!
여기서 layout에 만들어둔 button과 numberPicker들을 선언한다.
분과 초에 맞게 최솟값 최대값과 기본값 그리고 각 버튼에 대한 setOnClick을 선언해준다.
그렇게 AlertDialog.Builder를 이용해서 만들어둔 popup_settime.xml을 inflate해준다.
dialog.show()를 해준다음에
dialog.window!!.setLayout(width,height)을 이용해서 팝업창의 크기를 결정해준다. 물론 default는 match_parent이다.
공식문서를 보면 파라미터로 int값이 들어간다고 하는데 
위처럼 쓰여있다. 단위가 정확하게 뭔지는 모르겠다... 아시는분 댓글좀..!
아무튼 시작 버튼을 누르면 몇분 몇초를 설정했는지 Toast 메세지를 띄우고
운동 자세를 확인해주는 액티비티를 실행시키는 함수를 실행해준다!
이 액티비티는 나중에 startActivityForResult로 실행시키도록 바꿔야된다... 할게 너무 많다!!
결과화면

다음에 이어서~~