js에서 class를 알아봤으니 react class component와 함께 state를 공부해보겠다 :D
Class Components and State
state는 직접적으로 변경이 불가능한데, 그 이유는 react는 render function을 refresh(새로고침)하지 않기 때문이다. 따라서 state의 상태를 변경할 때 react가 render function을 호출해서 바꿔줘야한다. (호출은 setState function를 통해한다.)
따라서 아래의 코드로 바꿔주자
class App extends Component {
state = {
count: 0
}
add = () => {
//set은 새로운 State를 만들어야한다.(state는 obj인것을 기억)
this.setState({count:1});
}
minus = () => {
this.setState({count:-1});
}
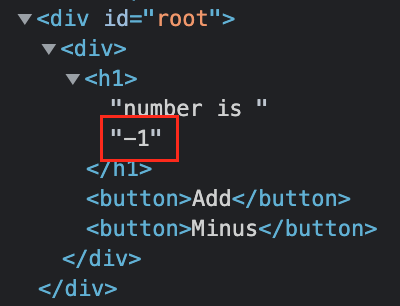
render() {
return <div>
<h1>number is {this.state.count}</h1>
<button onClick={this.add}>Add</button>
<button onClick={this.minus}>Minus</button>
</div>
}
}setState시 나타나는 단계는 아래와 같다.
1. setState 호출
2. react는 state를 refresh를 한다.
3. render function 호출
react는 html을 개발자 도구로 보게 된다면 신기한 동작을 하는데 이 동작은 변화가 있는 부분만 업데이트를 하는것을 볼 수 있다. render를 할 때, react는 virtual DOM을 가지고 있기 때문에 바뀐 부분만 다시 렌더링해준다.
이제 setState로 add와 minus가 1과 -1가 아닌 버튼을 누를때마다 +1, -1이 되게해보자
참고로 이 코드는 좋은 코드라 볼 수 없다. state에 의존하기 때문인데, 나중에 몇가지 성능 문제가 나타날 수 있다.
class App extends Component {
  state = {
    count: 0
  }

  add = () => {
   	this.setState({count: this.state.count +1});
  }

  minus = () => {
   this.setState({count: this.state.count -1});
  }

  render() {
    return <div>
      <h1>number is {this.state.count}</h1>
      <button onClick={this.add}>Add</button>
      <button onClick={this.minus}>Minus</button>
    </div>
  }
}
react는 setState를 function방식으로 현재 값을 가져오는것을 할 수 있기 때문에 아래와 같은 코드를 쓰는것이 좋고, 이 방식으로 state를 set할 때 react에서 외부의 상태에 의존하지 않는 좋은 방법이라고 한다.
class App extends Component {
  state = {
    count: 0
  }

  add = () => {
   	this.setState(current = > ({count: current.count +1}));
  }

  minus = () => {
   this.setState(current = > ({count: current.count -1})});
  }

  render() {
    return <div>
      <h1>number is {this.state.count}</h1>
      <button onClick={this.add}>Add</button>
      <button onClick={this.minus}>Minus</button>
    </div>
  }
}
Component Life Cycle
react class component는 render도 있지만 life cycle method를 가지고 있다.
이 life cycle method는 react의 component를 생성하고 없애는 방법이다.
component가 생성 될 때 render 전에 호출 되는 function, render 후 호출되는 function, component가 update될 때 호출되는 function(우리 코드에선 add, minus 버튼을 누를 때 생기는것)이 있는데, 이 중 필요한 function을 살펴보겠다!
Mounting
mounting은 born("태어나는 것")과 같다고 한다.
mounting을 할 때 먼저 호출되는 function이 있는데, 이것은 constructor라고하며 react에서 온것이 아닌 javascript의 class 만들 때 호출되는것이다.
//constructor와 render에 console.log를 찍으면 어떤게 먼저 나올까?
class App extends Component {
  //constructor 생성!
  constructor(props){
    //super와 props를 써줘야 error가 안나온다~
    super(props)
    console.log('constructor!')
  }
  state = {
    count: 0
  }

  add = () => {
    this.setState(current => ({ count: current.count + 1 }));
  }

  minus = () => {
    this.setState(current => ({ count: current.count - 1 }));
  }

  render() {
    console.log('render');
    return <div>
      <h1>number is {this.state.count}</h1>
      <button onClick={this.add}>Add</button>
      <button onClick={this.minus}>Minus</button>
    </div>

  }
}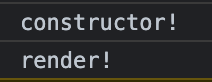
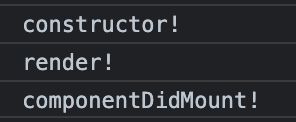
예상대로 constructor가 먼저 나온것을 확인 할 수 있다.constructor는 component가 website에 갈 때 호출한 다음 render를 부르는것을 알 수 있다. 그 다음 component가 render 할 때 componentDidMount()를 하는데 이것은 component가 처음 render됐다는 것을 알려주는 함수이다.
//componentDidMount()를 호출해보자!
class App extends Component {
  //constructor 생성!
  constructor(props){
    super(props)
    console.log('constructor!')
  }
  state = {
    count: 0
  }

  add = () => {
    this.setState(current => ({ count: current.count + 1 }));
  }

  minus = () => {
    this.setState(current => ({ count: current.count - 1 }));
  }

  //render를 알려주기 때문에 render가 먼저 나오는것을 알 수 있다.
  componentDidMount(){
  	console.log('componentDidMount!');
  }

  render() {
    console.log('render');
    return <div>
      <h1>number is {this.state.count}</h1>
      <button onClick={this.add}>Add</button>
      <button onClick={this.minus}>Minus</button>
    </div>

  }
}
Updating
만든 코드에서의 update는 add 혹은 minus를 클릭해서 state를 변경했을 때, update라고 볼 수 있다.(그래서 업데이트의 원인의 주최는 내가 된다.)
//componentDidUpdate()를 호출해보자!
class App extends Component {
  constructor(props){
    super(props)
    console.log('constructor!')
  }
  state = {
    count: 0
  }

  add = () => {
    this.setState(current => ({ count: current.count + 1 }));
  }

  minus = () => {
    this.setState(current => ({ count: current.count - 1 }));
  }

  componentDidMount(){
  	console.log('componentDidMount!');
  }

  //진짜 진짜 그냥 업데이트!
  componentDidUpdate(){
	console.log('componentDidUpetate!')
  }

  render() {
    console.log('render');
    return <div>
      <h1>number is {this.state.count}</h1>
      <button onClick={this.add}>Add</button>
      <button onClick={this.minus}>Minus</button>
    </div>

  }
}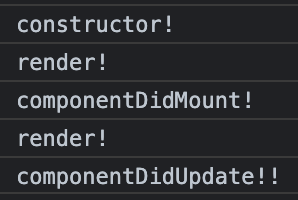
useState를 호출하면 component를 호출하고 render한 다음 update가 완료됐다고하면 componentUpdate가 실행되는것!
Unmounting
Unmounting은 component가 죽는것을 의미한다. 이 때 죽는다는 말은 예를들어 페이지를 바꿀 때, state를 사용해 component를 교체할 때 등등 component가 죽는데는 다양한 방법이 있다.(😢죽는다는 표현이 너무 불쌍하다..)
unmount된 component는 console.log로 보이지 않지만 componentWillUnmount는 component가 죽을 때 호출 되는것을 기억해야한다!