
컴포넌트
- 리액트 앱을 구성하는 레고 블럭 같은 존재
- 클래스 또는 함수로 나타낼 수 있다
- props와 같은 입력값을 받을 수 있으며, 엘리멘트를 반환한다
functional component
function Welcome(props) {
  return <h1>Hello, {props.name}</h1>;
}

const Welcome = () => return <h1>Hello, {props.name}</h1>;- 자바스크립트 함수처럼 쓴다
- JSX를 리턴한다
- 쓰기가 간단하고 리액트에서 권장하는 방법
- 화살표 함수로도 표현 가능
class component
class Welcome extends React.Component {
  render() {
    return <h1>Hello, {this.props.name}</h1>;
  }
}- 자바스크립트의 클래스와 같음
- 렌더링 시킬 엘리먼트를
render(){return 렌더링 시킬 엘리먼트}로 표현한다 - react18 이전에는 클래스 컴포넌트만 state를 가질 수 있었기 때문에 class component가 주로 사용되었으나 react 18부터 react hook을 제공하면서 함수도 많이 쓰임
함수 컴포넌트를 클래스 컴포넌트로 변경하는 법
- React.Component를 확장하는 동일한 이름의 ES6 class를 생성
- render()라고 불리는 빈 메서드를 추가
- 함수의 내용을 render() 메서드 안으로 옮김
- render() 내용 안에 있는 props를 this.props로 변경
- 남아있는 빈 함수 선언을 삭제
함수 컴포넌트 vs 클래스 컴포넌트
| 함수 컴포넌트 | 클래스 컴포넌트 | |
|---|---|---|
| 기능 | react hooks(useState, useEffect 등)사용 | lifecycle (componentWillMount, componentDidUpdate 등) |
| 표현 방법 | function Example() {return <h1>예시</h1>;} | class Example extends React.component {render () {return <h1>예시</h1>;}} |
| props 넘기는 법 | props를 argument로 넘겨준다 | 아래 예시처럼 {this.props.(prop종류이름)}로 작성하여 사용가ㄴ으 |
| props 예시 | function FunctionalComp(props) {return <h1>Hii, {props.name}</h1>;} | class ClassComp extends React.Component {render() {return <h1>Hii, {this.props.name}</h1>;} |
| state 관리 | useState() 사용 | constructor() 사용 |
| hoisting | JS함수 선언식의 경우 호이스팅이 된다는 특징이 그대로 적용됨. 따라서 선언 전에 사용가능 | JS에서 클래스는 선언 전에 사용할 수 없다는 특징이 그대로 적용됨 |
| 성능 차이 | 함수 컴포넌트는 type(string)과 props(object)로 구성되어 있기 때문에 성능 면에서 더 좋음. 함수 컴포넌트의 렌더링을 위해서는 함수 호출과 props 전달만 필요해서 빠름. | 클래스 컴포넌트는 인스턴스이며, 상태를 관리하고 조작하는 constructor()를 내부에 따로 포함하고 있음. 클래스 인스턴스 생성보다 함수 호출 시간이 더 짧기 때문에 성능 면에서 함수 컴포넌트가 더 좋은 편이다. |
출처: https://www.xenonstack.com/blog/functional-vs-class-components
컴포넌트 합성
- 컴포넌트는 컴포넌트 내에 다른 컴포넌트를 넣어서 사용할 수 있다
function Welcome(props) {
  return <h1>Hello, {props.name}</h1>;
}

function App() {
  return (
    <div>
      <Welcome name="Jenny" />
      <Welcome name="Ari" />
      <Welcome name="Cindy" />
    </div>
  );
}

const root = ReactDOM.createRoot(document.getElementById('root'));
root.render(<App />);

컴포넌트 추출
- 컴포넌트를 여러 개의 작은 컴포넌트로 나누는 것
- 컴포넌트는 독립적으로 재활용성이 높도록 "단순하게(한 가지 일만 하도록)" 만들어야 한다
(그래야 테스트도 쉬움)
아래는 리액트 공식문서에 있는 예시이다.
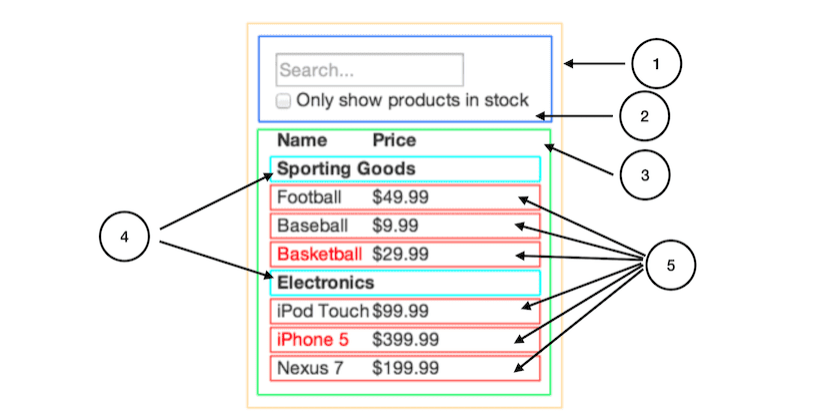
사진 출처: https://ko.reactjs.org/docs/thinking-in-react.html
FilterableProductTable(노란색): 예시 전체를 담는 container
SearchBar(파란색): 모든 유저의 입력(user input) 을 받는 컴포넌트
ProductTable(연두색): 유저의 입력(user input)을 기반으로 데이터 콜렉션(data collection)을 필터링 해서 보여주는 컴포넌트
ProductCategoryRow(하늘색): 각 카테고리(category)의 헤더를 보여주는 컴포넌트
ProductRow(빨강색): 각각의 제품(product)에 해당하는 행을 보여주는 컴포넌트
컴포넌트 분리 방법 관련 보면 좋은 자료
https://ko.reactjs.org/docs/thinking-in-react.html
https://www.youtube.com/watch?v=UUga4-z7b6s
(따로 정리 예정)
https://frontarm.com/james-k-nelson/how-should-i-separate-components/
(번역예정)
https://blog.openreplay.com/understanding-the-container-component-pattern-with-react-hooks
(번역예정)
props
- 하나의 컴포넌트에서 다른 컴포넌트로 데이터를 전달할 때 사용되는 프로퍼티
- 데이터는 부모 to 자식으로 한 방향으로 전달
- 읽기 전용 데이터이다
(부모 컴포넌트에서 전달받은 props는 자식 컴포넌트에서 수정되어서는 안됨)
const ChildComponent = () => {
  return <p>I'm the 1st child!</p>;
};

class ParentComponent extends Component {
  render() {
    return (
      <h1>
        I'm the parent component.
        <ChildComponent />
        <ChildComponent />
        <ChildComponent />
      </h1>
    );
  }
}

//결과
//I'm the parent component.
//I'm the 1st child!
//I'm the 1st child!
//I'm the 1st child!
예제 출처: https://itnext.io/what-is-props-and-how-to-use-it-in-react-da307f500da0