Nx 스탠드얼론 설정으로 React 앱 빌드하기
이 튜토리얼에서는 "standalone"(모노레포가 아닌) 설정에서 Nx와 함께 React를 사용하는 방법을 배웁니다.
무엇을 배우게 될까요?
- 새로운 React 애플리케이션을 생성하는 방법
- 단일 작업(예: 앱 serve)을 실행하거나 여러 작업을 병렬로 실행하는 방법
- 코드 생성기를 활용하여 컴포넌트를 scaffold하는 방법
- 코드베이스를 모듈화하고 유지보수성을 높이기 위해 아키텍처 제약 조건을 부과하는 방법
React 모노레포를 찾고 계신가요?

이 튜토리얼에서는 루트 레벨에 단일 애플리케이션이 있는 레포지토리를 설정하고 해당 코드를 라이브러리로 분리하여 구조를 추가합니다. React 모노레포 설정을 찾고 계신다면 [React 모노레포 튜토리얼](https://nx.dev/react-tutorial/1-code-generation)을 확인해보세요.
워밍업
다음은 이 튜토리얼의 최종 결과물의 소스 코드입니다.
Example repository
Open in Stackblitz
새 React 앱 만들기
다음 명령을 사용하여 새 standalone React 애플리케이션을 생성합니다:
npx create-nx-workspace@latest myreactapp --preset=react-standalone

? Bundler to be used to build the application …
Vite    [ https://vitejs.dev/ ]
Webpack [ https://webpack.js.org/ ]
Rspack  [ https://www.rspack.dev/ ]
원하는 번들러를 선택할 수 있습니다. 이 튜토리얼에서는 Vite를 사용하겠습니다. 위의 명령은 다음과 같은 구조를 생성합니다:
└─ myreactapp
   ├─ ...
   ├─ e2e
   │  └─ ...
   ├─ public
   │  └─ ...
   ├─ src
   │  ├─ app
   │  │  ├─ app.module.css
   │  │  ├─ app.spec.tsx
   │  │  ├─ app.tsx
   │  │  └─ nx-welcome.tsx
   │  ├─ assets
   │  ├─ main.tsx
   │  └─ styles.css
   ├─ index.html
   ├─ nx.json
   ├─ package.json
   ├─ project.json
   ├─ tsconfig.app.json
   ├─ tsconfig.json
   ├─ tsconfig.spec.json
   └─ vite.config.ts
설정에는 다음이 포함됩니다.
- Nx 워크스페이스의 루트에 있는 새로운 React 애플리케이션(src/app)
- Cypress 기반 e2e 테스트 세트(e2e/)
- Prettier 사전 구성
- ESLint 사전 구성
- Jest 사전 구성
여러분에게 생소할 수 있는 몇 가지를 설명하겠습니다.
nx.json 여기서 Nx의 작동 방식을 미세 조정합니다. 캐시 가능한 연산들을 정의하고 작업 파이프라인을 구성합니다. 이에 대해서는 곧 자세히 설명하겠습니다.
앱 서빙
가장 일반적인 작업은 이미 package.json 파일에 매핑되어 있습니다:
// package.json
{
  "name": "reactutorial",
  "scripts": {
    "start": "nx serve",
    "build": "nx build",
    "test": "nx test"
  }
  ...
}
새 React 애플리케이션을 서비스하려면 다음과 같이 실행하세요. 또는 다음을 사용하여 Nx를 직접 사용할 수도 있습니다.
nx serve
애플리케이션은 http://localhost:4200 에서 제공되어야 합니다.
Nx는 다음 구문을 사용하여 작업을 실행합니다:
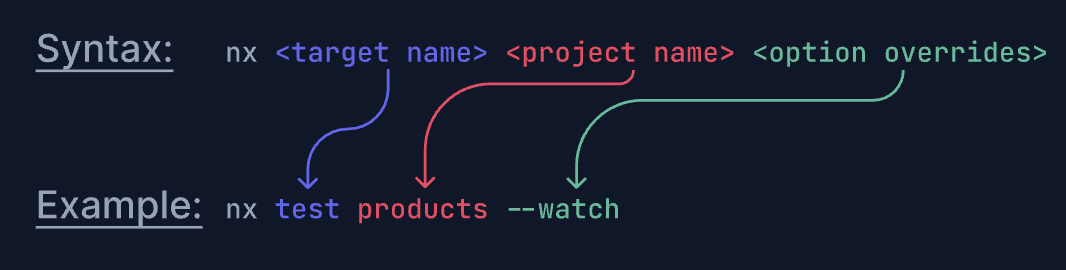
서빙, 빌드, 테스트 또는 커스텀 타겟 같은 모든 타겟은 project.json 파일에 정의됩니다.
// project.json
{
  "name": "myreactapp",
  ...
  "targets": {
    "serve": { ... },
    "build": { ... },
    "preview": { ... },
    "test": { ... },
    "lint": { ... },
    "serve-static": { ... },
  },
}
package.json을 사용할 수도 있습니다.

Nx는 **package.json**과 **project.json** 모두에서 작업을 가져올 수 있습니다. [자세히 보기](https://nx.dev/core-features/run-tasks)
각 타겟에는 해당 타겟을 실행하는 방법을 알려주는 구성 객체가 포함되어 있습니다.
{
  "name": "myreactapp",
  ...
  "targets": {
    "serve": {
      "executor": "@nx/vite:dev-server",
      "defaultConfiguration": "development",
      "options": {
        "buildTarget": "reactutorial:build"
      },
      "configurations": {
        "development": {
          "buildTarget": "reactutorial:build:development",
          "hmr": true
        },
        "production": {
          "buildTarget": "reactutorial:build:production",
          "hmr": false
        }
      }
     },
     ...
  },
}
가장 중요한 부분은 다음과 같습니다:
- executor -
<plugin>:<excutor-name>구문으로, 여기서 plugin은 Nx Plugin을 포함하는 NPM 패키지이고<executor-name>은 작업을 실행하는 함수를 가리킵니다. 이 경우, @nx/vite 플러그인에는 Vite를 사용하여 React 앱을 서빙하는 dev-server 실행기가 포함되어 있습니다. - options - 실행자 함수를 커스터마이징하기 위해 실행자 함수에 전달되는 추가 속성 및 플래그입니다.
Nx로 작업을 실행하는 방법에 대해 자세히 알아보세요.
테스트 및 린팅 - 여러 작업 실행하기
현재 설정에는 React 애플리케이션을 제공하고 빌드하기 위한 타겟뿐만 아니라 단위 테스트, e2e 테스트 및 린팅을 위한 타겟도 있습니다. 다시 말하지만, 이것들은 project.json 파일에 정의되어 있습니다. 이전과 동일한 구문을 사용하여 이러한 작업을 실행할 수 있습니다:
nx test # runs tests using Vitest (or you can configure it to use Jest)
nx lint # runs linting with ESLint
nx e2e e2e # runs e2e tests with Cypress
더 편리하게는 다음 구문을 사용하여 병렬로 실행할 수도 있습니다:
nx run-many -t test lint e2e


    ✔  nx run e2e:lint (2s)
    ✔  nx run myreactapp:lint (2s)
    ✔  nx run myreactapp:test (2s)
    ✔  nx run e2e:e2e (6s)

 ——————————————————————————————————————————————————————

 >  NX   Successfully ran targets test, lint, e2e for 2 projects (7s)
캐싱
한 가지 주목해야 할 점은 Nx가 실행하는 작업을 캐시할 수 있다는 점입니다.
이러한 모든 타겟은 Nx에 의해 자동으로 캐시됩니다. 하나 또는 모든 대상을 다시 실행하면 작업이 즉시 완료되는 것을 볼 수 있습니다. 또한 아래 출력 예제에서 볼 수 있듯이 일치하는 캐시 결과를 찾았으므로 작업을 다시 실행하지 않았다는 메모가 표시됩니다.
nx run-many -t test lint e2e

    ✔  nx run e2e:lint  [existing outputs match the cache, left as is]
    ✔  nx run myreactapp:lint  [existing outputs match the cache, left as is]
    ✔  nx run myreactapp:test  [existing outputs match the cache, left as is]
    ✔  nx run e2e:e2e  [existing outputs match the cache, left as is]

 ——————————————————————————————————————————————————————

 >  NX   Successfully ran targets test, lint, e2e for 5 projects (54ms)

   Nx read the output from the cache instead of running the command for 10 out of 10 tasks.
하지만 모든 작업을 캐시할 수 있는 것은 아닙니다. nx.json 파일에서 cacheableOperations를 구성할 수 있습니다. 캐싱 작동 방식에 대해 자세히 알아볼 수도 있습니다.
새 컴포넌트 생성하기
평소처럼 새 React 컴포넌트를 만들면 됩니다. 하지만 Nx 플러그인은 보통 제너레이터도 함께 제공합니다. 이를 통해 코드, 구성 또는 전체 프로젝트를 쉽게 scaffold할 수 있습니다. 다음 명령을 실행하고 출력을 검사하여 @nx/react 플러그인이 어떤 기능을 제공하는지 확인해보세요:
npx nx list @nx/react

 >  NX   Capabilities in @nx/react:

   GENERATORS

   init : Initialize the `@nrwl/react` plugin.
   application : Create a React application.
   library : Create a React library.
   component : Create a React component.
   redux : Create a Redux slice for a project.
   storybook-configuration : Set up storybook for a React app or library.
   component-story : Generate storybook story for a React component
   stories : Create stories/specs for all components declared in an app or library.
   component-cypress-spec : Create a Cypress spec for a UI component that has a story.
   hook : Create a hook.
   host : Generate a host react application
   remote : Generate a remote react application
   cypress-component-configuration : Setup Cypress component testing for a React project
   component-test : Generate a Cypress component test for a React component
   setup-tailwind : Set up Tailwind configuration for a project.
   setup-ssr : Set up SSR configuration for a project.

   EXECUTORS/BUILDERS

   module-federation-dev-server : Serve a host or remote application.
   module-federation-ssr-dev-server : Serve a host application along with it's known remotes.
보다 시각적인 UI를 선호하시나요?

보다 통합된 환경을 원한다면 코드 편집기용 "Nx Console" 확장 프로그램을 설치하면 됩니다. 이 확장 프로그램은 VSCode, IntelliJ를 지원하며 Vim용 LSP를 제공합니다. Nx Console은 Nx 구성 파일에서 자동 완성 기능을 지원하며 제네레이터 탐색 및 실행을 위한 UI를 제공합니다.

자세한 내용은 [에디터와 통합하기 문서](https://nx.dev/core-features/integrate-with-editors)에서 확인할 수 있습니다.
다음 명령을 실행하여 새 "hello-world" 컴포넌트를 생성합니다. 먼저 출력을 확인하기 위해 --dry-run을 추가하는 방법에 유의하세요.
npx nx g @nx/react:component hello-world --dry-run

>  NX  Generating @nx/react:component

✔ Should this component be exported in the project? (y/N) · false
CREATE src/app/hello-world/hello-world.module.css
CREATE src/app/hello-world/hello-world.spec.tsx
CREATE src/app/hello-world/hello-world.tsx

NOTE: The "dryRun" flag means no changes were made.
보시다시피 App/hello-world/ 폴더에 새 컴포넌트를 생성합니다. 제네레이터를 실제로 실행하려면 --dry-run 플래그를 제거하세요.
// src/app/hello-world/hello-world.tsx
import styles from './hello-world.module.css';

/* eslint-disable-next-line */
export interface HelloWorldProps {}

export function HelloWorld(props: HelloWorldProps) {
  return (
    <div className={styles['container']}>
      <h1>Welcome to HelloWorld!</h1>
    </div>
  );
}

export default HelloWorld;
배포용 앱 빌드
준비가 완료되어 애플리케이션을 출시하려는 경우 다음을 사용하여 빌드할 수 있습니다.
npx nx build

vite v4.3.5 building for production...
✓ 33 modules transformed.
dist/myreactapp/index.html                   0.48 kB │ gzip:  0.30 kB
dist/myreactapp/assets/index-e3b0c442.css    0.00 kB │ gzip:  0.02 kB
dist/myreactapp/assets/index-378e8124.js   165.64 kB │ gzip: 51.63 kB
✓ built in 496ms

 ——————————————————————————————————————————————————————————————————————————————————————————————————————————

 >  NX   Successfully ran target build for project reactutorial (1s)
필요한 모든 파일은 dist/myreactapp 폴더에 저장되며 원하는 호스팅 제공업체에 배포할 수 있습니다.
준비가 완료되었습니다!
이전 섹션에서는 Nx 사용, 작업 실행 및 Nx 워크스페이스 탐색의 기본 사항에 대해 배웠습니다. 이제 기능을 제공할 준비가 되었습니다!
하지만 아직 배울 것이 더 있습니다. 여기에는 두 가지 가능성이 있습니다:
- 다음 단계 섹션으로 이동하여 여기에서 다음 단계로 넘어가거나
- 계속 읽으면서 React로 작업할 때 Nx를 특별하게 만드는 요소에 대해 자세히 알아보세요.
로컬 라이브러리로 React 앱 모듈화하기
React 애플리케이션을 개발할 때 일반적으로 모든 로직은 app폴더에 위치합니다. "도메인"을 나타내는 다양한 폴더 이름으로 구분하는 것이 이상적입니다. 하지만 앱이 성장함에 따라 이는 점점 더 단일화됩니다.
└─ myreactapp
   ├─ ...
   ├─ src
   │  ├─ app
   │  │  ├─ products
   │  │  ├─ cart
   │  │  ├─ ui
   │  │  ├─ ...
   │  │  └─ app.tsx
   │  ├─ ...
   │  └─ main.tsx
   ├─ ...
   ├─ package.json
   ├─ ...
Nx를 사용하면 이 로직을 "로컬 라이브러리"로 분리할 수 있습니다. 주요 이점은 다음과 같습니다.
- 관심사 분리
- 재사용성 향상
- "도메인 영역" 간의 보다 명확한 "API"
- 각 라이브러리에 대해 독립적인 테스트/린트/빌드 명령을 사용할 수 있어 CI의 확장성 향상
- 여러 팀이 별도의 라이브러리에서 작업할 수 있도록 하여 팀의 확장성 향상
로컬 라이브러리 만들기
도메인 영역에 products, orders 및 보다 일반적인 디자인 시스템 컴포넌트인 ui가 포함된다고 가정해 봅시다. React 라이브러리 제네레이터를 사용하여 이러한 각 영역에 대한 새 라이브러리를 생성할 수 있습니다:
nx g @nx/react:library products --unitTestRunner=vitest --bundler=none --directory=modules
nx g @nx/react:library orders --unitTestRunner=vitest --bundler=none --directory=modules
nx g @nx/react:library ui --unitTestRunner=vitest --bundler=none --directory=modules/shared
--directory 플래그를 사용하여 라이브러리를 하위 폴더에 배치하는 방법에 주목하세요. 원하는 폴더 구조를 선택할 수 있으며, 모든 폴더를 루트 레벨로 유지할 수도 있습니다.
위의 명령을 실행하면 다음과 같은 디렉토리 구조가 생성됩니다:
└─ myreactapp
   ├─ ...
   ├─ modules
   │  ├─ products
   │  │  ├─ ...
   │  │  ├─ project.json
   │  │  ├─ src
   │  │  │  ├─ index.ts
   │  │  │  └─ lib
   │  │  │     ├─ modules-products.spec.ts
   │  │  │     └─ modules-products.ts
   │  │  ├─ tsconfig.json
   │  │  ├─ tsconfig.lib.json
   │  │  ├─ tsconfig.spec.json
   │  │  └─ vite.config.ts
   │  ├─ orders
   │  │  ├─ ...
   │  │  ├─ project.json
   │  │  ├─ src
   │  │  │  ├─ index.ts
   │  │  │  └─ ...
   │  │  └─ ...
   │  └─ shared
   │     └─ ui
   │        ├─ ...
   │        ├─ project.json
   │        ├─ src
   │        │  ├─ index.ts
   │        │  └─ ...
   │        └─ ...
   ├─ src
   │  ├─ app
   │  │  ├─ hello-world
   │  │  │  ├─ hello-world.module.css
   │  │  │  ├─ hello-world.spec.tsx
   │  │  │  └─ hello-world.tsx
   │  │  └─ ...
   │  ├─ ...
   │  └─ main.tsx
   ├─ ...
각 라이브러리들은
- 실행할 수 있는 해당 타겟이 있는 자체 project.json 파일이 있습니다(예: 주문에 대한 테스트 실행: nx test modules-orders).
- --directory 플래그를 기반으로 하는 이름이 있습니다(예: modules-orders). 해당 project.json 파일에서 이름을 찾을 수 있습니다.
- 라이브러리의 "public API"인 전용 index.ts 파일이 있습니다.
- 워크스페이스의 루트에 있는 tsconfig.base.json에 매핑됩니다.
라이브러리를 React 애플리케이션으로 가져오기
우리가 자동으로 생성하는 모든 라이브러리에는 루트 수준의 tsconfig.base.json에 생성된 별칭이 있습니다.
Reference