
Databinding에 대해 공부할 때 @BindingAdapter라는 어노테이션을 한 번 쯤은 봤을 것이다. 지금껏 xml - layout 태그 내에서 variable을 선언하고, RecyclerView + Adapter를 구현해서 RecyclerView의 ViewHolder 내에서 데이터를 한번에 바인딩 했었는데 나는 그게 Databinding의 전부인 줄 알았다. 하지만 다시 공부해보니 'Binding Adapter'라는 것을 직접 커스텀해서 사용할 수 있었고, Binding Adapter를 커스텀해서 사용하면 보일러 플레이트 코드를 줄일 수 있다는 장점이 있다고 해서 바로 프로젝트에 적용해봤다. 먼저 Binding Adapter가 무엇인지부터 알아보자.
Binding Adapter
미디엄에 Binding Adapter에 대해 잘 정리해놓은 글이 있어서 해당 글과 안드로이드 공식문서를 참고해서 정리해봤다. 정리하다보니 레이아웃 파일에서 당연한듯이 사용했던 뷰의 속성들이 다 Binding Adapter의 메서드였다는게 굉장히 놀라웠다..😀 어쨌든, 더 자세한 글을 보고싶다면 아래 링크를 참고하자!
👉 Android Databinding Adapter, Satya Pavan Kantamani
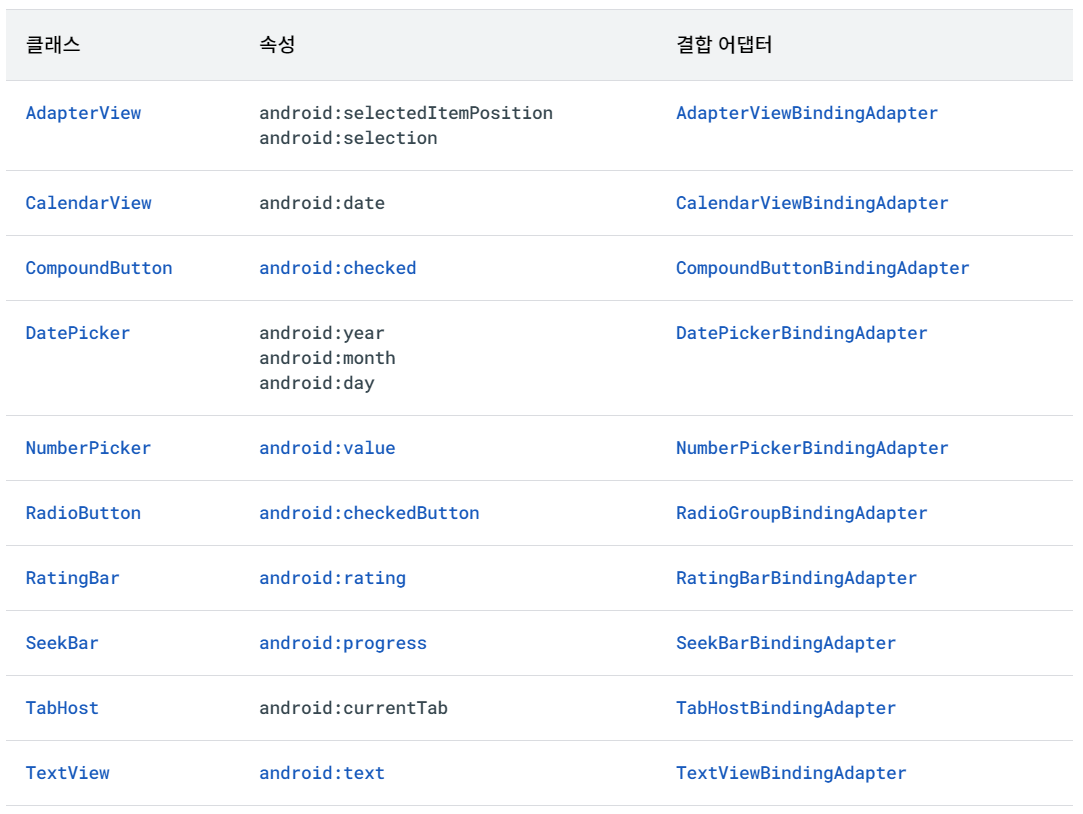
Binding Adapter는 값 또는 리스너를 설정하기 위해 필요한 프레임워크를 호출하는 정적 메서드다. 예를 들어 setText()를 호출해서 TextView의 값을 설정하거나, Button의 setOnClickListener()를 호출해서 Button 클릭 시의 이벤트를 설정하는것과 같다. 그러니까 한 마디로 정리하자면 안드로이드의 기본 뷰들은 대부분 이미 정의된 바인딩 어댑터가 있는 것이다.
<TextView
    android:id="@+id/user_id"
    android:layout_width="wrap_content"
    android:layout_height="wrap_content"
    android:text="@{item.id}"
  />
위의 TextView의 android:text를 예로 들어보자. Databinding 사용 시 액티비티나 프래그먼트에 해당하는 BindingImpl 클래스가 생성되는데, BindingImpl 또는 안드로이드 공식 문서에서 제공하는 코드를 통해 Databinding에서 제공하는 기본 어댑터 클래스인 TextViewBindingAdapter 클래스의 내부를 확인해 볼 수 있다.
Two-way attributes, Android Developers
public class TextViewBindingAdapter {

    private static final String TAG = "TextViewBindingAdapters";
    @SuppressWarnings("unused")
    public static final int INTEGER = 0x01;
    public static final int SIGNED = 0x03;
    public static final int DECIMAL = 0x05;

    @BindingAdapter("android:text")
    public static void setText(TextView view, CharSequence text) {
        final CharSequence oldText = view.getText();
        if (text == oldText || (text == null && oldText.length() == 0)) {
            return;
        }
        if (text instanceof Spanned) {
            if (text.equals(oldText)) {
                return; // No change in the spans, so don't set anything.
            }
        } else if (!haveContentsChanged(text, oldText)) {
            return; // No content changes, so don't set anything.
        }
        view.setText(text);
    }

    @InverseBindingAdapter(attribute = "android:text", event = "android:textAttrChanged")
    public static String getTextString(TextView view) {
        return view.getText().toString();
    }
}
Databinding 라이브러리는 TextView 말고도 여러 뷰에 대한 Binding Adapter를 제공한다. 이렇게 기본적으로 제공되는 Binding Adapter를 사용하면 보일러 플레이트 코드를 제거할 수 있어 더욱 깔끔한 코드를 작성할 수 있는데, XML을 사용해서 화면을 구현하고 있다면 지금껏 이렇게 잘 사용해왔을 것이다.
Custom Binding Adapter
Databinding 라이브러리에서 기본적으로 제공되는 Binding Adapter만 사용할 수도 있지만, Databinding을 사용하다 보면 기본적으로 제공되는 것만 사용하기에는 부족함을 느낄 때가 있다. 예를 들어 URL을 통해 가져온 이미지를 ImageView에 바인딩하거나, 변수의 값에 따라 다른 이미지를 불러와서 ImageView에 바인딩하는 것과 같은 상황일 때 말이다. 따라서 우리는 Binding Adapter를 필요한대로 커스텀해서 사용할 수 있는데, 바로 @BindingAdapter라는 어노테이션을 붙여서 사용할 수 있다.
✅ 예제 1
먼저 RecyclerView에 ViewModel이 가진 데이터들을 한번에 바인딩하는 Binding Adapter를 만들어보자. 물론 이 방식은 Binding Adapter를 만들지 않고 어댑터 클래스의 ViewHolder 내에서도 구현 가능하다.
ScheduleDataModel.kt
data class ScheduleDataModel(
    var date : String,
    var content : String,
    var alarm : String,
    var alarm_code : Int,
    var importance : Int
)
ScheduleDao.kt
@Dao
interface ScheduleDao {
    @Query("SELECT * FROM schedule")
    fun getAllSchedules() : List<ScheduleDataModel>
}
ViewModel.kt
class ViewModel(private val sDao : ScheduleDao) : ViewModel(){
	val result = sDao.getAllSchedules()
    // val result : List<ScheduleDataModel>
}
ResultDialog.xml
DataBinding을 사용하기 위해 레이아웃 파일을 layout 태그로 묶어준 후, 뷰에 바인딩 해줄 ViewModel을 data - variable 태그로 묶어준다. name 속성을 사용해 원하는 방식대로 네이밍해서 해당 뷰모델을 간단히 표현할 수도 있다. RecyclerView를 보면 'item'이라는 생소한 속성이 보이는데, 바로 이 'item'이 내가 커스텀한 Binding Adapter의 속성이다. Binding Adapter를 사용하면 뷰를 정의할 때 직접 지정한 속성을 사용할 수 있다.
<?xml version="1.0" encoding="utf-8"?>
<layout xmlns:android="http://schemas.android.com/apk/res/android"
    xmlns:tools="http://schemas.android.com/tools"
    xmlns:app="http://schemas.android.com/apk/res-auto">

    <data>
        <variable
            name="vm"
            type="com.example.ViewModel" />
    </data>

    <FrameLayout
        android:layout_height="wrap_content"
        android:layout_width="wrap_content">

        <androidx.constraintlayout.widget.ConstraintLayout
            android:layout_width="300dp"
            android:layout_height="wrap_content">

            <EditText
                android:id="@+id/inputText"
                android:layout_width="0dp"
                android:layout_height="wrap_content"
                app:layout_constraintTop_toTopOf="parent"
                app:layout_constraintStart_toStartOf="parent"
                app:layout_constraintEnd_toEndOf="parent"
                tools:ignore="MissingConstraints" />

            <androidx.recyclerview.widget.RecyclerView
                android:id="@+id/resultView"
                android:layout_width="match_parent"
                android:layout_height="wrap_content"
                item="@{vm.result}"
                app:layout_constraintTop_toBottomOf="@id/inputText"
                tools:ignore="MissingConstraints" />

        </androidx.constraintlayout.widget.ConstraintLayout>
    </FrameLayout>
</layout>
result_item.xml
RecyclerView에서 표현될 아이템에 대한 레이아웃 파일이다. 마찬가지로 데이터바인딩을 사용할 것이기 때문에 레이아웃 파일을 layout 태그로 묶어준 후, 뷰에 바인딩 해줄 데이터 클래스(ScheduleDataModel)를 data - variable 태그로 묶어주었다.
<?xml version="1.0" encoding="utf-8"?>
<layout
    xmlns:tools="http://schemas.android.com/tools"
    xmlns:android="http://schemas.android.com/apk/res/android"
    xmlns:app="http://schemas.android.com/apk/res-auto">

    <data>
        <variable
            name="item"
            type="com.example.ScheduleDataModel" />
    </data>

    <androidx.constraintlayout.widget.ConstraintLayout
        android:layout_width="match_parent"
        android:layout_height="wrap_content">

        <androidx.constraintlayout.widget.ConstraintLayout
            android:layout_width="match_parent"
            android:layout_height="wrap_content"
            app:layout_constraintStart_toStartOf="parent"
            app:layout_constraintEnd_toEndOf="parent"
            app:layout_constraintTop_toTopOf="parent"
            app:layout_constraintBottom_toBottomOf="parent"
            tools:ignore="MissingConstraints">

          	<TextView
                android:id="@+id/content"
                android:layout_width="wrap_content"
                android:layout_height="wrap_content"
                app:layout_constraintStart_toStartOf="parent"
                app:layout_constraintTop_toTopOf="parent"
                android:text="@{item.content}"/>

            <TextView
                android:id="@+id/date"
                android:layout_width="wrap_content"
                android:layout_height="wrap_content"
                app:layout_constraintTop_toBottomOf="@id/content"
                app:layout_constraintStart_toStartOf="parent"
                android:text="@{item.date}"/>

        </androidx.constraintlayout.widget.ConstraintLayout>
    </androidx.constraintlayout.widget.ConstraintLayout>
</layout>
ScheduleAdapter.kt
RecyclerView와 RecyclerView에 표시될 아이템들을 연결하기 위한 커스텀 어댑터 클래스다. onBindViewHolder에서 각 포지션에 맞는 list의 아이템을 Holder.onBind()에 전달해 뷰홀더 클래스와 연결해주면 레이아웃 파일에서 해당 데이터를 사용해 Databinding을 할 수 있다.
class ScheduleAdapter : RecyclerView.Adapter<ScheduleAdapter.Holder>() {

    var list = ArrayList<ScheduleDataModel>()
    private lateinit var binding : ResultItemBinding

    override fun onCreateViewHolder(parent: ViewGroup, viewType: Int): Holder {
        val inflater = LayoutInflater.from(parent.context)
        binding = ResultItemBinding.inflate(inflater, parent, false)
        return Holder(binding.root)
    }

    override fun onBindViewHolder(holder: Holder, position: Int) {
        holder.onBind(list[position], itemCount)
    }

    override fun getItemCount(): Int {
        return list.size
    }

    inner class Holder(val view: View) : RecyclerView.ViewHolder(view){

        fun onBind(item : ScheduleDataModel, size: Int){
            binding.item = item
        }
    }
}
DatabindingUtils.kt
Binding Adaper를 정의한 오브젝트 클래스로, @BindingAdaper("") 내에 속성명을 원하는대로 정의하면 된다. 또한 @JvmStatic 어노테이션도 추가해주는데, @BindingAdapter 어노테이션을 사용했을 경우 static으로 접근 가능하도록 해야하기 때문에 만약 사용하지 않으면 런타임 시 에러가 발생할 것이다.
object DataBindingUtil {
    @SuppressLint("NotifyDataSetChanged")
    @BindingAdapter("item")
    @JvmStatic
    fun setItems(recyclerView: RecyclerView, item: List<ScheduleDataModel>?){
        if (recyclerView.adapter == null){
            val adapter = item?.let { ScheduleAdapter(it) }
            recyclerView.layoutManager = LinearLayoutManager(recyclerView.context)
            recyclerView.adapter = adapter
        }
        if (item != null) {
            (recyclerView.adapter as ScheduleAdapter).list = item as ArrayList<ScheduleDataModel>
        }
        recyclerView.adapter?.notifyDataSetChanged()
    }
}
ResultFragment.kt
이제 프래그먼트에서 바인딩 객체에 뷰모델을 연결해주면 끝이다.
class ResultFragment : DialogFragment() {

    private val binding by viewBinding(ResultsDialogBinding::bind)
    private val viewModel : ViewModel by inject()

    override fun onCreateView(
        inflater: LayoutInflater,
        container: ViewGroup?,
        savedInstanceState: Bundle?
    ): View? {
        return inflater.inflate(R.layout.results_dialog, container, false)
    }
    override fun onViewCreated(view: View, savedInstanceState: Bundle?) {
        super.onViewCreated(view, savedInstanceState)
        binding.vm = viewModel
}
✅ 예제 2
두 번째 예제에서는 ViewModel이 가지고 있는 데이터(ScheduleDataModel) 중 특정 변수(importance)의 값에 따라 RecyclerView 아이템의 ImageView(importance_img)에 각각 다른 이미지를 출력하도록 Binding Adapter를 만들 것이다. 참고로 데이터클래스(ScheduleDataModel), ViewModel과 어댑터 클래스(ScheduleAdapter)는 예제 1과 동일하다.
Schedule_item.xml
<?xml version="1.0" encoding="utf-8"?>
<layout
    xmlns:tools="http://schemas.android.com/tools"
    xmlns:android="http://schemas.android.com/apk/res/android"
    xmlns:app="http://schemas.android.com/apk/res-auto">

    <data>
        <variable
            name="schedule"
            type="com.example.ScheduleDataModel" />
    </data>

    <androidx.constraintlayout.widget.ConstraintLayout
        android:layout_width="match_parent"
        android:layout_height="wrap_content">

        <androidx.constraintlayout.widget.ConstraintLayout
            android:layout_width="match_parent"
            android:layout_height="wrap_content"
            app:layout_constraintStart_toStartOf="parent"
            app:layout_constraintEnd_toEndOf="parent"
            app:layout_constraintTop_toTopOf="parent"
            app:layout_constraintBottom_toBottomOf="parent"
            tools:ignore="MissingConstraints">

            <TextView
                android:id="@+id/content"
                android:layout_width="wrap_content"
                android:layout_height="wrap_content"
                app:layout_constraintStart_toStartOf="parent"
                app:layout_constraintTop_toTopOf="parent"
                android:text="@{schedule.content}"/>

            <TextView
                android:id="@+id/alarm"
                android:layout_width="wrap_content"
                android:layout_height="wrap_content"
                app:layout_constraintTop_toBottomOf="@id/content"
                app:layout_constraintStart_toStartOf="parent"
                android:text="@{schedule.alarm}" />

            <ImageView
                android:id="@+id/importance_img"
                android:layout_width="20dp"
                android:layout_height="20dp"
                app:layout_constraintEnd_toEndOf="parent"
                app:layout_constraintTop_toTopOf="@id/content"
                app:layout_constraintBottom_toBottomOf="@id/alarm"
                android:scaleType="fitCenter"
                android:background="#00ff0000"
                set_image="@{schedule}"/>

        </androidx.constraintlayout.widget.ConstraintLayout>
    </androidx.constraintlayout.widget.ConstraintLayout>
</layout>
schedule_list_fragment.xml
<?xml version="1.0" encoding="utf-8"?>
<FrameLayout
    xmlns:android="http://schemas.android.com/apk/res/android"
    xmlns:tools="http://schemas.android.com/tools"
    android:layout_width="match_parent"
    android:layout_height="match_parent"
    xmlns:app="http://schemas.android.com/apk/res-auto">

    <androidx.constraintlayout.widget.ConstraintLayout
        android:layout_width="300dp"
        android:layout_height="wrap_content">

        <androidx.recyclerview.widget.RecyclerView
            android:id="@+id/schedule_Listview"
            android:layout_width="match_parent"
            android:layout_height="wrap_content"
            app:layout_constraintTop_toTopOf="parent"
            app:layout_constraintStart_toStartOf="parent"
            app:layout_constraintEnd_toEndOf="parent"
            app:layout_constraintBottom_toBottomOf="parent"
            tools:ignore="MissingConstraints" />

    </androidx.constraintlayout.widget.ConstraintLayout>
</FrameLayout>
DataBindingUtil.kt
object DataBindingUtil {

    @BindingAdapter("set_image")
    @JvmStatic
    fun setImageResource(view: ImageView, item: Schedule){
        val redImg = ContextCompat.getDrawable(view.context, R.drawable.red_most_important)
        val blueImg = ContextCompat.getDrawable(view.context, R.drawable.blue_moderately_important)
        val yellowImg = ContextCompat.getDrawable(view.context, R.drawable.yellow_least_important)

        item.let { schedule ->
            when (schedule.importance){
                0 -> { view.setImageDrawable(redImg) }
                1 -> { view.setImageDrawable(blueImg) }
                2 -> { view.setImageDrawable(yellowImg) }
            }
        }
    }
}
References
https://proandroiddev.com/android-databinding-adapters-1b7431bc1928
https://developer.android.com/topic/libraries/data-binding/two-way?hl=ko#two-way-attributes
https://in-idea.tistory.com/38
https://hanyeop.tistory.com/213
https://devvkkid.tistory.com/203
https://velog.io/@phoebe/%EB%8D%B0%EC%9D%B4%ED%84%B0%EB%B0%94%EC%9D%B8%EB%94%A9-Recyclerview