
알림 수신기(FCM) 초기 설정
- 파이어베이스에서 프로젝트 생성
- 구성파일 project -> app에 삽입
- android studio project에서 plugin, lib 추가
FCM이란?
- FireBase에서 제공하는 푸쉬알림, 메세징을 제공하는 라이브러리
FCM의 종류
- 알림메세지
-앱이 백그라운드에 있을경우 따로 구현없이 자동적으로 알림이 생성됨.
-다른 처리과정이 없기 때문에 다른 custom action에 있어서 어려움이 있음.
-구현은 쉬우나 모든 경우에 대해서 유연하게 대처하기 어렵다.
- 데이터 메세지
-앱에서 자체적으로 알림을 처리해줘야함.
-상대적으로 구현이 어렵지만 케이스가 다양한 경우에서 유연하게 대처가능.
-데이터 메세지 형식은 기본적으로 토큰과 데이터값을 가지고 있음.
위 프로젝트는 데이터 메세지를 처리하는 방법으로 구현하였음.
FCM을 수신하고 송신하기
토큰 얻기
메세지를 보내기 위해서 토큰값을 알아야 하는데,
private fun initFirebase(){
        FirebaseMessaging.getInstance().token
            .addOnCompleteListener{ task->
                if(task.isSuccessful){
                    binding.firebaseToken.text = task.result
                    Log.d("token", task.result.toString())
                }
            }
    }
위 코드를 통해 얻을 수 있다. 쉽게 이야기하면 토큰을 가져오는 task가 성공할 경우,
토큰을 화면에 띄우고, 로그로 찍어준다.
메세지 수신하고 처리하기
FCM을 이용한 경우 FireBaseMessagingService 클래스를 상속받아 처리한다.
class FirebaseMessagingService: FirebaseMessagingService() {

    override fun onNewToken(p0: String) {
    //새 토큰 생성시 호출되는 함수
        super.onNewToken(p0)
    }

    override fun onMessageReceived(remoteMessage: RemoteMessage) {
    //메세지를 수신하였을때 호출되는 함수
        super.onMessageReceived(remoteMessage)
    }
}
onMessageReceived 함수에서 수신을 받고 custom action을 취할 수 있다.
manifests 설정
<service android:name=".FirebaseMessagingService"
            android:exported="false">
            <intent-filter>
                <action android:name="com.google.firebase.MESSAGING_EVENT"/>
            </intent-filter>
        </service>
상속받은 클래스는 manifests에 service로 등록하여 백그라운드 환경에서도 호출되도록 한다.
메세지 보내기
FireBase -> Docs -> CloudMessaging -> send에 들어가면 테스트로 메세지를 보낼수 있다.
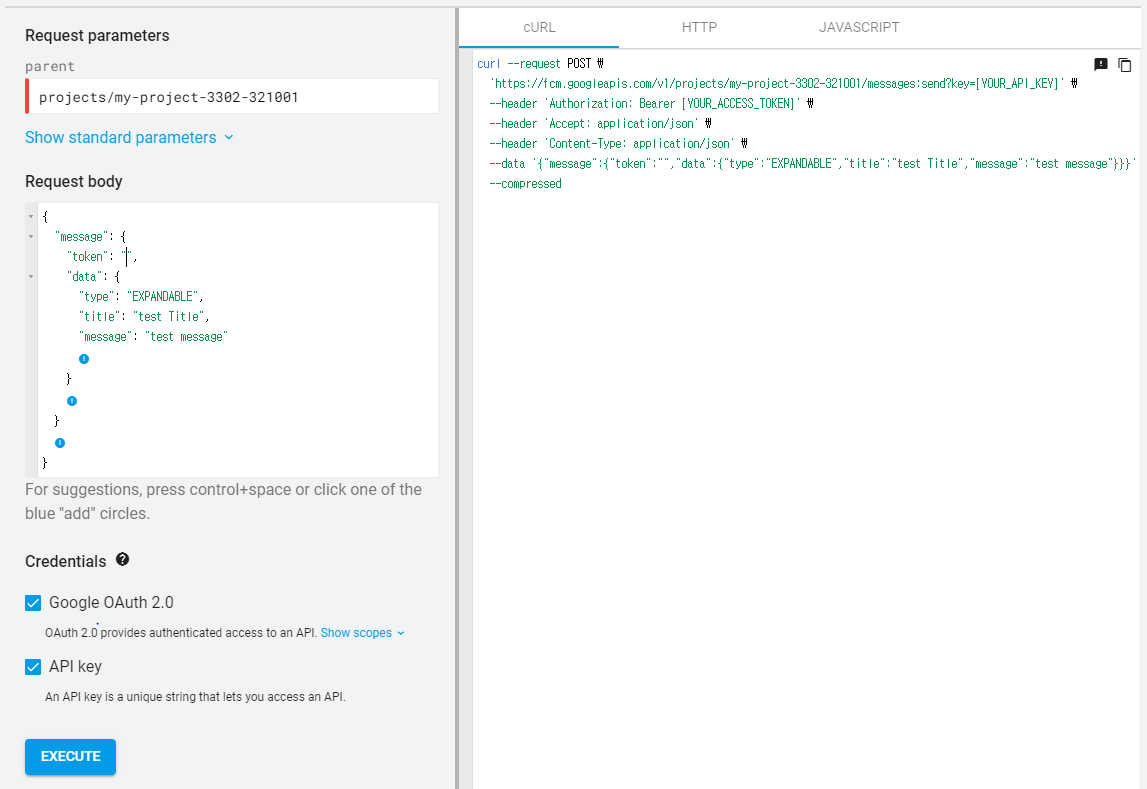
parent의 경우는 초기에 구성파일에서 확인할 수 있다.
AlarmManger 수신기
- TimePicker로 시간을 설정
private fun initChangeAlarmTimeButton(){
        binding.changeAlarmTimeButton.setOnClickListener {

            val calendar = Calendar.getInstance()
            //TimPickerDialog 생성
            TimePickerDialog(this, { picker, hour, minute ->
                //설정한 시간 SharedPreference 에 저장
                val model = saveAlarmModel(hour, minute, false)
                renderView(model)
				//기존 알람 삭제
                cancelAlarm()

            }, calendar.get(Calendar.HOUR_OF_DAY), calendar.get(Calendar.MINUTE), false)
                .show()
        }
}- 설정된 시간은 SharedPreference에 저장
private fun saveAlarmModel(hour: Int, minute: Int, onOff: Boolean): AlarmDisplayModel{
        val model = AlarmDisplayModel(
            hour = hour,
            minute = minute,
            onOff = onOff
        )
        val sharedPreferences = getSharedPreferences(SHARED_PREFERENCE_KEY, Context.MODE_PRIVATE)
        with(sharedPreferences.edit()){
            putString(ALARM_KEY, model.makeDataForDB())
            putBoolean(ON_OFF_KEY, model.onOff)
            commit() //with 함수의경우 commit
        }
        return model
}- AlarmManger를 통해 설정된 시간에 함수 호출
val newModel = saveAlarmModel(model.hour, model.minute, model.onOff.not())
            renderView(newModel)

            if (newModel.onOff){
                //알람이 켜졌을때 알람을 등록
                val calendar = Calendar.getInstance().apply {
                    set(Calendar.HOUR_OF_DAY, newModel.hour)
                    set(Calendar.MINUTE, newModel.minute)

                    if(before(Calendar.getInstance())){
                        add(Calendar.DATE, 1) //현재 시간보다 이전의 시간일 경우 하루뒤로 설정
                    }
                }
                val alarmManager = getSystemService(Context.ALARM_SERVICE) as AlarmManager
                val intent = Intent(this, AlarmReceiver::class.java)
                val pendingIntent = PendingIntent.getBroadcast(
                    this, ALARM_REQUEST_CODE, intent, PendingIntent.FLAG_UPDATE_CURRENT)

                alarmManager.setInexactRepeating(
                    AlarmManager.RTC_WAKEUP, //현재 시간을 기준으로 알람 설정
                    calendar.timeInMillis,
                    AlarmManager.INTERVAL_DAY,
                    pendingIntent
                )
            }else{
            //꺼진 경우 알람 제거
                cancelAlarm()
            }
            //온오프에 따라 처리
        }
알람의 특성상 백그라운드에서 실행될 경우가 다수이기 때문에 PendingIntent를 이용하여 알람이 호출되면 broadCastReciever를 상속한 AlarmReceiver로 전달한다.
- BroadCastReceiver가 알람을 받아서 알림 생성
class AlarmReceiver: BroadcastReceiver(){

    companion object{
        const val NOTIFICATION_CHANNEL_ID = "1000"
        const val NOTIFICATION_ID = 100
    }

    override fun onReceive(context: Context, intent: Intent) {
        createNotificationChannel(context)
        notifyNotification(context)
    }
onReceive함수가 호출되면 알림을 생성한다.
- Manifests에 등록
<receiver android:name=".AlarmReceiver"
            android:exported="false"/>
AlarmManager의 경우 Doze(잠자기 모드)에 영향을 받는다. 이에 영향을 받지 않기 위해서는
setAndAllowWhileIdle() 또는 setExactAndAllowWhileIdle()을 이용한다.
Notification 만들기
FCM 혹은 BroadCastReceiver를 호출받았다면 이를 사용자에게 알려줄 Notification을 만들어야 한다.
- Android API가 Oreo 이상의 버전이면 Notification의 채널을 생성해야 한다.
private fun createNotificationChannel(context: Context){
        if(Build.VERSION.SDK_INT >= Build.VERSION_CODES.O){
            val notificationChannel = NotificationChannel(
                NOTIFICATION_CHANNEL_ID,
                "기상 알림",
                NotificationManager.IMPORTANCE_HIGH
            )
            NotificationManagerCompat.from(context).createNotificationChannel(notificationChannel)
        }
}- NotificationCompat.Bulder를 통해 Notification을 상세하게 커스텀할 수 있다.
private fun notifyNotification(context: Context){
        with(NotificationManagerCompat.from(context)){
            val builder = NotificationCompat.Builder(context, NOTIFICATION_CHANNEL_ID)
                .setContentTitle("알림")
                .setContentText("일어날 시간입니다.")
                .setSmallIcon(R.drawable.background_ring)
                .setPriority(NotificationCompat.PRIORITY_HIGH)

            notify(NOTIFICATION_ID, builder.build())
        }
}- Notification의 구성뿐 아니라 디자인을 수정하고 싶으면 custom layout을 생성하고
DecoratedCustomViewStyle()을 통해서 Notification을 커스텀할 수 있다.
  notificationBuilder.setStyle(
                    NotificationCompat.DecoratedCustomViewStyle()
                )
                    .setCustomContentView(RemoteViews(
                        packageName,
                        R.layout.new_custom_notification //따로 제작한 layout
                        ).apply{
                            setTextViewText(R.id.title, title)
                            setTextViewText(R.id.text, text)
                    }
                    )
            }
컴붕이
안유익한글 잘 봤습니다 :)