JS 로 폭죽을 구현해보자.
우선 앞서 배운 코드를 기반으로 대충 퍼지는 코드를 작성해보면 우선 <canvas> 의 전반적인 설정값을 갖고있을 CanvasOption 클래스
canvasOption.ts
export default class CanvasOption {
    canvas: HTMLCanvasElement = document.querySelector("canvas") as HTMLCanvasElement;
    ctx: CanvasRenderingContext2D = this.canvas.getContext("2d")!;
    dpr: number = window.devicePixelRatio;
    fps: number = 60;
    interval: number = 1000 / this.fps;
    canvasWidth: number = innerWidth;
    canvasHeight: number = innerHeight;
    bgColor: string = '#000000';
};
그리고 각각의 점이 될 Particle 클래스
Particle.ts
export default class Particle extends CanvasOption {
    x: number;
    y: number;
    vx: number;
    vy: number;
    opacity: number = 1;

    constructor(x: number, y: number, vx: number, vy: number) {
        super();
        this.x = x;
        this.y = y;
        this.vx = vx;
        this.vy = vy;
    }
    update = () => {
        this.x += this.vx;
        this.y += this.vy;
        this.opacity -= 0.01;
    };
    draw = () => {
        this.ctx.fillStyle = `rgba(255 255 255 ${this.opacity})`;
        this.ctx.beginPath();
        this.ctx.arc(this.x, this.y, 10, 0, Math.PI * 2);
        this.ctx.fill();
        this.ctx.closePath();
    };
}
그리고 마지막으로 실제 그려주는 로직이 들어가는 Canvas 클래스를 생성해준다.
Canvas.ts
export default class Canvas extends CanvasOption {
    particles: Array<Particle>;
    constructor() {
        super();
        this.particles = [];
    }

    init = () => {
        this.canvasWidth = innerWidth;
        this.canvasHeight = innerHeight;
        this.canvas.width = this.canvasWidth * this.dpr;
        this.canvas.height = this.canvasHeight * this.dpr;
        this.ctx.scale(this.dpr, this.dpr);

        this.canvas.style.width = this.canvasWidth + "px";
        this.canvas.style.height = this.canvasHeight + "px";

        this.createParticles();
    };

    createParticles = () => {
        const PARTICLE_NUM = 10;
        const x = randomNumBetween(0, this.canvasWidth);
        const y = randomNumBetween(0, this.canvasHeight);
        for (let i = 0; i < PARTICLE_NUM; i++) {
            const vx = randomNumBetween(-5, 5);
            const vy = randomNumBetween(-5, 5);
            this.particles.push(new Particle(x, y, vx, vy));
        }
    };

    render = () => {
        let now: number, delta: number;
        let then = Date.now();
        const frame = () => {
            window.requestAnimationFrame(frame);
            now = Date.now();
            delta = now - then;
            if( delta < this.interval ) return;
            this.ctx.fillStyle = this.bgColor;
            this.ctx.fillRect(0, 0, this.canvasWidth, this.canvasHeight);

            this.particles.forEach((el: Particle, index:number) => {
                el.update();
                el.draw();

                if (el.opacity < 0) this.particles.splice(index, 1);
            });

            then = now - (delta % this.interval);
        };
        window.requestAnimationFrame(frame);
    }
};
동그라미로 퍼지게 하기

그럼 이렇게 정사각형의 형태로 퍼지게 된다.
왜 그럴까?
왜냐하면 현재 구현된 랜덤 값를 구하는 함수가 5 ~ -5 값을 반환하도록 설정되었기 때문이다.
export const randomNumBetween = (min: number, max: number) => {
    return Math.random() * (max - min) + min;
};
그렇다면 우리는 이제 단순 x, y 값이 아닌, 원의 형태를 갖도록 하는 함수를 만들어줘야한다.
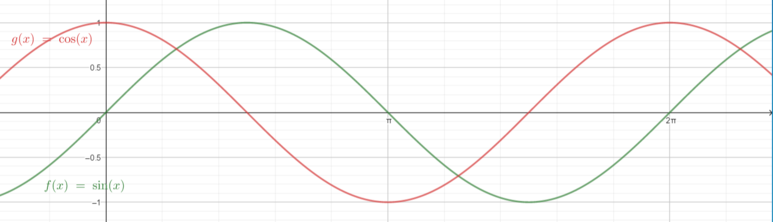
여기서 갑자기 중등 수학이 나오는데
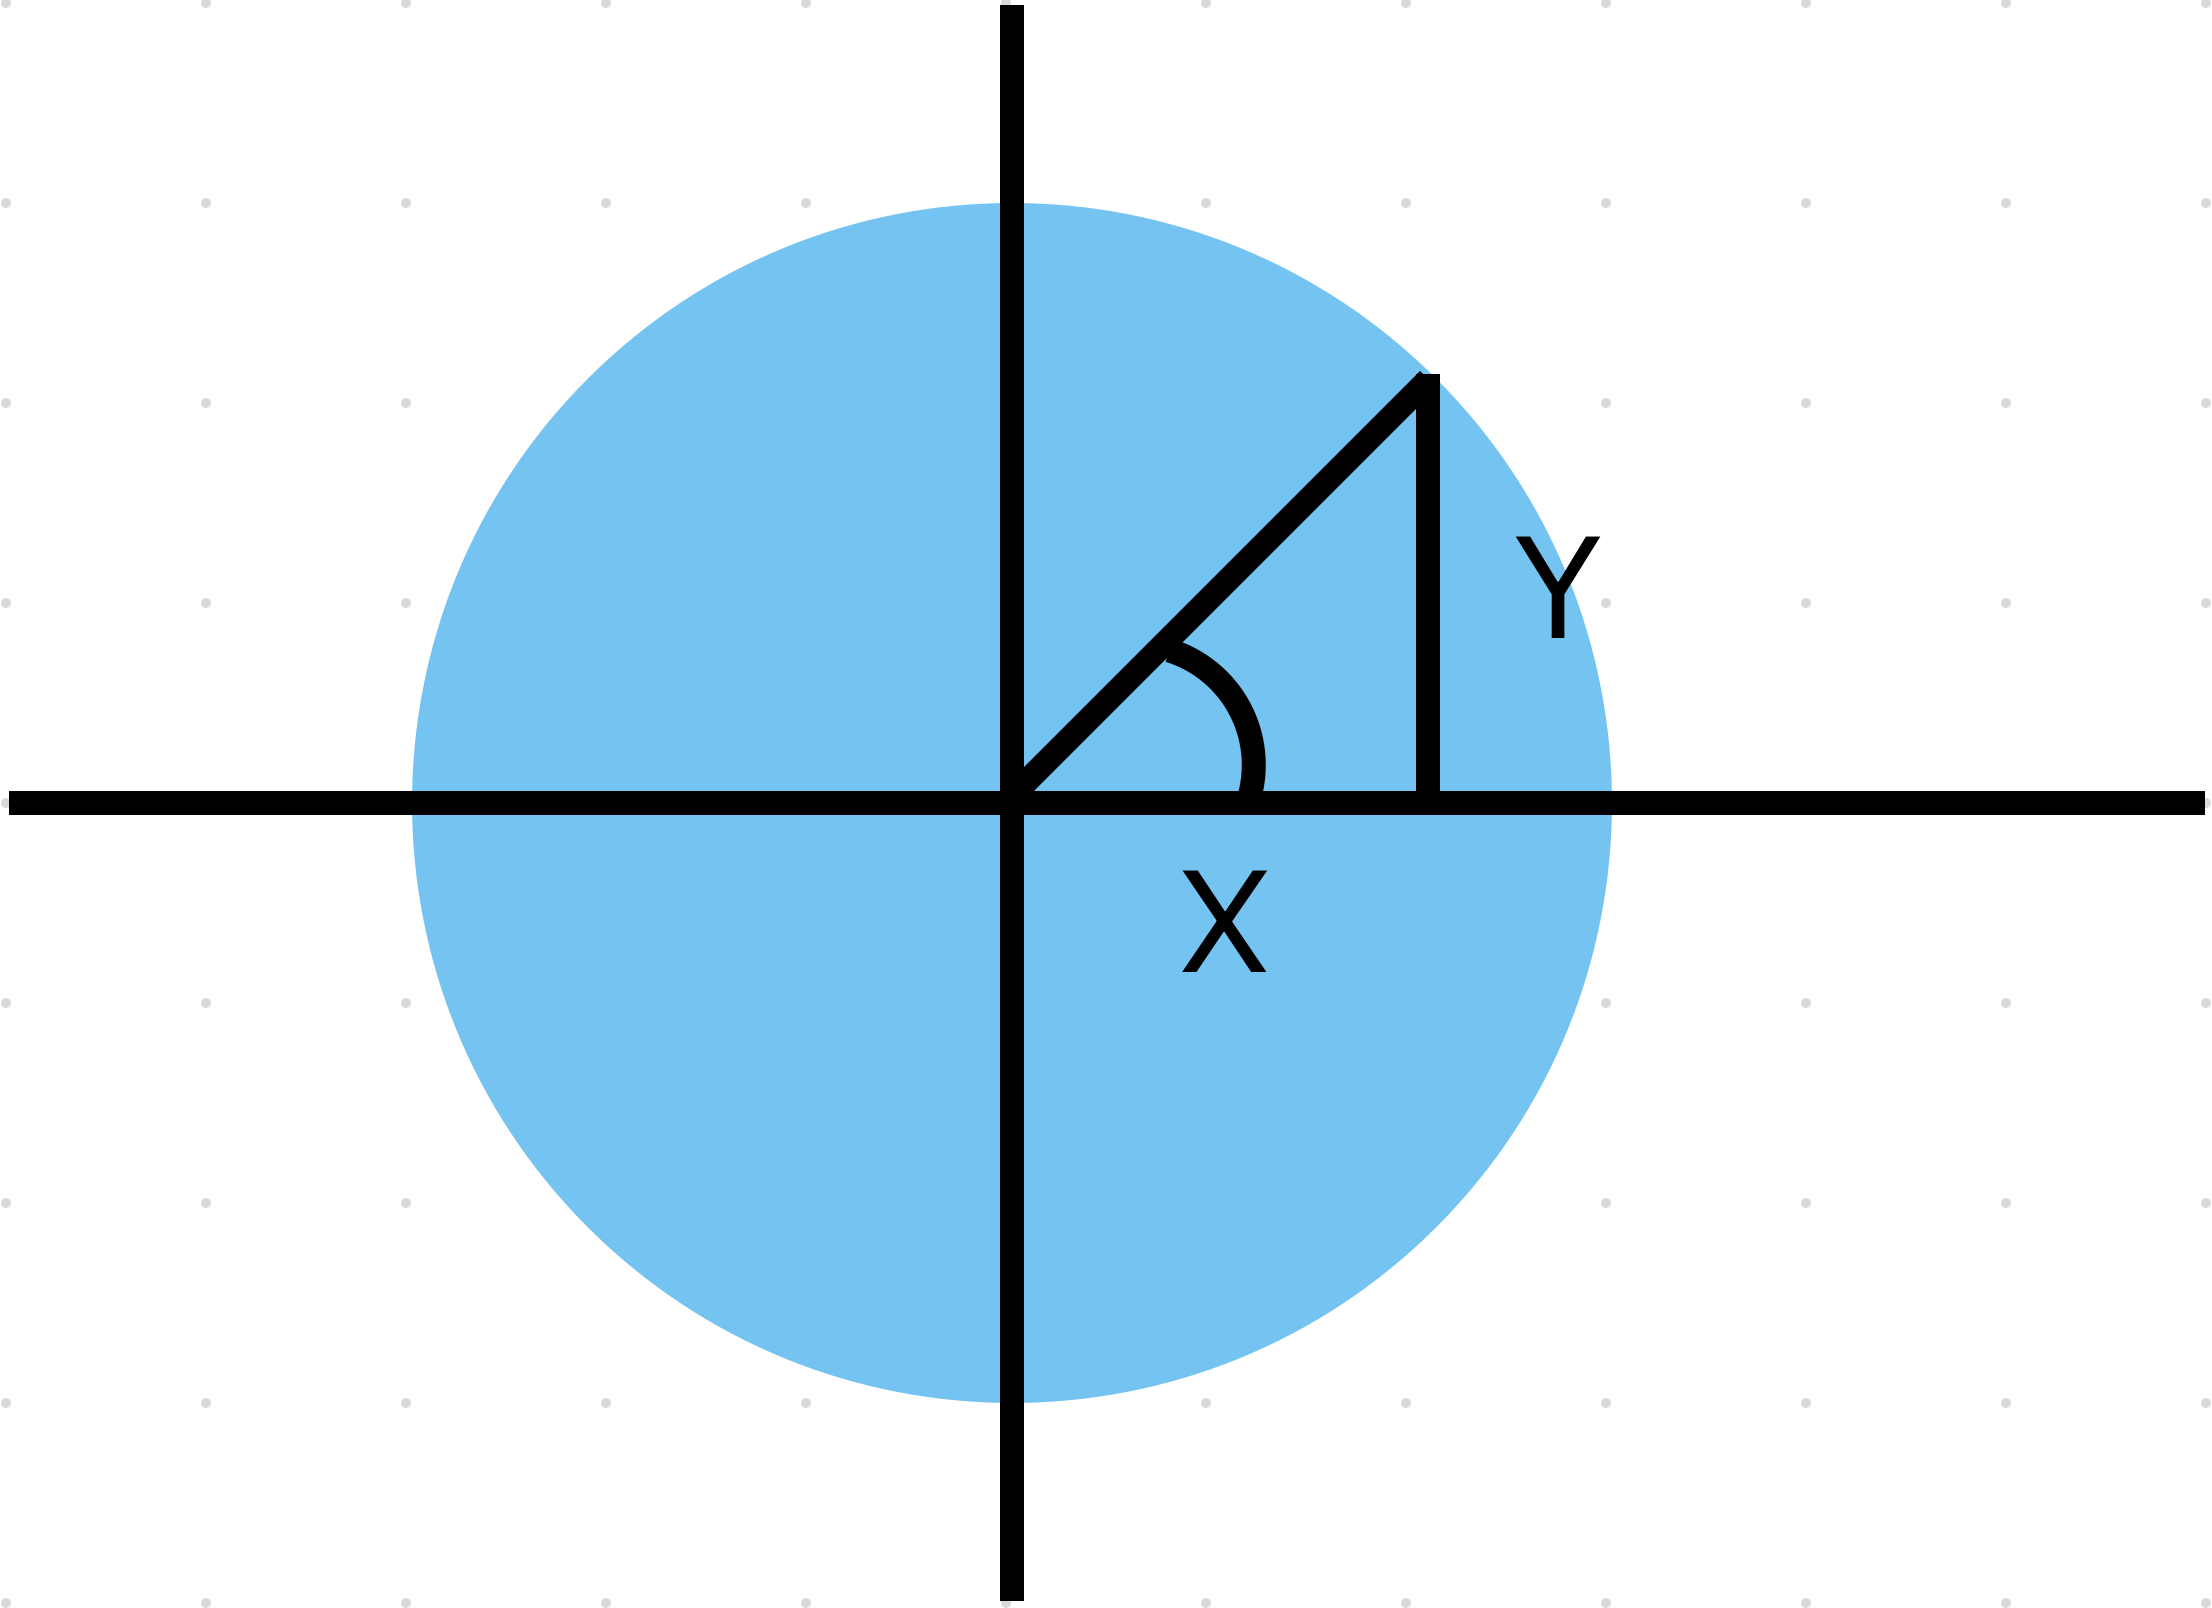
여기서 sin, cos 을 이용하여 x/r = cosθ, y/r = sinθ, 이니까 각각 x=rcosθ, y = rsinθ 가 된다.
그럼 이제 변환에 따라 r 이 이동 거리니까 속도처럼 보이고 θ 의 역할이 어느 방향으로 퍼질지를 결정한다.
createParticles = () => {
    const PARTICLE_NUM = 10;
    const x = randomNumBetween(0, this.canvasWidth);
    const y = randomNumBetween(0, this.canvasHeight);
    for (let i = 0; i < PARTICLE_NUM; i++) {
        const r = randomNumBetween(0.1, 3);
        const angle = Math.PI / 180 * randomNumBetween(0, 360);
        const vx = r * Math.cos(angle);
        const vy = r * Math.sin(angle);
        this.particles.push(new Particle(x, y, vx, vy));
    }
};
중력을 붙이기
export default class Particle extends CanvasOption {
    x: number;
    y: number;
    vx: number;
    vy: number;
    opacity: number;
    gravity: number = 0.12;
    friction: number = 0.93;

    constructor(x: number, y: number, vx: number, vy: number, opacity: number) {
        super();
        this.x = x;
        this.y = y;
        this.vx = vx;
        this.vy = vy;
        this.opacity = opacity;
    }
    update = () => {
        this.vy += this.gravity;

        this.vx *= this.friction;
        this.vy *= this.friction;

        this.x += this.vx;
        this.y += this.vy;
        this.opacity -= 0.02;
    };
    draw = () => {
        this.ctx.fillStyle = `rgba(255, 255, 255, ${this.opacity})`;
        this.ctx.beginPath();
        this.ctx.arc(this.x, this.y, 2, 0, Math.PI * 2);
        this.ctx.fill();
        this.ctx.closePath();
    };
}
Particle 클래스의 욺직이는 velocity 를 실제 불꽃 놀이처럼 시간이 지나면 천천이 멈추는 것 처럼 해주고 또 중력을 받아 내려가기 때문에 friction 이라는 1 보다 조금 작은 값으로 언제가는 0 으로 수렴하도록 하였고, vy 에는 중력을 조금씩 더해준다는 느낌으로 gravity 라는 상수로 vy에 계속 더해주었다.
render = () => {
    let now: number, delta: number;
    let then = Date.now();
    const frame = () => {
        requestAnimationFrame(frame);
        now = Date.now();
        delta = now - then;
        if( delta < this.interval ) return;
        this.ctx.fillStyle = this.bgColor + '20';
        this.ctx.fillRect(0, 0, this.canvasWidth, this.canvasHeight);

        this.particles.forEach((el: Particle, index:number) => {
            el.update();
            el.draw();

            if (el.opacity < 0) this.particles.splice(index, 1);
        });

        then = now - (delta % this.interval);
    };
    requestAnimationFrame(frame);
}
그리고 마지막으로 이전 "frame" 을 덮는 과정으로 .fillStyle() 메서드를 사용할 때 16 진수 제일 마지막 2 자리에 알파값을 추가함으로써 잔상 효과를 줄 수 있다.

꼬리 붙이기
사실 불꽃 놀이는 슈우우우욱.... 펑! 이다. 그래서 슈우우우욱.... 를 담당하는 꼬리를 만들어보자.
Tail
export default class Tail extends CanvasOption {
    x: number;
    y: number = this.canvasHeight;
    vy: number;
    color: string;
    friction: number = 0.985;
    opacity: number = 1;
    angle: number = randomNumBetween(0, 2);

    constructor(x: number, vy: number, color: string){
        super()
        this.x = x;
        this.vy = vy;
        this.color = color;
    }
    update = () => {
        this.vy *= this.friction;
        this.y += this.vy;

        this.angle += 1;
        this.x += Math.cos(this.angle) * this.vy * 0.2;

        this.opacity = -this.vy * 0.1;
    }
    draw = () => {
        this.ctx.fillStyle = `rgba(${this.color}, ${this.opacity})`;
        this.ctx.beginPath();
        this.ctx.arc(this.x, this.y, 1, 0, Math.PI*2);
        this.ctx.fill()
        this.ctx.closePath();
    }
}
우선 tail 클래스를 만들어주자. 우선 속성값부터 설명하면 슈우우우욱... 을 담당하는 부분은 아래서 위로만 올라가기 때문에 vx 는 필요없다.
그리고 어느순간 정지해야하기 때문에 마찬가지로 속도가 나중에 0 에 수렴할 수 있도록 0.985 로 대충 잡았다.
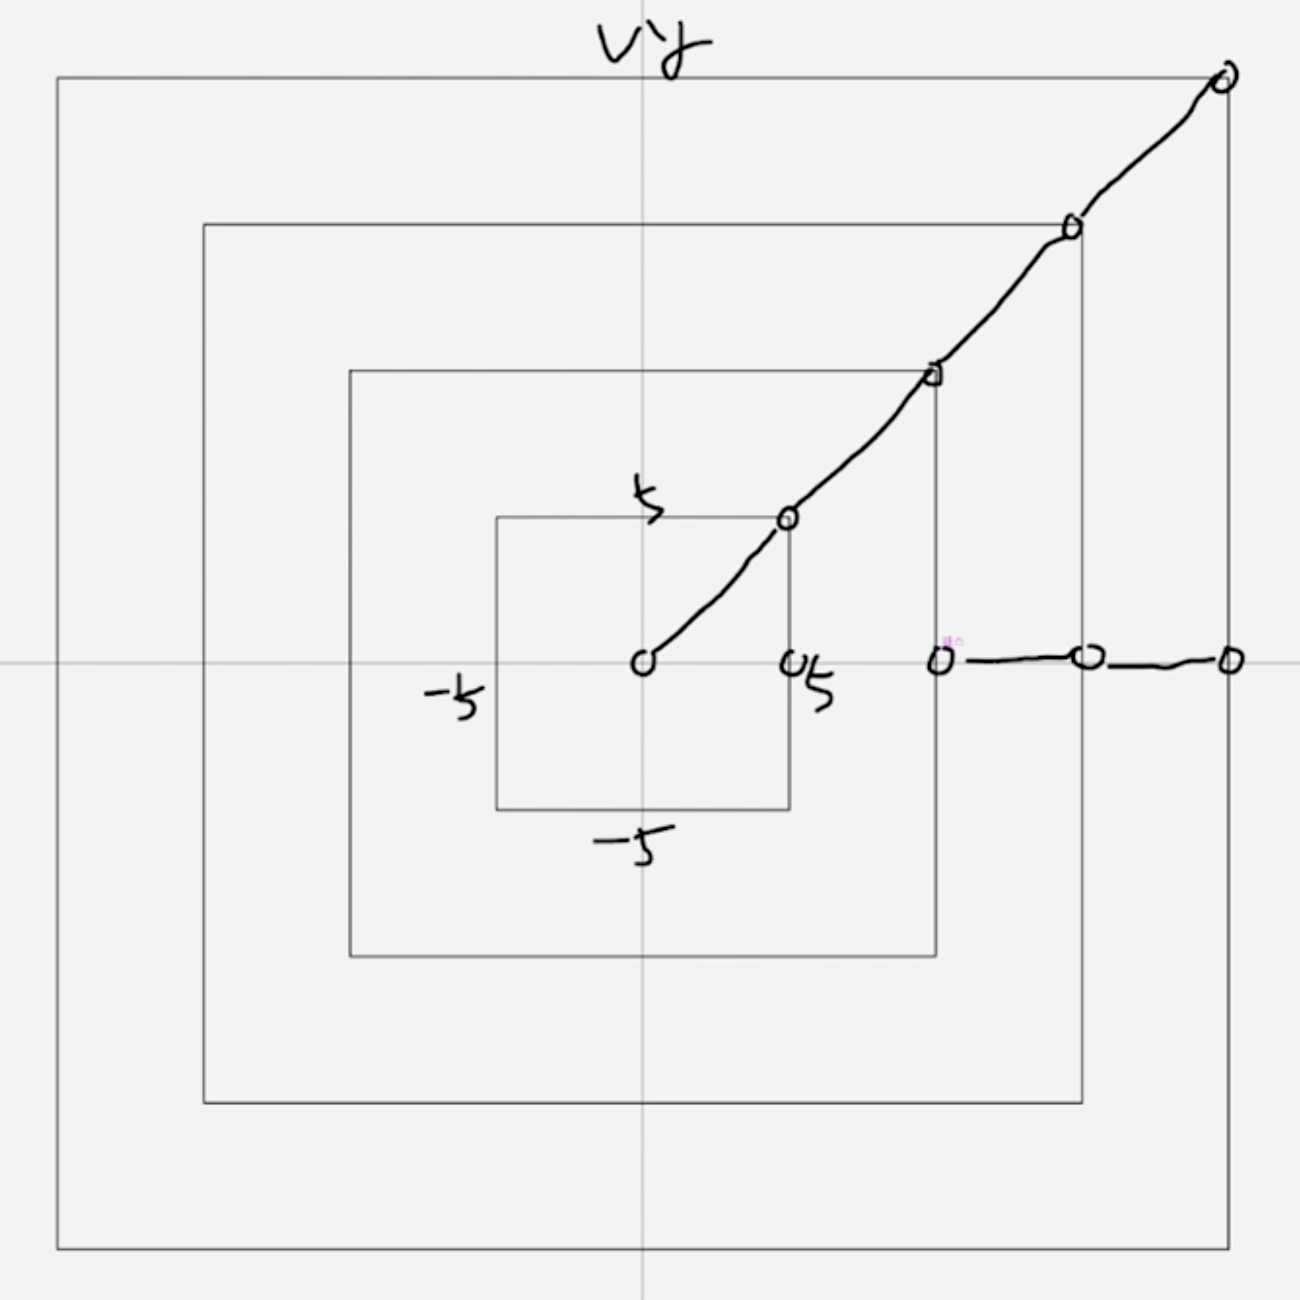
angle 은 올라갈 때 그냥 직선으로만 올라가면 심심하니까 불규칙 하게 올라갈 수 있도록 anle 값을 넣어주었다.
그리고 -1, 1 을 넘지 않는 이 그래프를 x 에 더해주면서 y 축을 쭉 더해주면 이제 좌우로 불규칙 하게 왔다리 갔다리 하면서 올라가는 tail 이 완성되는 것이다.
그리고 이를 바탕으로 앞서 Canvas 클래스에 작성한 함수들을 조금 손 보면 된다.
createTail(){
    const x = randomNumBetween(this.canvasWidth * 0.2, this.canvasWidth * 0.8);
    const vy = -this.canvasHeight * randomNumBetween(0.01, 0.015);
    const color = "255, 255, 255"
    this.tails.push(new Tail(x, vy, color));
}

createParticles = (x: number, y: number, color: string) => {
    const PARTICLE_NUM = 400;
    for (let i = 0; i < PARTICLE_NUM; i++) {
        const r = randomNumBetween(2, 100) * hypotenuse(innerWidth, innerHeight) * 0.0001;
        const angle = Math.PI / 180 * randomNumBetween(0, 360);
        const vx = r * Math.cos(angle);
        const vy = r * Math.sin(angle);
        const opacity = randomNumBetween(0.6, 0.9);
        this.particles.push(new Particle(x, y, vx, vy, opacity, color));
    }
};

render = () => {
    let now: number, delta: number;
    let then = Date.now();
    const frame = () => {
        requestAnimationFrame(frame);
        now = Date.now();
        delta = now - then;
        if( delta < this.interval ) return;
        this.ctx.fillStyle = this.bgColor + '20';
        this.ctx.fillRect(0, 0, this.canvasWidth, this.canvasHeight);

        if(Math.random()<0.03) this.createTail();

        this.tails.forEach((el: Tail, index: number)=>{
            el.update();
            el.draw();

            if(el.vy > -0.7){
                this.tails.splice(index, 1);
                this.createParticles(el.x, el.y, el.color);
            }
        })

        this.particles.forEach((el: Particle, index:number) => {
            el.update();
            el.draw();

            if (el.opacity < 0) this.particles.splice(index, 1);
        });

        then = now - (delta % this.interval);
    };
    requestAnimationFrame(frame);
}
우선 앞서 작성한 Tail 클래스의 인스턴스를 좌, 우가 짤리지 않도록 innerWidth 의 양쪽 20% 씩을 넉넉하게 잡아주고
vy 는 canvas 높이 값에서 random 값 혹은 friction 으로 멈추는 위치를 봐가면서 조절해주면 된다.
그리고 tail 의 x 값에서 터져야하니까 createParticle 에 인수를 넘겨주어 해당 위치에서 터질 수 있도록 해줬다.
마지막으로 Math.random()<0.03 로 대충 확률을 설정해주고
createTail 로 Tail 을 만들어줬다면 vy 가 거즘 정지될 때 즉, 엄청 큰 - 값이었다가 점점 0에 가까워 질 때 tails 배열에서 빼주고 해당 (x, y) 위치에서 터뜨려 주는 코드이다.
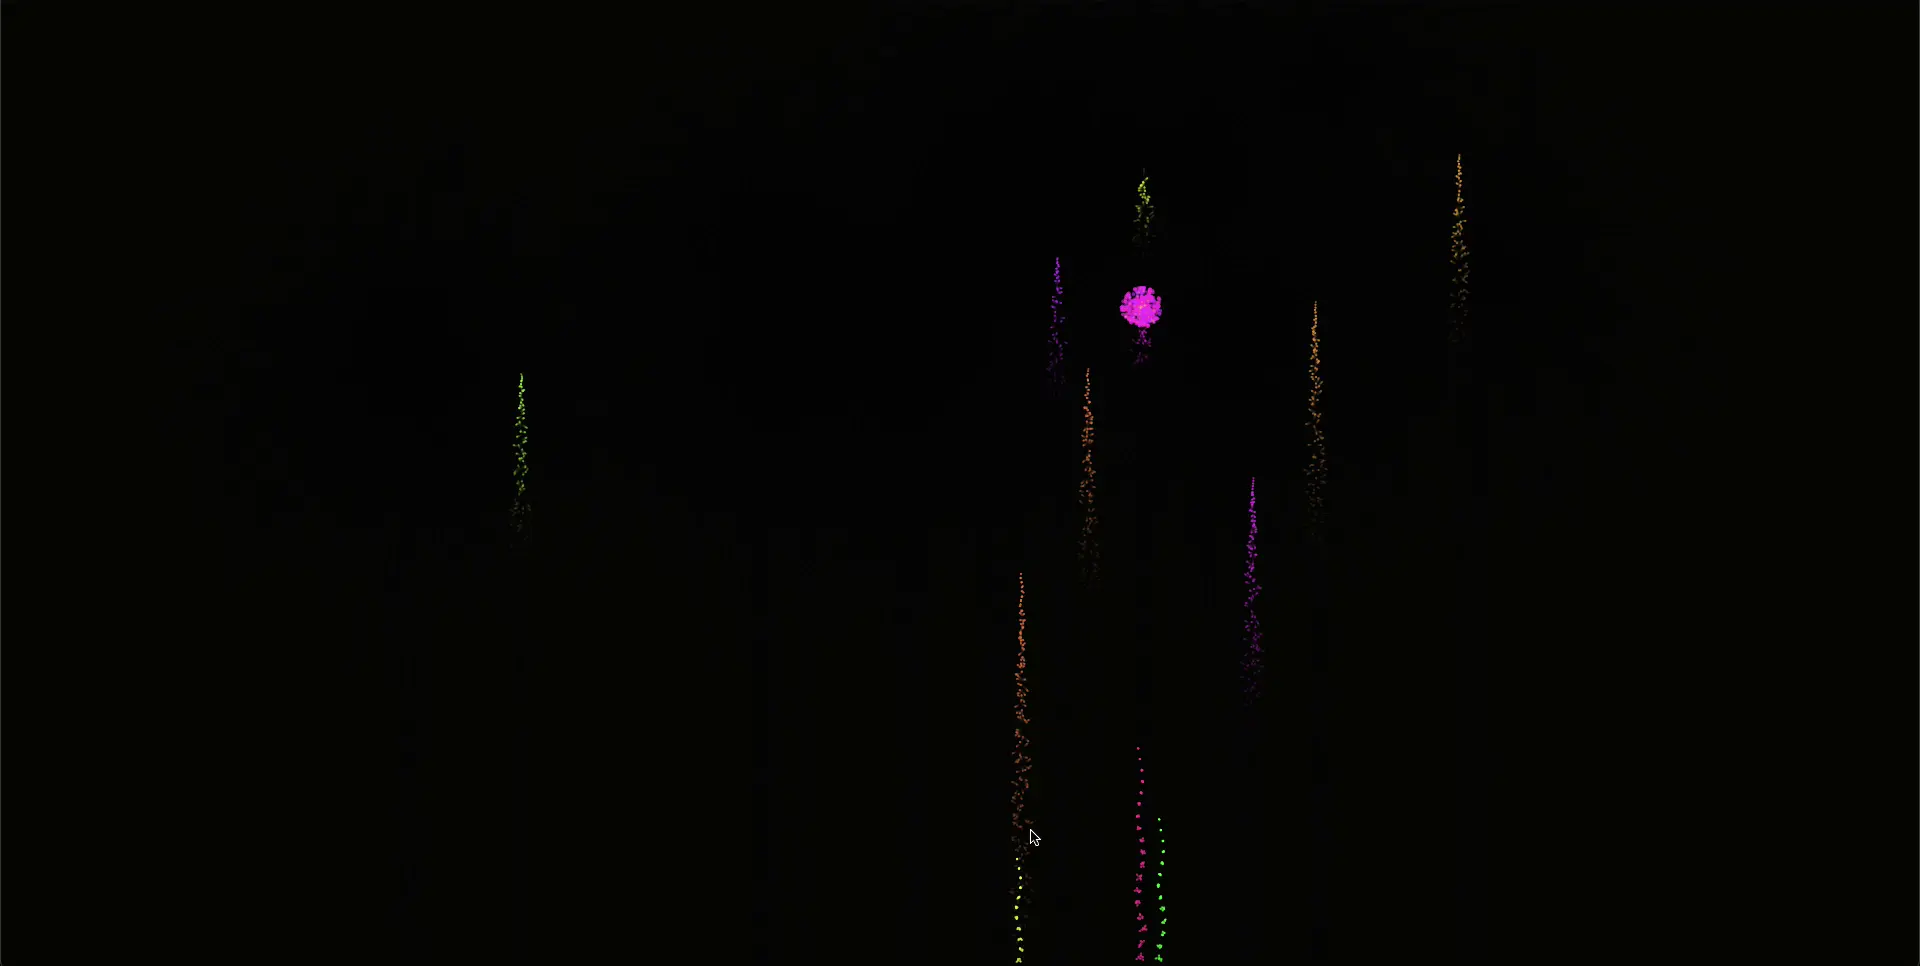
스파크 만들기
위 짤을 보면 충분히 아름답지만 뭔가 단조롭다. 그래서 색을 입히는 스파크를 구현해보자.
원리는 사실 Particle 과 굉장히 유사하다.
export default class Spark extends CanvasOption{
    x: number;
    y: number;
    vx: number;
    vy: number;
    opacity: number;
    colorDeg: number;
    constructor(x:number, y: number, vx: number, vy: number, opacity: number, colorDeg: number){
        super();
        this.x = x;
        this.y = y;
        this.vx = vx;
        this.vy = vy;
        this.opacity = opacity;
        this.colorDeg = colorDeg;
    }
    update=()=>{
        this.opacity -= 0.01;

        this.x += this.vx;
        this.y += this.vy;
    }
    draw=()=>{
        this.ctx.beginPath();
        this.ctx.arc(this.x, this.y, 1, 0, Math.PI * 2);
        this.ctx.fillStyle = `hsla(${this.colorDeg}, 100%, 65%, ${this.opacity})`;
        this.ctx.fill();
        this.ctx.closePath();
    }
}
이때, 여기서 random 값을 갖고 진행하면 더욱 이쁠 것 같은데 방법은 바로 HLS 를 사용하는 것이다.
HSL
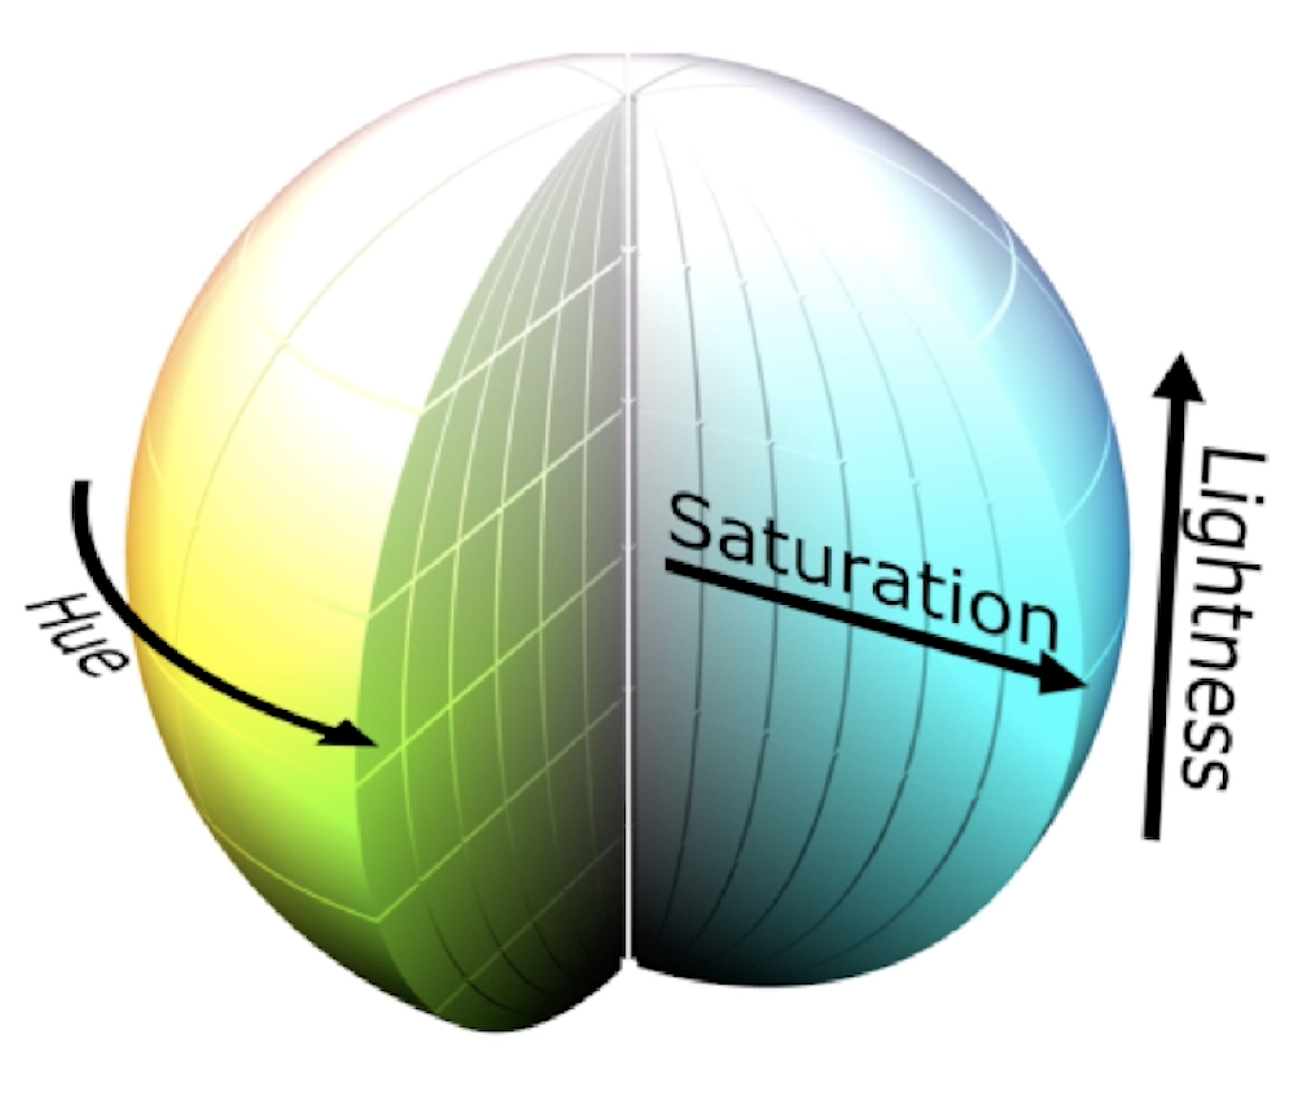
Hue, Saturation, Lightness 로
Hue: 0° ~ 360° 0° 는 빨간색을 뜻한다.
Saturation: 0% ~ 100% 범위를 갖으며 채도를 나타낸다. 0은 무채색이다.
Lightness: 0% ~ 100% 로 밝기를 나타낸다. 0 이 검정.
그리고 이를 토대로 render 함수를 수정해주면 된다.
render = () => {
    let now: number, delta: number;
    let then = Date.now();
    const frame = () => {
        requestAnimationFrame(frame);
        now = Date.now();
        delta = now - then;
        if( delta < this.interval ) return;
        this.ctx.fillStyle = this.bgColor + '20';
        this.ctx.fillRect(0, 0, this.canvasWidth, this.canvasHeight);

        // 터질 때 하늘을 조금 밝게 하였음
        this.ctx.fillStyle = `rgba(255, 255, 0, ${this.particles.length / 50000})`
        this.ctx.fillRect(0, 0, this.canvasWidth, this.canvasHeight);

        if(Math.random() < 0.03) this.createTail();

        this.tails.forEach((el: Tail, index: number)=>{
            el.update();
            el.draw();

            // 날아오를 때 그냥 날가면 단조로우니 주변에 스파크 추가
            // 개수는 정점에 도착할 수록 개수를 줄이기 위해 점점 줄어는 vy 선택, 배수(0.5)로 개수 조절
            for(let i = 0; i < Math.round(-el.vy * 0.5); i++){

                // 이리저리를 흝날리는 효과
                const vx = randomNumBetween(-5, 5) * 0.05;
                const vy = randomNumBetween(-5, 5) * 0.05;

              	// 스파크가 오래 남아있으면 안 되니까 최대한 작은 값, 최대 0.5 정도로 산정
                const opacity = Math.min(-el.vy, 0.5);
                this.sparks.push(new Spark(el.x, el.y, vx, vy, opacity, el.colorDeg));
            }

            if(el.vy > -0.7){
                this.tails.splice(index, 1);
                this.createParticles(el.x, el.y, el.colorDeg);
            }
        })

        this.particles.forEach((el: Particle, index:number) => {
            el.update();
            el.draw();

            // 스파크 개수 조절
            if(Math.random() < 0.1){
                this.sparks.push(new Spark(el.x, el.y, 0, 0, 0.3, 45));
            }

            if (el.opacity < 0) this.particles.splice(index, 1);
        });

        this.sparks.forEach((el:Spark, index: number)=>{
            el.update();
            el.draw();

            if(el.opacity < 0)this.sparks.splice(index, 1);

        });
        then = now - (delta % this.interval);
    };
결과물


역시 3대 150 쩡우님이십니다!! 잘보고 퍼가요!!