인터셉터
인터셉터는 @Injectable() 주석이 달린 클래스이며 NestInterceptor 인터페이스를 구현합니다.
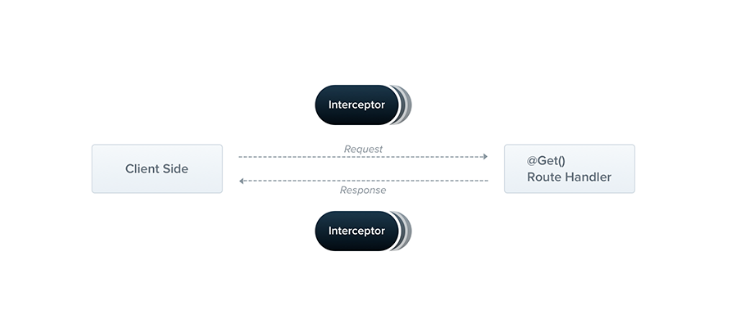
인터셉터에는 AOP(Aspect Oriented Programming) 기술에서 영감을 받은 일련의 유용한 기능이 있습니다.
- 메서드 실행 전/후에 추가 로직 바인딩
- 함수에서 반환된 결과 반환
- 함수에서 발생한 예외 반환
- 기본 기능 동작 확장
- 특정 조건에 따라 함수를 완전히 재정의합니다.(예: 캐싱 목적)
인터셉터를 만들어 보도록 하겠습니다.
success.interceptor.ts
import {
  CallHandler,
  ExecutionContext,
  Injectable,
  NestInterceptor,
} from '@nestjs/common';
import { Observable, tap } from 'rxjs';

@Injectable()
export class SuccessInterceptor implements NestInterceptor {
  intercept(
    context: ExecutionContext,
    next: CallHandler<any>,
  ): Observable<any> | Promise<Observable<any>> {
    console.log('before');
    const now = Date.now();
    return next
      .handle()
      .pipe(tap(() => console.log(`after... ${Date.now() - now}ms`)));
    // throw new Error('Method not implemented.');
  }
}
이제 컨트롤러에 추가해보도록 하겠습니다.
@Controller()
@UseInterceptors(SuccessInterceptor)
export class AppController {
  // ... 생략
}
api를 호출하게 되면 해당 결과가 나오게 됩니다.

여기서 'api hello in'은 컨트롤러 안에 로그를 찍었습니다.
이렇게 인터셉터가 컨트롤러에 의존성 주입이 되어서 컨트롤러 로직 앞 뒤에 로그를 남기는 것을 확인할 수 있습니다.
해당 게시글은 "NestJS 공식 홈페이지"와
인프런 강의 "탄탄한 백엔드 NestJS, 기초부터 심화까지(윤상석)"을 참고하여 만들었습니다.
성장하는, 나눌 줄 아는 개발자