글을 시작하며
안녕하세요, 단테입니다.
어느덧 7강입니다.
지금까지 공부하시느라 수고 많으셨습니다.
우리 좀만 더 달려봅시다.
오늘 배울 주제는 대단히 중요합니다.
규모가 큰 프로그램일수록 코드를 구조화 하고 나누는 작업은 필수 불가결한 작업이 되기 때문에
모듈화는 언어 사용에 있어 하나의 주요 기능으로 소개될 만큼 잘 알고 있어야 합니다.
왜 모듈화가 필수 불가결한데요?
여러분은 코드를 작성할 때 가장 중요하게 여기는 부분이 무엇인가요?
에러가 작은 코드? 경량화된 코드?
여러 관점에서 대단히 다양한 답변이 나올 수 있겠습니다만, 내가 작성하는 코드의 구조가 과거 / 현재 / 미래에 걸쳐서 어느 시점에서 보아도 변경이 용이한지의 여부가 제가 생각하는 가장 중요한 부분입니다.
멀티 패러다임 언어이든, 그렇지 않든 언어로 작성된 프로그램의 사이즈가 커질수록 객체지향에서 비롯된 다양한 패턴들을 담습하거나 모방할 수밖에 없게 되기 때문에 엔터프라이즈 프로그램을 작성하는데 있어서 변경 용이성은 꼭 달성해야 할 과제입니다.
코드를 잘게 나누어 다른 파일에 배치하고 적절한 디렉토리에 저장하는 것만으로도 모듈화의 많은 부분을 달성할 수 있습니다.
우리가 작성하는 하나의 패키지는 많은 바이너리 crates와 또 다른 library crate를 가지고 있습니다.
이 패키지가 커질수록 더 작은 create로 잘게 나누는 작업이 필요할 것입니다.
Crate
앞서 등장했던 crate(크레이트)는 러스트 컴파일러가 한번에 해석하는 러스트 코드의 단일 집합체입니다.
다른 프로그래밍 언어에서의 모듈이나 패키지와 동일한 개념으로 하나의 크레이트는 여러 모듈을 가지고 있을 수 있습니다.
이런 크레이트의 버전은 Cargo.toml 파일에 명시하여 의존성을 관리할 수 있습니다. 마치 자바스크립트의 package.json 처럼요.
러스트 생태계에는 npm registry와 같은 crates.io라는 라이브러리 저장소가 있습니다.
러스트에서 crate는 고유의 이름으로 식별되며 새로운 crate를 생성할 때는 cargo new 명령어를 사용합니다. my_crate라는 이름의 라이브러리를 만들고 싶다면 다음처럼 해주면 되겠습니다.
cargo new my_crate --lib하나의 crate는 여러 모듈의 집합소이고 이 crate를 사용해 모듈화된 코드를 재사용할 수 있습니다.
binary crate
바이너리 크레이트는 CLI 나 서버에서 컴파일하고 실행할 수 있는 프로그램입니다. 각 크레이트에는 main 함수를 정의해야하며 여태까지 봤었던 코드들은 모두 binray crate입니다.
library crate
library crate는 이와 반대로 main 함수가 없습니다. 그리고 실행가능하게 컴파일되지 않습니다. 그저 다른 프로젝트에서 공유되어 사용될 수 있게 기능을 정의해둡니다.
crate root
crate root는 러스트 컴파일러가 crate의 root module을 만들때 가장 먼저 해석을 시작하는 파일입니다.
package
패키지는 하나 이상의 크레이트가 모여 기능을 제공하는 집합입니다. 이 패키지는 Cargo.toml 파일을 가지고 있으며 이 파일에서 어떻게 crate를 빌드해야 하는지 결정합니다. Cargo 또한 CLI 환경에서 구동가능하게 만들어진 패키지로 binary crate도 있고 라이브러리 crate도 있습니다.
패키지는 여러 바이너리 크레이트를 가질 수 있지만, 라이브러리 크레이트는 최대 한개만 가질 수 있습니다.
그리고 종류와 상관없이 최소 한개 이상의 crate를 가지고 있어야 합니다.
$ cargo new my-project
     Created binary (application) `my-project` package
$ ls my-project
Cargo.toml
src
$ ls my-project/src
main.rs
위처럼 새로운 패키지를 만든 후에 파일 경로를 보면 Cargo.toml이 있습니다. 별도의 엔트리 포인트를 설정해주지 않는다면 src/main.rs 를 바이너리 crate의 crate root로 간주합니다. 또한 src/lib.rs가 있다면 이 파일을 라이브러리 crate의 root로 간주합니다. Cargo는 crate root 파일을 rustc를 이용해 라이브러리나 바이너리로 빌드합니다.
src/main.rs, src/lib.rs가 같이 패키지 내부에 있다면 두 개의 crate가 생성됩니다.
패키지의 src/bin 폴더에 여러 파일을 만듬으로 여러 binary crate를 가질 수 있습니다.
러스트 모듈 시스템
러스트에서는 use keyword 사용해 특정 항목을 스코프로 가져올 수 있습니다.
crate 를 컴파일 할 때 컴파일러는 crate root파일을 살펴봅니다. `
- library crate일 경우
src/lib.rs - binary crate일 경우
sr/main.rs
crate root파일에 모듈을 선언해봅시다.
러스트에서 모듈을 작성할 때는 mod 키워드를 사용하며 컴파일러는 다음의 경로를 같이 살펴봅니다.
mod garden으로 정의된 중괄호 내부- src/garden.rs
- src/garden/mod.rs
서브 모듈
러스트에서 crate root가 아니라면 어떤 곳에서도 submodule을 선언할 수 있습니다.
러스트 컴파일러는 parent 모듈의 이름이 있는 디렉토리 아래의 다음 이름에서 서브 모듈을 찾습니다.
parent 모듈은 parent_module, 서브 모듈은 submodule 이라는 이름을 가지고 있다고 합시다.
- parent_module이 선언된 곳에서
mode submodule {}내부에 선언된 코드들
// parent_module
mod submodule {
    fn my_module() {
        println!("this is my_module function");
    }
}- 서브 모듈과 동일한 이름을 가진 파일
// parent_module
mod submodule

// submodule.rs
fn my_module() {
        println!("this is my_module function");
}- mod.rs로 작성된 파일
// parent_module
mod submodule

// submodule/mod.rs
fn my_module() {
        println!("this is my_module function");
}
두번째 방법으로 작성해봅시다.
parent_module에 대한 서브모듈 submodule을 정의한다고 가정하면
submodule.rs 파일을 작성합니다.
// submodule.rs

fn submodule_function() {
    // submodule function code goes here
}
그리고 parent module에서 mod 키워드를 사용해 서브모듈이 정의된 파일의 path를 명시합니다.
// parent_module.rs

mod submodule;

fn parent_function() {
    // parent function code goes here
}
참조하기
이를 메인 함수에서 사용하기 위해 다음 처럼 :: double colon을 사용해 참조합니다.
use parent_module::submodule;

fn main() {
    submodule::submodule_function();
}
submodule에 정의되어있는 모든 정의들을 사용하고 싶다면 다음 처럼 *를 사용해 스코프로 가져옵니다.
use parent_module::submodule::*;

fn main() {
    submodule_function();
}
binary crate를 실제로 만들어보자.
아래와 같은 backyard binary crate를 만들어봅시다.
backyard
├── Cargo.lock
├── Cargo.toml
└── src
    ├── garden
    │   └── vegetables.rs
    ├── garden.rs
    └── main.rs
src/main.rs
// src/main.rs
use crate::garden::vegetables::Asparagus;

pub mod garden;

fn main() {
  let plant = Asparagus {};
  println!("I'm growing {:?}!", plant);
}
binary crate이기 때문에 main.rs에 메인 함수를 선언해주어야 합니다.
use crate::garden::vegetables::Asparagus;를 선언해 vegetables 서브 모듈의 Asparagus struct를 메인 함수의 스코프 내부에서 사용할 수 있게 합니다.
pub mod garden은 컴파일러에게 모듈이 src/garden.rs에 있는 코드를 포함하라고 알려줍니다.
src/garden.rs
pub mod vegetablesgarden.rs 파일에는 pub mod vegetables를 선언해 서브 모듈이 선언된 src/garden/vegetables.rs 또한 포함되어야 한다는 사실을 말해줍니다.
src/garden/vegetables.rs
pub struct Asparagus {}private vs public
러스트 모듈은 공개 범위를 설정할 수 있고 이를 privacy라고 합니다.
privacy가 private으로 ㅅ너언된 아이템들은 그들이 정의된 모듈 내부에서만 사용할 수 있습니다.
모듈에 선언된 각 코드들은 item 이라고 하며 이 item들은 별도의 추가 키워드와 함께 선언되지 않으면 기본적으로 private으로 설정됩니다.
private 정의는 모듈 내부에 구현된 아이템이 실수로 외부에서 수정되지 않도록 도와줍니다.
public 아이템/모듈로 만들고 싶다면 pub mod 키워드를 사용해야 합니다. 이를 통해 외부 코드가 여러분이 작성한 코드를 의존하게 만들 수 있습니다.
mod front_of_house {
  pub mod hosting {
    pub fn add_to_waitlist() {}

    pub fn seat_at_table() {}
  }
}
예제에서 hosting과 내부 아이템인 함수들은 pub 키워드를 통해 정의되었고 front_of_house 외부에서 참조될 수 있습니다.
front_of_house::hosting::function_name`pub mod front_of_house {
pub mod hosting {
pub fn add_to_waitlist() {}
fn seat_at_table() {}
}
}위의 예제에서 add_to_waitlist 함수는 public privacy를 가지고 있고 seat_at_table은 private privacy를 가지고 있습니다. seat_at_table은 hosting 모듈 외부에서 사용될 수 없습니다.
module tree
src/main.rs, src/lib.rs를 crate root라고 부르는 이유는 각 crate root 파일들이 crate라고 하는 모듈 구조를 만듭니다. 이 모듈 구조를 우리는 module tree라고 합니다.
crate
 └── front_of_house
     ├── hosting
     │   ├── add_to_waitlist
     │   └── seat_at_table
     └── serving
         ├── take_order
         ├── serve_order
         └── take_payment
위의 트리에서는 모듈이 서로 다른 서브 모듈을 어떻게 포함하는지 보여줍니다.
hosting 모듈은 front_of_house 모듈에 있습니다. hosting 모듈은 serving 모듈이라는 형제를 가지고 있습니다. hosting 모듈은 front_of_house 모듈의 child 입니다.
front_of_house모듈은 hosting 모듈의 parent입니다.
mod front_of_house {
    mod hosting {
        fn add_to_waitlist() {}

        fn seat_at_table() {}
    }

    mod serving {
        fn take_order() {}

        fn serve_order() {}

        fn take_payment() {}
    }
}

mod kitchen {
    fn prepare_food() {}

    fn cook_food() {}

    fn clean_up() {}
}
위 예제에서 front_of_house 와 kitchen은 top-level 모듈입니다.
hosting, serving은 front_of_house의 서브 모듈이며 각 모듈은 내부에 함수를 item으로 가지고 있습니다.
paths
러스트가 참조되는 아이템을 모듈 트리 어디에서 찾는지 알아보겠습니다.
absolute path
절대 경로는 crate root에서 부터 시작합니다. crate name으로 시작하며 crate::로 선언되는 path는 absolute path입니다.
relative path
상대 경로는 현재 모듈로부터의 경로는 self, super를 사용함으로 사용할 수 있습니다.
// src/lib.rs
mod front_of_house {
    mod hosting {
        fn add_to_waitlist() {}
    }
}

pub fn eat_at_restaurant() {
    // Absolute path
    crate::front_of_house::hosting::add_to_waitlist();

    // Relative path
    front_of_house::hosting::add_to_waitlist();
}
eat_at_restaurant 함수는 library crate의 public api 이기 때문에 pub 키워드로 선언이 되었습니다. front_of_house의 모듈 내부의 아이템인 add_to_waitlist 함수를 사용하기 위해 절대경로를 사용했습니다.
crate::front_of_house::hosting::add_to_waitlist();
여기서 crate::front_of_house는 파일 디렉토리에서 /front_of_house와 동일합니다.
add_to_waitlist 의 두번째 참조는 상대경로를 사용하는 경우입니다. 동일 레벨에서 선언된 모듈을 사용했습니다. 이는 front_of_house/hosting/add_to_waitlist와 같이 참조하는 것과 동일합니다.
하지만 앞서 선언한 예제는 컴파일 시 에러가 발생합니다.
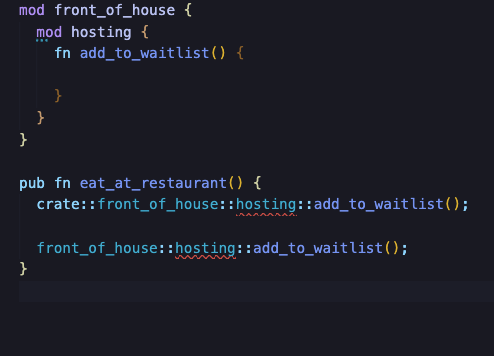
hosting 모듈은 상위 모듈에 대해 기본적으로 private 하기 때문에 아래와 같이 사용해야 합니다.
상위 모듈은 내부 모듈의 private 아이템을 사용할 수 없습니다. 하지만 하위 모듈은 부모 모듈의 아이템을 사용할 수 있습니다.
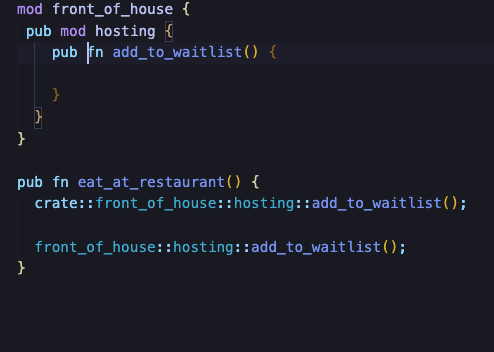
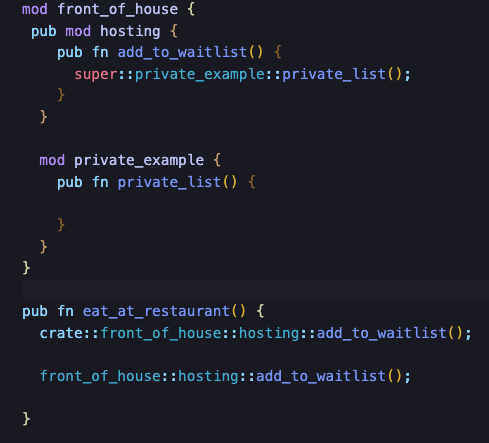
mod front_of_house {
 pub mod hosting {
    pub fn add_to_waitlist() {
      super::private_example::private_list();
    }
  }

  mod private_example {
    pub fn private_list() {

    }
  }
}

pub fn eat_at_restaurant() {
  crate::front_of_house::hosting::add_to_waitlist();

  front_of_house::hosting::add_to_waitlist();

}
위 코드는 아래와 같이 컴파일 에러가 발생하지 않습니다. private_example이 private일지라도 add_to_waitlist에서 부모 모듈의 아이템인 private_example::private_list를 사용할 수 있습니다.
use
정의한 모듈을 매번 double colon ::를 사용하는 것 보다 더 간편한 방법은 use 키워드를 사용하는 것입니다.
// src/lib.rs
mod front_of_house {
  pub mod hosting {
      pub fn add_to_waitlist() {}
  }
}

use crate::front_of_house::hosting;

pub fn eat_at_restaurant() {
    hosting::add_to_waitlist();
}
use crate::front_of_house::hosting을 crate root에 선언함으로써 hosting은 이제 스코프 내부에서 사용할 수 있게 되었습니다.
use가 유효한 스코프
use는 오직 특정 스코프 내부에만 단축 path를 사용할 수 있게 도와줍니다.
mod front_of_house {
    pub mod hosting {
        pub fn add_to_waitlist() {}
    }
}

use crate::front_of_house::hosting;

mod customer {
    pub fn eat_at_restaurant() {
        hosting::add_to_waitlist();
    }
}
위 코드를 빌드할 시 다음과 같은 에러가 발생합니다.
error[E0433]: failed to resolve: use of undeclared crate or module `hosting`
  --> src/lib.rs:11:9
   |
11 |         hosting::add_to_waitlist();
   |         ^^^^^^^ use of undeclared crate or module `hosting`

warning: unused import: `crate::front_of_house::hosting`
 --> src/lib.rs:7:5
  |
7 | use crate::front_of_house::hosting;
  |     ^^^^^^^^^^^^^^^^^^^^^^^^^^^^^^
  |
  = note: `#[warn(unused_imports)]` on by default

For more information about this error, try `rustc --explain E0433`.
warning: `playground` (lib) generated 1 warning
error: could not compile `playground` due to previous error; 1 warning emitted
이를 해결하기 위해서는 customer 모듈 내부에서 use 키워드를 사용하거나 super::hosting과 같이 parent module 참조를 사용해야 합니다.
use 키워드 사용에 대한 convention
가 - use crate::front_of_house::hosting;
mod front_of_house {
    pub mod hosting {
        pub fn add_to_waitlist() {}
    }
}

use crate::front_of_house::hosting;

pub fn eat_at_restaurant() {
    hosting::add_to_waitlist();
}
eat_at_restaurant 바디에서 hosting::add_to_waitlist와 같이 함수를 참조하기 위해 hosting까지만 use 키워드를 사용했습니다.
나 - use crate::front_of_house::hosting::add_to_waitlist;
mod front_of_house {
    pub mod hosting {
        pub fn add_to_waitlist() {}
    }
}

use crate::front_of_house::hosting::add_to_waitlist;

pub fn eat_at_restaurant() {
    add_to_waitlist();
}
위의 예제에서는 eat_at_restaurant에서 add_to_waitlist와 같이 hosting::를 생략하기 위해서 use 키워드로 hosting::add_to_waitlist까지 작성했습니다.
A 모듈에서 B 모듈의 함수를 사용할 때 상위 모듈을 참조하는 것이 로컬 함수를 사용하는 것과 명확히 구분되기 때문에 첫번째 예제 가와 같이 사용하는 것이 좋습니다.
다른 상황을 보겠습니다.
다음처럼 structs, enums와 같은 item을 use 키워드를 사용해 가져올 때는 full path를 가져오는 것이 좋습니다.
use std::collections::HashMap;

fn main() {
  let mut map = HashMap::new();
  map.insert(1,2);
}
동일한 이름의 item을 동일 스코프에서 사용한다면?
다른 모듈에서 선언된 동일한 이름의 아이템 Result를 사용하려면 상위 모듈의 path를 선언한 후 참조해서 사용해야 합니다.
use std::fmt;
use std::io;

fn function1() -> fmt::Result {
    // --snip--
}

fn function2() -> io::Result<()> {
    // --snip--
}
또 다른 해결방안은 as 키워드와 함께 사용하는 것입니다. 자바스크립트의 as가 떠오르죠?
use std::fmt::Result;
use std::io::Result as IoResult;

fn function1() -> Result {
    // --snip--
}

fn function2() -> IoResult<()> {
    // --snip--
}
re-exporting
// src/lib.rs
mod front_of_house {
    pub mod hosting {
        pub fn add_to_waitlist() {}
    }
}

pub use crate::front_of_house::hosting;

pub fn eat_at_restaurant() {
    hosting::add_to_waitlist();
}
외부 스코프에서 hosting을 사용하기 위해서는 restaurant::front_of_hoㅕse::hosting::add_to_waitlist()로 호출해야 합니다.
이를 간편하게 하기 위해 pub use키워드를 사용해 re-exporting 기법을 적용한다면 restaurant::hosting::add_to_waitlist()와 같이 줄여서 호출할 수 있습니다.
외부 패키지 사용하기
rand 의존성을 내부 패키지에서 사용하고 싶다면
Cargo.toml에 다음과 같이 버전과 함께 명시해야 합니다.
Cargo.toml
rand = "0.8.5"use rand::Rng;
fn main() {
let secret_number = rand::thread_rng().gen_range(1..=100);
}std 라이브러리도 위의 main 함수가 선언된 패키지에서는 외부 패키지입니다.
use std::collections::HashMap;간편하게 선언해서 사용하기
// --snip--
use std::cmp::Ordering;
use std::io;
// --snip--
use std::io;
use std::io::Write;
위 코드는 아래와 같이 한줄로 표현할 수 있습니다.
use std::{cmp::Ordering, io};
use std::io::{self, Write};
모듈 분리하기
한 파일에 모두 작성되어 있는 모듈을 여러 파일에 나누어 분리해보겠습니다.
아래와 같이 crate root 내부에서 다른 파일에 선언된 front_of_house 모듈을 사용하기 위해서는 해당 모듈에 다른 파일에 작성해야 합니다.
// src/lib.rs
mod front_of_house;

pub use crate::front_of_house::hosting;

pub fn eat_at_restaurant() {
  hosting::add_to_waitlist();
}
src/front_of_house.rs 에 작성합니다.
pub mod hosting {
  pub fn add_to_waitlist() {}
}
mod는 다른 언어의 include, import와 같은 명령어가 아닙니다.
모듈 트리 내부에서 한번만 mod 명령어를 사용하면 컴파일러는 파일이 프로젝트 내부에 있는 것을 알게 됩니다.
hosting 모듈은 src/front_of_house/housing.rs에 선언하겠습니다.
hosting 모듈을 옮기기에 앞서서 src/front_of_house.rs에 hosting 모듈을 선언합니다.
// src/front_of_house.rs
pub mod hosting; // src/front_of_house/hosting.rs
pub fn add_to_waitlist() {}hosting.rs를 src 디렉토리에 위치 시키면 컴파일러는 hosting.rs 코드가 hosting 모듈이 crate root에 선언된 모듈이라고 생각하지 front_of_house 모듈의 하위 모듈이라고 생각하지 않습니다. 특정 모듈의 하위 모듈은 해당 모듈의 이름으로 만들어진 디렉토리 하위 패스에 놓여야 합니다.
글을 마무리하며
오늘 내용은 좀 길었죠?
러스트 언어로 프로그램을 작성하면서 꼭 알고 있어야 할 내용이므로 어쩔 수 없이 내용이 길어졌습니다.
여기까지 함께 공부하시느라 너무 수고하셨습니다.
다음 포스팅에서 뵙겠습니다.
메리크리스마스!