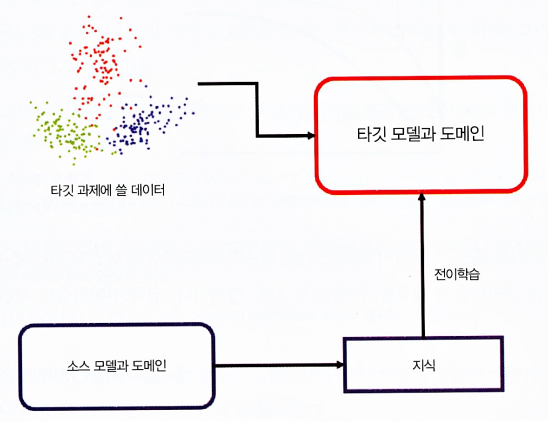
전이학습이란?
- 전이학습 정의 : 한 설정에서 학습한 것을 다른 설정의 일반화를 개선하기 위해 활용 하는 것
- 소스과제에서 습득한 지식을 타깃 과제 학습 시 추가로 입력
전이학습 방법
- 딥러닝 시스템은 전통적인 머신러닝 시스템보다 더 많은 훈련 시간과 데이터의 양이 필요
- 다양한 최첨단의 딥러닝 네트워크가 컴퓨터 비전 및 자연어 처리(NLP)와 같은 영역 전반에서 개발되고 테스트 됨
- 대부분의 경우 팀/연구자는 다른 사람들이 사용할 수 있도록 이러한 네트워크의 세부 사항을 공유
- 사전 훈련된 네트워크/모델은 딥러닝 맥락에서 전이학습의 기초가 됨
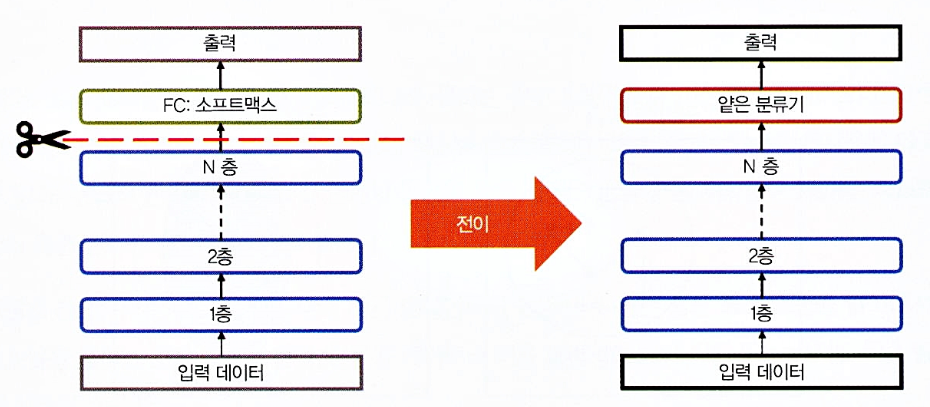
특성 추출
- 딥러닝의 체계는 서로 다른 층에서 서로 다른 특성을 학습하는 층이 있는 아키텍처
- 이 층은 최종 출력을 얻기 위해 마지막 층(분류의 경우 보통 전체가 연결된 층)에 연결
- 이 층 아키텍처 덕분에 최종 층에서 고정된 특성 추출기 없이 사전 훈련된 네트워크(V3 or VGG같은 모델)를 활용해 작업할 수 있음
- 아래 그림은 특성 추출을 기반으로 한 심층 전이를 표현한 것
미세 튜닝
- fine turning은 좀 더 복잡한 기술로, 단순히 최종 층을 대체하는 것뿐만 아니라 이전층의 일부를 선택적으로 재훈련시키기도 함
- 심층 신경망은 다양한 하이퍼 파라미터를 통해 변경이 가능한 아키텍처
- 초기 층은 일반적인 특성을 포착하는 반면, 나중 층은 특정 작업에 더 초점을 맞춤
- 재훈련하는 동안 특정 층을 고정(가중치를 고정)하거나 필요에 맞게 나머지 층을 미세 튜닝할 수 있음
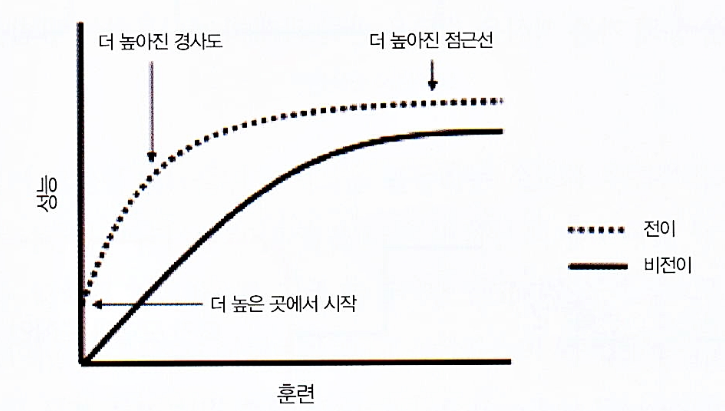
- 이 경우 네트워크의 전체 아키텍처 지식을 활용해 재훈련 단계의 시작점으로 사용
- 이는 더 적은 학습 시간으로 더 나은 성과를 달성하는데 도움이 됨
사전 훈련 모델
- 전이학습의 기본 요구사항 중 하나는 소스 과제에서 잘 수행된 모델이 존재해야 한다는 것
- 사전 훈련된 모델은 보통 모델이 안정된 상태로 훈련되는 동안 모델이 가진 수백만 개의 파라미터/가중치 형태로 공유됨
- VGG16, InceptionV3와 같이 사전 훈련된 다양한 모델을 케라스에서 내려받을 수 있음
실습
- 강아지, 고양이 사진 판별하기
훈련 데이터 읽기(검증 데이터 세트)
# zipfile를 통해서 압축을 해제
# data 폴더에 해당 내용을 압축 해제한다.
zip_file = zipfile.ZipFile("./dog_cat.zip", "r")
extract_dir = "./data"
zip_file.extractall(extract_dir)
# training set를 만들기 위해서 압축된 폴더에서 강아지, 고양이 사진을 별도로 읽는다.
# (강아지 사진 4005, 고양이 사진 4000장)
IMG_DIM = (150, 150)
train_files = glob.glob('./[사진저장경로]/*.jpg')
train_dogs_imgs = [img_to_array(load_img(img, target_size=IMG_DIM)) for img in train_files]
train_files = glob.glob('./[사진저장경로]/*.jpg')
train_cats_imgs = [img_to_array(load_img(img, target_size=IMG_DIM)) for img in train_files]
train_imgs = np.concatenate((np.array(train_dogs_imgs), np.array(train_cats_imgs)))# label 데이터 만들기
train_dogs_label = np.ones(len(train_dogs_imgs))
train_cats_label = np.zeros(len(train_cats_imgs))
train_label = np.concatenate((train_dogs_label, train_cats_label))# 강아지 사진 4005장, 고양이 사진 4000장 사진인지 확인한다.
print (train_dogs_imgs.__len__())
print (train_cats_imgs.__len__())
4005
4000# index 번호 4005부터는 고양이 사진이 시작된다.
array_to_img(train_imgs[4005])
테스트 데이터 읽기
# test set를 만들기 위해서 압축된 폴더에서 강아지, 고양이 사진을 별도로 읽는다.
IMG_DIM = (150, 150)
test_files = glob.glob('[사진저장경로]/*.jpg')
test_dogs_imgs = [img_to_array(load_img(img, target_size=IMG_DIM)) for img in test_files]
test_files = glob.glob('[사진저장경로]/*.jpg')
test_cats_imgs = [img_to_array(load_img(img, target_size=IMG_DIM)) for img in test_files]
test_imgs = np.concatenate((np.array(test_dogs_imgs), np.array(test_cats_imgs)))
test_imgs_scaled = test_imgs.astype('float32')
test_imgs_scaled /= 255


# label 데이터 만들기
test_dogs_label = np.ones(len(test_dogs_imgs))
test_cats_label = np.zeros(len(test_cats_imgs))
test_label = np.concatenate((test_dogs_label, test_cats_label))
print (test_imgs_scaled.shape)
print (test_label.shape)
(2023, 150, 150, 3)
(2023,)## 훈련데이터, 검정데이터 나누기
from sklearn.model_selection import train_test_split
X_train, X_val, y_train, y_val = train_test_split(train_imgs_scaled, train_label, test_size=0.2, random_state=42)모델 설계
batch_size = 32
epochs = 10
input_shape = (150, 150, 3)

from tensorflow.keras.layers import Conv2D, MaxPooling2D, Flatten, Dense, Dropout
from tensorflow.keras.models import Sequential
from tensorflow.keras import optimizers

model = Sequential()

model.add(Conv2D(16, kernel_size=(3, 3), activation='relu',
                 input_shape=input_shape))
model.add(MaxPooling2D(pool_size=(2, 2)))

model.add(Conv2D(64, kernel_size=(3, 3), activation='relu'))
model.add(MaxPooling2D(pool_size=(2, 2)))

model.add(Conv2D(128, kernel_size=(3, 3), activation='relu'))
model.add(MaxPooling2D(pool_size=(2, 2)))

model.add(Flatten())
model.add(Dense(512, activation='relu'))
model.add(Dense(1, activation='sigmoid'))


model.compile(loss='binary_crossentropy',
              optimizer=optimizers.RMSprop(),
              metrics=['accuracy'])

model.summary()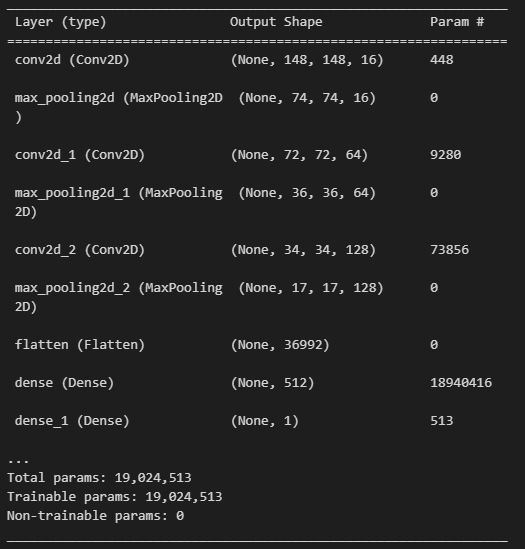
print (f"conv2d의 파라미터수  -> {3 * 3 * 3 * 16 + 16}")
print (f"두번째 conv2d의 파라미터수  -> {16 * 3 * 3 * 64 + 64}")
print (f"세번째 conv2d의 파라미터수  -> {64 * 3 * 3 * 128 + 128}")
print (f"flatten으로 펼치면 -> {17 * 17 * 128}")

conv2d의 파라미터수  -> 448
두번째 conv2d의 파라미터수  -> 9280
세번째 conv2d의 파라미터수  -> 73856
flatten으로 펼치면 -> 36992train_imgs_scaled.shape
(8005, 150, 150, 3)# Keras 모델을 사용하여 딥 러닝 모델을 학습
history = model.fit(x=X_train, y=y_train,
validation_data=(X_val, y_val),
batch_size=batch_size,
epochs=epochs,
verbose=1)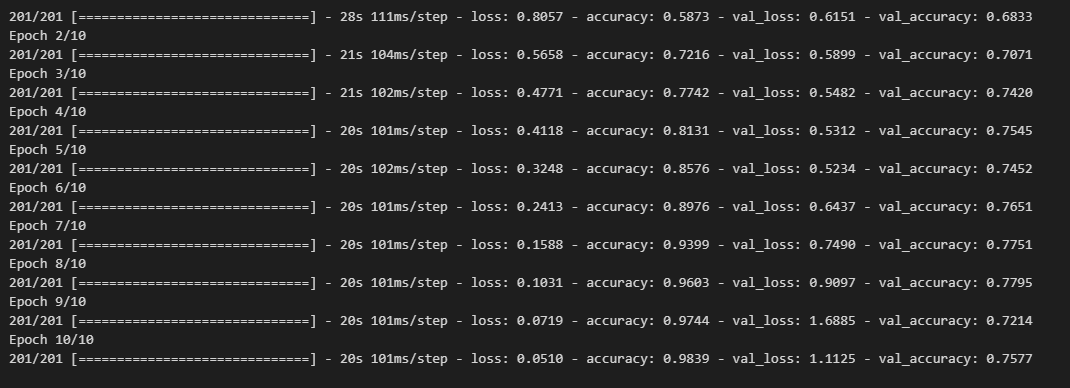
# Accuracy, Loss값 시각화
f, (ax1, ax2) = plt.subplots(1, 2, figsize=(12, 4))
t = f.suptitle('Basic CNN Performance', fontsize=12)
f.subplots_adjust(top=0.85, wspace=0.3)

epoch_list = list(range(1,11))
ax1.plot(epoch_list, history.history['accuracy'], label='Train Accuracy')
ax1.plot(epoch_list, history.history['val_accuracy'], label='Validation Accuracy')
ax1.set_xticks(np.arange(0, 11, 5))
ax1.set_ylabel('Accuracy Value')
ax1.set_xlabel('Epoch')
ax1.set_title('Accuracy')
l1 = ax1.legend(loc="best")

ax2.plot(epoch_list, history.history['loss'], label='Train Loss')
ax2.plot(epoch_list, history.history['val_loss'], label='Validation Loss')
ax2.set_xticks(np.arange(0, 11, 5))
ax2.set_ylabel('Loss Value')
ax2.set_xlabel('Epoch')
ax2.set_title('Loss')
l2 = ax2.legend(loc="best")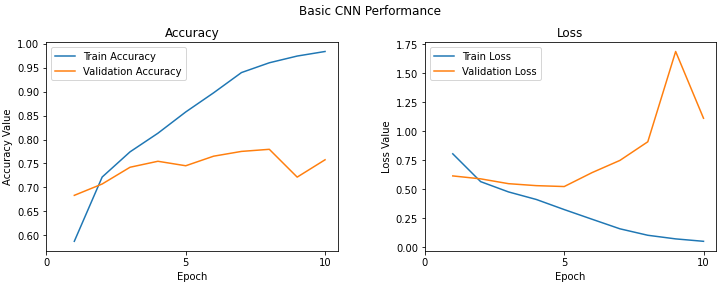
# 최적모델 저장
model1_out = model.predict(test_imgs_scaled)
# 평가지표 확인
model.evaluate(test_imgs_scaled, test_label)
Dropout 적용해보기
model2 = Sequential()

model2.add(Conv2D(16, kernel_size=(3, 3), activation='relu',
                 input_shape=input_shape))
model2.add(MaxPooling2D(pool_size=(2, 2)))

model2.add(Conv2D(64, kernel_size=(3, 3), activation='relu'))
model2.add(MaxPooling2D(pool_size=(2, 2)))

model2.add(Conv2D(128, kernel_size=(3, 3), activation='relu'))
model2.add(MaxPooling2D(pool_size=(2, 2)))

model2.add(Conv2D(128, kernel_size=(3, 3), activation='relu'))
model2.add(MaxPooling2D(pool_size=(2, 2)))

model2.add(Flatten())
model2.add(Dense(512, activation='relu'))
model2.add(Dropout(0.3))
model2.add(Dense(512, activation='relu'))
model2.add(Dropout(0.3))
model2.add(Dense(1, activation='sigmoid'))


model2.compile(loss='binary_crossentropy',
              optimizer=optimizers.RMSprop(),
              metrics=['accuracy'])

model2.summary()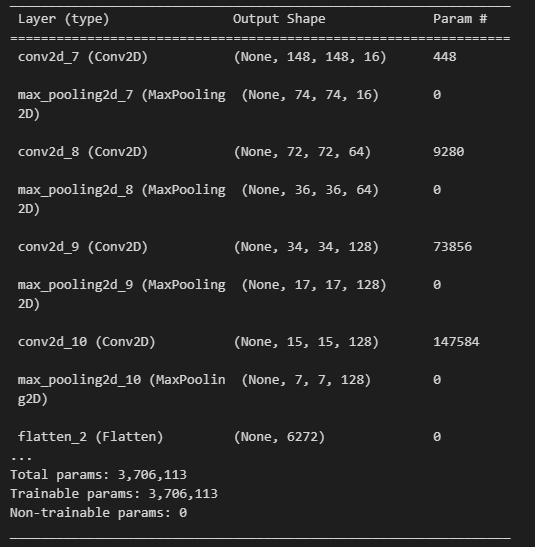
history = model2.fit(x=X_train, y=y_train,
                    validation_data=(X_val, y_val),
                    batch_size=batch_size,
                    epochs=20,
verbose=1) 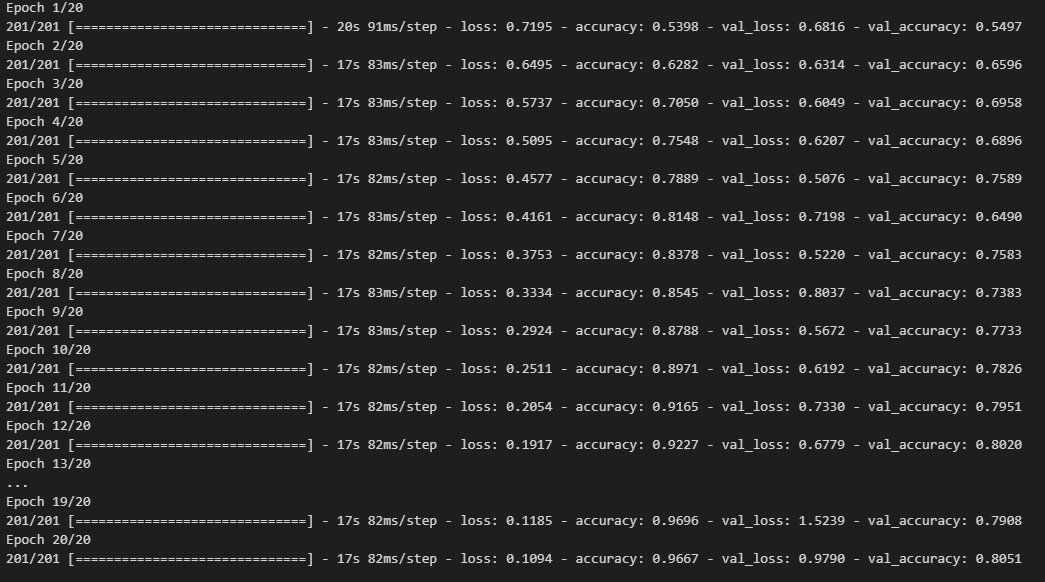
f, (ax1, ax2) = plt.subplots(1, 2, figsize=(12, 4))
t = f.suptitle('Basic CNN Performance', fontsize=12)
f.subplots_adjust(top=0.85, wspace=0.3)

epoch_list = list(range(1,21))
ax1.plot(epoch_list, history.history['accuracy'], label='Train Accuracy')
ax1.plot(epoch_list, history.history['val_accuracy'], label='Validation Accuracy')
ax1.set_xticks(np.arange(0, 21, 5))
ax1.set_ylabel('Accuracy Value')
ax1.set_xlabel('Epoch')
ax1.set_title('Accuracy')
l1 = ax1.legend(loc="best")

ax2.plot(epoch_list, history.history['loss'], label='Train Loss')
ax2.plot(epoch_list, history.history['val_loss'], label='Validation Loss')
ax2.set_xticks(np.arange(0, 21, 5))
ax2.set_ylabel('Loss Value')
ax2.set_xlabel('Epoch')
ax2.set_title('Loss')
l2 = ax2.legend(loc="best")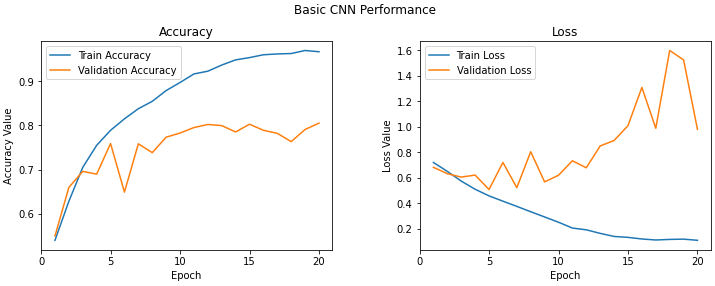
# 최적모델 저장
model2.save('cats_dogs_basic_cnn_2.h5')
# 평가지표 확인
model2.evaluate(test_imgs_scaled, test_label)
VGG(Visual Geometry Group)
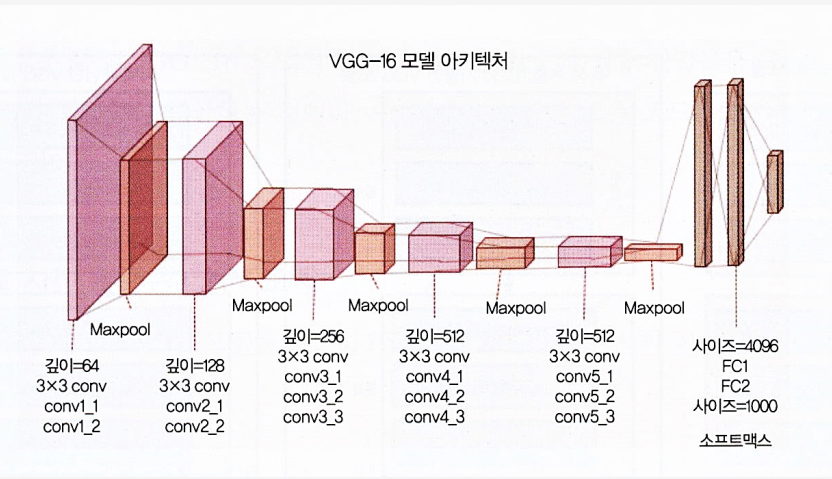
VGG-16 모델의 이해
- 이지멧 데이터베이스에 구축된 16계층 네트워크
- 이미지넷 데이터베이스는 이미지 인식과 분류를 목적으로 제작
- 3x3 합성곱 필터로 이루어진 총 13개의 합성곱층은 다운 샘플링을 위한 최대 풀링층, 4096유닛과 전체가 연결된 2개의 은닉층, 그리고 연속된 1000개 유닛의 밀집층이로 이루어짐
- 여기서는 전체가 연결된 밀집층에서 이미지가 개인지 고양이인지만 예측할 것이기 때문에 마지막 세개의 층은 필요 없음
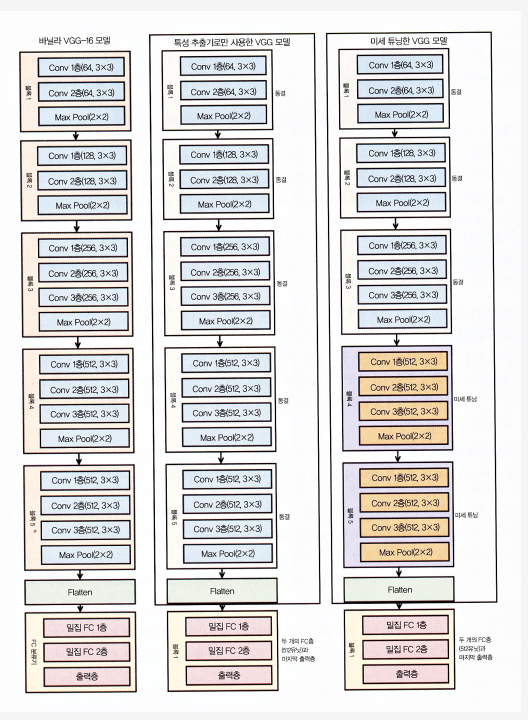
- 처음 5개 블록에만 더 신경을 써서 VGG 모델을 효과적인 특성 추출기로 활용하겠습니다.
- 모델 하나에서는 각 에포크 후에 가중치가 업데이트되지 않도록 5개의 모든 합성곱 블록을 동결시켜서 간단한 특성 추출기로 사용
- 마지막 모델의 경우, 동결하지 않은 끝의 두 블록(블록4와 블록5)의 VGG 모델에 미세튜닝을 적용해서 모델을 훈련할 때(데이터 배치당) 각 에포크에서 가중치가 업데이트되도록 할 것
# VGG16 모델을 불러와서 이미지 분류 모델을 만들기
from tensorflow.keras.applications import vgg16 as vgg
base_model = vgg.VGG16(weights='imagenet',
                       include_top=False,
                       input_shape=(150, 150, 3))

# VGG16 모델의 세 번째 블록에서 마지막 층 추출
last = base_model.get_layer('block3_pool').output
from tensorflow.keras.layers import Dropout, Flatten, Dense, GlobalAveragePooling2D,BatchNormalization
from tensorflow.keras import Model
# 상위 층에 분류층 추가
x = GlobalAveragePooling2D()(last)
x= BatchNormalization()(x)
x = Dense(256, activation='relu')(x)
x = Dense(256, activation='relu')(x)
x = Dropout(0.6)(x)
pred = Dense(1, activation='sigmoid')(x)
model3 = Model(base_model.input, pred)
for layer in base_model.layers:
layer.trainable = False
model3.compile(loss='binary_crossentropy',
optimizer=optimizers.Adam(lr=0.01),
metrics=['accuracy'])model3.summary()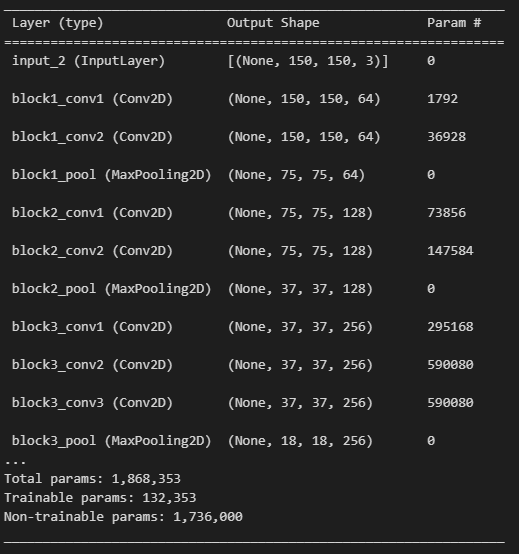
history = model3.fit(x=X_train, y=y_train,
                    validation_data=(X_val, y_val),
                    batch_size=batch_size,
                    epochs=20,
verbose=1)f, (ax1, ax2) = plt.subplots(1, 2, figsize=(12, 4))
t = f.suptitle('Basic CNN Performance', fontsize=12)
f.subplots_adjust(top=0.85, wspace=0.3)
epoch_list = list(range(1,21))
ax1.plot(epoch_list, history.history['accuracy'], label='Train Accuracy')
ax1.plot(epoch_list, history.history['val_accuracy'], label='Validation Accuracy')
ax1.set_xticks(np.arange(0, 21, 5))
ax1.set_ylabel('Accuracy Value')
ax1.set_xlabel('Epoch')
ax1.set_title('Accuracy')
l1 = ax1.legend(loc="best")
ax2.plot(epoch_list, history.history['loss'], label='Train Loss')
ax2.plot(epoch_list, history.history['val_loss'], label='Validation Loss')
ax2.set_xticks(np.arange(0, 21, 5))
ax2.set_ylabel('Loss Value')
ax2.set_xlabel('Epoch')
ax2.set_title('Loss')
l2 = ax2.legend(loc="best")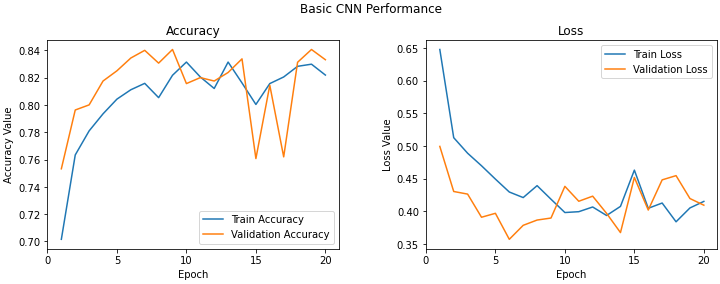
# 모델평가 지표
model3.evaluate(test_imgs_scaled, test_label)
# 최적모델 저장
model3.save('cats_dogs_basic_cnn_3.h5')
실습2
django를 이용하여 개, 고양이 구분해보기
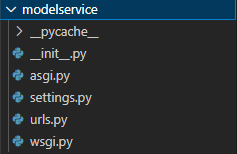
# 장고프로젝트 만들기
django-admin startproject modelservice
# 장고 애플리케이션 만들기
django-admin startapp model
- modelservice 폴더에 setting.py 수정
- 아래코드 추가 (마지막 2줄)
  INSTALLED_APPS = [
    "django.contrib.admin",
    "django.contrib.auth",
    "django.contrib.contenttypes",
    "django.contrib.sessions",
    "django.contrib.messages",
    "django.contrib.staticfiles",
    'rest_framework',
    "model.apps.ModelConfig",
]
- modelservice 폴더에 urls.py 수정
- from django.urls import path, include 추가(빨간색 부분)
- path('predict/', include('model.urls')) 추가
- model 폴더에 urls.py 생성
- 아래코드 추가
from django.urls import path
from . import views
urlpatterns = [
    path("", views.predict)
]
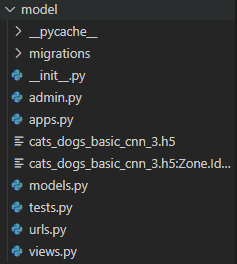
- views.py에 개, 고양이 구분 로직 구현
from django.shortcuts import render
from rest_framework.decorators import api_view
from rest_framework.response import Response
import base64
import tensorflow as tf
from io import BytesIO
from PIL import Image
import numpy as np
from tensorflow.keras.preprocessing.image import img_to_array, load_img

model = tf.keras.models.load_model("./model/cats_dogs_basic_cnn_3.h5")

# Create your views here.
@api_view(["POST"])            #코디네이터 - 포스트 방식으로 구현
def predict(request):
    base64_string = request.data.get('image')
    img = Image.open(BytesIO(base64.b64decode(base64_string)))
    print (type(img))
    img.save("3.png")
    dog_image =img_to_array(load_img("./{}".format("3.png"), target_size=(150,150))).astype('float32')
    img_to_array(load_img("{}".format("3.png"), target_size=(150,150))).astype('float32')
    dog_image = dog_image.reshape(1, 150, 150, 3)
    dog_image /= 255                # 이미지 데이터를 정규화
    rt = model.predict(dog_image)  # 정규화된 이미지를 모델에 입력으로 넣고, 모델의 예측 결과를 반환하는 코드


    if rt < 0.5 :
        rt_dict = {
                'result' : '고양이 사진을 보내셨네요...'
             }
    else:
        rt_dict = {
                'result' : '강아지 사진을 보내셨네요...'
             }

return Response(rt_dict)- 모델 테스트 코드
import requests
import base64
url = "http://127.0.0.1:8000/predict/"
with open(r"[사진저장경로]/cat.4029.jpg", 'rb') as img:
    base64_string = base64.b64encode(img.read())
r = requests.post(url, data = {'image' : base64_string})
r.text-
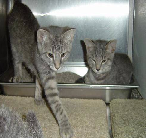
테스트 이미지
-
결과
'{"result":"강아지 사진을 보내셨네요..."}'
공부 기록