
2023_1_13_TIL
예외와 에러의 차이점
- 예외 -> 개발자가 처리할 수 '있는' 오류
- 에러 -> 개발자가 처리할 수 '없는' 오류
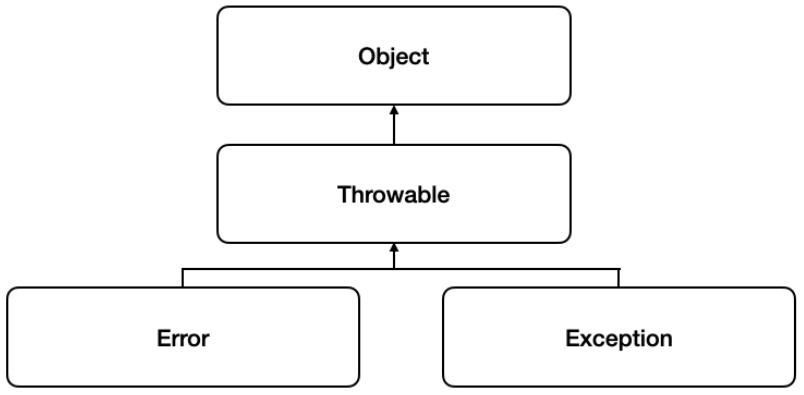
예외 클래스의 상속 구조
- Throwable클래스를 상속받은 Exception 클래스
- 일반예외 클래스(checked Exception) -> 실행 전
- 실행예외 클래스(Unchecked Exception, RuntimeException) -> 실행할 때
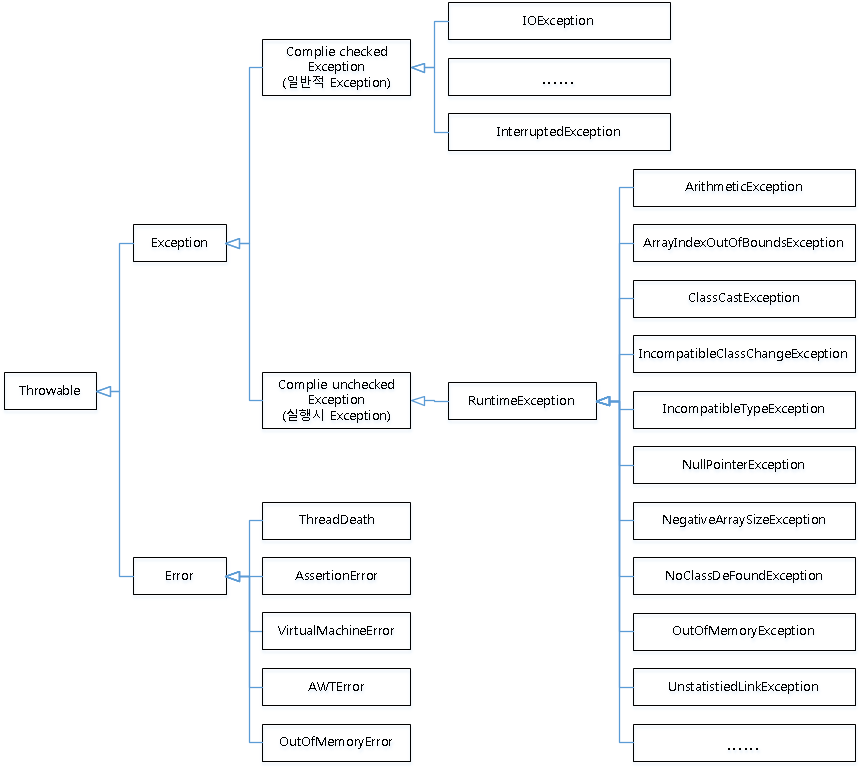
일반 예외 클래스(checked Exception)
- InterruptedException
- Thread.sleep(시간) -> 일정시간 해당 스레드를 일시정지 상태만듬
- Thread클래스의 정적 메소드
- 일반 예외 발생할 수 있음 -> 반드시 예외처리
- Thread.sleep(시간) -> 일정시간 해당 스레드를 일시정지 상태만듬
- ClassNotFoundExecption
- Class.forName("패키지명.클래스명") -> 클래스를 동적으로 메모르에 로딩 메소드
- 해당 클래스 정보 담은 Class 타입 return
- 메모리에 로딩하는 과정에서 해당 클래스가 존재X -> ClassNotFoundException발생
- IOException
- 콘솔, 파일에 데이터를 write(), read() 할 때 발생
- FileNotFoundException
- 파일을 읽을 때 해당 경로에 없으면 발생
- 실제 파일의 존재 유무와는 상관 없음 -> 반드시 예외처리 필요
- CloneNotSupportException
- Objcet 클래스는 clone()를 가지고 있음
- 복사 대상이 되는 클래스는 Cloneable 인터페이스를 반드시 상속
- 해당 클래스가 복사 기능을 제공해서
- 해당 클래스가 Cloneable 상속X -> CloneNotSupportException 발생
import java.io.FileInputStream;
import java.io.InputStreamReader;

class A implements Cloneable {
	protected Object clone() throws CloneNotSupportException {
    	return super.clone();
    }
}
public class CheckedException {
	public static void main(String[] args) {
    	// 일반 예외
        Thread.sleep(1000);

        Class cls = Class.forName("java.lang.Objcet2");

        InputStreamReader in = new InputStreamReader(System.in);
        in.read();

        FileInputStream fis = new FileInputStream("text.txt");

        A a1 = new A();
        A a2 = (A)a1.clone();
    }
}
실행 예외 클래스(Unchecked Exception, RuntimeException)
- 해당 클래스는 실행 중 실행 예외 발생 -> 프로그램 강제 종료
- ArithmeticException -> 산술 관련
- ClassCastException
- 업 캐스팅 -> 항상 가능
- 다운 캐스팅 -> 가능할 수도, 안 가능할 수도
- 다운 캐스팅일때 사용
- ArrayIndexOutOfBoundException -> 배열 인덱스 잘못 사용
- NumberFormatException
- 문자열을 숫자, 실수로 변환 시, 문자열이 변환하고자 하는 숫자 형식이 아닌 경우
- NullPointerException
- 참조변수가 실제 객체를 가리키고 있지 않을 때
- 현재 가리키고 있는 객체가 없다는 것을 의미
class A{}
class B extends A{}

public class UncheckedException {
    public static void main(String[] args) {
    	// 실행예외
        System.out.println(3 / 0);

        A a = new A();
        B b = (B) a;

        int[] array = {1, 2, 3};
        System.out.println(array[3]);

        int num = Integer.parseInt("10!");

        String str = null;
        System.out.println(str.charAt(2));
    }
}
예외 처리 문법
- 예외처리 구문 있으면 -> JVM은 예외가 처리됐다고 판단
- 예외처리 구문 내에 아무런 코드를 작성안 해도, 예외 처리로 간주
- try, catch, finally(생략 가능)
try {
	// 일반 예외, 실행 예외 발생 가능 코드
} catch (예외 클래스명 참조 변수명) {
	// 예외가 발생했을 때 처리
} finally {
	// 예외 발생 여부에 상관없이 무조건 실행
}
public class TryCatchFinally {
public static void main(String[] args) {
// 1
try {
System.out.println(3 / 0);
System.out.println("프로그램 종료");
} catch (ArithmeticException e) {
System.out.println("숫자는 0으로 나눌 수 없습니다.");
System.out.println("프로그램 종료");
}
// 2
try {
System.out.println(3 / 0);
} catch (ArithmeticException e) {
System.out.println("숫자는 0으로 나눌 수 없습니다");
} finally {
System.out.println("프로그램 종료");
}
}
}예외 처리 과정
- 예외가 발생X -> catch 구문 작동X -> finally있으면 무조건 실행
- 예외처리 과정
- try에서 예외 발생 -> JVM가장 먼저 인지 -> JVM내에서 발생한 예외 타입의 객체를 생성 후 catch매개변수로 전달
다중 예외 처리
- 다중 예외 처리 -> 실행할 catch 블록의 선택과정은 항상 위에서부터 확인(순서대로)
public class MultiCatch_1 {
    public static void main(String[] args) {
    	// 다중 X
        try {
            System.out.println(3 / 0);
        } catch (ArithmeticException e) {
            System.out.println("숫자는 0으로 나눌 수 없습니다.");
        } finally {
            System.out.println("프로그램 종료");
        }

        try {
            int num = Integer.parseInt("10A");
        } catch (NumberFormatException e) {
            System.out.println("숫자로 바꿀 수 없습니다.");
        } finally {
            System.out.println("프로그램 종료");
        }
        System.out.println();

        // 다중 O
        try {
            System.out.println(3 / 0);
            int num = Integer.parseInt("10A");
        } catch (ArithmeticException e) {
            System.out.println("숫자는 0으로 나눌 수 없습니다.");
        } catch (NumberFormatException e) {
            System.out.println("숫자로 바꿀 수 없습니다.");
        } finally {
            System.out.println("프로그램 종료");
        }
    }
}- 다중 catch 구문에서 catch 블록의 올바른 순서
- Exception이 항상 모든 예외 클래스 밑에 위치
public class MultiCatch_2 {
    public static void main(String[] args) {
        try {
            System.out.println(3 / 0);
            int num = Integer.parseInt("10A");
        } catch (NumberFormatException e) {
            System.out.println("숫자로 바꿀 수 없습니다.");
        } catch (Exception e) {
            System.out.println("숫자는 0으로 나눌 수 없습니다.");
        } finally {
            System.out.println("프로그램 종료");
        }
    }
}- 예외의 OR 연산으로 구성한 다중 catch구문
public class MultiCatch_3 {
    public static void main(String[] args) {
        try {
            System.out.println(3 / 0);
            int num = Integer.parseInt("10A");
        } catch (ArithmeticException e) {
            System.out.println("예외가 발생했습니다.");
        } catch (NumberFormatException e) {
            System.out.println("예외가 발생했습니다.");
        }

        // OR 적용
        try {
            System.out.println(3 / 0);
            int num = Integer.parseInt("10A");
        } catch (ArithmeticException | NumberFormatException e) {
            System.out.println("예외가 발생했습니다.");
        }
    }
}
리소스 자동 해제 예외 처리
- finally -> 리소스를 해체하는 것(대표적인 기능)
- 리소스해제 -> 사용하지 않는 자원 반납 -> 메모리 공간 확보위해서
- 리소스 자동 해제 기능이 포함된 try-with-resource구문
- 소괄호안에 자동으로 리소스를 반납할 객체 생성 -> 마지막 자동으로 해제
import java.io.IOException;
import java.io.InputStreamReader;

public class TryWithResource_1 {
    public static void main(String[] args) {
        System.out.println("문자을 입력하세요!");

        // 리소스 자동 해제
        try (InputStreamReader isr1 = new InputStreamReader(System.in);) {
            char input = (char)isr1.read();
            System.out.println("입력글자 = " + input);
        } catch (IOException e) {
            e.printStackTrace();
        }

		// 리소스 수동 해제
        InputStreamReader isr2 = null;
        try {
            isr2 = new InputStreamReader(System.in);
            char input = (char) isr2.read();
            System.out.println("입력글자 = " + input);
        } catch (IOException e) {
            e.printStackTrace();
        } finally {
            if (isr2 != null) {
                try {
                    isr2.close();
                } catch (IOException e) {
                    e.printStackTrace();
                }
            }
        }
    }
}- 리소스 자동 래체를 위한 클래스 -> AutoCloseable 인터페이스 구현
- 해당 인터페이스는 abstract close()포함 -> 해당 인터페이스 구현한 모든 클래스의 객체는 내부에 close() 보장
- 즉, AutoCloseable인터페이스를 구현해 내부에 close()메소드를 포함하고 있는 클래스의 객체에 한해서 리소스 자동 해제 기능 제공
- 리소스가 자동해제 가능한 클래스 생성 및 try-with-resource
class A implements AutoCloseable {// <<--
    String resource;
    A(String resource) {
        this.resource = resource;
    }
    @Override
    public void close() throws Exception {// <<--
        if (resource != null) {
            resource = null;
            System.out.println("리소스가 해제되었습니다.");
        }
    }
}

public class TryWithResource_2 {
    public static void main(String[] args) {
        A a1 = null;
        try {
            a1 = new A("특정 파일");
        } catch (Exception e) {
            System.out.println("예외처리");
        } finally {
            if (a1.resource != null) {
                try {
                    a1.close();// <<--
                } catch (Exception e){
                    e.printStackTrace();
                }

            }
        }

        try (A a2 = new A("특정 파일");) {
        } catch (Exception e) {
            System.out.println("예외처리");
        }
    }
}
예외 전가 문법
- 예외를 전가 -> 예외 처리의 의무를 호출한 메소드가 가짐
- 직접 예외처리를 할 때와 호출메소드로 예외를 전가할 때
// 1. 하위 메소드서 직접 예외를 처리
class A {
    void abc() {
        bcd();
    }
    void bcd() {
        try {
            Thread.sleep(1000);
        } catch (InterruptedException e) {
            e.printStackTrace();
        }
    }
}

// 2. 예외를 호출 메소드로 전가
class B {
    void abc() {
        try {
            bcd();
        } catch (InterruptedException e) {
            e.printStackTrace();
        }
    }
    void bcd() throws InterruptedException {// <<--
        Thread.sleep(1000);
    }
}

public class ThrowsException_1 {
    public static void main(String[] args) {
    }
}- 계속 예외처리를 전가하면??
- main()를 실행한 JVM에서 직접 예외 처리
public class ThrowsException_2 {
    public static void main(String[] args) throws ClassNotFoundException{// <<--
        Class cls = Class.forName("java.lang.Object2");
    }
}- 여러개 예외 한꺼번에 전가하기
// 1. 하위메소드에 직접 예외를 처리할 때
class A {
    void abc() {
        bcd();
    }
    void bcd() {
        try {
            Class cls = Class.forName("java.lang.Object");
            Thread.sleep(1000);
        } catch (ClassNotFoundException | InterruptedException e) {
            e.printStackTrace();
        }
    }
}

// 2. 예외를 호출 메소드로 전가할 때
class B {
    void abc() {
        try {
            bcd();
        } catch (ClassNotFoundException | InterruptedException e) {
            e.printStackTrace();
        }
    }
    void bcd() throws ClassNotFoundException, InterruptedException{// <<--
        Class cls = Class.forName("java.lang.Object");
        Thread.sleep(1000);
    }
}

public class ThrowsException_3 {
    public static void main(String[] args) {
    }
}
사용자 정의 예외 클래스 생성 방법
- 사용자 정의 예외 클래스 작성
- Exception를 상속
- RuntimeException를 상속
- 생성자2가지 추가 ->
- 기본생성자
- 문자열을 입력받는 생성자 -> 예외메시지를 받아 예외 객체를 생성하는 생성자
- 사용자 정의 예외 객체 생성
- 위에서 정의한 클래스로 객체 생성
- 예외 상황에서 예외객체 던지기
- 예외객체를 던진다 = 실제 JVM에게 예외 객체를 만들어 전달
- throw vs throws
- throw -> 예외 객체를 던지는 기능
- throws -> 예외를 전가
- 던져진 예외 객체 -> JVM 전달 -> 해당 예외객체를 처리할 catch블록 찾기
// 1. 사용자 일반 예외
class MyException extends Exception {
    public MyException() {
        super();
    }
    public MyException(String message) {
        super(message);
    }
}

// 2. 사용자 실행 예외
class MyRTException extends RuntimeException {
    public MyRTException() {
        super();
    }
    public MyRTException(String message) {
        super(message);
    }
}

// 3. 사용자 정의 예외 객체 생성
class A {
    MyException me1 = new MyException();
    MyException me2 = new MyException("예외 메시지: MyException");

    MyRTException mre1 = new MyRTException();
    MyRTException mre2 = new MyRTException("예외 메시지: MyRTException");

	// 4. 예외 던지기(throw): 던진 시점에 예외 발생
    // 방법 1. 예외 직접 처리
    void abc_1(int num) {
        try {
            if (num > 70) {
                System.out.println("정상 작동");
            } else {
                throw me1;// <<--
            }
        } catch (MyException e) {// <<--
            System.out.println("예외 처리 1");
        }
    }
    void bcd_1() {
        abc_1(65);
    }

	// 방법 2. 예외 전가
    void abc_2(int num) throws MyException{
        if (num > 70) {
            System.out.println("정상 작동");
        } else {
            throw me1;// 예외를 던진 시점에 예외 발생
        }
    }
    void bcd_2() {
        try {
            abc_2(65);
        } catch (MyException e) {// <<--
            System.out.println("예외 처리 2");
        }
    }
}

public class CreateUserException {
    public static void main(String[] args) {
        A a = new A();
        a.bcd_1();
        a.bcd_2();
    }
}
예외 클래스의 메소드
- 2개의 메소드는 Throwable 클래스의 메소드
- getMessage()
public class ExceptionMethod_1 {
    public static void main(String[] args) {
        // 없는 것
        try {
            throw new Exception();
        } catch (Exception e) {
            System.out.println(e.getMessage());
        }

		// 있는 것
        try {
            throw new Exception("예외메시지");
        } catch (Exception e) {
            System.out.println(e.getMessage());
        }
    }
}- printStackTrace() -> 전가된 과정, 예외 발생이 전달되는 경로
- 최초로 예외가 발생한 위치에서 해당 예외가 전달되는 경로 확인
- Integer.parseInt() -> cde() -> bcd() -> abc() -> main()
class A {
    void abc() throws NumberFormatException {
        bcd();
    }
    void bcd() throws NumberFormatException {
        cde();
    }
    void cde() throws NumberFormatException {
        int num = Integer.parseInt("10A");
    }
}

public class ExceptionMethod_2 {
    public static void main(String[] args) {
        A a = new A();

        try {
            a.abc();
        } catch (NumberFormatException e) {
            e.printStackTrace();
        }
    }
}
사용자 정의 예외 클래스의 사용 예시
class MinusExceptions extends Exception {
    public MinusExceptions() {
        super();
    }
    public MinusExceptions(String message) {
        super(message);
    }
}
class OverException extends Exception {
    public OverException() {
        super();
    }
    public OverException(String message) {
        super(message);
    }
}

class A {
    void checkScore(int score) throws MinusExceptions, OverException{
        if (score < 0) {
            throw new MinusExceptions("예외 발생: 음숫값 입력");
        } else if (score > 100) {
            throw new OverException("예외 발생: 100점 초과");
        } else {
            System.out.println("정상적인 값입니다.");
        }
    }
}

public class UserExceptionExample {
    public static void main(String[] args) {
        A a = new A();

        try {
            a.checkScore(85);
            a.checkScore(150);
        } catch (MinusExceptions | OverException e) {
            System.out.println(e.getMessage());
            e.printStackTrace();
        }
    }
}
참조
https://choiblack.tistory.com/39
https://codedragon.tistory.com/4447

현재 블로그 : https://jasonsong97.tistory.com/