
2023_1_23_TIL
byte단위 입출력과 char단위 입출력
- 송수신하고자 하는 데이터를 byte 단위로 쪼개 보내고 받는 것
- 모든 데이터는 byte들의 모음
- byte단위 입출력은 텍스트 전송에 특화됨
- byte단위 -> InputStream | OutputStream (추상클래스)
- char단위 -> Reader | Writer (추상클래스)
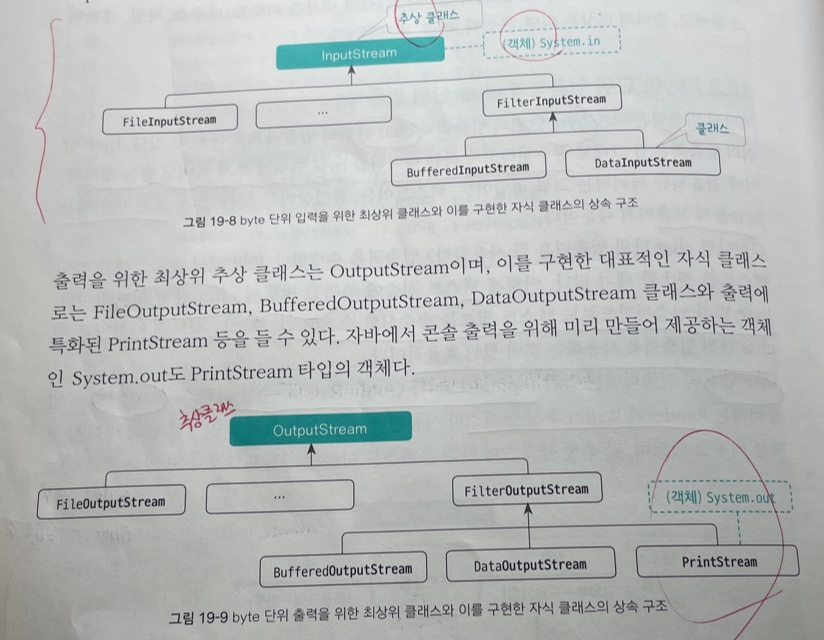
InputStream과 OutputStream의 상속구조
- 상속 구조
InputStream의 주요 메소드
- int available()
- InputStream의 남은 바이트 수를 리턴
- abstract int read()
- 데이터를 1byte씩 읽어 int 하위 1byte에 저장해 리턴(추상메소드)
- int read(byte[ ] n)
- 읽은 데이터를 byte[ ] b의 0번째 위치부터 저장하며 읽은 바이트 수를 리턴
- int read(byte[ ]b, int off, int len)
- len 개수만큼 읽은 데이터를 byte[ ] b의 off 위치부터 저장
- void close()
- 자원 반납
- InputStream의 자식 클래스로 객체를 생성 후 사용하기만 하면됨
OutputStream의 주요 메소드
- void flush()
- 메모리 버퍼에 쓰여진 데이터를 내보내는 명령
- flush()가 실행되야 실제 출력됨
- abstract void write(int b)
- 1byte를 ouput 버퍼에 출력(추상메소드)
- void write(byte[ ] b)
- 매개변수로 넘겨진 byte[ ] b의 0번째 위치에서부터 메모리 버퍼에 출력
- void write(byte[ ], int off, int len)
- byte[ ]의 off위치에서 len개를 읽은 후 출력
- void close()
InputStream 객체 생성 및 활용
- FileInputStream으로 InputStream 객체 생성하기
- 데이터는 한쪽으로만 이동할 수 있으므로 데이터를 읽는 것만 가능
- 생성자
// 첫 번째 생성자
File inFile = new File("inFile.txt");
InputStream fis = new FileInputStream(inFile);
// 두 번째 생성자
InputStream fis = new FileInputStream("inFile.txt");

// FileInputStream의 객체 생성과 available(), close()메소드의 활용
public class FileInputStream_1 {
    public static void main(String[] args) throws IOException {
    	// 입력 파일 생성
        File infile = new File("src/sec02_fileinputoutputstream/files/FileInputStream1.txt");

        // InputStream 객체 생성
        InputStream is = new FileInputStream(infile);
        int data;
        while ((data = is.read()) != -1) {
            System.out.println("읽은 데이터: " + (char)data + "남은 바이트 수: " + is.available());
        }

        // InputStream 자원 반납
        is.close();
    }
}- 영문 데이터 파일 읽고 출력하기
public class FileInputStream_2 {
    public static void main(String[] args) throws IOException {
    	// 입력 파일 생성
        File inFile = new File("src/sec02_fileinputoutputstream/files/FileInputStream1.txt");

        // 1. 1-byte 단위 읽기
        InputStream is1 = new FileInputStream(inFile);
        int data;
        while ((data = is1.read()) != -1) {
            System.out.print((char) data);
        }
        is1.close();
        System.out.println();
        System.out.println();

        // 2. n-byte 단위 읽기(byte[]의 처음 위치에서부터 읽은 데이터 저장)
        InputStream is2 = new FileInputStream(inFile);
        byte[] byteArray1 = new byte[9];// 한번에 읽을 수 있는 최대 데이터가 9bytes
        int count1;
        while ((count1 = is2.read(byteArray1)) != -1) {
            for (int i = 0; i < count1; i++) {
                System.out.print((char) byteArray1[i]);
            }
            System.out.println(": count1 = " + count1);
        }
        is2.close();
        System.out.println();
        System.out.println();

		// 3. n-byte 단위 읽기(앞에서 length만큼 읽어 byte[] offset 위치에서 부터 입력)
        // 파일에서 데이터를 length개 읽어 배열의 offset위치부터 넣으라
        InputStream is3 = new FileInputStream(inFile);
        byte[] byteArray2 = new byte[9];// 최소 offset + length
        int offset = 3;
        int length = 6;
        int count2 = is3.read(byteArray2, offset, length);
        for (int i = 0; i < offset + length; i++) {
            System.out.print((char) byteArray2[i]);
        }
        is3.close();
    }
}- 한글 데이터 파일 읽고 출력하기
- 한글은 문자당 2~3byte를 가짐 -> 따라서, read()는 1byte씩 읽어 출력 어려움
- 2번쨰 read() or 3번째 read() 사용
- 기본값 문자셋 -> UTF-8
- 한글은 문자당 2~3byte를 가짐 -> 따라서, read()는 1byte씩 읽어 출력 어려움
public class FileInputStream_3 {
    public static void main(String[] args) throws IOException {
    	// 1. 입력 파일 생성
        File inFile = new File("src/sec02_fileinputoutputstream/files/FileInputStream2.txt");

        // 2. n-byte 단위 읽기(byte[]의 처음 위치에서부터 읽은 데이터 저장)
        InputStream is2 = new FileInputStream(inFile);
        byte[] byteArray1 = new byte[9];
        int count1;
        while ((count1 = is2.read(byteArray1)) != -1) {
        // byteArray의 0번째부터 (count1-1)번째까지의 byte[]데이터를 UTF-8문자셋을 이용해 문자열로 변환한다는 의미
            String str = new String(byteArray1, 0, count1, Charset.forName("UTF-8"));
            System.out.print(str);
            System.out.println(": count = " + count1);
        }
        is2.close();
        System.out.println();
        System.out.println();

		// 3. n-byte 단위 읽기(앞에서 length만큼 읽어 byte[] offset 위치에 넣기)
        InputStream is3 = new FileInputStream(inFile);
        byte[] byteArray2 = new byte[9];// offset + length
        int offset = 3;
        int length = 6;
        int count2 = is3.read(byteArray2, offset, length);
        // 기본값 문자셋이 파일과 동일한 UTF-8로 구성 -> Charset.defaultCharSet()
        String str = new String(byteArray2, 0, offset + length, Charset.defaultCharset());
        System.out.print(str);
        is3.close();

    }
}
OutputStream 객체 생성 및 활용
- FileOutputStream으로 OutputStream 객체 생성하기
- 파일 쓰기만 가능
- true -> 이어쓰기
- false(default) -> 덮어쓰기
// 첫 번째 생성자
File outFile1 = new File("outFile1.txt");
OutputStream fos1 = new FileOutputStream(outFile1);
// 두 번째 생성자
File outFile2 = new File("outFile2.txt");
OutputStream fos2 = new FileOutputStream(outFile2, true);
// 세 번째 생성자
OutputStream fos3 = new FileOutputStream("outFile1.txt");
// 네 번째 생성자
OutputStream fos4 = new FileOutputStream("outFile2.txt", true);- 영문 데이터 파일 출력하기
- write() -> flush() 마무리(무조건)
public class FileInputStream_4 {
    public static void main(String[] args) throws IOException {
    	// 입력 파일 생성
        File outFile = new File("src/sec02_fileinputoutputstream/files/FileOutputStream1.txt");

        // 1. 1-byte 단위 쓰기
        OutputStream os1 = new FileOutputStream(outFile);
        os1.write('J');
        os1.write('A');
        os1.write('V');
        os1.write('A');
        os1.write('\r');// 13
        os1.write('\n');// 10 개행
        os1.flush();
        os1.close();
        System.out.println();

        // 2. n-byte단위 쓰기(byte[]의 처음부터 끝까지 데이터 쓰기)
        OutputStream os2 = new FileOutputStream(outFile, true);// 내용 연결
        byte[] byteArray1 = "Hello!".getBytes();
        os2.write(byteArray1);
        os2.write('\n');
        os2.flush();
        os2.close();
        System.out.println();

        // 3. n-byte 단위 쓰기(byte[]의 offset부터 length개의 byte 데이터 쓰기)
        OutputStream os3 = new FileOutputStream(outFile, true);// 내용 연결
        byte[] byteArray2 = "Better the last smile than the first laughter".getBytes();
        os3.write(byteArray2, 7, 8);
        os3.flush();
        os3.close();
    }
}- 한글 데이터 파일 출력하기
public class FileOutputStream_2 {
    public static void main(String[] args) throws IOException {
    	// 1. 입력 파일 생성
        File outFile = new File("src/sec02_fileinputoutputstream/files/FileOutputStream2.txt");

        // 2. n-byte 단위 쓰기(byte[]의 처음부터 끝까지 데이터 쓰기)
        OutputStream os2 = new FileOutputStream(outFile, true);// 내용 연결
        byte[] byteArray1 = "안녕하세요".getBytes(Charset.forName("UTF-8"));
        os2.write(byteArray1);
        os2.write('\n');
        os2.flush();
        os2.close();
        System.out.println();

        // 3. n-byte 단위 쓰기(byte[]의 offset부터 length개의 byte 데이터 쓰기)
        OutputStream os3 = new FileOutputStream(outFile, true);// 내용연결
        byte[] byteArray2 = "반갑습니다.".getBytes(Charset.defaultCharset());
        os3.write(byteArray2, 6, 6);
        os3.flush();
        os3.close();
    }
}
Console InputStream 사용하기
- System.in 객체로 InputStream 사용하기
- 자바API에서 제공하는 콘솔 입력을 위한 InputStream
- Console 입력시, 자원 반납 X
- Enter, 로 구분 -> 1줄 단위로만 입력 가능
- 콘솔로 입력된 영문 데이터 읽기와 처리하기
- 남아있는 버퍼값을 꺼내주기 -> '\n'
public class ConsoleInputObject_1 {
    public static void main(String[] args) throws IOException {
    	// InputStream 객체 생성
        InputStream is = System.in;
        int data;
        while ((data = is.read()) != '\r') {
            System.out.println("읽은 데이터: " + (char) data + " 남은 바이트 수: " + is.available());
        }
        System.out.println(data);
        System.out.println(is.read());// 버퍼를 비워 주기 위해 입력 버퍼에 남아 있는 \n을 read() 메소드를 이용해 꺼냄
    }
}

/// read() 메소드를 이용해 콘솔로 영문 데이터 읽기
public class ConsoleInputObject_2 {
    public static void main(String[] args) throws IOException {
        InputStream is = System.in;

        // 1. 1-byte 단위 읽기
        int data;
        while ((data = is.read()) != '\r') {
            System.out.print((char) data);
        }
        is.read();
        System.out.println();
        System.out.println();

        // 2. n-byte 단위 읽기(byte[]의 처음 위치에서부터 읽은 데이터 저장)
        byte[] byteArray1 = new byte[100];
        int count1 = is.read(byteArray1);
        for (int i = 0; i < count1; i++) {
            System.out.print((char) byteArray1[i]);
        }
        System.out.println(" : count = " + count1);
        System.out.println();

        // 3. n-byte 단위 읽기(앞에서 length만큼 읽어 byte[] offset 위치에 넣기)
        byte[] byteArray2 = new byte[8];// offset + length
        int offset = 3;
        int length = 5;
        int count2 = is.read(byteArray2, offset, length);
        for (int i = 0; i < offset + length; i++) {
            System.out.print((char) byteArray2[i]);
        }
        System.out.println(": count = " + count2);
    }
}- 콘솔로 입려된 한글 데이터 읽어 처리하기
public class ConsoleInputObject_3 {
    public static void main(String[] args) throws IOException {
        InputStream is = System.in;

        // n-byte 단위 읽기(byte[]의 처음 위치에서부터 읽은 데이터 저장)
        byte[] byteArray1 = new byte[100];
        int count1 = is.read(byteArray1);
        String str1 = new String(byteArray1, 0, count1, Charset.forName("UTF-8"));
        System.out.println(str1);

        // n-byte 단위 읽기(앞에서 length만큼 읽어 byte[] offset 위치에 넣기)
        byte[] byteArray2 = new byte[9];
        int offset = 3;
        int length = 6;
        int count2 = is.read(byteArray1, offset, length);
        String str2 = new String(byteArray2, 0, offset + count2, Charset.defaultCharset());
        System.out.println(str2);
    }
}
Console OutputStream 사용하기
- System.out 객체로 OutputStream 사용하기
- 자원 반납 X
- write()는 버퍼에 기록을 하기 때문에 flush() 호출필요
- 영문 데이터를 콘솔로 출력하기
public class ConsoleOutputObject_1 {
    public static void main(String[] args) throws IOException {
        OutputStream os = System.out;

        // 1. 1-byte 단위 쓰기
        os.write('J');
        os.write('A');
        os.write('V');
        os.write('A');
        os.write('\r');
        os.write('\n');
        os.flush();

        // 2. n-byte 단위 쓰기(byte[]의 처음부터 끝까지 데이터 쓰기)
        byte[] byteArray1 = "Hello!".getBytes();
        os.write(byteArray1);
        os.flush();

        // 3. n-byte 단위 쓰기(byte[]의 offset부터 length개의 byte데이터를 쓰기)
        byte[] byteArray2 = "Better the last smile than the first laughter".getBytes();
        os.write(byteArray2, 7, 8);
        os.flush();
    }
}- 한글 데이터를 콘솔로 출력하기
public class ConsoleOutputObject_2 {
    public static void main(String[] args) throws IOException {
        OutputStream os = System.out;

        // n-byte 단위 쓰기(byte[]의 처음부터 끝까지 데이터 쓰기)
        byte[] byteArray1 = "안녕하세요".getBytes(Charset.forName("UTF-8"));
        os.write(byteArray1);
        os.write('\n');
        os.flush();

        // n-byte 단위 쓰기(byte[]의 offset부터 length개의 byte 데이터를 쓰기)
        byte[] byteArray2 = "반갑습니다.".getBytes(Charset.defaultCharset());
        os.write(byteArray2, 6, 6 );
        os.flush();
    }
}
입출력 Filter
- BufferedInputStream과 BufferedOutputStream을 이용해 속도 향상시키기
- 속도 증가(239배)
// 생성자
BufferedInputStream(InputStream in)
BufferedInputStream(InputStream in, int size)// 버퍼의 크기를 직접 지정 안하면 기본값

BufferedOutputStream(OutputStream os)
BufferedOutputStream(OutputStream os, int size)
public class BufferedInputOutputStream {
public static void main(String[] args) throws IOException {
// 파일 생성
File orgFile = new File("src/sec04_filterinputoutputstream/files/mycat_origin.jpg");
File copyFile1 = new File("src/sec04_filterinputoutputstream/files/mycat_copy1.jpg");
File copyFile2 = new File("src/sec04_filterinputoutputstream/files/mycat_copy2.jpg");
long start, end, time1, time2;
// 1. BufferedInputStream, BufferedOutputStream을 사용하지 않을 때
start = System.nanoTime();
try (InputStream is = new FileInputStream(orgFile);
OutputStream os = new FileOutputStream(copyFile1);) {
// 복사하는 코드
int data;
while ((data = is.read()) != -1) {
os.write(data);
}
} catch (IOException e) {
e.printStackTrace();
}
end = System.nanoTime();
time1 = end - start;
System.out.println("Without BufferedXXXStream: " + time1);
System.out.println();
// 2. BufferedInputStream, BufferedOutputStream을 사용할 때
start = System.nanoTime();
try (InputStream is = new FileInputStream(orgFile);
BufferedInputStream bir = new BufferedInputStream(is);
OutputStream os = new FileOutputStream(copyFile2);
BufferedOutputStream bos = new BufferedOutputStream(os)) {
// 복사하는 코드
int data;
while ((data = bir.read()) != -1) {
bos.write(data);
}
} catch (IOException e) {
e.printStackTrace();
}
end = System.nanoTime();
time2 = end - start;
System.out.println("With BufferedXXXStream: " + time2);
// 비교
System.out.println("Ratio of with and Without: " + time1 / time2);
}
}- DataInputStream과 DataOutputStream을 이용해 데이터 타입 다양화하기
- int, long, double, String 등 지원
// 생성자
DataInputStream(InputStream in)

DataOutputStream(OutputStream out)
public class DataInputOutputStream {
public static void main(String[] args) throws IOException {
// 파일 생성
File dataFile = new File("src/sec04_filterinputoutputstream/files/file1.data");
// 데이터 쓰기(DataOutputStream)
try (OutputStream os = new FileOutputStream(dataFile);
DataOutputStream dos = new DataOutputStream(os)) {
dos.writeInt(35);
dos.writeDouble(5.8);
dos.writeChar('A');
dos.writeUTF("안녕하세요");
dos.flush();
}
// 데이터 읽기(DataInputStream)
try (InputStream is = new FileInputStream(dataFile);
DataInputStream dis = new DataInputStream(is)) {
System.out.println(dis.readInt());
System.out.println(dis.readDouble());
System.out.println(dis.readUTF());
System.out.println(dis.readChar());
}
}
}- Filter Combine - Buffered(Input/Output)Stream + Data(Input/Output)Stream
- 최종적으로 원하는 기능을 마지막으로
public class CombineFilterStream {
    public static void main(String[] args) throws IOException {
    	// 파일 생성
        File dataFile = new File("src/sec04_filterinputoutputstream/files/file2.data");

        // 데이터 쓰기(DataOutputStream)
        try (OutputStream os = new FileOutputStream(dataFile);
             BufferedOutputStream bos = new BufferedOutputStream(os);
             DataOutputStream dos = new DataOutputStream(bos)) {
            dos.writeInt(35);
            dos.writeDouble(5.8);
            dos.writeChar('A');
            dos.writeUTF("안녕하세요");
            dos.flush();
        }

        // 데이터 읽기(DataInputStream)
        try (InputStream is = new FileInputStream(dataFile);
            BufferedInputStream bis = new BufferedInputStream(is);
            DataInputStream dis = new DataInputStream(bis)) {
            System.out.println(dis.readInt());
            System.out.println(dis.readDouble());
            System.out.println(dis.readChar());
            System.out.println(dis.readUTF());
        }
    }
}- 다양한 출력에 특화된 PrintStream
- 자동 flush()기능 -> 할 필요 없음
- System.out.println()는 PrintStream클래스의 인스턴스 메소드인 println()을 호출해 온 것
- 파일 위치정보 -> File 객체 or 파일 경로 문자열 형태로 전달
// 생성자
// 1. 출력할 파일을 매개변수로 직접 받을 때
PrintStream(File file)
PrintStream(String fileName)

// 2. OutputStream을 매개변수로 받을 때
PrintStream(OutputStream out)
PrintStream(OutputStream out, boolean autoFlush)
/// PrintStream 객체 생성 및 활용(File 출력, OutputStream 출력, 콘솔 출력)
public class PrintStreamExample {
public static void main(String[] args) throws IOException, FileNotFoundException {
// File 객체 생성
File outFile1 = new File("src/sec04_filterinputoutputstream/files/PrintStream1.txt");
File outFile2 = new File("src/sec04_filterinputoutputstream/files/PrintStream2.txt");
// 1. PrintStream(FileOutputStream(File))
try (OutputStream os1 = new FileOutputStream(outFile1);
PrintStream ps = new PrintStream(os1)) {
ps.println(3.8);
ps.print(3 + " 안녕 " + 12345 + "\n");
ps.printf("%d ", 7).printf("%s %f", "안녕", 5.8);
ps.println();
} catch (IOException e) {}
// 2. PrintStream(File)
try (PrintStream ps = new PrintStream(outFile2)) {
ps.println(3.8);
ps.print(3 + " 안녕 " + 12345 + "\n");
ps.printf("%d ", 7).printf("%s %f", "안녕", 5.8);
ps.println();
} catch (IOException e) {}
// 3. PrintStream ps = System.out
try (OutputStream os2 = System.out;
PrintStream ps = new PrintStream(os2)) {
ps.println(3.8);
ps.print(3 + " 안녕 " + 12345 + "\n");
ps.printf("%d ", 7).printf("%s %f", "안녕", 5.8);
ps.println();
} catch (IOException e) {}
}
}
현재 블로그 : https://jasonsong97.tistory.com/